The Project Gutenberg EBook of Your 1952 Champion Owner's Guide, by
Studebaker Corporation

This eBook is for the use of anyone anywhere in the United States and most
other parts of the world at no cost and with almost no restrictions
whatsoever.  You may copy it, give it away or re-use it under the terms of
the Project Gutenberg License included with this eBook or online at
www.gutenberg.org.  If you are not located in the United States, you'll have
to check the laws of the country where you are located before using this ebook.

Title: Your 1952 Champion Owner's Guide

Author: Studebaker Corporation

Release Date: August 15, 2020 [EBook #62925]

Language: English

Character set encoding: UTF-8

*** START OF THIS PROJECT GUTENBERG EBOOK YOUR 1952 CHAMPION OWNER'S GUIDE ***


Produced by Ron Box, Stephen Hutcheson and the Online
Distributed Proofreading Team at https://www.pgdp.net
A word with you—
You no doubt have many reasons for your choice of this car. All of them, we are sure, are good reasons. Accept our congratulations and thanks on your purchase of a fine motor car.
Speaking of reasons, we have three for printing this book. First, to tell you what you have in your car. Second, to tell you how to operate it. Third, to tell you what care it should receive to serve you best.
For more technical information as to how your car or any of its parts operates or how to make any of a multitude of adjustments or repairs, we refer you to your Studebaker dealer. Studebaker owners operate their cars with the assurance of a friendly, nation-wide service organization. Dealers’ men are constantly informed by us of the latest advances in technical procedures, tools, and equipment.
The General Service Department THE STUDEBAKER CORPORATION

With your new Studebaker you received a Dealer Service Policy from your Studebaker dealer. Please read it carefully.
Under its terms you, as the owner of a new Studebaker, are entitled to receive from your dealer during the warranty period, two thorough check-ups which are important to the efficient operation of your car. These services will be performed gratis only by the dealer from whom you purchased the car and advance arrangements should be made with him if these services are to become due while you are touring or after a change of residence.
Any Studebaker dealer in the U. S. or Canada is authorized to replace, without charge for material or labor, any parts found to be defective under the terms of the Studebaker Factory Warranty.
Always keep your Dealer Service Policy with the car during the warranty period. It will be necessary to present the Policy in order to obtain the parts replacement privileges under the Warranty from other than the Studebaker dealer from whom you bought the car.
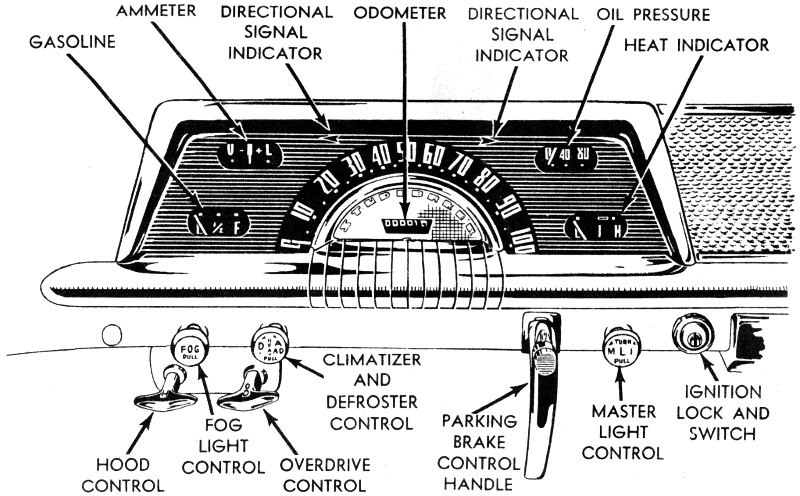
The driver of a new car should become familiar with the functions of the instruments and controls described below before operating the car. Standard equipment varies to some extent between different models. The illustration above includes both standard and extra equipment.
Ignition Switch The ignition switch is operated by means of a key which, when turned to the right, supplies current to the ignition system and accessories. Turned to the left, the key completes the electrical circuit to the gasoline gage, radio, and other accessories but not to the ignition. The ignition key should always be removed when you leave the car.
Starter Switch The starter is controlled by a button on the toeboard located directly beneath the clutch pedal. By completely depressing the clutch pedal, the electrical circuit through the starter switch is completed. Do not operate starter when the engine is running.
Ammeter When the engine is not running and any of the electrical circuits are in use, the ammeter will register a discharge (-). With the engine running at a reasonable speed, even though all electrical circuits are in use, the ammeter will register a charge (+) until the battery is completely charged, after which the needle should swing back and remain around the zero mark. Any abnormal fluctuation of the ammeter needle in either direction is a signal to the driver to have the electrical 6 system checked and serviced by his authorized Studebaker dealer.

Heat Indicator The temperature of the coolant in the engine cooling system is shown by the electric heat indicator which, under normal conditions, should register within the rectangular mark on the face of the gage. In summer, and on hot, long drives this may normally be a little higher.
If the gage registers an abrupt or continuous rise to the “H” mark, stop the car immediately and investigate. Check the water level, fan belt, hose connections, and look for water leaks. Continued use at this temperature will cause serious damage and unnecessary expense.
The gage registers only when the ignition key is turned either to the right or left.
Check the water level frequently.
Gasoline Gage The gasoline gage registers when the ignition key is turned either to the right or left. If you wish to know the quantity of fuel in the tank when the engine is not running, turn the ignition key to the left. It takes about 30 seconds for the gage to register after the ignition key is turned.
Oil Pressure Gage The oil pressure gage indicates the working pressure of the oil as it circulates within the engine. Normally, the gage will register between 20 and 40 pounds (1,4 and 2,8 kgs.) at 40 miles (64 km.) per hour. This gage does not indicate the amount of oil in the crankcase.
If this gage should fluctuate rapidly or drop to zero, STOP the car immediately and check the cause. Continued operation of the car under these conditions will probably cause serious damage.
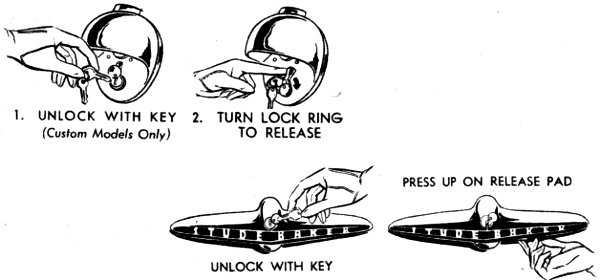
Locks and Keys Two sets of keys are furnished with the car. One key operates the front door external locks and the ignition switch. The other key operates locks on the package compartment door (except Champion Custom) and the luggage compartment lid.
To prevent unauthorized persons from purchasing a duplicate ignition key, the key number does not appear on the key or on the face of the lock, but is stamped on a small metal tag supplied with the keys. The compartment key number is stamped on the key or on the lock housing. Both key numbers should be recorded on page 15 of this manual and elsewhere among the owner’s permanent possessions, after which the metal tag should be destroyed.
Duplicate keys may be ordered by key number from the nearest authorized Studebaker dealer. If the key numbers are not known, the order must be accompanied by the car serial number.
Front door lock controls are designed so that either front door, locked from the inside, may be opened from 8 the outside with the key. This is an advantage in parking lots when close parking blocks one door.
If an inside front door handle is set to “lock” position with the door open and the door is then closed, the lock releases; Studebaker front doors must be key-locked in such circumstances. The key will always unlock either of the front doors from the outside no matter whether it has been locked from the inside with the door lock control or locked from the outside with the key.
The next three paragraphs explain the operation of the door locks.
1. Front door inside handles, when pushed up from the normal position to lock the door from the inside, will spring back to the normal position although the lock will remain set.
2. The front doors are locked from the outside with the key. Turn the key to the stop clockwise on left front doors and counterclockwise on right front doors. Return the key to the vertical position to remove it from the lock. To unlock the front doors follow the same procedure except turn the key to the stop in the opposite direction to that used to lock the door.
3. To lock either rear door of sedans, simply move the inside door handle upward, whether the door is open or closed. The door will remain locked until the inside rear door handle is moved downward to the full open position.
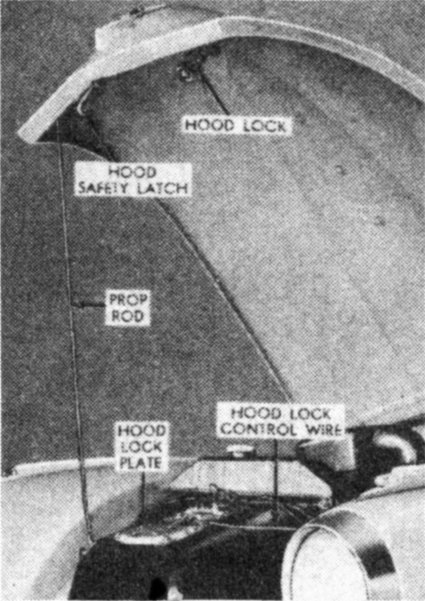
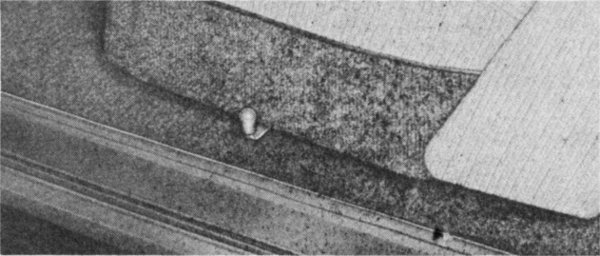
Hood Lock The hood lock safeguards your battery, carburetor, and other under-the-hood equipment against theft and tampering as long as the car doors are locked. The hood control (marked “H”) is located on the driver’s side of the car just below the lower end of the instrument panel. To unlock the hood, pull the control until the automatic hood lock is released. To raise the hood, release the safety latch as illustrated. As a safety measure, after raising the hood, remove the end of the hood prop from its bracket and place it in the hole provided on the underside of the hood at the front.
Care should always be taken in raising or lowering the hood. Never try to force the hood lock or safety latch. This might affect adjustments which would result in an improperly operating part.
Lower the hood firmly so that the automatic hood latch and the safety latch are fastened securely.
Light Control Switch A pull-and-turn type switch control is located on the driver’s side of the lower instrument board to operate the headlights, instrument lights, map light, tail lights, and parking lights.
Parking and Tail Lights Pull light switch control to the first position for parking and tail lights.
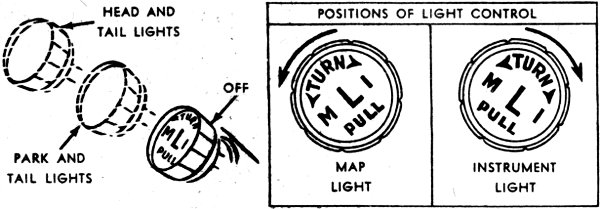
Headlights and Tail Lights Pull the light switch control as far out as possible (second position) to operate the headlights and tail lights.
Headlight Beam Control Switch The foot-operated switch to the left of the clutch pedal operates the headlight beam. Pressing down on the switch will change the headlights from country to traffic beam, and vice versa as traffic conditions require. When the country beam is in use the red tell-tale light in the speedometer face will be lighted. Use the traffic beam when approaching oncoming traffic and in city driving.
Instrument and Map Lights The instruments are lighted with non-glare black light. Turn the control clockwise for instrument lights.
In Deluxe and Regal models a map light can be lighted by turning the control counterclockwise. On these models, this light will also operate whenever either of the front doors is open.
Dome Light The dome light in all models is operated by a switch just to the rear of the right front door. On Deluxe and Regal models, this light operates on 2-door bodies when either front door is open and on 4-door bodies when either rear door is open.
There is no dome light in convertible models.
License Plate Light The light for the rear license plate is located in the center of the luggage compartment handle. The light operates whenever the headlights are turned on.
Stop Lights They light whenever the brake pedal is depressed, making a distinct red light shine to warn following vehicles.
Luggage Compartment Light This light goes on when tail lights are lighted and the luggage compartment lid is open. The luggage compartment light is available at slight extra cost.
Package Compartment To open the package compartment door after unlocking, turn the rotary knob to the right and open door. An automatic package compartment light is available at extra cost.
Ash Receiver To remove the tray for cleaning, push down on the retainer while pulling outward on the tray.
Front Seat Adjustment The front seat is easily adjusted forward or backward. Move the control lever forward at the driver’s side of the seat (as shown in the illustration above). This unlocks the mechanism and permits 12 the seat to be shifted to the desired position.
In addition to this quickly adjusted shift, there are three basic positions in which the seat can be bolted by your authorized Studebaker dealer to accommodate the leg length of the owner. From any of these basic positions, the front seat adjustment mechanism will give you the full adjustment range.
Clutch Pedal The clutch pedal disengages the clutch when depressed, engages it when released. The clutch pedal, depressed to the floorboard, also operates the starter button located directly under the pedal.
Steering Post Gearshift The steering post gearshift is operated in the conventional manner, and provides three forward speeds and one reverse speed.
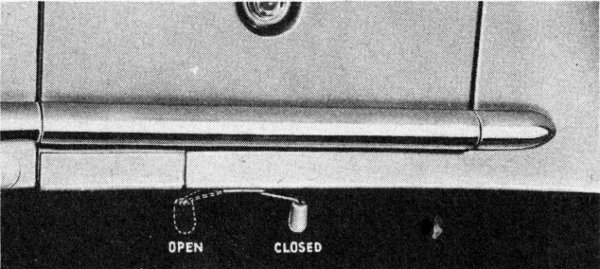
Luggage Compartment Lid and Lock The luggage compartment lid is controlled by a lock and handle contained in the rear emblem incorporating the license plate light and rear license plate bracket. The luggage compartment lock is operated with the same key which operates the package compartment lock.
To close, lock and remove the key. Lower lid firmly to be sure it has latched. The tight rubber weatherseals have a spring action which will tend to hold lid in a slightly raised position unless it is firmly closed.
Brake Controls Braking pressure is applied to all four wheels in proportion to the amount of foot pressure applied to the brake pedal.
The parking brake lever operates independently of the hydraulic brake system, applying brake pressure to the rear wheels only. To set the parking brake, depress brake pedal and pull back on parking brake handle. To release the parking brake, depress brake pedal, pull back slightly on the handle, press the release button with the thumb, and let the handle move forward.
Windshield Wiper Control The windshield wiper control knob, located at the top center of the instrument board, must be turned clockwise to operate the wiper blades.
Windshield Washer The Studebaker AC-2047 safety windshield washer is equipped with a control button mounted on the dash just above and to the left of the clutch pedal pad. To operate, exert a slight foot pressure on the button, which will eject water to right and left Windshields. An antifreeze and wetting agent is available from your dealer for injection into the water supply jar.
Windshield Washers are available at extra cost.
Seat Cushion Auxiliary Springs To vary the front or rear seat cushion resiliency for the driver or passengers, Select-O-Seat cushion springs are available as an accessory.
It is desirable to limit driving speeds during the first 1000 miles (1609 km.) of operation in order that the closely fitted parts of the engine and chassis may have an opportunity to “wear in” smoothly.
For the first 500 miles (805 km.) it is recommended that you do not drive your car at speeds in excess of 50 miles (80,5 km.) per hour. For the second 500 miles (805 km.) it is recommended that you do not drive your car at speeds in excess of 60 miles (96,6 km.) per hour.
While it is always better to let your engine warm up at lower speeds, you should, by all means, follow such a practice during the first 1000 miles (1609 km.) of operation.
Further, it is well to avoid continuous high speed driving during the first 1000 miles (1609 km.) even though the engine has been warmed up.
The use of special run-in oils is not necessary. Use only engine oils produced by reputable oil companies.
During the run-in period it is important to change the oil shortly after the engine is put into operation. Therefore, change oil at least by the end of the first 1000 miles (1609 km.). After 1000 miles (1609 km.), change oil regularly. See page 32.
It is a good practice to have the oil level checked whenever gasoline is purchased. Keep oil at the Full mark. Do not overfill.
The viscosity of the oil to be used depends entirely upon prevailing temperatures. See page 33.
| Serial Number | The serial number of your car is stamped on a plate attached to the left front door lock pillar post. Record it in the space provided. |
| Engine Number | The engine number is stamped on a machined pad at the upper left front of the cylinder block. Record it in the space provided. |
| Body Number | The body number is stamped on a plate attached to the dash under the hood. Record it in the space provided. |
| Key Numbers | Ignition and front doors: |
| This number is stamped on a metal tag furnished with the keys. Record it in the space provided. | |
| Package Compartment and Luggage Compartment Doors: | |
| This number is stamped on the compartment key or on the lock housing. Record it in the space provided. |
Paint and Trim When ordering paint materials be sure that the serial and body numbers above as well as the paint color name printed on the sticker attached to the underside of the package compartment accompany your order.
When trim materials are needed, it is important that the serial and body numbers which you have recorded above be furnished.
Before starting the engine be sure the gearshift lever is in neutral position. Depress the accelerator to the toeboard once only and then immediately release it. This permits the automatic choke to come into full operation. This operation is essential to easy starting. Turn the ignition key to the right. Then depress the clutch pedal to the toeboard to operate the starter.
If engine should not start after a few revolutions, completely depress accelerator and, holding it in this position, operate starter.
Starting a Hot Engine It is easier to start a hot engine if the accelerator is held approximately halfway to the floorboard until the engine starts. Release the accelerator as soon as the engine starts.
Warming Up the Engine A gasoline engine performs best when it reaches an operating temperature of approximately 170° F. (76,7° C.). This is the normal range indicated by the rectangular mark on the face of the heat indicator. In cold weather the engine temperature should be raised by allowing the engine to idle slowly before driving the car.
Do not drive the car until oil pressure registers on the gage. If it registers above 40 lbs. (2,8 kgs.), drive slowly until pressure returns to normal, or approximately 40 lbs. (2,8 kgs.).
After starting, the high idle system may cause the engine to “race”. If so, depress and immediately release the accelerator.
Should the battery fail to supply enough current to start the engine with the starter, place the transmission in conventional high gear and either push or tow the car until the engine starts. OD control (on cars so equipped) must be in Out position. Be sure ignition is On and parking brake released.
To shift the gears in either the conventional or overdrive ratios with the steering post gearshift lever, follow this procedure:
1. Start engine and with clutch pedal still depressed, place gearshift lever in low (first) gear position.
2. Release parking brake.
3. Release the clutch pedal gradually and at the same time slowly accelerate.
1. At approximately 10 miles (16 km.) per hour, release accelerator and depress clutch pedal.
2. Place gearshift lever in second (intermediate) gear position.
3. Release the clutch pedal gradually and at the same time slowly accelerate.
1. At approximately 18 miles (29 km.) per hour, release accelerator and depress clutch pedal.
2. Shift lever into high (third) gear position.
3. Release the clutch pedal gradually and at the same time slowly accelerate. Without overdrive, this is the highest or cruising gear ratio.
1. Bring the car to a complete stop.
2. Depress clutch pedal.
3. Place lever in reverse gear position.
4. Release the clutch pedal gradually and at the same time slowly accelerate.
Shifting Tips To avoid excessive wear on the clutch, transmission, and drive mechanism, never try to jump gears (that is, do not shift from low to high, or start out in second and avoid using low) and never shift from any gear—even the neutral position—into reverse until the car’s motion is stopped. Also, never make a gear shift until the clutch pedal is depressed, disengaging the clutch. Make it a habit to pause for an instant in neutral as the gearshift lever passes from one gear ratio to another.
The automatic overdrive operates only when the control handle, next to the hood control handle and marked OD, is in its full forward position. It engages automatically when the accelerator is released momentarily at or above the overdrive cut-in speed of 30 to 35 miles (50 to 55 km.) per hour.
If, while in overdrive, it is desired to gain more power for passing cars in traffic or on grades, push the accelerator 19 to the floorboard. This cuts out the overdrive and it will remain inoperative until the accelerator is again released. At that time the overdrive again engages automatically.
The overdrive control can be pulled out, thereby locking the transmission in the conventional position. This should be done for descending steep, mountainous grades, or when pushing or towing the car to start the engine. The circumstances under which this change can be made safely are as follows:
1. To change the transmission from overdrive to the locked-in conventional position while the car is standing still, merely pull out the OD control.
2. To change the transmission from overdrive to the locked-in conventional position when driving below the overdrive cut-in speed of approximately 30-35 m.p.h. (50-55 km.) accelerate the engine and at the same time pull out the OD control.
3. To change the transmission from overdrive to the locked-in conventional position when driving in overdrive, completely depress the accelerator past the wide-open throttle position and as soon as the transmission is in conventional, pull out the OD control.
If the OD control is in the locked-in conventional position (pulled out) it can be placed in the overdrive position while the car is standing still. To make this change when the car is moving at any forward speed, accelerate slightly and push the control fully forward.
Overdrive is available at extra cost.
The automatic Hill Holder retains the same degree of braking effort on an upgrade as that applied by the driver in stopping as long as the clutch pedal is depressed. The Hill Holder does not operate on level or descending surfaces. However, the clutch must be depressed before releasing the brake pedal. This permits the right foot to be removed from the brake pedal to operate the accelerator when ready to resume forward motion. Releasing the clutch pedal releases the action of the Hill Holder.
To use the Hill Holder when stopping on an upgrade, depress the clutch pedal and then apply foot brakes. The right foot may now be removed from the brake pedal. To release Hill Holder action, release the clutch pedal.
Hill Holder is special equipment for the Champion available at extra cost.
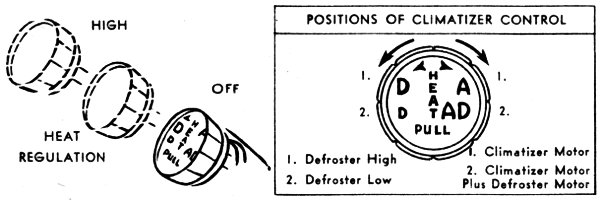
The Studebaker Climatizer is a fresh air heating and ventilating system. Fresh air passes through an air duct and then through the Climatizer heater core. The warmed air is discharged forward and rearward from below the front seat and spreads uniformly through the car interior.
The Climatizer heat output is thermostatically controlled so that you may select the degree of heating desired and be assured of its remaining constant until you reset the control. Pushing or pulling the control regulates a thermostat which in turn controls the flow of water through the heater coils. The further outward you pull the control, the warmer will be the hot air output of the Climatizer.
When the engine cooling water is cold and the control is in the closed position, the thermostat permits a full flow of water into the heat core until the temperature at the thermostat unit (just above the accelerator pedal) reaches approximately 70° F. (21° C.). As the water gets warmer, the thermostat will maintain that temperature. If you desire more heat in the car, pull the Climatizer control. After using the Climatizer a few times you will find the position of the control that gives you the heat in the car which best suits your comfort. Further regulation of the control will be unnecessary.
If you wish to obtain maximum heat flow in extremely cold weather, pull the handle to its full “out” position. This will lock the valve open until you push the handle forward.
The entire range of Climatizer and defroster operation is controlled through the use of the Climatizer and vent controls. The Climatizer control operates thermostat when pulled or pushed, operates blowers when turned. The vent control opens and closes the right outside cowl ventilator.
1. To open the outside right cowl ventilator, move the control lever (directly beneath the package compartment) to the left. This is the position of the ventilator whenever you operate the Climatizer or want to draw fresh outside air into the car through the Climatizer system. To close the ventilator, move the control lever to the right. When using Climatizer, be sure the inner ventilator door is closed.
2. Pull Climatizer control handle outward to the position which gives the temperature desired by the car occupants. The further outward the control is pulled, the warmer the air will become.
3. Turn the Climatizer control handle clockwise to the first position to operate the Climatizer blower. Turning the control to the second position clockwise will continue the Climatizer blower operation and will also add the operation of the defroster blower.
4. Slight opening of one or more ventilators or windows permits some measure of directional control over circulation since warm air flow will be increased towards such openings. For uniform temperature and defrosting efficiency throughout the entire car, however, it is generally recommended that windows and vents be fully closed.
NOTE.—If upon entering a cold car, the accumulation of moisture on windshield and windows appears excessive, open the ventilator windows for rapid circulation until the moisture begins to clear.
Defroster Operation Turn the Climatizer control counterclockwise to the first position for maximum hot air flow through the defroster ducts; turn control to the second position to reduce the defroster air flow.
Climatizer and defroster are special equipment available at extra cost.
The mechanically operated top of the Studebaker convertible models is raised and lowered by an electric motor and prelubricated driving arms and gears. The mechanism is controlled by a lever located at the left of the two control handles at the lower edge of the instrument panel on the driver’s side of the car. Moving the lever to the left raises the top, and to the right, lowers it. When the lever is released from either of these positions, it automatically returns to the central position, stopping the electric motor.
Always let the motor operate the top—never try to force the top up or down by hand.
The electric motor is guarded against short circuit and overload by a 30-ampere circuit breaker. Should a short circuit or overload occur in the top operating system, the circuit breaker will automatically interrupt the circuit and will continue to interrupt it until the cause is eliminated.
If the circuit breaker interrupts the current flow for any reason, see your Studebaker dealer.
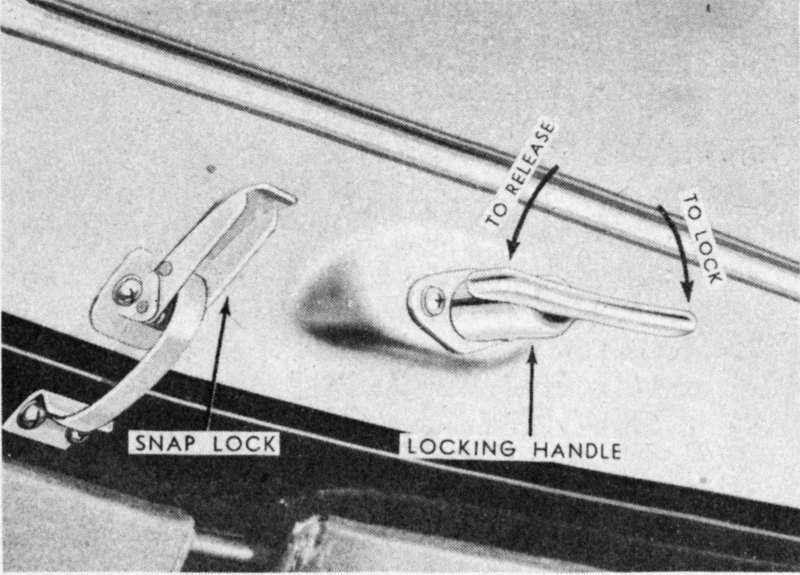
1. Unsnap the fasteners on both sides of the top cover at the points indicated in the illustration below. Snap the top cover boot in place on the rear of the seat back. Remove any packages or other material from the top well behind the seat.
2. Pull both sun visors down and release the snap lock at the left of the locking handle on the header. Turn the top locking handle at the center of the header fully to the left (counterclockwise). Lift the top free of the pilots.
3. Move the control switch lever to the right and hold it in this position until the top rests on the rear deck of the car; then release the lever.
4. Cover the top with the boot and snap all boot fasteners in place.

1. Unsnap the boot fasteners along the rear deck and side panels. Uncover the top and let the boot hang over the rear seat back.
2. After pulling down both sun visors, move the top operating lever to the left and hold it in this position until the top header is approximately one foot above the windshield pilots; then release the lever.
3. Grasp the top locking handle firmly with the right hand and guide the top down over the windshield pilots while the left hand holds the top operating lever at its “Raise” position. When the header rests on the windshield, release the control lever. Lock the snap lock at the left of the locking handle on the header. Lock the top securely to the windshield by turning the top locking handle clockwise two 26 or three complete turns. Test the lock by attempting to lift the top free of the pilots.
4. Snap the fasteners in place along the top side rails and side panels on both sides of the top. There are 6 of these fasteners on each side. Let the boot fold down into the top compartment or unsnap the boot from the rear seat back and place it in the boot bag provided.
The radiator of this car may be equipped with a pressure-type cap. If it is so equipped, remove the cap by turning it slowly half-way to the open position and pausing to permit relief of any vapor or steam pressure present. Then complete turning of cap to the stop and remove it.
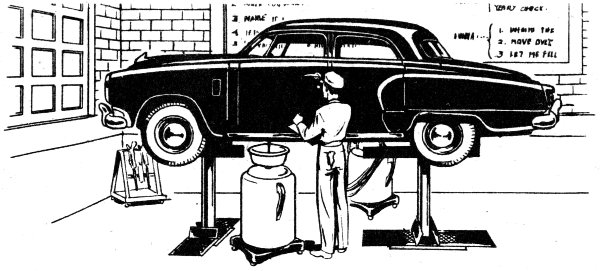
It is good for reasons of economy and to forestall unexpected need of service to have your car inspected once a month or at 1000 mile (1609 km.) lubrication periods. An ideal time to have many of the parts or units inspected is while the car is on the lubrication hoist in the raised position.
Proper lubrication is good assurance that your car will continue to perform with increasing satisfaction. Only high quality lubricants should be used on your car.
Your Studebaker dealer knows every lubrication requirement for your car. Take it to him for periodic lubrication. The recommendations given in the following paragraphs are, in many ways, the most important in the entire booklet. If a lubrication service must, of necessity, be performed by a non-Studebaker serviceman, be sure he understands the requirements mentioned in this section and on the charts on pages 28, 29, and 30.
Universal Joints Lubricate with light weight chassis lubricant at 1000 mile (1609 km.) intervals. Only a low pressure (hand) gun should be used to lubricate these bearings.
Transmission Lubricant The transmission should be filled to the level of the filler plug hole with S.A.E. 90 mineral oil gear lubricant or S.A.E. 40 engine oil, both summer and winter. On cars equipped with overdrive transmission, fill slowly, using the fill hole of the main case. For transmission capacities, see table on page 53.
(Continued on page 31)
| ★ | 1,000 Miles (1.609 km.) | |||
| ★ | 5,000 Miles (8.046 km.) | |||
| ★ | 10,000 Miles (16.090 km.) | |||
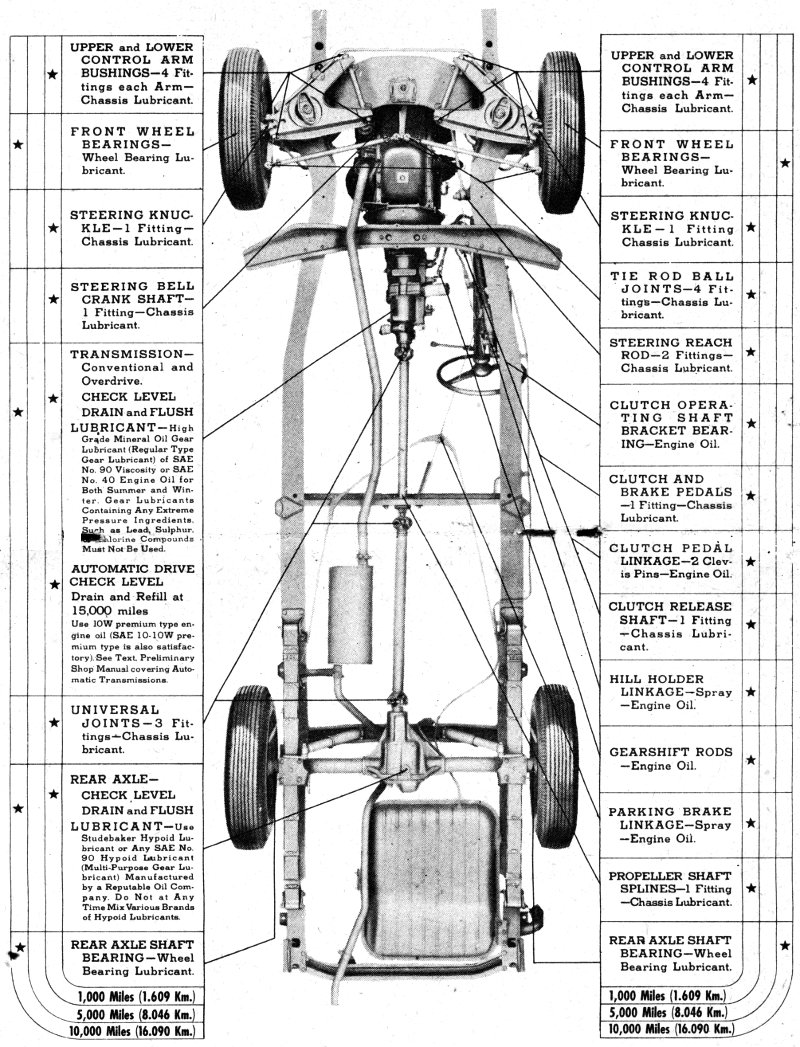
| ★ | UPPER and LOWER CONTROL ARM BUSHINGS—4 Fittings each Arm—Chassis Lubricant. | |||
| ★ | FRONT WHEEL BEARINGS—Wheel Bearing Lubricant. | |||
| ★ | STEERING KNUCKLE—1 Fitting—Chassis Lubricant. | |||
| ★ | STEERING BELL CRANK SHAFT—1 Fitting—Chassis Lubricant. | |||
| ★ | ★ | TRANSMISSION—Conventional and Overdrive. | ||
| CHECK LEVEL | ||||
| DRAIN and FLUSH | ||||
| LUBRICANT—High Grade Mineral Oil Gear Lubricant (Regular Type Gear Lubricant) of SAE No. 90 Viscosity or SAE No. 40 Engine Oil for Both Summer and Winter. Gear Lubricants Containing Any Extreme Pressure Ingredients, such as Lead, Sulphur, Chlorine Compounds Must Not Be Used. | ||||
| ★ | AUTOMATIC DRIVE | |||
| CHECK LEVEL | ||||
| Drain and Refill at 15.000 miles | ||||
| Use 10W premium type engine oil (SAE 10-10W premium type is also satisfactory). See Text, Preliminary Shop Manual covering Automatic Transmissions. | ||||
| ★ | UNIVERSAL JOINTS—3 Fittings—Chassis Lubricant. | |||
| ★ | ★ | REAR AXLE— | ||
| CHECK LEVEL | ||||
| DRAIN and FLUSH | ||||
| LUBRICANT—Use Studebaker Hypoid Lubricant or any SAE No. 90 Hypoid Lubricant (Multi-Purpose Gear Lubricant) Manufactured by a Reputable Oil Company. Do Not at Any Time Mix Various Brands of Hypoid Lubricants. | ||||
| ★ | REAR AXLE SHAFT BEARING—Wheel Bearing Lubricant. | |||
| ★ | UPPER and LOWER CONTROL ARM BUSHINGS—4 Fittings each Arm—Chassis Lubricant. | |||
| ★ | FRONT WHEEL BEARINGS—Wheel Bearing Lubricant. | |||
| ★ | STEERING KNUCKLE—1 Fitting—Chassis Lubricant. | |||
| ★ | TIE ROD BALL JOINTS—4 Fittings—Chassis Lubricant. | |||
| ★ | STEERING REACH ROD—2 Fittings—Chassis Lubricant. | |||
| ★ | CLUTCH OPERATING SHAFT BRACKET BEARING—Engine Oil. | |||
| ★ | CLUTCH AND BRAKE PEDALS—1 Fitting—Chassis Lubricant. | |||
| ★ | CLUTCH PEDAL LINKAGE—2 Clevis Pins—Engine Oil. | |||
| ★ | CLUTCH RELEASE SHAFT—1 Fitting—Chassis Lubricant. | |||
| ★ | HILL HOLDER LINKAGE—Spray—Engine Oil. | |||
| ★ | GEARSHIFT RODS—Engine Oil. | |||
| ★ | PARKING BRAKE LINKAGE—Spray—Engine Oil. | |||
| ★ | PROPELLER SHAFT SPLINES—1 Fitting—Chassis Lubricant. | |||
| ★ | REAR AXLE SHAFT BEARING—Wheel Bearing Lubricant. | |||
| ★ | GENERATOR—2 Oilers—SAE No. 20 Engine Oil. | |||
| ★ | OIL FILLER TUBE CAP—Service Every 1,000 Miles or Daily if Dust Conditions are Severe. Wash the Element in Kerosene and allow to Dry Thoroughly. Apply Light Engine Oil to Element. | |||
| ★ | DISTRIBUTOR—SAE No. 20 Engine Oil—3 to 5 Drops on Felt Under Rotor and in Oil Cup at Side. Small Amount of Petroleum Jelly on Cam. | |||
| ★ | STEERING GEAR[1] | |||
| Ross—Special lubricant as approved by Ross Gear and Tool Company of Lafayette, Indiana | ||||
| Saginaw—Multi-Purpose SAE 90 gear lubricant | ||||
| ★ | GEARSHIFT CONTROL CASE (Conventional and Overdrive Only)—One Fitting—Chassis Lubricant. | |||
| ★ | OIL FILTER—Under Normal Conditions, the Oil Filter Cartridge Should be Replaced after Five to Six Thousand Miles of Operation. Where Severe Dust and Dirt Conditions Prevail, It will be Necessary to Replace the Oil Filter Cartridge at Correspondingly Lower Mileages. | |||
| ★ | CARBURETOR AIR CLEANER—Service Every 1,000 Miles Where Dust Conditions Prevail. It May be Necessary to Services the Unit Daily; or More Often Under Severe Dust Conditions. | |||
| To Service the “Oil Bath” Type, Remove Cleaner. Wash Filter Element in Kerosene and Drain Thoroughly. Clean Oil Reservoir and Refill to Indicated Level. Use SAE 30 Engine Oil for above +32° F. and SAE 20 Engine Oil for below +32° F. Do Not Use an Oil Lighter than SAE 20. | ||||
| To Service the “Oil Coated Filter” Type, Remove the Filter Element. Wash in Kerosene and Shake Out Until Dry. Reoil the Element Thoroughly With Fresh Clean Oil. Allow the Excess Oil to Drain Off, and Reinstall Element. | ||||
| ★ | ENGINE OIL LEVEL GAGE—Check Oil Level Add or Change Oil as Required. Crankcase capacity—5 U.S. Quarts. | |||
| Lowest Temp Anticipated | Oil Viscosity | |||
|---|---|---|---|---|
| +32° F. | SAE 30 | |||
| +10° F. | SAE 20 | |||
| -10° F. | SAE 10-10W or 10W | |||
| ★ | 1,000 Miles (1.609 km.) | |||
| ★ | 5,000 Miles (8.046 km.) | |||
| ★ | 10,000 Miles (16.090 km.) | |||

CHAMPION
The Lubrication Points Established Are For Average Use and Should Be Changed to Suit Individual Operating Conditions
(Continued from page 27)
Rear Axle Lubricant Use Studebaker hypoid lubricant or any S.A.E. 90 hypoid lubricant (multi-purpose type gear lubricant) for summer and winter. Do not mix various brands of hypoid lubricants. Use light engine oil for flushing. Do not use kerosene.
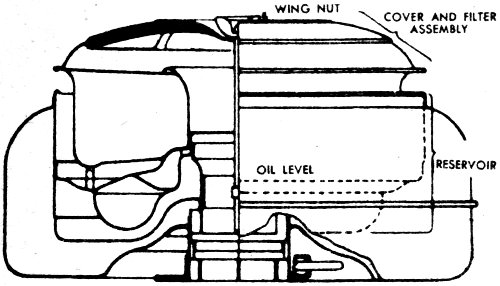
Crankcase Oil Level The oil in the crankcase is checked by withdrawing the oil level gage on the left side of the engine. The oil filler pipe cap contains a filtering element to clean the air of any impurities before it enters the crankcase. This filter is easily cleaned by removing the cap and immersing it in kerosene. Allow filter cap to dry thoroughly. Then dip cap in a good grade of engine oil so that filtering element is thoroughly oil coated. Drain off excess oil and replace cap. It’s a good idea to have the oil level checked when purchasing gasoline.
Never allow oil level shown on oil level gage to fall below the ADD OIL mark. DO NOT OVERFILL.
Engine Oil Filter The Fram oil filter (on cars so equipped) assists in removing dirt and foreign matter from the oil and is provided with a replaceable filter element.
Under normal conditions the Fram Filter cartridge should be replaced after approximately every 5000 miles 32 (8046 km.) of operation. Severe dust conditions may warrant replacing the cartridge at correspondingly lower mileages.
When it is necessary to replace the cartridge, care should be taken to see that a new cover gasket is installed and that the cover is securely tightened. The cover should also be checked occasionally to make sure that it remains tight.
Engine Oil Renewal Engine oil should be changed at least by the end of the first 1000 miles (1609 km.). After this period the oil should be changed regularly, the frequency depending on the condition of the oil as affected by operating and atmospheric conditions.
Under average driving conditions oil should be changed at 2500 to 3000 mile (4023 to 4828 km.) intervals.
Engine Oil Viscosity “Engine oil viscosity” is a term which indicates, broadly, the “body” of the oil to be used in your engine, although other scientific considerations enter into assigning viscosity numbers to oil.
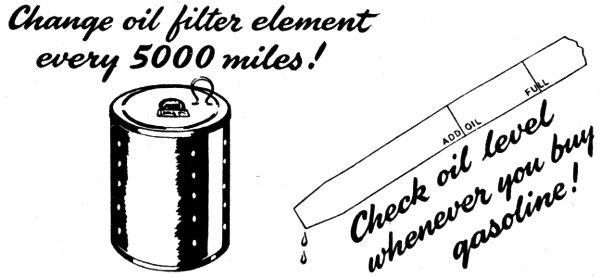
Change oil filter element every 5000 miles!
Check oil level whenever you buy gasoline!
Generally speaking, you use a thin oil in winter because it flows more freely in cold temperatures than a thick oil. Since, as stated above, the oil in your car’s crankcase, if of good quality, will be useful for many hundreds of miles, it is impractical to change oil more 33 often than necessary. Therefore, we list below the viscosities of engine oil recommended for your car at lowest prevailing temperature generally expected in your locality during the various seasons of the year.
| LOWEST TEMPERATURE ANTICIPATED | OIL RECOMMENDATION |
|---|---|
| +32° F. (0° C.) | S.A.E. 30 |
| +10° F. (-12.2° C.) | S.A.E. 20 |
| -10° F. (-23.3° C.) | S.A.E. 10W[2] |
| Below -10° F. (-23.3° C.) | S.A.E. 5W[3] |
Most of the higher priced motor oils sold today contain chemical detergents which hold extremely small particles of carbon or other foreign matter in suspension. Many of the particles are so small that they flow through the oil filters with the oil and remain in suspension. For this reason, oil which is perfectly good for lubrication purposes may be discolored when seen on the oil level gage. With such oils the need for an oil change should be governed by the mileage the oil has been used and the dust conditions prevalent during that mileage. As long as the oil retains a “slick” quality and good body, it is generally satisfactory.
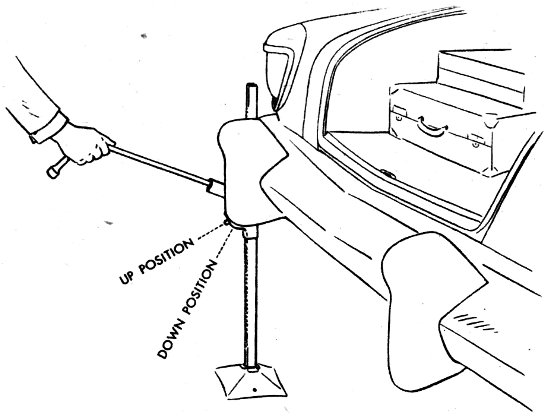
Raise or lower car with jack outside bumper bar.
Remove wheel cover ... retaining nuts ... and wheel.
Replace spare and tools snugly in proper spaces.
1. Before using jack, set parking brake by depressing brake pedal and pull outward on parking brake handle. On steep grades, it may be advisable to block the front or rear wheels as an extra precaution against rolling.
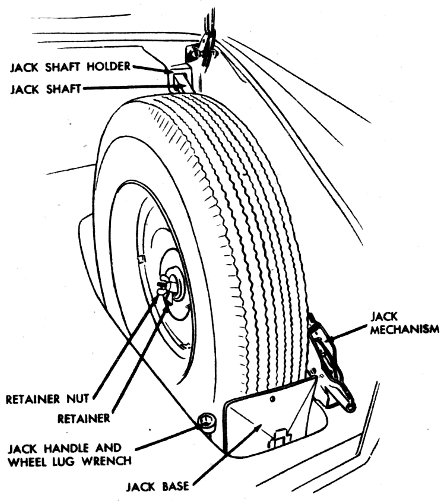
2. Open luggage compartment and unscrew single lug nut to free spare wheel and tire. Remove jack base, jack handle, spare wheel and tire, and bumper jack.
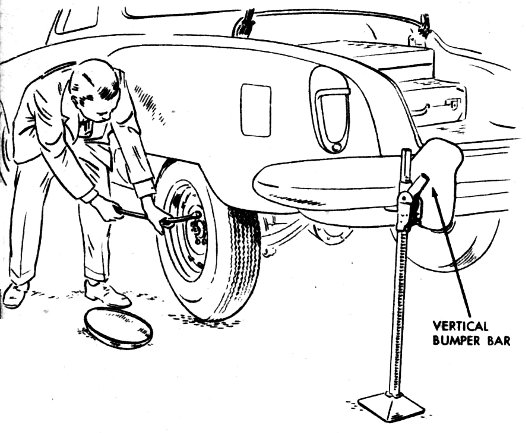
3. Place jack base so that jack lip will contact underside of bumper at outer edge of the vertical bumper bar on the flat tire side of the car. Also place base so that it will be about one inch inward from the outer edge of the bumper.
4. Put the jack mechanism lever in the UP position. Place lip of jack in contact with the underside of the bumper against the outer edge of the vertical bumper bar.
5. Use chisel end of jack handle to remove hub cover. Then place chisel end of the jack in the jack mechanism and jack up the car. Note—If tire to be changed is on a front wheel, jack up only a few notches to be sure jack is secure, then start wheel lug nuts loose before continuing the jacking up process. On rear wheels, the parking brake will hold the wheel so that the nuts can be loosened after the car has been jacked up.
6. On wheels on the left side of the car, the wheel lug nuts are left-hand threaded. To remove them, use the hexagonal wrench end of the jack handle and 36 turn the nuts clockwise. On wheels on the right side of the car, the nuts are removed by turning them counterclockwise. Nuts are installed by turning them in the direction opposite to that used in removing them.
7. Raise car with jack until wheel is free of the road and can revolve freely. This is important to be sure you have enough clearance to install spare. Remove flat tire and wheel and place spare wheel and tire over studs. Install lug nuts and tighten uniformly and firmly.
8. Lower jack by first placing jack mechanism lever in its DOWN position and work the jack with the handle in the same manner as when raising car.
9. Replace tools and spare in this order: Jack shaft and mechanism go into the holder provided at the right of the spare wheel well. Jack mechanism must fit snug against bulge of tire to prevent rattling. Next install the spare wheel and tire, being sure the hinged bolt comes through the wheel hub hole. Place retainer plate over bolt and screw on the retainer nut. Wedge jack handle and jack base between tire and well. Put luggage compartment lid handle in closed position, lock handle and remove key, and close lid.
The storage battery is located under the hood on the left side. The carrier clamp bolt wing nuts should be kept finger tight but not so tight as to crack the battery case.
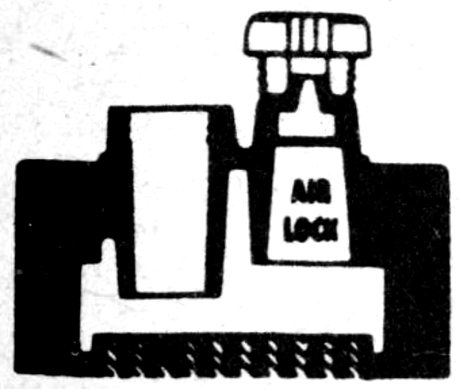
Place cap on safety-vent forming air lock in breather-chamber

Fill well with distilled water. Air lock prevents solution rising above bottom of well.
Remove cap from safety-vent and solution drops to correct level. Replace cap in filter hole.
Have the following three items checked frequently:
1. Water level—maintain at the proper height with distilled water.
2. The specific gravity of the battery solution.
3. Battery connections—should be clean and tight.
Charging Precautions It is advisable to observe the following precautions when charging a battery at home or elsewhere. During the charging and for a short time immediately thereafter, the chemical reaction in the battery gives off hydrogen gas in sufficient quantities as to be explosive. When working near a battery being charged, or just after it has been charged, it is important that no flame or spark have an opportunity to ignite the hydrogen gas. To prevent possibility of a static electricity spark’s causing such an explosion with the battery in the car, it is well to ground the car electrically by means of a metal bar or chain running from the car’s frame or 38 bumper to the ground. When the charging or recently charged battery is out of the car, it should be placed where it will not be exposed to flame, spark, or static electricity.
The crankcase is provided with a cross ventilation system to reduce harmful dilution of the engine oil by water and fuel. Crankcase dilution is aggravated by low speed driving with frequent stops and starts because the engine does not warm up to the normal operating temperature. The driver can materially assist in preventing this condition by observing the following suggestions:
1. After starting, give the engine time to warm up before driving.
2. Keep the engine in good mechanical condition. See that the compression is good and that the ignition and carburetion systems are kept in peak condition.
3. Clean the crankcase at least once a year, preferably when winter oil is changed for summer weight oil.
4. Use the proper grade of a reputable engine oil.
5. Use a good grade of fresh gasoline.
6. Check thermostat operation.
Operating an engine at subnormal temperatures causes a much more rapid dilution of the crankcase oil than is experienced at normal temperatures.
Because of the chemical reaction between metal and the lime or other minerals in water, one U. S. pint (.833 Imperial pt., 0.47 liters) of an approved inhibitor such as 39 Studebaker Cooling System Rust Inhibitor or Resistor should be added to the cooling system of every new car and replenished as needed throughout the life of the car. This will help protect the entire cooling system (radiator, cylinder block, cylinder head, and water pump) from any chemical corrosions, rust, or calcification within the radiator core which may restrict the passages. This does not, however, dispense with the need of flushing the cooling system seasonally, spring and fall. Following each draining a pint of the inhibitor should be used unless it is included in the new coolant.
Many anti-freeze compounds do contain a rust inhibitor. Ask your dealer whether the anti-freeze you use during the winter is of this kind. If so, it will not be necessary to install a rust inhibitor in the cooling system while such an anti-freeze is in use.
Carbon Monoxide is a lethal gas, odorless, tasteless, and colorless, found in the exhaust fumes of all engines. Never start the engine in a closed garage. Always open garage doors wide before starting the engine and keep the doors open as long as the engine is operating.
The kind of gasoline you use in your new Studebaker is an important factor in performance, economy, and service.
It is important to purchase your gasoline from a dealer selling the product of a reputable refinery in sufficient volume to assure fresh, clean gasoline which hasn’t accumulated moisture, dirt and tank settlings from lying dormant for relatively long periods.
Speed Drive at a moderate and constant speed.
Idling Shut off the engine while parked, even for a few minutes, such as waiting for long freight trains at railroad crossings. Idling, except to warm up a cold engine, is sheer waste.
Stopping Come to a gradual stop whenever possible. This saves fuel, brake lining, and tires.
Accelerating If peak economy is to be obtained, acceleration must be gradual. Rapid acceleration wastes gasoline.
Tires Keep your tires properly inflated.
Lubrication Keep both the engine and chassis well lubricated at all times. This reduces friction to a minimum.
Mechanical Condition Periodic “tuning” of the engine by your Studebaker dealer’s service department will insure maximum mechanical efficiency necessary to good gasoline mileage.
Inflate and check tires to recommended pressures given on page 53 with the tires cold (at atmospheric temperatures), and not after a long run.
If your tires are checked immediately after a long run, do not permit the attendant to reduce the pressures by letting out air. Wait until the tires have had a chance to cool before checking pressures.
You can ensure more even wear of all tires by having your Studebaker dealer criss-cross them according to the latest factory recommendations at approximately 4000 mile (6437 km.) intervals. Have tires and wheels checked for need of balance after each criss-crossing.
For economy of fuel consumption and noiseless combustion relative to the type of gasoline used, the ignition timing may be advanced or retarded. Such an adjustment should be made by your Studebaker dealer.
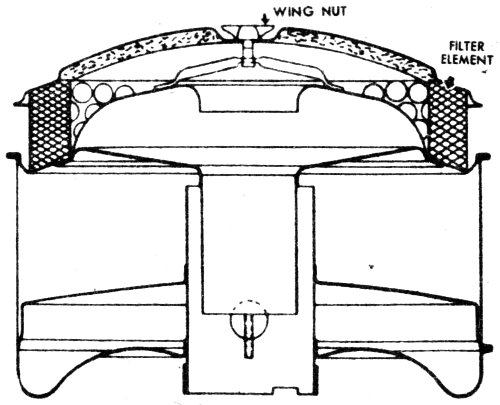
Two types of air cleaner are available for Studebaker cars. One is the “oil wetted” type for cars operated a greater part of the time over pavement and roads which are comparatively free from dust. The other is known as the “oil bath” type and is available at extra cost for cars operated where dust conditions are severe.
Dust particles, although microscopically small, are highly abrasive and tend to score and cut the smooth glasslike surfaces of working parts—increasing the rate of wear. The proper type of air cleaner installed on your 42 car, properly maintained and serviced, will increase the life of the engine, and aid in maintaining its normal efficiency.
OIL WETTED AIR CLEANER
Because local conditions alone determine the frequency of air cleaner service, it will be necessary to ask your dealer how often this should be performed.
1. Remove the filter element, clean with kerosene, and shake out until dry.
2. When thoroughly dry submerge in a good grade of engine oil and allow excess oil to drain before reinstalling the element in the cleaner.
3. Replace filter element and wipe off all excess oil.
1. Remove the filter element, clean in kerosene, and allow to dry thoroughly.
2. Clean the oil reservoir.
3. Pour one pint of new engine oil into the reservoir. S.A.E. 50 for above 32° F. (0° C.) S.A.E. 20 for 43 below 32° F. (0° C.) is recommended for this purpose. Do not use an oil lighter than S.A.E. 20 in the cleaner at any time.
4. Reassemble element and filter unit and install on car.
OIL BATH AIR CLEANER
To drain the cooling system, drain the radiator, block, and, if car is so equipped, Climatizer and defroster.
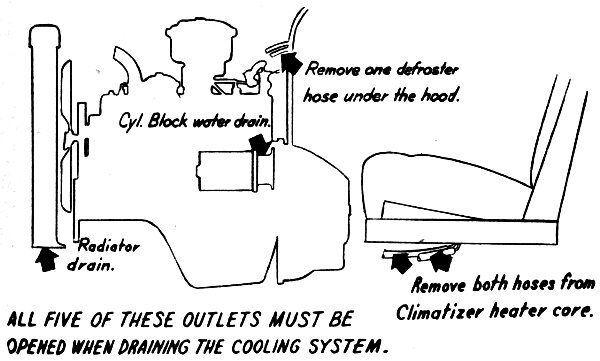
ALL FIVE OF THESE OUTLETS MUST BE OPENED WHEN DRAINING THE COOLING SYSTEM.
Either the alcohol-base or ethylene-glycol base anti-freeze is recommended for use in your Studebaker. Be sure the brand you select contains a rust inhibitor. Do not use an anti-freeze preparation which contains salt, sugar, calcium chloride, soda, or petroleum base compounds.
Reputable anti-freeze companies supply their dealers with charts showing the amount of anti-freeze to use for protection to various anticipated temperatures, depending upon cooling system capacity given on page 53.
The high luster, hard-baked enamel finish of your new Studebaker is best retained by an application of approved Studebaker Cleaner and Polish or Cleaner and Wax after each washing. The enamel, however, should not be subjected to an application of wax of any kind during the first 60 days so that sufficient time may be provided for the finish to become fully hardened.
Approved Studebaker appearance maintenance materials are available from your Studebaker dealer. These are recommended to remove the accumulation of road scum and dullness resulting from weather or road conditions and to restore the luster of the enamel finish. Do not become alarmed when polishing or waxing if a slight amount of color appears on the cloth. This is a natural condition.
Alcohol, anti-freeze mixtures containing alcohol, and calcium chloride or other chemical mixtures used to melt 45 snow and ice or to settle dust should be flushed with water as soon as possible in order to avoid damage to the enamel finish and chromium parts.
When washing the car, first saturate all foreign substances on the finish with cold water. Then use a clean sponge and running water for the removal of dirt. Dry the body with a clean, damp chamois skin, using a straight horizontal or vertical motion, rather than a circular motion. It is important that a different sponge and chamois skin be used on the body from that used on the chassis.
Chromium and nickel plated finishes are of a perishable nature and will deteriorate if not properly cared for. These parts should be kept clean and free from dirt and foreign matter. To clean chromium plated parts, use clear water and a clean cloth. To protect the finish after the parts are cleaned, apply a coating of paste-type body wax. For further details on chrome plated parts, see the card placed in the package compartment.
Clean upholstery means not only a better looking automobile but gives longer wear and affords greater comfort and enjoyment.
The use of a vacuum cleaner and a thorough brushing of the upholstery and headlining (with the nap or pile) will usually brighten the interior noticeably. Remove the cushions from the car and brush to remove foreign particles from the fabric.
Studebaker Fabric Cleaner (available through Studebaker dealers) is effective in removing all types of stains and does not harm the upholstery.
Seat and side upholstery can be washed safely with soap and water. Use lukewarm water and a neutral soap. The suds should be good and frothy, not watery. Apply in moderate quantities with a damp cloth, sponge, or soft brush. Remove soap suds with a clean, damp cloth or sponge, then wipe the surface several times with a dry cloth. While the material is still damp, brush it lightly with a whisk broom or brush of medium stiffness. Permit air to circulate freely over the wet upholstery. When dry, brush again to loosen any minute matting. When brushing, always brush fabric with the lay of the pile or nap.
Leather upholstery may be cleaned with a soft sponge and saddle soap. Make a light suds with lukewarm water and saddle soap. This type of soap is especially suitable for cleaning leather and leaves the surface soft and pliable.
Rinse the sponge occasionally in clean water. After completing the cleaning operation, use a clean, soft cloth to polish the surface of the leather.
Studebaker Chromium Cleaner (powder type AC-1464) is recommended for cleaning white sidewall tires. Studebaker Black Rubber Finish is recommended for black tires and all black rubber parts.
The life of any convertible top can be materially lengthened if care is taken to lower the top only when it is dry. Never operate the top motor when the car is in motion.
Tops used on Studebaker convertible models are made of a two-ply material. The face of the black top is made of cotton and rayon. The face of the light-colored tops used on some Studebaker convertible models is made of Orlon[4] acrylic fiber and will not shrink, mildew, or stretch as a result of exposure to the elements. These facing materials are bound to a cotton backing material.
Cleaning Traffic grime and most other soiling may be removed by washing the top with a sudsy mixture of mild (neutral) soap and warm water. A soft brush may be used if necessary. Strong solvents, naphtha, or carbon tetrachloride are not recommended for cleaning this fabric.
Rear Windows of convertible tops are made of a clear plastic material. They should not be wiped while dry since the abrasive particles in the dust will tend to scratch the surface of the plastic. Clean the convertible top rear window by flooding it with cold water and wiping off the dirt with a soft cloth or sponge during the flooding process.
Occasionally your serviceman will recommend an engine tune-up. The frequency of tune-ups depends almost entirely on the amount of driving and the type of driving you do. When you purchase a tune-up, we recommend that you request at least the following operations:
1. Check the manifold heater valve for free operation.
2. Clean and adjust spark plugs; install with new gaskets.
3. Clean carburetor air cleaner.
4. Clean fuel pump bowl and strainer; install with new gasket.
5. Clean inside of distributor cover, cable terminals, and sockets.
6. Tighten cylinder head cap screws to recommended tension.
7. Adjust fan belt.
8. Remove and clean carburetor choke thermostatic control. Replace with new gasket and adjust, if necessary.
9. Check and set ignition timing.
10. Adjust carburetor idle screw with engine at normal operating temperatures.
11. Adjust idle stop screw to produce engine speed corresponding with 8 miles (13 km.) per hour road speed in high gear.
Carburetor Adjustment for High Altitude The carburetor is carefully calibrated to provide efficient operation. Studebaker dealers are acquainted with the adjustments which are needed for high altitude operation.
Brake Adjustment The self-adjusting brakes on your car are self-compensating for lining wear and require no adjustment. They are properly set at the factory.
With each application of the brakes, however, the linings wear and, after a time, new linings should be installed to provide the maximum braking area and to avoid damage to the brake drums. When the lining needs replacement, the self-adjusting feature ceases to operate. When this occurs, the brake pedal free travel will increase and the driver is warned that the brakes need relining. If your brakes do not operate satisfactorily, see your Studebaker dealer.
Clutch Pedal Travel Adjustment Clutch pedal free travel is the distance the pedal moves forward before resistance of the release mechanism is felt. When the free travel is greater than one inch (25,4 mm.) or less than one-half inch (12,7 mm.) adjustment should be made by your Studebaker dealer.
The Hill Holder (on cars so equipped) should be checked and adjusted if necessary whenever the clutch pedal travel is adjusted.
Fan Belt Adjustment To insure efficient fan, water pump and generator operation, it is important that the fan belt is not over-tightened. Any readjustment should be performed by a Studebaker dealer.
Front Wheel Camber Adjustment Camber adjustment is properly set at the factory ½° greater on the driver’s side of the car than on the other side. Should a front end alignment check reveal need of camber readjustment, it should be set as nearly to ¾° on driver’s side and ¼° on the other side as possible. In any setting, the driver’s side camber should be ½° more than the other side.
Body Drain Holes All drain holes should be kept open to prevent accumulation of water.
The door drain holes are easily cleared with a pen-knife or other flat instrument which can be inserted in the holes and run back and forth a few times to loosen any congestion.
Body drain holes should be cleaned by the serviceman.
See page 54 for minimum seasonal service recommendations.
Criss-cross Tires Regularly. (See page 41)
If emergency adjustments or repairs must be made at shops other than authorized Studebaker dealerships, ask the repairman to refer to this section of your Owner’s Guide to be sure that he understands the several “special-to-Studebaker” measurements and other service data given below.
| IGNITION | ||
|---|---|---|
| Breaker point gap | .020″ (0,508 mm.) | |
| (Check every 10,000 miles [16,090 km.]) | ||
| Breaker arm tension | 17 to 20 oz. (481,95 to 566,99 grams) | |
| Spark plug gap | .022″-.027″ (0,559-0,686 mm.) | |
| Note:—In normal use, check every 5000 miles (8046 km.) and replace after 10,000 miles (16.090 km.). Under some conditions of operation it may be desirable to clean and adjust spark plugs every 2500 miles (4023 km.). | ||
| Firing order | 1-5-3-6-2-4 | |
| (No. 1 is the front cylinder) | ||
| VALVES | ||
| Tappet clearance (engine cold) | .016″ (0,406 mm.) | |
| Intake and Exhaust | ||
| Angle of valve seat | 45° | |
| ENGINE OIL PRESSURE | ||
| 40 miles (64 km) per hour | 20 to 40 lbs. (1,4 kgs. to 2,8 kgs.) reading on oil gage | |
| Pressure at which relief valve opens | 40 lbs. (2,8 kgs.) | |
| CIRCUIT BREAKERS AND FUSES | Amperes | |
| Circuit Breaker—Head, Parking, Tail, and Instrument Lights | 30 | |
| Circuit Breaker—Convertible Top Motor | 30 | |
| Circuit Breaker—Body and Stop Lights | 20 | |
| Circuit Breaker—Climatizer and Defroster | 20 | |
| Overdrive | 20 | |
| Fog Lights | 20 | |
| Radio | 14 | |
| Electric Directional Signal | 14 | |
| Underhood Light | 5 | |
| Electric Clock | 3 | |
| 52 | ||
| BATTERY | ||
| Voltage | 6 | |
| Specific Gravity | 1.280-1.300 fully charged | |
| Willard Number | HDW-1-100 | |
| Do not overfill. Check water level frequently | ||
| BRAKES (HYDRAULIC) | ||
| Pedal free travel | 1/16″ to 3/16″ (1,6 to 4,8 mm.) | |
| (Before the master cylinder piston starts to move) | ||
| CLUTCH | ||
| Pedal free travel | ½″ to 1″ (12,7 to 25,4 mm.) | |
| LAMP BULB SPECIFICATIONS | ||
| Location | Voltage and Number | Candle Power |
| Headlight | 6-8 Sealed Beam No. 4030 | |
| (For Right Hand Drive Use 45-20 Watt Metal Back Sealed Unit) | ||
| Parking | 6-8 Mazda No. 63 | 3 |
| (With Directional Signals) | 6-8 Mazda No. 1158 | 3-21 |
| Tail | 6-8 Mazda No. 1154 | 3 |
| Stop | ″ | 21 |
| Instruments | 6-8 Mazda No. 55 | 1½ |
| Trunk | ″ | ″ |
| Dome | 6-8 Mazda No. 88 | 15 |
| License Plate | 6-8 Mazda No. 63 | 3 |
| Tell-Tale Headlight Beam | 6-8 Mazda No. 51 | ½ |
| Directional Signal | ||
| Front | 6-8 Mazda No. 1158 | 21-3 |
| Rear | 6-8 Mazda No. 1129 | 21 |
| Tell-Tale | 6-8 Mazda No. 55 | 1½ |
| Map | 6-8 Mazda No. 88 | 15 |
| Package Compartment | 6-8 Mazda No. 55 | 1½ |
| Underhood | 6-8 Mazda No. 87 | 15 |
| Fog Lamp | 6-8 Mazda No. 4015 clear glass | |
| Radio | 6-8 Mazda No. 44 | |
| Clock | 6-8 Mazda No. 55 | 1½ |
| Cigar Lighter | 6-8 Mazda No. 51 | ½ |
| Ash Tray | 6-8 Mazda No. 51 | ½ |
| 53 | ||
| STEERING | ||
| Toe-In | 1/16″ to ⅛″ (1,58 mm. to 3,16 mm.) | |
| Caster | -1° to -2½° No Load | |
| Camber | 0° to +1° No Load | |
| (See page 50 for camber adjustment) | ||
| King Pin Inclination | 5¼° | |
| TIRE PRESSURES | ||
| 6.40 x 15 | 26 lbs. (1,82 kgs) front | |
| 24 lbs. (1,68 kgs) rear | ||
| Above pressures are with tires cool (local temperatures) | ||
| CAPACITIES | |||
|---|---|---|---|
| U. S. | Imperial | Liters | |
| Engine (Crankcase) | 5.00 quarts | 4.17 quarts | 4,73 |
| Cooling System | 10.00 quarts | 8.35 quarts | 9,50 |
| with Climatizer | 11.50 quarts | 9.60 quarts | 10,80 |
| Transmission—Conventional | 1.60 pints | 1.33 pints | 0,75 |
| Transmission—Overdrive | 2.75 pints | 2.29 pints | 1,36 |
| Rear Axle | 2.50 pints | 2.08 pints | 1,18 |
| Gasoline Tank | 18.00 gallons | 15.00 gallons | 68,00 |
| LICENSE DATA | ||
|---|---|---|
| Model Number | 12G | |
| Number of Cylinders | 6 | |
| Cylinder Bore | 3″ (76,2 mm.) | |
| Stroke | 4″ (101,6 mm.) | |
| Piston Displacement | 169.6 cu. in. (2780 cc.) | |
| Horsepower (NACC or RAC Rating) | 21.6 | |
| Weight—See your dealer. Weight varies by body style and special equipment. Your car’s registerable weight is ............ pounds. | ||
Cooling System: Drain and reverse flush cooling and heating systems. Check entire system for leaks. Refill radiator with correct anti-freeze solution, including Rust Inhibitor if not contained.
Crankcase: Drain and refill crankcase with good oil of correct grade. Change filter cartridge if not recently changed.
Brakes: Check for need of service.
Steering: Check wheel alignment (camber, toe-in, king pin inclination). Inspect all steering connections.
Generator: Check generator output.
Battery: Test specific gravity of battery. Check water level. Clean, tighten, and coat terminals with petroleum jelly.
Cylinder Head: Tighten cylinder head bolts with torque wrench.
Lubrication: Lubricate chassis (unless performed in last 1000 miles) including any periodic lubrication requirements due.
Fuel System: Clean fuel pump bowl and reset carburetor adjustment if necessary.
Starter: Check efficiency for proper current draw from battery.
Cooling System: Drain and reverse flush. Check thermostat. Check condition of radiator hose fan belt. Refill cooling system and install Rust Inhibitor.
Crankcase: Clean inside of engine crankcase. Clean Floto screen. Change engine oil. Install new filter cartridge if not recently changed.
Brakes: Check brakes for need of service.
Steering: Check wheel alignment (camber, toe-in, king pin inclination). Inspect all steering connections.
Generator: Check generator output.
Battery: Test specific gravity of battery. Check water level. Clean, tighten, and coat terminals with petroleum jelly.
Cylinder Head: Tighten cylinder head bolts with torque wrench.
Lubrication: Lubricate chassis (unless performed in last 1000 miles) including any periodic lubrication requirements due.
Fuel System: Clean fuel pump bowl and reset carburetor adjustment if necessary.
Starter: Check efficiency for proper current draw from battery.
THESE REQUIREMENTS MAY VARY WITH DIFFERING CLIMATIC CONDITIONS.

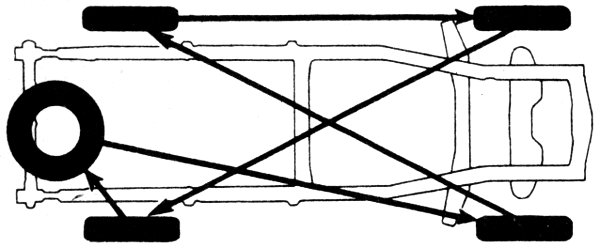
SIMPLIFIED WIRING DIAGRAM
A B C D E F G H I J K L M N O P Q R S T U V W X Y Z
Printed in U.S.A.
115130M
We warrant each new motor vehicle sold by us to be free from defects in material and workmanship under normal use and service, our obligation under this warranty being limited to making good at Studebaker factories any part or parts thereof, including all equipment or trade accessories (except tires) supplied by Studebaker as standard or optional equipment, which shall, within ninety (90) days after making delivery of such vehicle to the original purchaser or before such vehicle has been driven four thousand (4,000) miles, whichever event shall first occur, be returned to us with transportation charges prepaid and which our examination shall disclose to our satisfaction to have been thus defective; this warranty being expressly in lieu of all other warranties, express or implied, and of all other obligations or liabilities on our part, and we neither assume nor authorize any other person to assume for us any other liability in connection with the sale or use of our motor vehicles.
This warranty shall not apply to any motor vehicle which shall have been repaired or altered outside of Studebaker factories in any way so as, in our judgment, to affect its stability or reliability, nor which has been subject to misuse, negligence or accident, nor to any commercial motor vehicle sold by us which shall have been operated at a speed exceeding the factory rated speed, or loaded beyond the factory rated load capacity.
THE STUDEBAKER CORPORATION South Bend 27, Indiana
We reserve the right to make changes in design or to make additions to or improvements upon our products without incurring any obligations to install the same on vehicles previously built.
The Willard Storage Battery Company provides a 90 day standard factory warranty on the battery. They also provide an adjustment policy prorated on a sliding scale based on the length of service of the battery. Your Studebaker dealer will be pleased to handle details of battery warranty service for you.
KEEP THIS BOOKLET IN A CONVENIENT PLACE IN YOUR CAR. IT CONTAINS IMPORTANT INFORMATION ABOUT THE OPERATION AND CARE OF YOUR NEW CHAMPION.
End of the Project Gutenberg EBook of Your 1952 Champion Owner's Guide, by
Studebaker Corporation

*** END OF THIS PROJECT GUTENBERG EBOOK YOUR 1952 CHAMPION OWNER'S GUIDE ***

***** This file should be named 62925-h.htm or 62925-h.zip *****
This and all associated files of various formats will be found in:
        http://www.gutenberg.org/6/2/9/2/62925/

Produced by Ron Box, Stephen Hutcheson and the Online
Distributed Proofreading Team at https://www.pgdp.net

Updated editions will replace the previous one--the old editions will
be renamed.

Creating the works from print editions not protected by U.S. copyright
law means that no one owns a United States copyright in these works,
so the Foundation (and you!) can copy and distribute it in the United
States without permission and without paying copyright
royalties. Special rules, set forth in the General Terms of Use part
of this license, apply to copying and distributing Project
Gutenberg-tm electronic works to protect the PROJECT GUTENBERG-tm
concept and trademark. Project Gutenberg is a registered trademark,
and may not be used if you charge for the eBooks, unless you receive
specific permission. If you do not charge anything for copies of this
eBook, complying with the rules is very easy. You may use this eBook
for nearly any purpose such as creation of derivative works, reports,
performances and research. They may be modified and printed and given
away--you may do practically ANYTHING in the United States with eBooks
not protected by U.S. copyright law. Redistribution is subject to the
trademark license, especially commercial redistribution.

START: FULL LICENSE

THE FULL PROJECT GUTENBERG LICENSE
PLEASE READ THIS BEFORE YOU DISTRIBUTE OR USE THIS WORK

To protect the Project Gutenberg-tm mission of promoting the free
distribution of electronic works, by using or distributing this work
(or any other work associated in any way with the phrase "Project
Gutenberg"), you agree to comply with all the terms of the Full
Project Gutenberg-tm License available with this file or online at
www.gutenberg.org/license.

Section 1. General Terms of Use and Redistributing Project
Gutenberg-tm electronic works

1.A. By reading or using any part of this Project Gutenberg-tm
electronic work, you indicate that you have read, understand, agree to
and accept all the terms of this license and intellectual property
(trademark/copyright) agreement. If you do not agree to abide by all
the terms of this agreement, you must cease using and return or
destroy all copies of Project Gutenberg-tm electronic works in your
possession. If you paid a fee for obtaining a copy of or access to a
Project Gutenberg-tm electronic work and you do not agree to be bound
by the terms of this agreement, you may obtain a refund from the
person or entity to whom you paid the fee as set forth in paragraph
1.E.8.

1.B. "Project Gutenberg" is a registered trademark. It may only be
used on or associated in any way with an electronic work by people who
agree to be bound by the terms of this agreement. There are a few
things that you can do with most Project Gutenberg-tm electronic works
even without complying with the full terms of this agreement. See
paragraph 1.C below. There are a lot of things you can do with Project
Gutenberg-tm electronic works if you follow the terms of this
agreement and help preserve free future access to Project Gutenberg-tm
electronic works. See paragraph 1.E below.

1.C. The Project Gutenberg Literary Archive Foundation ("the
Foundation" or PGLAF), owns a compilation copyright in the collection
of Project Gutenberg-tm electronic works. Nearly all the individual
works in the collection are in the public domain in the United
States. If an individual work is unprotected by copyright law in the
United States and you are located in the United States, we do not
claim a right to prevent you from copying, distributing, performing,
displaying or creating derivative works based on the work as long as
all references to Project Gutenberg are removed. Of course, we hope
that you will support the Project Gutenberg-tm mission of promoting
free access to electronic works by freely sharing Project Gutenberg-tm
works in compliance with the terms of this agreement for keeping the
Project Gutenberg-tm name associated with the work. You can easily
comply with the terms of this agreement by keeping this work in the
same format with its attached full Project Gutenberg-tm License when
you share it without charge with others.

1.D. The copyright laws of the place where you are located also govern
what you can do with this work. Copyright laws in most countries are
in a constant state of change. If you are outside the United States,
check the laws of your country in addition to the terms of this
agreement before downloading, copying, displaying, performing,
distributing or creating derivative works based on this work or any
other Project Gutenberg-tm work. The Foundation makes no
representations concerning the copyright status of any work in any
country outside the United States.

1.E. Unless you have removed all references to Project Gutenberg:

1.E.1. The following sentence, with active links to, or other
immediate access to, the full Project Gutenberg-tm License must appear
prominently whenever any copy of a Project Gutenberg-tm work (any work
on which the phrase "Project Gutenberg" appears, or with which the
phrase "Project Gutenberg" is associated) is accessed, displayed,
performed, viewed, copied or distributed:

  This eBook is for the use of anyone anywhere in the United States and
  most other parts of the world at no cost and with almost no
  restrictions whatsoever. You may copy it, give it away or re-use it
  under the terms of the Project Gutenberg License included with this
  eBook or online at www.gutenberg.org. If you are not located in the
  United States, you'll have to check the laws of the country where you
  are located before using this ebook.

1.E.2. If an individual Project Gutenberg-tm electronic work is
derived from texts not protected by U.S. copyright law (does not
contain a notice indicating that it is posted with permission of the
copyright holder), the work can be copied and distributed to anyone in
the United States without paying any fees or charges. If you are
redistributing or providing access to a work with the phrase "Project
Gutenberg" associated with or appearing on the work, you must comply
either with the requirements of paragraphs 1.E.1 through 1.E.7 or
obtain permission for the use of the work and the Project Gutenberg-tm
trademark as set forth in paragraphs 1.E.8 or 1.E.9.

1.E.3. If an individual Project Gutenberg-tm electronic work is posted
with the permission of the copyright holder, your use and distribution
must comply with both paragraphs 1.E.1 through 1.E.7 and any
additional terms imposed by the copyright holder. Additional terms
will be linked to the Project Gutenberg-tm License for all works
posted with the permission of the copyright holder found at the
beginning of this work.

1.E.4. Do not unlink or detach or remove the full Project Gutenberg-tm
License terms from this work, or any files containing a part of this
work or any other work associated with Project Gutenberg-tm.

1.E.5. Do not copy, display, perform, distribute or redistribute this
electronic work, or any part of this electronic work, without
prominently displaying the sentence set forth in paragraph 1.E.1 with
active links or immediate access to the full terms of the Project
Gutenberg-tm License.

1.E.6. You may convert to and distribute this work in any binary,
compressed, marked up, nonproprietary or proprietary form, including
any word processing or hypertext form. However, if you provide access
to or distribute copies of a Project Gutenberg-tm work in a format
other than "Plain Vanilla ASCII" or other format used in the official
version posted on the official Project Gutenberg-tm web site
(www.gutenberg.org), you must, at no additional cost, fee or expense
to the user, provide a copy, a means of exporting a copy, or a means
of obtaining a copy upon request, of the work in its original "Plain
Vanilla ASCII" or other form. Any alternate format must include the
full Project Gutenberg-tm License as specified in paragraph 1.E.1.

1.E.7. Do not charge a fee for access to, viewing, displaying,
performing, copying or distributing any Project Gutenberg-tm works
unless you comply with paragraph 1.E.8 or 1.E.9.

1.E.8. You may charge a reasonable fee for copies of or providing
access to or distributing Project Gutenberg-tm electronic works
provided that

* You pay a royalty fee of 20% of the gross profits you derive from
  the use of Project Gutenberg-tm works calculated using the method
  you already use to calculate your applicable taxes. The fee is owed
  to the owner of the Project Gutenberg-tm trademark, but he has
  agreed to donate royalties under this paragraph to the Project
  Gutenberg Literary Archive Foundation. Royalty payments must be paid
  within 60 days following each date on which you prepare (or are
  legally required to prepare) your periodic tax returns. Royalty
  payments should be clearly marked as such and sent to the Project
  Gutenberg Literary Archive Foundation at the address specified in
  Section 4, "Information about donations to the Project Gutenberg
  Literary Archive Foundation."

* You provide a full refund of any money paid by a user who notifies
  you in writing (or by e-mail) within 30 days of receipt that s/he
  does not agree to the terms of the full Project Gutenberg-tm
  License. You must require such a user to return or destroy all
  copies of the works possessed in a physical medium and discontinue
  all use of and all access to other copies of Project Gutenberg-tm
  works.

* You provide, in accordance with paragraph 1.F.3, a full refund of
  any money paid for a work or a replacement copy, if a defect in the
  electronic work is discovered and reported to you within 90 days of
  receipt of the work.

* You comply with all other terms of this agreement for free
  distribution of Project Gutenberg-tm works.

1.E.9. If you wish to charge a fee or distribute a Project
Gutenberg-tm electronic work or group of works on different terms than
are set forth in this agreement, you must obtain permission in writing
from both the Project Gutenberg Literary Archive Foundation and The
Project Gutenberg Trademark LLC, the owner of the Project Gutenberg-tm
trademark. Contact the Foundation as set forth in Section 3 below.

1.F.

1.F.1. Project Gutenberg volunteers and employees expend considerable
effort to identify, do copyright research on, transcribe and proofread
works not protected by U.S. copyright law in creating the Project
Gutenberg-tm collection. Despite these efforts, Project Gutenberg-tm
electronic works, and the medium on which they may be stored, may
contain "Defects," such as, but not limited to, incomplete, inaccurate
or corrupt data, transcription errors, a copyright or other
intellectual property infringement, a defective or damaged disk or
other medium, a computer virus, or computer codes that damage or
cannot be read by your equipment.

1.F.2. LIMITED WARRANTY, DISCLAIMER OF DAMAGES - Except for the "Right
of Replacement or Refund" described in paragraph 1.F.3, the Project
Gutenberg Literary Archive Foundation, the owner of the Project
Gutenberg-tm trademark, and any other party distributing a Project
Gutenberg-tm electronic work under this agreement, disclaim all
liability to you for damages, costs and expenses, including legal
fees. YOU AGREE THAT YOU HAVE NO REMEDIES FOR NEGLIGENCE, STRICT
LIABILITY, BREACH OF WARRANTY OR BREACH OF CONTRACT EXCEPT THOSE
PROVIDED IN PARAGRAPH 1.F.3. YOU AGREE THAT THE FOUNDATION, THE
TRADEMARK OWNER, AND ANY DISTRIBUTOR UNDER THIS AGREEMENT WILL NOT BE
LIABLE TO YOU FOR ACTUAL, DIRECT, INDIRECT, CONSEQUENTIAL, PUNITIVE OR
INCIDENTAL DAMAGES EVEN IF YOU GIVE NOTICE OF THE POSSIBILITY OF SUCH
DAMAGE.

1.F.3. LIMITED RIGHT OF REPLACEMENT OR REFUND - If you discover a
defect in this electronic work within 90 days of receiving it, you can
receive a refund of the money (if any) you paid for it by sending a
written explanation to the person you received the work from. If you
received the work on a physical medium, you must return the medium
with your written explanation. The person or entity that provided you
with the defective work may elect to provide a replacement copy in
lieu of a refund. If you received the work electronically, the person
or entity providing it to you may choose to give you a second
opportunity to receive the work electronically in lieu of a refund. If
the second copy is also defective, you may demand a refund in writing
without further opportunities to fix the problem.

1.F.4. Except for the limited right of replacement or refund set forth
in paragraph 1.F.3, this work is provided to you 'AS-IS', WITH NO
OTHER WARRANTIES OF ANY KIND, EXPRESS OR IMPLIED, INCLUDING BUT NOT
LIMITED TO WARRANTIES OF MERCHANTABILITY OR FITNESS FOR ANY PURPOSE.

1.F.5. Some states do not allow disclaimers of certain implied
warranties or the exclusion or limitation of certain types of
damages. If any disclaimer or limitation set forth in this agreement
violates the law of the state applicable to this agreement, the
agreement shall be interpreted to make the maximum disclaimer or
limitation permitted by the applicable state law. The invalidity or
unenforceability of any provision of this agreement shall not void the
remaining provisions.

1.F.6. INDEMNITY - You agree to indemnify and hold the Foundation, the
trademark owner, any agent or employee of the Foundation, anyone
providing copies of Project Gutenberg-tm electronic works in
accordance with this agreement, and any volunteers associated with the
production, promotion and distribution of Project Gutenberg-tm
electronic works, harmless from all liability, costs and expenses,
including legal fees, that arise directly or indirectly from any of
the following which you do or cause to occur: (a) distribution of this
or any Project Gutenberg-tm work, (b) alteration, modification, or
additions or deletions to any Project Gutenberg-tm work, and (c) any
Defect you cause.

Section 2. Information about the Mission of Project Gutenberg-tm

Project Gutenberg-tm is synonymous with the free distribution of
electronic works in formats readable by the widest variety of
computers including obsolete, old, middle-aged and new computers. It
exists because of the efforts of hundreds of volunteers and donations
from people in all walks of life.

Volunteers and financial support to provide volunteers with the
assistance they need are critical to reaching Project Gutenberg-tm's
goals and ensuring that the Project Gutenberg-tm collection will
remain freely available for generations to come. In 2001, the Project
Gutenberg Literary Archive Foundation was created to provide a secure
and permanent future for Project Gutenberg-tm and future
generations. To learn more about the Project Gutenberg Literary
Archive Foundation and how your efforts and donations can help, see
Sections 3 and 4 and the Foundation information page at
www.gutenberg.org


Section 3. Information about the Project Gutenberg Literary Archive Foundation

The Project Gutenberg Literary Archive Foundation is a non profit
501(c)(3) educational corporation organized under the laws of the
state of Mississippi and granted tax exempt status by the Internal
Revenue Service. The Foundation's EIN or federal tax identification
number is 64-6221541. Contributions to the Project Gutenberg Literary
Archive Foundation are tax deductible to the full extent permitted by
U.S. federal laws and your state's laws.

The Foundation's principal office is in Fairbanks, Alaska, with the
mailing address: PO Box 750175, Fairbanks, AK 99775, but its
volunteers and employees are scattered throughout numerous
locations. Its business office is located at 809 North 1500 West, Salt
Lake City, UT 84116, (801) 596-1887. Email contact links and up to
date contact information can be found at the Foundation's web site and
official page at www.gutenberg.org/contact

For additional contact information:

    Dr. Gregory B. Newby
    Chief Executive and Director
    gbnewby@pglaf.org

Section 4. Information about Donations to the Project Gutenberg
Literary Archive Foundation

Project Gutenberg-tm depends upon and cannot survive without wide
spread public support and donations to carry out its mission of
increasing the number of public domain and licensed works that can be
freely distributed in machine readable form accessible by the widest
array of equipment including outdated equipment. Many small donations
($1 to $5,000) are particularly important to maintaining tax exempt
status with the IRS.

The Foundation is committed to complying with the laws regulating
charities and charitable donations in all 50 states of the United
States. Compliance requirements are not uniform and it takes a
considerable effort, much paperwork and many fees to meet and keep up
with these requirements. We do not solicit donations in locations
where we have not received written confirmation of compliance. To SEND
DONATIONS or determine the status of compliance for any particular
state visit www.gutenberg.org/donate

While we cannot and do not solicit contributions from states where we
have not met the solicitation requirements, we know of no prohibition
against accepting unsolicited donations from donors in such states who
approach us with offers to donate.

International donations are gratefully accepted, but we cannot make
any statements concerning tax treatment of donations received from
outside the United States. U.S. laws alone swamp our small staff.

Please check the Project Gutenberg Web pages for current donation
methods and addresses. Donations are accepted in a number of other
ways including checks, online payments and credit card donations. To
donate, please visit: www.gutenberg.org/donate

Section 5. General Information About Project Gutenberg-tm electronic works.

Professor Michael S. Hart was the originator of the Project
Gutenberg-tm concept of a library of electronic works that could be
freely shared with anyone. For forty years, he produced and
distributed Project Gutenberg-tm eBooks with only a loose network of
volunteer support.

Project Gutenberg-tm eBooks are often created from several printed
editions, all of which are confirmed as not protected by copyright in
the U.S. unless a copyright notice is included. Thus, we do not
necessarily keep eBooks in compliance with any particular paper
edition.

Most people start at our Web site which has the main PG search
facility: www.gutenberg.org

This Web site includes information about Project Gutenberg-tm,
including how to make donations to the Project Gutenberg Literary
Archive Foundation, how to help produce our new eBooks, and how to
subscribe to our email newsletter to hear about new eBooks.