
The Project Gutenberg eBook of The automobile owner's guide, by Frank B. Scholl
Title: The automobile owner's guide
Author: Frank B. Scholl
Release Date: November 18, 2022 [eBook #69375]
Language: English
Produced by: Charlene Taylor, Harry Lamé and the Online Distributed Proofreading Team at https://www.pgdp.net (This file was produced from images generously made available by The Internet Archive)
Please see the Transcriber’s Notes at the end of this text.

THE AUTOMOBILE
OWNER’S GUIDE
BY
FRANK B. SCHOLL

D. APPLETON AND COMPANY
NEW YORKLONDON
1920
COPYRIGHT, 1920, BY
D. APPLETON AND COMPANY
PRINTED IN THE UNITED STATES OF AMERICA
[v]
The automobile has taken its place as one of the most successful and useful inventions of the day. It is equaled only by the internal combustion gas engine, which is a factor in making it practical and efficient.
Gasoline-propelled vehicles have become one of man’s greatest aids in business efficiency, but nevertheless it is very important that we consider the facts, that the adoption of the automobile by man for business, commerce and pleasure is on a very large scale, and that the production by manufacturers is so great that very little thought is given to proper care, which is an ever-present factor in economical operation and a fair return for the investment.
The purpose of this book is to serve as a practical guide for those who own, operate, or contemplate purchasing an automobile.
The contents of this book cover the entire field that would be of value to the owner or chauffeur in making his own repairs. The parts and expressions are given in their simplest form; technical terms, tables and scales have been entirely eliminated, as they mean little or nothing to the average owner, and are of value only to the mechanical engineer and draftsman.
The illustrations, drawings and diagrams are intended only for the purpose of bringing out points that are more readily understood and explained in this manner. No attempt has been made to conform to proportionate exactness or scale accurateness.
Since there are many different makes of cars, motors, and equipment, the functional action of all is practically the same, therefore we use for illustration only those which are used by the majority of manufacturers.
[vi]
While, as a general rule, you will find all automobiles efficient and reliable, troubles and conditions are bound to arise that are somewhat puzzling; therefore, to assist the owner, we have written a chapter on trouble hints conveniently arranged in three columns, headed troubles, cause, and remedy.
The entire book is worked out along such lines, and so arranged, that a man or a boy with a common school education can easily master it and become an efficient mechanic.
[vii]
After twelve years’ experience with the automobile, I find that only one-third of the present-day owners understand the mechanical operation, care and proper upkeep of their cars; the other two-thirds know little or nothing of their cars, and are unable to locate or detect trouble, or make the slightest adjustment necessary to remedy it. This fact remains as the chief cause of the present high depreciation in cars, and the loss of millions of dollars annually to automobile owners.
After two years of observation and close investigation, I find the vast majority of the present owners are eager to acquire mechanical knowledge, but they have not accomplished their aim, chiefly because the available books to attain that end are too technical, dry, and overdescriptive for the average owner and beginner in mechanics.
The automobile is not an individually constructed piece of machinery, but a combination of individual inventions, each adapted to a functional purpose, which is necessary to the harmony of successful operation. A great many of these mechanical achievements are of delicate construction, and very apt to get out of adjustment. This, however, is not always the case, as grease, dirt and foreign matter with which the various parts come in contact often prevent them from operating properly.
Therefore a little common knowledge of operation and a little care will enable an owner to operate his car successfully, thereby avoiding unnecessary trouble, damage and expense.
One of the chief aims of the writer is to make this book interesting and thorough, in order to hold the reader until he understands the entire contents, after which he should be able to make any necessary repairs and adjustments, or to hold a position as automobile mechanic.
[viii]
In order to accomplish the foregoing and prevent a student from becoming discouraged we use functional principle as the base for explanation whenever possible.
The instructions set forth in this book are not taken merely from theory, but have been put into successful operation by the writer, who for several years sold cars in outlying districts where garage facilities were limited, and where it was necessary to make a mechanic of every purchaser in order to sustain the high reputation of the car sold. Later on his plan of instructions was used in an automobile school where he was chief instructor, and still later they were developed into a note system which he used in establishing an automobile school in the city of Toledo, Ohio.
The students turned out by this school were very efficient and successful, and finished the course in less than one-half the time usually required for the average automobile course.
This book was written during the twenty months that the writer spent in the U. S. Army, from the note system used in his automobile school.
F. B. S.
[ix]
| PAGE | ||
|---|---|---|
| Preface | v | |
| Introduction | vii | |
| INTRODUCTORY CHAPTER. | ||
| History of the Gasoline Engine and Early Automobile construction | 1 | |
| Purchasing a new car | 3 | |
| Purchasing a used car | 4 | |
| Selecting and testing a used car | 5 | |
| Driving instructions | 6 | |
| Road rules for city and country | 9 | |
| What to do in case of accident | 10 | |
| CHAPTER I. | ||
| Gasoline Engine Construction, and Parts | 12 | |
| The engine block castings, cylinders, pistons, connecting rods, bearings, crank shaft, cam shaft and fly-wheel. | ||
| CHAPTER II. | ||
| Valve Construction and Operation | 21 | |
| Valve construction. Types and operation of the valves in an 8-cylinder V-type engine. Valve locations and valve grinding. Valve care. | ||
| CHAPTER III. | ||
| The Operation of a 4-Cycle 4-Cylindered Gasoline Engine | 29 | |
| Explaining the cycle. The 4-, 6-, 8-, 12-cylindered engine—The Knight sleeve valve engine—S. A. E. Horse Power scale—Displacement-Engine charts—Lubrication oils and greases—Lubrication systems—Care—Cleaning—and adjusting of lubrication systems. | ||
| CHAPTER IV.[x] | ||
| Brief Treatise on Carburetion | 45 | |
| The Stromberg plain tube Model M carburetor. Principle of action—Installation—Adjustment and maintenance—Stromberg Model L adjustment. | ||
| CHAPTER V. | ||
| Nitro Sunderman Carburetor | 60 | |
| Principle of action, action of venturi, adjustment and general care. | ||
| The Schebler Model R carburetor, action and adjustment points. | ||
| CHAPTER VI. | ||
| Stewart Carburetor | 65 | |
| Principle of operation—Adjustment and maintenance. | ||
| CHAPTER VII. | ||
| Carter Carburetor | 70 | |
| Operating principle—Adjustment and care. | ||
| CHAPTER VIII. | ||
| Schebler Plain Tube Carburetor | 72 | |
| Operation—Instructions for installing, adjustment and maintenance. | ||
| CHAPTER IX. | ||
| Kerosene Carburetors | 76 | |
| Operating principle—Installation and adjustment. | ||
| CHAPTER X. | ||
| Heated Manifolds and Hot Spots | 79 | |
| Action—Advantage and design. | ||
| CHAPTER XI. | ||
| Cooling Systems | 82 | |
| Purpose of cooling system—Circulating systems—The force pump circulating system—Overheating—Radiator cleaning—Freezing—Freezing solutions—Radiator repairing—The air cooling system. | ||
| CHAPTER XII.[xi] | ||
| Muffler Construction | 86 | |
| Purpose—Advantage—Type—Assembly and Maintenance. | ||
| CHAPTER XIII. | ||
| Vacuum Systems | 89 | |
| Operating principle—Purpose of the air vent—Failure to feed gasoline to carburetor—Removing top—Cleaning gasoline strainer screen—Operating principle and general maintenance. | ||
| CHAPTER XIV. | ||
| Electrical Dictionary of Parts, Units and Terms | 95 | |
| Voltage—Amperage—Ohms—Current—Circuit—Low tension Current—High Tension Current—Induction coil—Commutator—Insulation—Shunt or choking coil—Fuse—Condenser—Dynamo—Voltaic cell—Accumulator—Storage battery—Electrolyte—Hydrometer—Ammeter—Circuit breaker—Switch—Generator—Regulator—Contact-breaker—Non-vibrating coil—Distributors. | ||
| CHAPTER XV. | ||
| The Magneto | 101 | |
| Parts—Assemblage—Operating principle. | ||
| CHAPTER XVI. | ||
| Bosch High Tension Magneto, Type ZR | 105 | |
| Operating principle—Primary or low tension circuit—Secondary or high tension circuit—Timing magneto gears—Timing magneto with engine—The condenser—Safety spark gap—Interrupter timing range—Cutting out ignition—Caution—Care—Maintenance. | ||
| CHAPTER XVII. | ||
| Magneto Washing, Repairing and Timing | 111 | |
| Magneto cleaning—Magneto repairing—Magneto assembling—Magneto timing to engine. | ||
| CHAPTER XVIII. | ||
| North East Ignition System | 114 | |
| Wiring ignition distributor—Ignition coil—Breaker box and distributor head assembly—Condenser—Breaker contacts—Breaker cam—Distributor head—Automatic spark advance mechanism—Manual spark control—Timing the distributor—General care. | ||
| CHAPTER XIX.[xii] | ||
| Atwater Kent Ignition Systems | 126 | |
| Type CC system—Operating principle—Setting or timing—Adjustment—Oiling—General care. | ||
| CHAPTER XX. | ||
| Atwater Kent Battery Ignition System | 132 | |
| Type K-2-Operating principle—Operation of contact maker—Contactless distributor—Wiring diagram of current flowage—Setting and timing the unisparker—Timing with engine—Automatic spark advance—Contact point adjustment—Oiling diagram—Condenser—Testing for ignition trouble. | ||
| CHAPTER XXI. | ||
| Philbrin Single Spark, and High Frequency Duplex Ignitioystems | 141 | |
| Operation of contact maker—Current induction—Duplex system—Duplex switch—Duplex switch action—Wiring diagram—Adjustment of contact points—General care. | ||
| CHAPTER XXII. | ||
| Electrical Starting and Lighting Systems | 147 | |
| The generator—The regulator—The automatic cut-out—One unit system—Two unit system—Three unit system—The starting motor—Lubrication—Maintenance. | ||
| CHAPTER XXIII. | ||
| Electric Lighting and Starting Systems | 154 | |
| Wiring diagram Bijur system—Operation of Bijur system—Starting motor—Operation of starting motor—Wiring circuits—Fuse—Ground fuse—Lamp controller—Oiling—Battery testing—General care. | ||
| CHAPTER XXIV. | ||
| North East Starter Used on Dodge Brothers’ Cars | 161 | |
| Model G starter-generator operation—Wiring diagram—Starter-generator action—Mounting—Drive—Charging rate adjustment—Fuse—Locating trouble—Starting switch and reverse current cut-out—Running with battery disconnected. | ||
| CHAPTER XXV.[xiii] | ||
| The Delco Electrical System | 167 | |
| Motoring the generator—Cranking the engine—Generating electrical energy—Diagram of motor generator operation—Lubrication—Ignition switch—Circuit breaker—Ignition coil—Distributor—Contact breaker and timer—Care. | ||
| CHAPTER XXVI. | ||
| Storage Battery | 180 | |
| Construction—Chemical action—Cells—Electrolyte solution—Battery charging—Care and maintenance—Hydrometer testing—Battery idle—Battery freezing—General care. | ||
| CHAPTER XXVII. | ||
| Spark Plugs and Care | 186 | |
| Type—Construction—Connections—Assembling—Repairing—Cleaning—General care. | ||
| CHAPTER XXVIII. | ||
| Clutch Construction, Type and Care | 189 | |
| Clutch operation—Gear shifting—Change speeds—Cone clutch—Cone clutch care—Cone clutch adjustment—Multiple disc clutch—Borg and Beck clutch—Borg and Beck clutch adjustment—Disc clutch cleaning, wet plate, dry plate—Cone clutch leather—Cone clutch leather patterns—Cutting—General care. | ||
| CHAPTER XXIX. | ||
| Transmissions, Types, Operation and Care | 198 | |
| Operation of—Planetary type—Progressive type—Selective type—Gear shifts—Unit-power-plant—Transmission cleaning—Lubrication—Care. | ||
| CHAPTER XXX. | ||
| Universal Joints | 204 | |
| Universal joints—Slip joints—Operation—Construction diagram—Tightening—Lubrication—Care. | ||
| CHAPTER XXXI. | ||
| Differential Gears | 207 | |
| Bevel gear action—Construction—Adjusting—Gearless differential—Action—Adjustment—Advantage—Worm gear drive differential—Operation—Adjustment—Lubrication—General care. | ||
| CHAPTER XXXII.[xiv] | ||
| Axle Types, Operation and Care | 212 | |
| Dead axles—The semi-floating axle—Adjustment—Lubrication—The full-floating axle—Construction—Adjustment—Lubrication—The I-beam front axle—The spindle—Steering knuckle—Care of all types. | ||
| CHAPTER XXXIII. | ||
| Brake Types, Operation and Care | 218 | |
| Brake adjustment—Brake re-lining—Brake care—Brake cleaning. | ||
| CHAPTER XXXIV. | ||
| Springs and Spring Care Tests | 223 | |
| Spring types—Spring lubrication—Weekly spring care—Bi-monthly spring care—Spring wrapping. | ||
| CHAPTER XXXV. | ||
| Alignment | 229 | |
| Wheel alignment—Lengthwise—Crosswise—Axle alignment—Lengthwise—Alignment tests—Mechanical alignment—Lengthening wheelbase. | ||
| CHAPTER XXXVI. | ||
| Steering Gears, Type and Construction | 232 | |
| Operation of worm and sector type—Adjustment of worm and sector type—Worm and nut type—Adjustment of worm and nut type—Rack and pinion type—Connections—Drag link—General care. | ||
| CHAPTER XXXVII. | ||
| Bearing Types, Use and Care | 236 | |
| Plain bearings—Bushings—Roller bearings—Flexible roller bearings—Radial ball bearings—Thrust ball bearings—End thrust—Double thrust—Cleaning—Care—Maintenance. | ||
| CHAPTER XXXVIII. | ||
| Car Arrangement | 243 | |
| Showing location and names of parts—Adjustment—General care. | ||
| CHAPTER XXXIX. | ||
| Overhauling the Car | 247 | |
| Instructions showing how to go about it—And how to give the car a thorough overhauling. | ||
| CHAPTER XL.[xv] | ||
| Repair Equipment | 251 | |
| Road repair necessities—Shop repair necessities. | ||
| CHAPTER XLI. | ||
| Car Cleaning, Washing and Care | 253 | |
| Body construction—Body washing—Running gear washing—Engine cleaning—Cleaning upholstering—Rug cleaning—Windshield cleaning—Sedan or closed body cleaning—Tire cleaning—Rim cleaning—Light lens cleaning—Caution. | ||
| CHAPTER XLII. | ||
| Tires, Build, Quality and Care | 256 | |
| Tire care—Tire chains—Cross chains—Tube care—Tube repairing—Tire and tube storage. | ||
| CHAPTER XLIII. | ||
| Electrical System | 259 | |
| General overhauling and tuning hints. | ||
| CHAPTER XLIV. | ||
| Automobile Painting | 262 | |
| CHAPTER XLV. | ||
| Carbon Removing | 263 | |
| Trouble Hints | 264 | |
| FORD SUPPLEMENT. | ||
| I | The car—its operation and care | 269 |
| II | The Ford Engine | 277 |
| III | The Ford Cooling System | 287 |
| IV | The Gasoline System | 290 |
| V | The Ford Ignition System | 295 |
| VI | The Ford Transmission | 301 |
| VII | The Rear Axle Assembly | 307 |
| VIII | The Ford Muffler | 310 |
| IX | The Ford Running Gear | 311 |
| X | The Ford Lubrication System | 316 |
| XI | Care of Tires | 320 |
| XII | Points of Maintenance | 323 |
| XIII | The Ford One Ton Truck | 325 |
| XIV | The F. A. Starting and Lighting System Installed on Sedans and Coupés | 328 |
| Index | 335 | |
| FIGURE | PAGE | |
|---|---|---|
| 1. | Typical Four-Cylinder Block | 13 |
| 2. | Cylinder Block with Head Removed | 13 |
| 3. | Removable Cylinder Head (Reversed) | 14 |
| 4. | Typical Cylinder Piston | 15 |
| 5. | Typical Piston Ring | 15 |
| 6. | Typical Connecting Rod | 16 |
| 7. | Counter-Balanced Crank Shaft | 17 |
| 8. | 5-M-B Crank Shaft | 17 |
| 9. | Cam Shaft | 18 |
| 10. | Flywheel | 19 |
| 11. | 8-Cylinder Valve Arrangement | 22 |
| 12. | Poppet Valve | 23 |
| 13. | Valve Types, Location and Operation | 24 |
| 14. | Valve Timing Marks | 25 |
| 15. | Knight Valve-Timing Marks—4-Cylinder | 27 |
| 16. | Knight Valve-Timing Marks—8-Cylinder | 28 |
| 17. | 4-Stroke Cycle | 29 |
| 18. | Diagram of Action, 4-Cylinder 4-Cycle Engine | 31 |
| 19. | Power Stroke Diagram | 32 |
| 20. | Buick Engine—Parts Assembly | 36 |
| 21. | Buick Engine—Location Inside Parts Assembly | 37 |
| 22. | Buick Motor—End View | 38 |
| 23. | Liberty U. S. A. Engine | 39 |
| 24. | Splash Oiling | 41 |
| 25. | Plunger Pump Oiling System | 42 |
| 26. | Stromberg Model M Carburetor—Sectional View | 46 |
| 27. | Stromberg Carburetor Model M—Air Bleeder Action | 47 |
| 28. | Stromberg Carburetor Model M—Accelerating Well | 49 |
| 29. | Stromberg Carburetor Model M—Idling Operation | 51 |
| 30. | Stromberg Carburetor—Throttle 1⁄5 Open | 52 |
| 31. | Stromberg Carburetor—Throttle Wide Open | 53 |
| 32. | Stromberg Model M—Adjustment Points | 55 |
| 33. | Stromberg Model “L”—Adjustment Points[xviii] | 58 |
| 34. | Sunderman Carburetor | 60 |
| 35. | Sunderman Carburetor | 61 |
| 36. | Sunderman Carburetor | 62 |
| 37. | Sunderman Carburetor | 63 |
| 38. | Schebler Model R Carburetor Assembled | 64 |
| 39. | Stewart Carburetor | 66 |
| 40. | Carter Carburetor | 70 |
| 41. | Schebler Carburetor Model Ford A—Sectional View | 72 |
| 42. | Schebler Carburetor Model Ford A—Adjustment Points | 73 |
| 43. | Holley Kerosene Carburetor | 76 |
| 44. | Holley Kerosene Carburetor Installment | 77 |
| 45. | Hot Spot Manifold | 79 |
| 46. | Holley Vapor Manifold—Ford Cars | 80 |
| 47. | Thermo-Syphon Cooling System | 82 |
| 48. | Muffler—Three Compartment | 86 |
| 49. | Muffler | 87 |
| 50. | Vacuum System—Top Arrangement | 89 |
| 51. | Vacuum System Installation | 90 |
| 52. | Vacuum System Diagram—Stewart Warner | 91 |
| 53. | Vacuum System—Inside View of Parts | 94 |
| 54. | Coil Diagram | 96 |
| 55. | Dynamo—Diagram of Action | 98 |
| 56. | Magnets—Pole Blocks | 101 |
| 57. | Armature Core—Wound Armature | 102 |
| 58. | Primary and Secondary Winding and Current Direction | 102 |
| 59. | Breaker—Slip Ring—Distributor | 103 |
| 60. | Bosch M Distributor and Interruptor—Housing Removed | 106 |
| 61. | Wiring Diagram Bosch Magneto, Type ZR-4 | 107 |
| 62. | Wiring Diagram, North-East System—on Dodge Car | 115 |
| 63. | North-East Distributor—Model O—Ignition | 116 |
| 64. | North East Breaker-Box | 118 |
| 65. | Automatic Spark Advance Mechanism—North East | 121 |
| 66. | Atwater Kent Circuit Diagram—Type C. C. | 127 |
| 67. | Atwater Kent Contact Breaker—Type C. C. | 128 |
| 68. | Atwater Kent Distributor and Contactless Block | 128 |
| 69. | Distributor Wire Connections to Distributor[xix] | 129 |
| 70. | Atwater Kent Type C. C. Wiring Diagram | 130 |
| 71. | Atwater Kent Contact Breaker—Diagram of Action—Type K-2 System | 133 |
| 72. | Atwater Kent Contact Breaker—Diagram of Action—Type K-2 System | 133 |
| 73. | Atwater Kent Contact Breaker—Diagram of Action—Type K-2 System | 134 |
| 74. | Atwater Kent Contact Breaker—Diagram of Action—Type K-2 System | 134 |
| 75. | Atwater Kent Distributor and Contactless Block | 135 |
| 76. | Atwater Kent Wiring Diagram Type K-2 | 136 |
| 77. | Atwater Kent K-2 Wiring | 137 |
| 78. | Atwater Kent Automatic Spark Advance Mechanism—A-K Type K-2 | 138 |
| 79. | Atwater Kent Contact Breaker—Oiling Diagram—A-K Type K-2 | 139 |
| 80. | Philbrin Contact Maker—Point Adjustment | 141 |
| 81. | Philbrin Contact Maker and Distributor Blade | 142 |
| 82. | Switch Case | 143 |
| 83. | Duplex High Frequency Switch | 144 |
| 84. | Philbrin Wiring Diagram | 145 |
| 85. | Bijur 2-V System Mounted on Hupmobile Engine | 149 |
| 86. | Bijur Starter Mechanism Showing Action | 151 |
| 87. | Bijur Starter Mechanism Showing Action | 152 |
| 88. | Wiring Diagram Model N—Hupmobile | 153 |
| 89. | Wiring Diagram—Jeffrey-Chesterfield Six | 155 |
| 90. | Wiring Diagram—Jeffrey Four | 158 |
| 91. | Hydrometer Syringe | 159 |
| 911⁄2. | Dodge Wiring Diagram | 162 |
| 92. | North East Model G Starter Generator | 164 |
| 93. | Delco Motor Generator—Showing Parts | 168 |
| 94. | Delco Motor Generator—Diagram of Operation | 170 |
| 95. | Delco Ignition Switch Plate | 173 |
| 96. | Delco Ignition Switch Circuit Breaker—Mounted | 173 |
| 97. | Delco Ignition Coil | 175 |
| 98. | Delco Wiring Diagram—Buick Cars | 176 |
| 99. | Delco Ignition Distributor | 177 |
| 100. | Delco Ignition Contact Breaker and Timer | 178 |
| 101. | Storage Battery, Sectional View | 180 |
| 102. | Storage Battery, Sectional View[xx] | 182 |
| 103. | Hydrometer Syringe | 183 |
| 104. | Spark Plug | 187 |
| 105. | Cone Clutch and Brake | 190 |
| 106. | Multi-Disc Unit Power Plant, Clutch and Transmission | 192 |
| 107. | Borg and Beck Clutch | 193 |
| 108. | Cone Clutch Leathers—Pattern—Cutting | 196 |
| 109. | Friction Transmission | 199 |
| 110. | Selective Type of Gear Shifts | 200 |
| 111. | Sliding Gear Transmission—Sectional View | 201 |
| 112. | Clutch and Transmission Assembly—Unit Power Plant | 203 |
| 113. | Slip Joint and Universal | 204 |
| 114. | Universal Joint Construction Diagram | 205 |
| 115. | Differential Action Diagram | 207 |
| 116. | Differential Assembly | 208 |
| 117. | Differential Adjusting Points | 209 |
| 118. | Allen Gearless Differential | 210 |
| 119. | Semi-Floating Rear Axle | 213 |
| 120. | Full-Floating Axle—Wheel-End Arrangement | 214 |
| 121. | Full-Floating Axle | 214 |
| 122. | Steering Knuckle and Front Axle Parts | 215 |
| 123. | I-Beam Front Axle | 216 |
| 124. | Brake—Types and Adjustment | 219 |
| 125. | Brake—Showing Toggle Arrangement | 220 |
| 126. | Transmission Brake—Equalizer | 220 |
| 127. | Brake—Arrangement and Adjustment—“Buick” | 221 |
| 128. | 1⁄2-Elliptical Front Spring | 226 |
| 129. | Full-Elliptic Spring | 226 |
| 130. | 3⁄4-Elliptical Rear Spring | 227 |
| 131. | Platform Spring | 227 |
| 132. | Cantilever Spring, Front | 228 |
| 133. | Cantilever Spring, Rear | 228 |
| 134. | Wheel Alignment Diagram | 230 |
| 135. | Worm and Sector Steering Gear | 233 |
| 136. | Worm and Nut Steering Gear | 234 |
| 137. | Rack and Pinion Type Steering Gear | 234 |
| 138. | Steering Wheel | 235 |
| 139. | Plain Bearings or Bushings | 236[xxi] |
| 140. | Shims | 237 |
| 141. | Bock Roller Bearing | 237 |
| 142. | Hyatt Roller Bearing | 238 |
| 143. | Double Row Radial Ball Bearing | 239 |
| 144. | Double Row Thrust Bearing | 241 |
| 145. | End Thrust Bearing | 241 |
| 146. | Car Arrangement | 245 |
| 147. | Ford Motor—Sectional View | 278 |
| 148. | Ford Motor—Valve and Cylinder Assembly | 279 |
| 149. | Ford Fuel System | 290 |
| 150. | Ford Transmission Assembly | 303 |
| 151. | Ford Rear Axle System | 308 |
| 152. | Ford Brake | 309 |
| 153. | Ford Spindle | 311 |
| 154. | Ford Chassis Oiling Chart | 317 |
[1]
THE AUTOMOBILE OWNER’S GUIDE
A great many experiments were conducted with the explosive type of motor between 1840 and 1860. These motors were very heavy and crude affairs and furnished little or no power. They were either abandoned or given up by those conducting the experiments, and had all but disappeared in the later 50’s. The chief difficulties that they could not overcome were, the finding of a suitable and combustible fuel, a way to distribute it to the explosion chambers in proper proportion, and a device to ignite it at the proper time. Many of these early inventions used coal tar gases and gunpowder as fuel.
The first designs for an internal combustion engine of the four stroke cycle type were devised in 1862 by M. Beau de Rochas. These designs were taken in hand by a German by the name of Otto, and many experiments were conducted by him and two other Germans, Daimler and Benz, which resulted in a fairly successful engine. The Otto Gas Engine Co., of Deutz, Germany, was then formed with Daimler as general manager. Experiments were carried on which resulted in many improvements, such as valve adjusting and electrical spark ignition. Many other smaller improvements were worked out which overcame many of the difficulties of the former and cruder devices.
[2]
The first gas engines were all of the single cylinder type, very heavily constructed and produced from three to five horse power. In 1886, Daimler conceived the idea of constructing the multiple type of engine with water-jacketed cylinders. Benz also completed a very successful motor in the late fall of 1886, which embodied the water cooling idea. The practical beginning of the gas engine as a factor in vehicle propulsion began in the fall of 1886, when Daimler applied his motor to a two-wheeled contrivance, which greatly resembled our present-day motorcycle. While this machine ran, it was not considered a very great success. Benz in the early part of 1887, connected his motor to a three-wheeled vehicle with which he was able to travel at the rate of three miles per hour.
The real beginning of the present-day automobile took place in Paris, France, in 1890, when M. Panhard secured the patent rights from Daimler to use his engine. He then built a four-wheeled vehicle, which carried some of the ideas of present-day construction, such as a steering device and brakes. To this he applied his engine and was able to travel at the rate of six miles per hour. In 1891 Peugeot Frères completed their vehicle and installed a Benz engine. This vehicle or car, as it was then called by the French government on account of its being mechanically driven, was able to make from seven to eight miles per hour.
The perfecting of the automobile was hampered very much between the years 1891 and 1898 by stringent laws that had been enacted by the French government, which all but prohibited the driving of a car on the public thoroughfare.
The first American-made automobile of the gas propelled type was completed in the year 1892 by Charles Duryea. This car embodied many of our present-day ideas but was very lightly constructed and under-powered.
In 1893 another car made its appearance in America. This car was built by Edward T. Haynes and was the beginning of the present-day Haynes’ line of famous cars.
[3]
The first automobile club was organized in Paris, France, in the year 1894 with the Marquis de Dion as president. The purpose of this club was to secure a reformation of the laws that had been enacted when the automobile made its first appearance on the public thorough-fare, and to make laws and rules to govern automobile racing.
At that time it was necessary when driving on a public highway to have some one run seventy-five feet in advance of a car waving a red flag, and to shout a warning at street intersections. These stringent laws, however, were repealed by the government through influential aid brought to bear on it by the automobile club assisted by the rapid progress of the automobile industry.
When you are going to buy a new car go about it in this manner and protect your investment.
First.—Choose the car that suits you best in regard to cost, operation, and appearance.
Second.—Inquire as to the financial status of the manufacturer. If there is anything wrong with the car, or the management of the company, it will show up here.
Third.—Orphaned cars may run as well and give as good service as anybody could ask for, but when a company fails or discontinues to manufacture a model, the car immediately loses from one-third to one-half of its actual value. That is, providing you wish to trade it in or sell it as a used car.
Fourth.—What kind of service does the agency in your vicinity give? Do they take any interest in the cars they sell after they are in the hands of the purchaser?
Fifth.—The amount of interest taken in your purchase by the agent or service station usually determines the amount of depreciation at the end of the season.
Sixth.—If you are purchasing your first car some little adjustments will be required, and conditions will arise that require[4] understanding and attention. You, therefore, must acquire either a functional and mechanical knowledge of the operation, or depend on the agent or service station for help.
Seventh.—You will probably say that you can get along without such help. You probably can, but what will be the results? Will you be required to stand a loss in the long run resulting from excessive repair bills and depreciation which could have been prevented to a great extent?
Eighth.—Remember that an agent can fool you when you are buying, but that you cannot fool him if you wish to sell or trade in.
Ninth.—Remember that this book, The Automobile Owners’ Guide, was written to assist you in just such cases as we have presented, and that by spending a little time in study you can acquire a working knowledge of your car, and become independent of the service station and the agent, which will result in a big saving in both repair bills and depreciation.
The question is often asked, Does it pay to invest money in a second-hand car? The answer may be either yes or no, and depends entirely upon the condition of the car.
For example, A and B purchase a new car at the same time. A is rather conservative. He is also a careful driver and gives his car the best of attention. B is a careless driver and pays little or no attention to adjustments and lubrication.
A has seen to proper lubrication and has kept the parts properly adjusted and tightened up, and his careful driving has kept the alignment in perfect condition. His car at the end of the first season requires a little overhauling which will put it in as good condition as it was when it was new as far as service is concerned, and it is worth 85 to 90 per cent of its original value.
B has not seen to proper lubrication and has allowed his[5] motor to overheat. The cylinders and pistons are scored and worn, and the valves are warped and do not seat properly. He drove into deep ruts and chuck-holes, and bumped into curbs and posts while turning around. His axles and wheels are out of line; the frame and all the running parts which it supports are out of alignment. Overhauling will not put this car in A-1 condition, and it is not worth more than 30 per cent. of the original cost price. It would be a poor investment at any price to an owner who is buying it for his own use.
Selecting and Testing a Used Car.—First.—If you are buying from a dealer who trades in cars, judge his statement of the condition of a car according to his ability as a mechanic and according to his reputation for accuracy. If you are buying from a reputable used car dealer his word can usually be taken as a correct statement of conditions as his business depends upon the accuracy of his statements and he knows the condition of a car before he buys it.
Second.—See the former owner. Get his statement of the condition of the car and the care it has had, and judge it by his appearance, and the general appearance of his home and property.
Third.—If the car is listed as Rebuilt or Overhauled, see if the oil-pan, differential, and transmission covers have been removed. If this has been done the old grease will either have been cleaned off or show marks of the removal. If these marks are found the proper adjustments and replacements have probably been made.
Fourth.—Don’t judge the mechanical condition of a car by its outward appearance.
Fifth.—Examine the tires and figure the cost of replacement if any are found in poor condition.
Sixth.—Jack up the front axle and test the wheels for loose or worn bearings.
Seventh.—Grasp the wheel at the top and bottom and wiggle it to determine whether the spindle bolts or steering device connections are worn.
[6]
Eighth.—Jack up the rear axle, set the gear shift-lever into high-speed, move the wheel in and out from the bottom to discover worn bearings, and move the wheel, forward and backward, to determine the amount of back-lash in the differential and universal joints.
Ninth.—Test the compression of the cylinders while the engine is cold using the hand crank. If one cylinder is found weak, a leak exists and the escaping compression can be heard.
Tenth.—Run the motor until it is warm. If any weakness in compression is noticeable the cylinders are probably scored, or the rings may be worn. The valves may also be warped, thereby preventing them from seating properly.
Eleventh.—Examine the shoulders of the cross-members supporting the engine, radiator, or transmission to see if they are cracked or broken.
Twelfth.—The battery may have deteriorated through improper attention. Test the solution with a hydrometer. If it is found well up, it can be passed as O. K.
Thirteenth.—Don’t judge the condition of the car by the model, as a two or three-year-old model may be in better mechanical condition than a six-month or year-old model.
A new driver should remain cool and take things in a natural way as a matter of course. There is nothing to get nervous or excited about when learning to drive a car. Any one can master the art of driving quickly by remaining cool and optimistic.
First.—Acquire some definite knowledge of the operation of the engine and its accompanying devices.
Second.—Have some one explain the operation of the accelerator, spark, and throttle levers.
Third.—Study the relative action of the clutch and gear-shifting pedal.
[7]
Fourth.—The new driver takes the wheel and assumes a natural and calm position with the muscles relaxed.
Fifth.—He adjusts the motor control levers. The throttle lever is advanced one-fourth its sliding distance on the quadrant. The spark lever is set to one-half the sliding distance on the quadrant.
Sixth.—Push the ignition-switch button, IN, or ON, and press the starter button, letting it up as soon as the engine begins to fire.
Seventh.—Not all gear-shifts are marked, consequently it is a good idea to let the new driver feel out the different speed changes. This is accomplished by pushing out the clutch and placing the shift-lever into one of the four slots. Now let up the clutch pedal until it starts to move the car, continue the feeling-out process until the reverse speed gear is located, and at this point impress on him that first and reverse speeds, are always opposite each other, lengthwise either on the right or left side of neutral, while second speed is always crosswise opposite reverse, and high-speed is opposite first on the other side of neutral.
Eighth.—Starting the car with engine running, advance the spark-lever three-fourths the distance on the quadrant, advance the throttle until the engine is turning over nicely (not racing). Place one hand on the steering-wheel and with the other grasp the gear-shift-lever, push in the clutch pedal, hold it for five seconds, in order that the clutch brake may stop rotation. Place the shift-lever into the first-speed slot and let up on the clutch pedal. The car should be driven four or five hundred feet on this speed until the driver acquires the “nack” of steering.
Ninth.—To shift to second speed advance the gas throttle until the car gathers a smooth rolling motion, press in the clutch pedal and allow three to five seconds for the brake to retard the speed of the clutch, then shift the lever to second speed and release the clutch pedal easily.
Tenth.—To shift into high-speed retard the throttle lever a trifle (to prevent the engine from racing), throw out the[8] clutch and shift the lever into the high-speed slot. Perform these operations slowly but without hesitation.
Eleventh.—To shift to reverse speed go through the same operation that you followed when first was used, except that the shift-lever is placed in the reverse slot.
Twelfth.—The reverse speed-gear is never engaged unless the car is at a “stand-still,” as this gear turns in an opposite direction.
Thirteenth.—Always test the emergency brake lever and the speed shift-lever, to be sure that they are in a neutral position before starting the engine.
Fourteenth.—Remember that in case of emergency the car can be stopped quickly by pushing in both foot-pedals. Pressure on the clutch pedal disconnects the engine from the car, while pressure on the “foot” or service brake pedal, slows up the motion of the car and will bring it quickly to a stand-still.
Fifteenth.—Always push the clutch out when using the service brake to check the rolling motion of the car.
Sixteenth.—When you wish to stop the car and motor kick out the clutch and hold it in this position while you stop the rolling motion of the car with the service brake and shift the gears to neutral. Then set the emergency brake and turn off the switch to stop the motor.
If the engine cannot take the car up a steep grade in low speed (due to defective motor or gravity fuel feed) stop, engage reverse speed, turn off the ignition switch, and let the car back down to level or a place where you can turn around, and back up the hill. The reverse speed is geared from one and a half to two times lower than first speed.
Nineteen.—To stop the back wheels from skidding turn the front wheels in the direction which the back wheels are sliding and release the brakes. Turning away or applying the brakes adds momentum to the sliding motion.
Twenty.—If for any reason you must or cannot avoid driving into the ditch unless the ditch is very shallow, turn the car directly toward the opposite bank. The front or rear[9] springs will lodge in the bank and prevent the car from rolling over and crushing the occupants, and the car can be drawn out more easily from this position.
1.—Be courteous to all whom you meet and give your assistance if necessary.
2.—When encountering a bad stretch of road, with the track on your side, don’t drive in and force another machine coming towards you to get out of the track. WAIT.
3.—Never block a track. In case you wish to stop and talk to some one, drive to one side.
4.—Keep on the right hand side of the road at all times, whether moving or standing, except as prescribed in Paragraph 5.
5.—In passing vehicles traveling in the same direction, always pass on the left and blow the horn.
6.—In passing a vehicle that has just stopped, slow down and sound the horn.
7.—In changing your direction, or stopping, always give the appropriate hand signal.
8.—Hand signals, straight up or up on 45° angle, STOP. Straight out or horizontal, TURNING TO THE LEFT. Down at an angle of 45°, TURNING TO THE RIGHT.
9.—The distance between vehicles outside of towns and cities, 20 yards; between vehicles passing through towns and cities, 5 yards; between vehicles halted at the curb, 2 yards.
10.—Bring all vehicles under easy control at street and road intersections.
11.—A maximum driving speed should not exceed 7 miles in business sections of cities, 15 miles in residential sections, 25 miles on country roads.
12.—Form the habit of slowing down and looking both ways before crossing tracks.
13.—Always pass a street car on the right side.
14.—Always stop 8 feet from a street car when passengers[10] are getting off, unless there is a safety zone, then drive slowly.
15.—Never drive over the side-walk line while waiting for signal of traffic officer.
16.—Notify traffic officer which way you wish to turn with hand signal.
17.—Always stop and wait for an opening when driving from a side street or road into a main thoroughfare.
18.—Make square turns at all street corners unless otherwise directed by traffic officer.
19.—If you wish to turn from one street into another wait until the traffic officer gives the straight ahead signal, then give the appropriate signal to those in the rear.
20.—Always drive near the curb when you wish to turn to the right, and to the right of the center line of the street when you wish to turn to the left.
21.—Drive straight ahead at 42nd St. and 5th Ave., N. Y., and at Market and Broad St., Newark, N. J. These corners handle more traffic than any two corners in the United States. No turns are made at either corner.
22.—Exercise care not to injure road ways.
23.—Do not damage improved roads by the use of chains when unnecessary.
24.—In case the car is not provided with chains, rope wrapped around the tires will make a good substitute.
25.—In case of fire, do not try to put it out with water as the gasoline will only float and spread the fire. Use a fire extinguisher or smother with sand or with a blanket.
1.—In case of injury to person or property stop car and render such assistance as may be needed.
2.—Secure the name of person injured or of owners of said property.
3.—Secure names and addresses of witnesses to the accident.
4.—Draw diagram of streets as shown in Fig. A. Show[11] relative positions of the colliding vehicles and the object of pedestrian just before the accident.
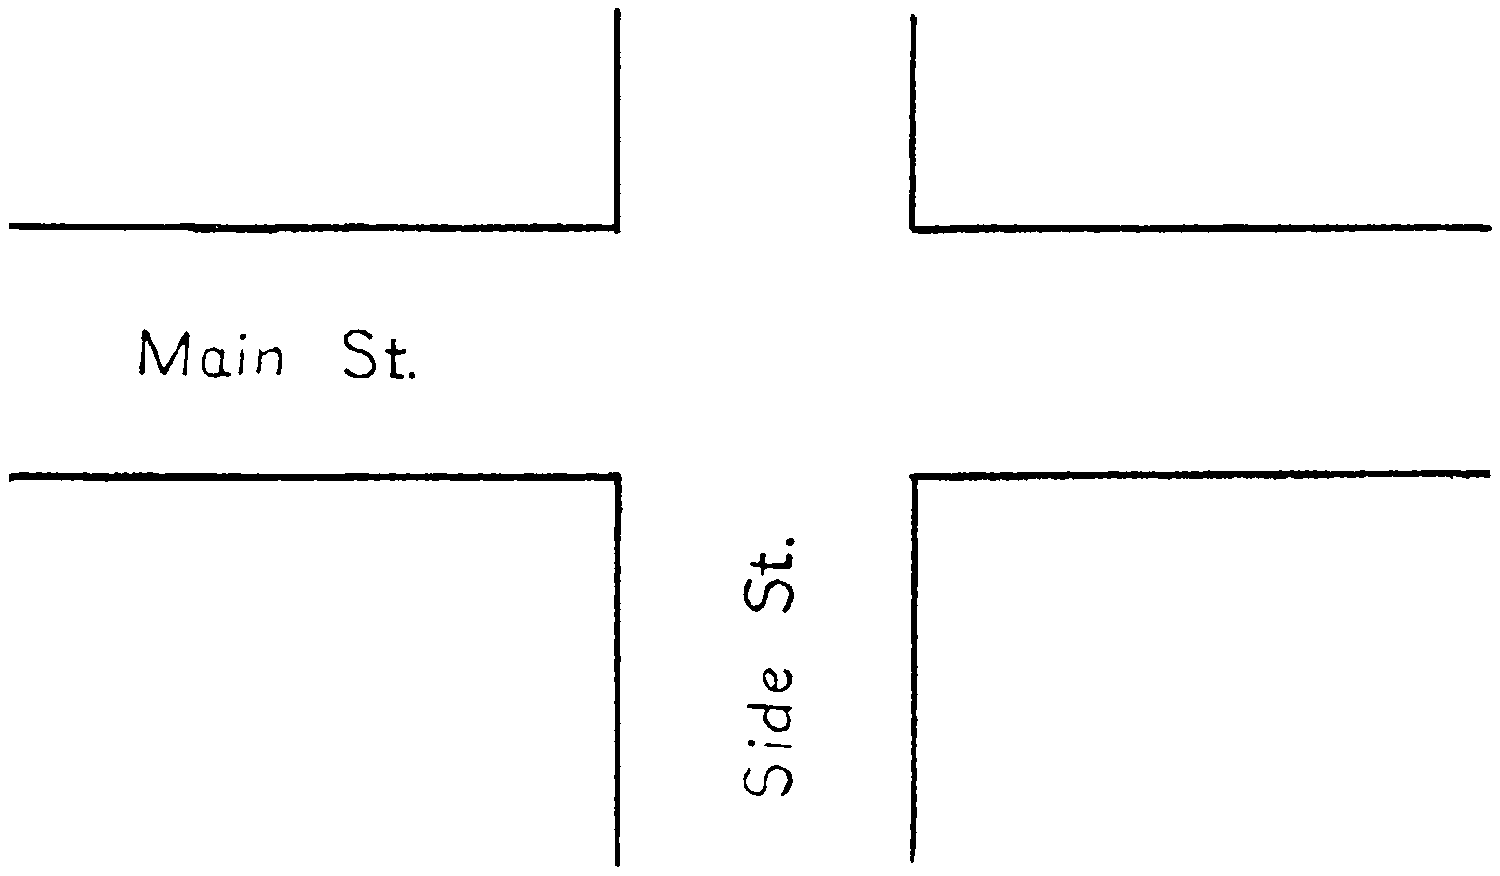
Fig. A. Street Intersection
5.—Label streets and every object depicted and add measurements and line showing course followed by vehicles, etc., and any explanatory statements which would aid an understanding of the occurrence.
6.—File this report at police headquarters.
[12]
We will use for purposes of illustration the common four-cylinder, four cycle, cast en bloc, “L”-head type of motor, as this type is used probably by 90% of the automobile manufacturers. The block of this type of motor is cast with an overlapping shoulder at the upper left hand side which contains a compartment adjoining the combustion chamber in which the intake and exhaust valves seat, and the casting is made, in the shape of the Capital letter L turned upside down. This arrangement allows both valves to seat in one chamber and to operate from one cam shaft.
The operation of each cylinder is identically the same whether you have a one or a many cylindered motor, consequently when you have gained a working knowledge of one cylinder, others are a mere addition. This may sound confusing when the eight or twelve cylindered motor is mentioned, but is more readily understood when we consider the fact that an eight or twelve cylindered motor is nothing more than two fours or two sixes, set to a single crank-case or base in V-shape to allow the connecting rods of each motor to operate on a single crank shaft. This arrangement also allows all the valves to operate from a single cam shaft, thereby making the motor very rigid and compact, which is an absolute necessity considering the small space that is allowed for the motor in our present-day designs.
Fig. 1. The casting or block, which is the foundation of the whole motor or engine, usually has a removable head which allows for easy access to the pistons and valves. The block is cast with a passage or compartment through the head[13] and around the cylinders through which water circulates for cooling the adjoining surfaces of the cylinders. This alleviates the danger from expansion and contraction caused by the tremendous heat generated in and about the combustion chambers. This block also contains the cylinders and valve seats. The pistons and valves are fitted to their respective positions as construction progresses.
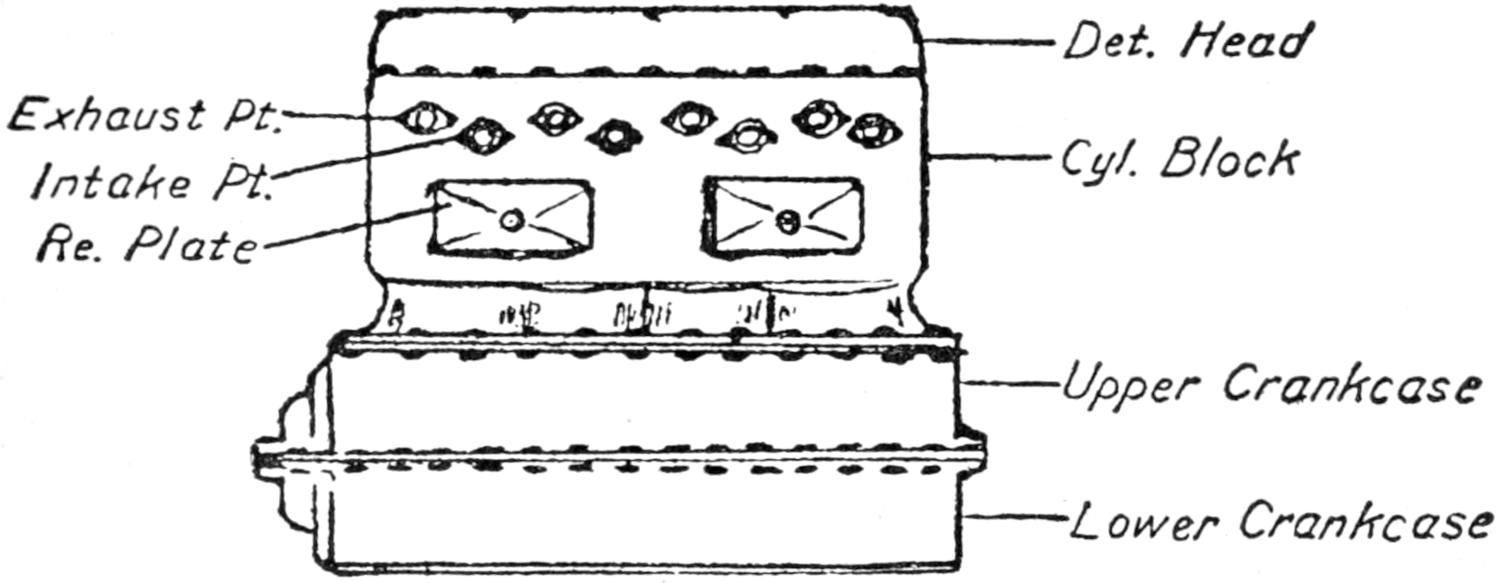
| Det. Head | |
| Exhaust Pt. Intake Pt. Re. Plate |
Cyl. Block |
| Upper Crankcase | |
| Lower Crankcase |
Fig. 1. Typical Four-cylinder Block
Fig. 2. The block with head removed shows the smooth flush surface of the block face and the location of the cylinders in which the pistons operate or slide, with each power impulse or explosion. When the piston is at its upper extreme it comes within a sixteenth of an inch of being flush with the top of the block, while the valves (also shown in Fig. 2) rest on ground-in seats, in their respective chambers, and are operated by a stem which extends downward from the head through a guide bushing in the block to the cam shaft.

Pistons
Water Vents
Intake Valve
Exhaust Valve
Fig. 2. Cylinder Block With Head Removed
[14]
The location of the water vents is also shown, through which water is circulated to prevent the cylinders from overheating which would cause the pistons to “stick” from expansion.
Fig. 3. The top or head of the motor is removed, exposing the combustion chambers. These chambers must be absolutely air-tight as the charge of gas drawn in through the inlet valve is compressed here before the explosion takes place, and low compression means a weak explosion, which causes the motor to run with an uneven-jumpy motion, and with an apparent great loss of power. A copper fiber insert gasket is placed between the top of the block and the head before it is bolted down. This gasket prevents any of the compression from escaping through unevenness of the contact surfaces, as metal surfaces are prone to warp when exposed to intense heat. It is necessary to turn the bolts in the head down occasionally, as the heat causes expansion. The following contraction, which loosens them, results in a loss of compression and a faulty operation of the motor.

Combustion Chamber
Spark Plug Vent
Water Circulating Vent
Bolt Holes
Fig. 3. Removable Cylinder Head (Reversed)
The spark-plug vents through the head are usually located directly over the piston although in some cases they are over the valve head and in some motors which are cast without a removable head they may be at one side of the combustion chamber. The location of the spark-plug does not materially affect the force of the explosion, although when it is located directly over the piston a longer plug may be used, as the pistons do not come up flush with the top of the block, and a spark-plug extended well into the combustion chamber will not become corroded with carbon or burnt oil as is usually[15] the case with a plug which does not extend beyond the upper wall surface of the combustion chamber.
Fig. 4. The plunger or piston is turned down to fit snugly within the cylinder and is cast hollow, with two shoulders extending from the inside wall.

| Head Ring Wrist Pin Oil Ring |
Ring Groove Bushing Wrist Pin Set Screw Ring Groove |
Set Screw Bushing Wrist Pin |
Fig. 4. Typical Cylinder Piston
Fig. 4A shows a split piston. Three grooves are cut into it near the head to receive the piston rings. The width and depth of these grooves vary according to the size of the piston. A hole is bored through the piston and shoulders about half way from each end. The bushing or plain bearing shown in Fig. 4B is pressed into this hole and forms a bearing for the wrist pin also shown in Fig. 4B. Wrist pins are usually made of a much softer metal than the bearing, and are subjected to severe duty, which often causes them to wear and produce a sharp knock; this may be remedied by pressing out the pin, giving it a quarter turn, and replacing it in that position.
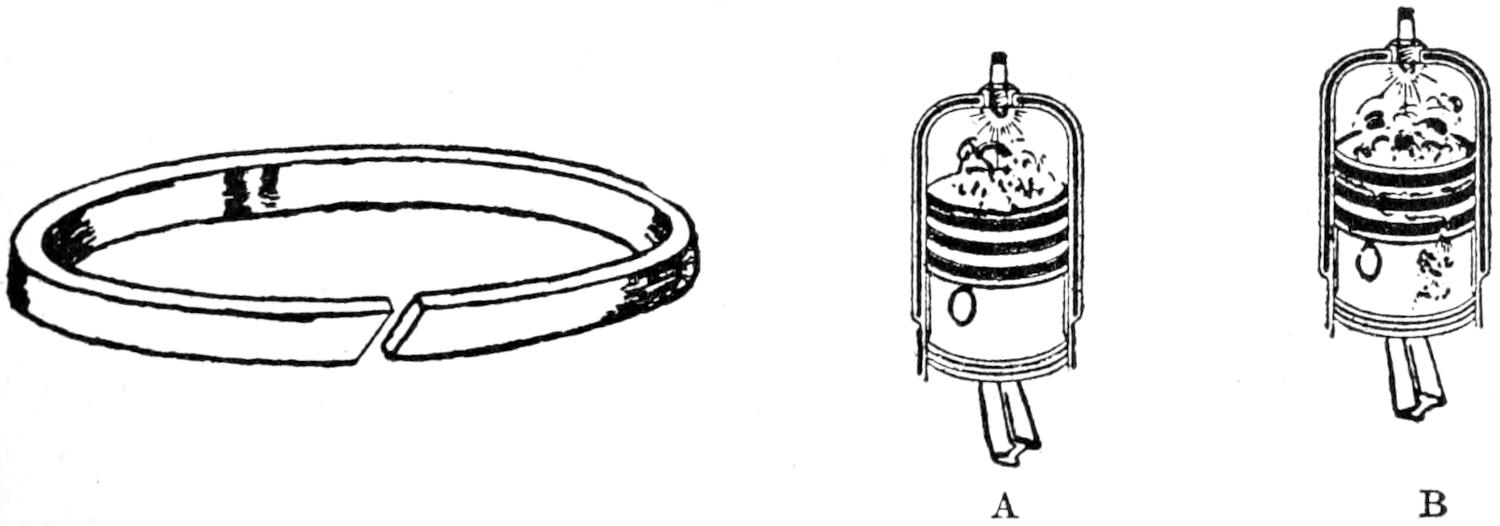
Fig. 5. Typical Piston Ring
Fig. 5 shows a split joint piston ring. Piston rings are usually made from a high grade gray iron, which fits into the grooves in the piston and springs out against the cylinder walls, thereby preventing the compressed charge of gas from escaping down the cylinder, between the wall and the piston.[16] Fig. 5A shows a piston equipped with leak-proof rings; this type of piston ring has overlapping joints, and gives excellent service, especially when used on a motor which has seen considerable service. Fig. 5B illustrates how piston rings may line up, or become worn from long use, or from faulty lubrication. This trouble may be easily detected by turning the motor over slowly. The escaping charge can usually be heard and the strength required to turn the motor will be found much less uniform on the defective cylinder.
The motor should be overhauled at least once every year, and by applying new rings to the pistons at this time new life and snappiness may be perceived at once.
The connecting rod shown in Fig. 6 has a detachable or split bearing on the large end, and takes its bearing on the crank pin of the crank shaft. The small or upper end may have either a hinge joint or press fit to the wrist pin. This rod serves as a connection and delivers the power stroke from the piston to the crank shaft. These rods are required to stand very hard jars caused by the explosion taking place over the piston head. The bearings are provided with shims between the upper and lower half for adjusting. Piston or connecting rod bearings must be kept perfectly adjusted to prevent the bearings from cracking or splitting which will cause the rod to break and which may cause considerable damage to the crank case.

| Wrist Pin Bearing | Upper Half Crank Pin Bearing |
Lower Half Bearing End Overlaps |
| Shims | ||
| Bolts | ||
| BushingRod | Shims | |
Fig. 6. Typical Connecting Rod
Fig. 7 shows a counter balanced crank shaft. This type[17] of crank-shaft is provided with weights which balance the shaft and carry the momentum gathered in the revolution.

| Rear Main Bearing | Weight | Center Main Bearing |
Front Main Bearing |
| Fly Wheel Attached to this Ring |
Timing Gear Attached Here |
||
| Crank Pin | Crank Pins | ||
Fig. 7. Counter-Balanced Crank Shaft
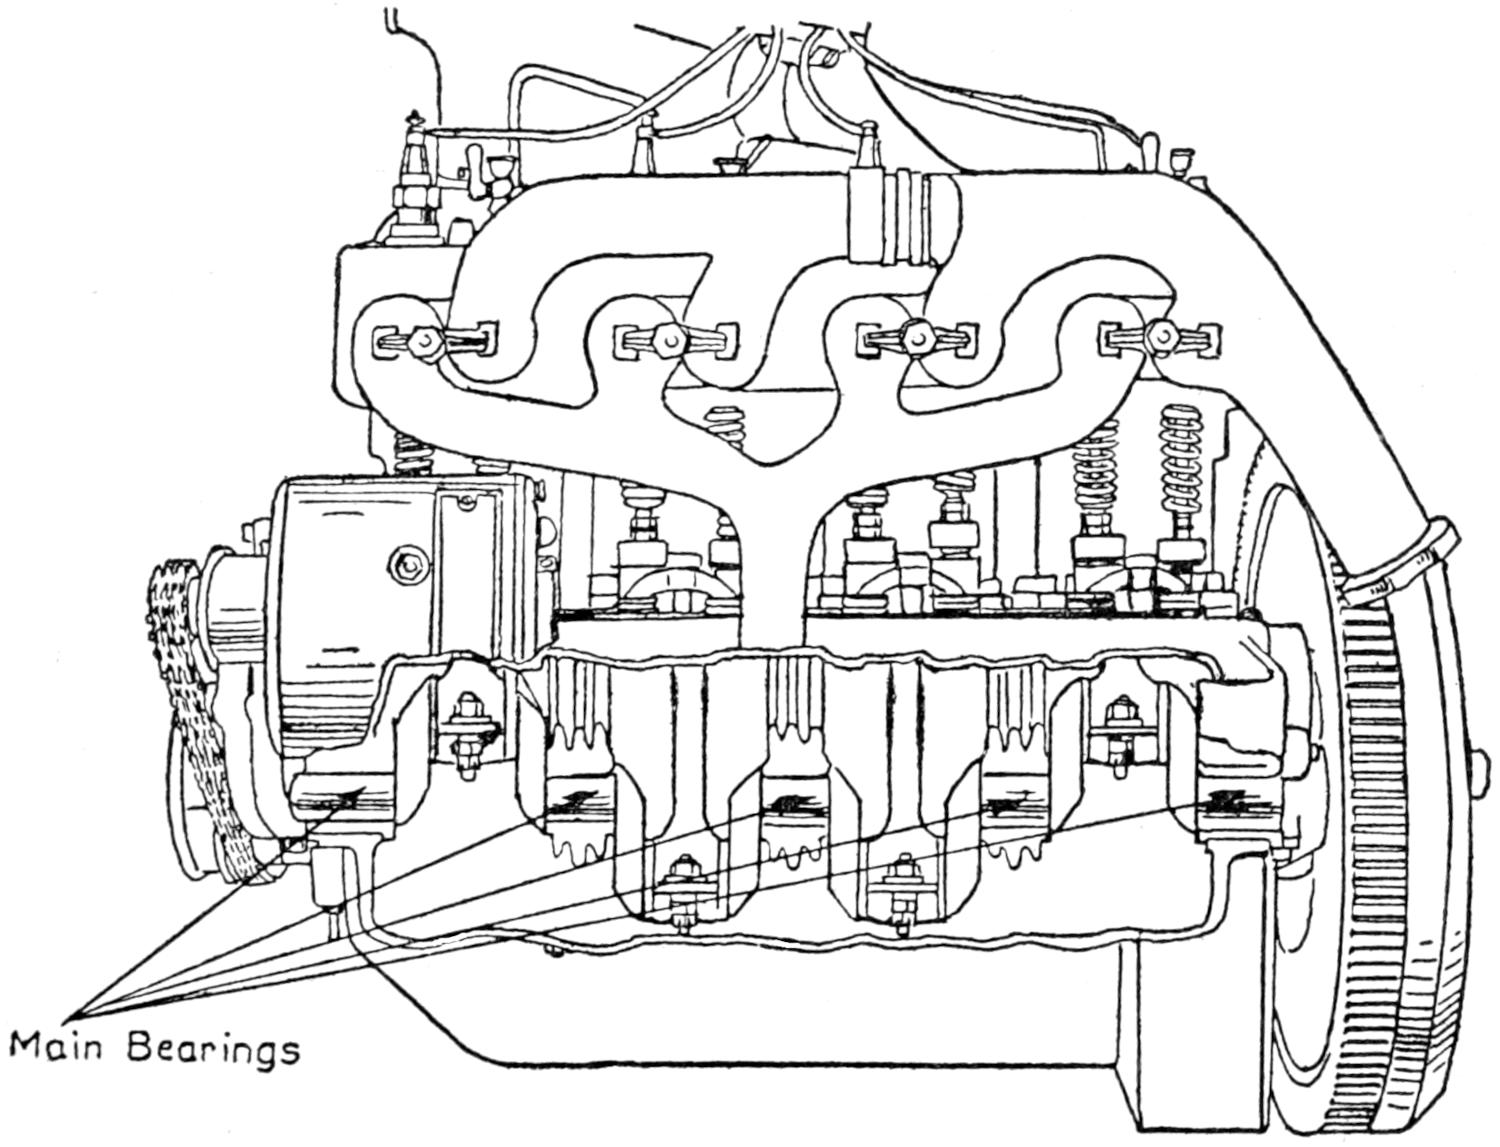
Main Bearings
Fig. 8. 5-M-B Crank Shaft
Fig. 8 shows the plain type of crank shaft with the timing gear attached to the front end and the fly-wheel attached to the rear end. The crank shaft shown is carried or held by five main bearings, which is an exception, as the majority of motor manufacturers use only three main bearings to support the crank shaft, while in some of the smaller motors only two are[18] used. These bearings are always of the split type, the seat for the upper half is cast into the upper part of the crank-case, and the lower half is usually attached to the upper half by four bolts which pass through the flange at each side of the bearing. Small shims of different sizes are employed between the flanges of each half of the bearing in order to secure a perfect adjustment which is very essential, as these bearings are subjected to heavy strains and severe duty. A shim may be removed occasionally as the bearing begins to show wear. A worn main bearing can be detected by placing the metal end of a screw-driver or hammer on the crank-case opposite the bearing and the other end to the ear. If the bearing is loose or worn a dull bump or thud will be heard. This looseness should be taken up by removing a shim of the proper thickness.

| Cam Gear | Bearings | Cams |
| Cams |
Fig. 9. Cam Shaft
Main bearings run loose for any length of time will be found very hard to adjust as the jar which they are subjected to invariably pounds them off center which makes readjustment a very difficult task to accomplish with lasting effect. New main bearings in a motor should always be scraped to secure a perfect fit. A loose piston or connecting rod bearing will produce a sharp knock which can easily be determined from the dull thud produced by a loose main bearing. (Fig. 9.) The cam shaft revolves on bearings and is usually located at the base of the cylinders on the left hand side looking toward the radiator and carries a set of cams for each cylinder. The cam pushes the valve open, and holds it in this position,[19] while the piston travels the required number of degrees of the cycle or stroke.
The cam shaft is driven from the crank shaft usually through a set of timing gears, and operated at one-half the speed of the crank shaft in a four cycle motor, as a valve is only lifted once, while the crank shaft makes two revolutions or four strokes. The cam-shaft bearings, and the timing gears are usually self-lubricating and require very little attention. Timing of the cam shaft is a rather difficult matter and will be treated in a following chapter under the head of valve timing.
| Start Gear | Key-Seat |
| Shaft-Seat | |
| Cone Clutch Seat |
Disc Clutch Small Disc Bolt on Here |
Fig. 10. Flywheel
The oil pan or reservoir forms the lower half or base of the crank case. The lubricating oil is carried here at a level which will allow the piston rods to dip into it at each revolution of the crank shaft. The timing gears receive their lubrication from the supply carried in the reservoir by means of a plunger or piston pump which is operated from the cam shaft. The balance of the motor is usually lubricated by a splash system taken up in a later chapter on lubrication. The oil is carried at a level between two points marked, high and low, on a glass or float gauge which is located on the crank case. A gasket made of paper or fiber is used between the union or connection of the oil reservoir and the upper half of the crank[20] case to prevent the oil from working out through the connection.
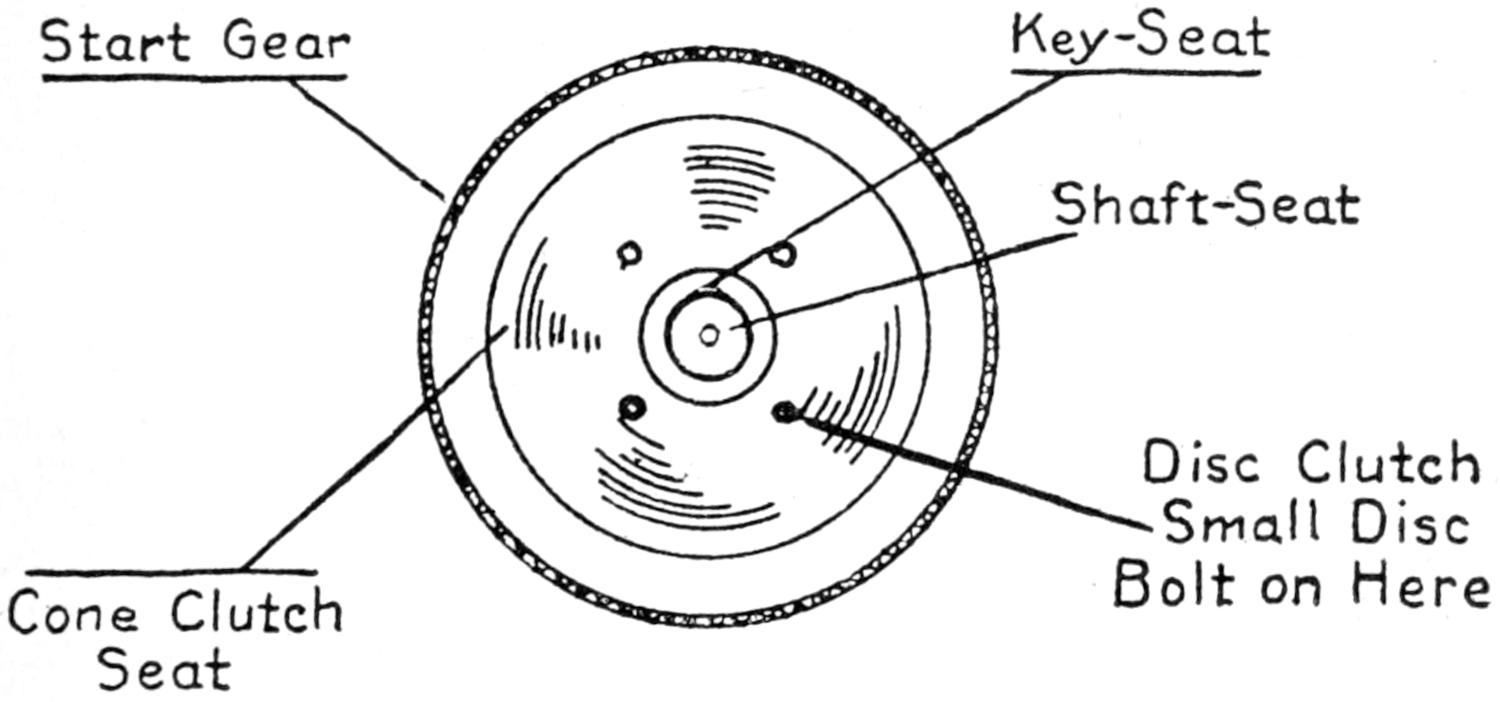
Fig. 10 represents the flywheel. The flywheel is usually keyed to the crank shaft directly behind the rear main bearing. This wheel is proportionate in weight to the revolving speed of the motor, which it keeps in balance by gathering the force of the power stroke. The momentum gathered by it in this stroke carries the pistons through the three succeeding strokes called the exhaust, intake, and compression strokes. The flywheel also serves as a connection between the power-plant and the running gear of the car, as a part of the clutch is located on it, and the connection takes place either in the rim or on the flange.
[21]
The proper and accurate functional operation of the valves is as necessary to successful motor operation as the proper adjustment of a hairspring is to a watch, for if a hairspring becomes impaired in any way, a watch will not keep correct time. This is the case in a motor when a valve becomes impaired. The valves in a motor, therefore, must be considered the most vital part conducive to successful and economical operation of the motor.
The valves are manufactured from a high grade tungsten or carbon steel, and are designed to withstand the intense heat which the heads located in the combustion chambers are subjected to, without warping. A perfect seat is required to prevent leaking, which will cause low compression and a weak power impulse, thus reducing the power and harmony of successful operation.
The poppet valve is used by about ninety-five per cent. of motor manufacturers. This type of valve is mechanically operated from the cam shaft at one-half the crank shaft speed, as a valve is lifted only once in every four strokes, or two revolutions of the crank shaft. The reduction in speed is accomplished by using a gear on the cam shaft, twice the size of that on the crank shaft.
The heads and chambers must be kept free from carbon which forms and bakes into a shale and has a tendency to crack and chip as the temperature changes in the combustion chambers. These chips are blown about in the cylinders until they lodge or are trapped by the descending valves. It then forms a pit on the seat and prevents the[22] valves from seating properly. This leaves an open space which attracts more carbon, and the entire functional action of the valve is soon impaired, necessitating regrinding in order that it may properly seat again.
Carbon is generated from a poor gas mixture or from excessive use of lubricating oil and may be considered the chief cause of improper functional action of the valves.
| Valve Head | Removable Plates |
Cam Shaft | Valve Head |
| Valve Seat | Valve Seat | ||
| Tappet for Adjusting Valves |
Tappet for Adjusting Valves |
||
Fig. 11. 8-Cylinder Valve Arrangement
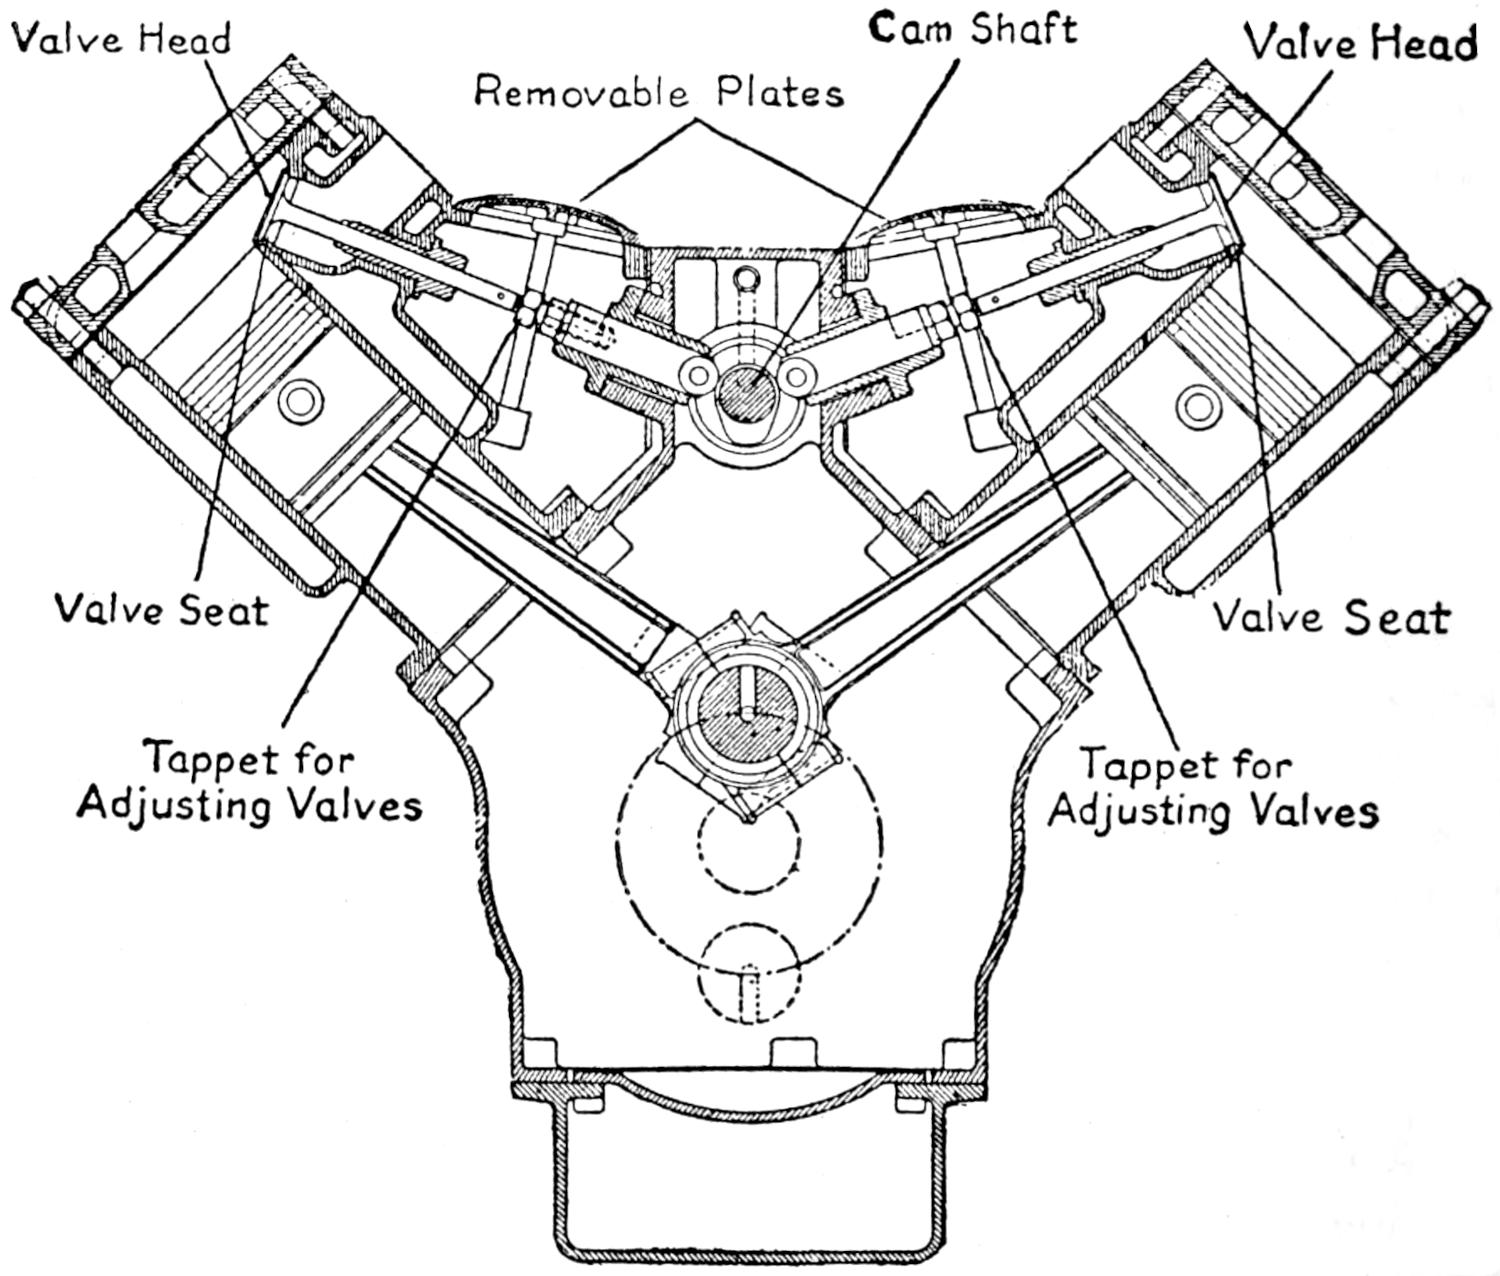
Fig. 11 shows the location of the cam shaft, valves, and tappet adjustment, on a V-shaped engine. The cylinders of this type of engine are arranged in two blocks, consisting of four cylinders in each, set directly opposite each other on an angle of 90°. The connecting rods from opposite[23] cylinders are yoked and take their bearing on the same crank pin. This arrangement allows the intake and exhaust valves of each opposite cylinder to operate from a single cam shaft, or in other words the entire sixteen valves are operated by a single cam shaft carrying eight cams. Consequently an eight or twelve cylindered engine is identical in regard to valve timing to either a four or six cylindered engine.
Valve Head
Valve Seat
Valve Guide
Valve Stem
Valve Spring
Sp. Seat
Cap Screw
Tappet
Lock Nut
Guide Bushing
Push Block
Roller
Cam
Fig. 12. Poppet Valve
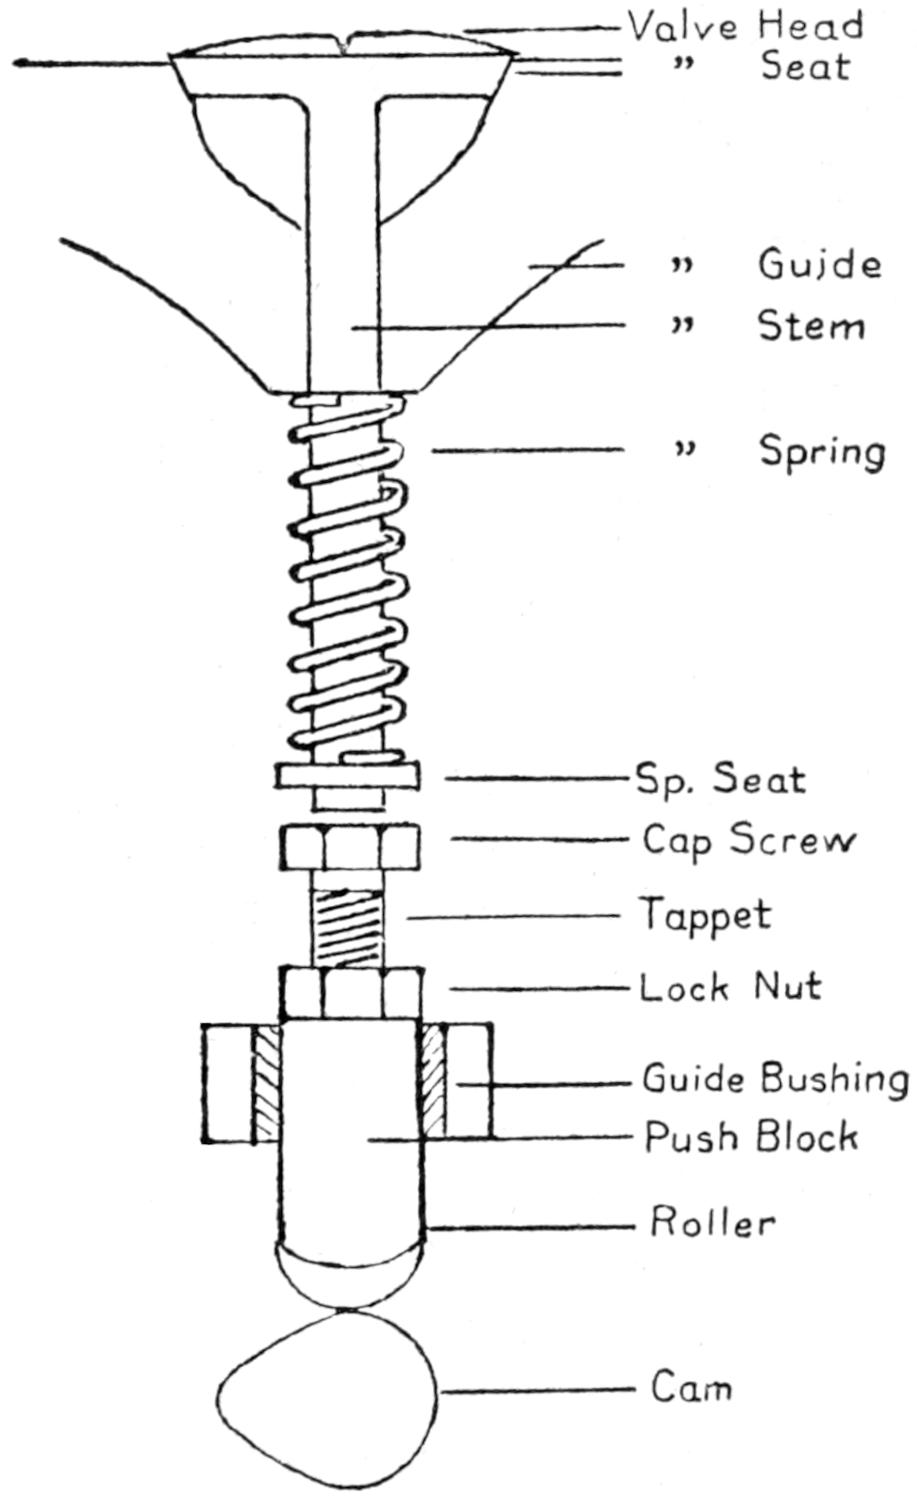
Fig. 12 shows a poppet valve. This type of valve has only one adjustment, called the tappet. The adjustment is made by turning the cap-screw out of the push block until the head comes into contact with the valve stem. The lock nut on the cap screw is then turned down tightly to the[24] push block to hold the adjustment. A strong spring is placed on the valve stem which causes it to close quickly and remain closed until it comes into contact with the cam.
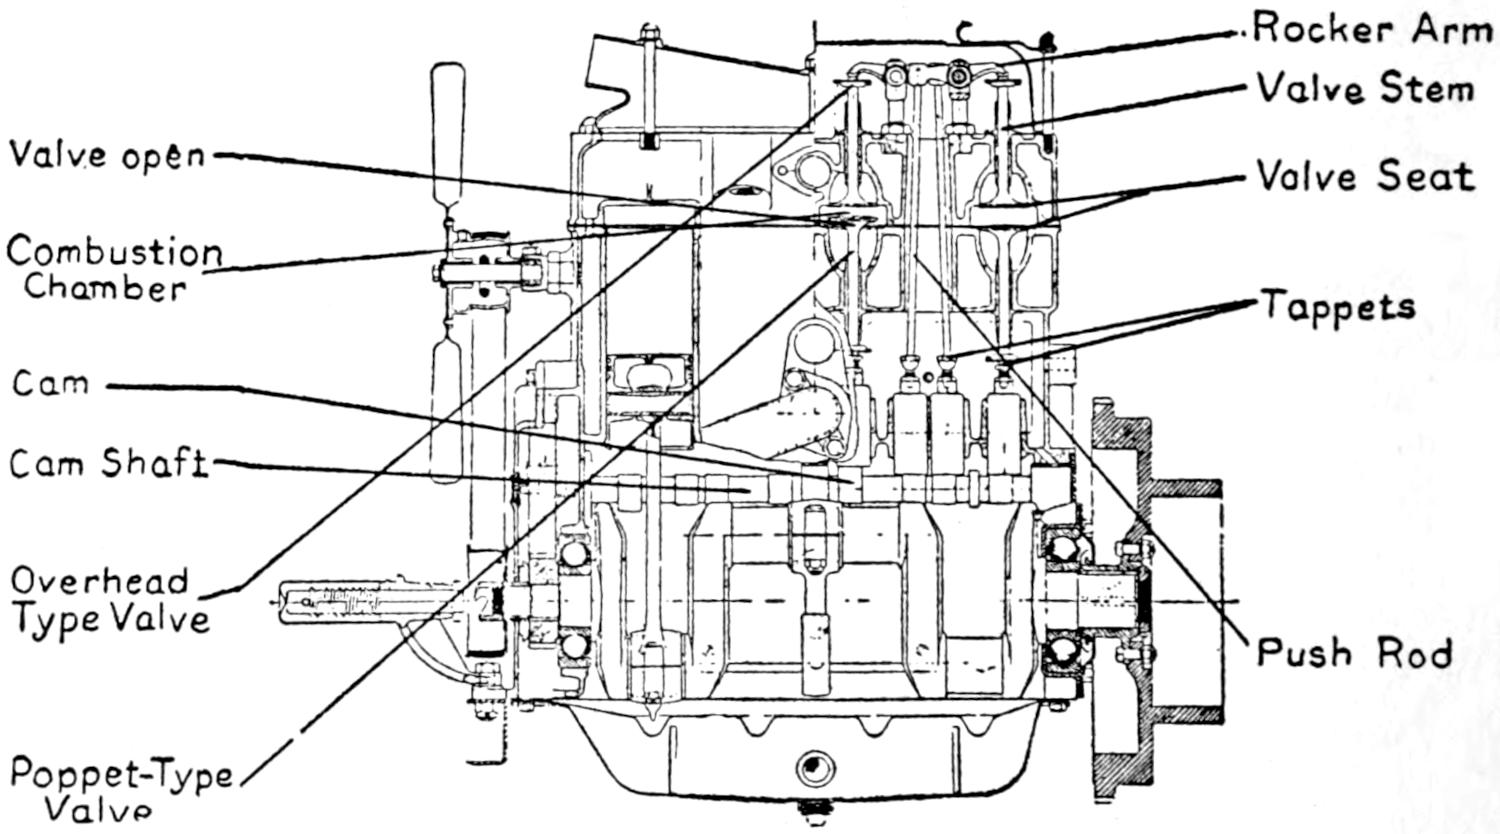
Valves are set and operate in three different positions as shown in Fig. 13. The exhaust valve in this case seats on the floor of the combustion chamber and is operated by the stem which extends through the casting to the tappet, while the intake valve seats on the upper wall of the combustion chamber and is operated from over head by a push-rod extending from the tappet to a rocker-arm. When both valves are operated from above and seat on the upper wall of the combustion chamber the motor is referred to as the overhead valve type of motor. In the majority of motors both valves seat on the floor of the valve chamber.
| Rocker Arm | |
| Valve Stem | |
| Valve Open | Valve Seat |
| Combustion Chamber |
Tappets |
| Cam | |
| Cam Shaft | |
| Overhead Type Valve |
Push Rod |
| Poppet-Type Valve |
Fig. 13. Valve Types, Location and Operation
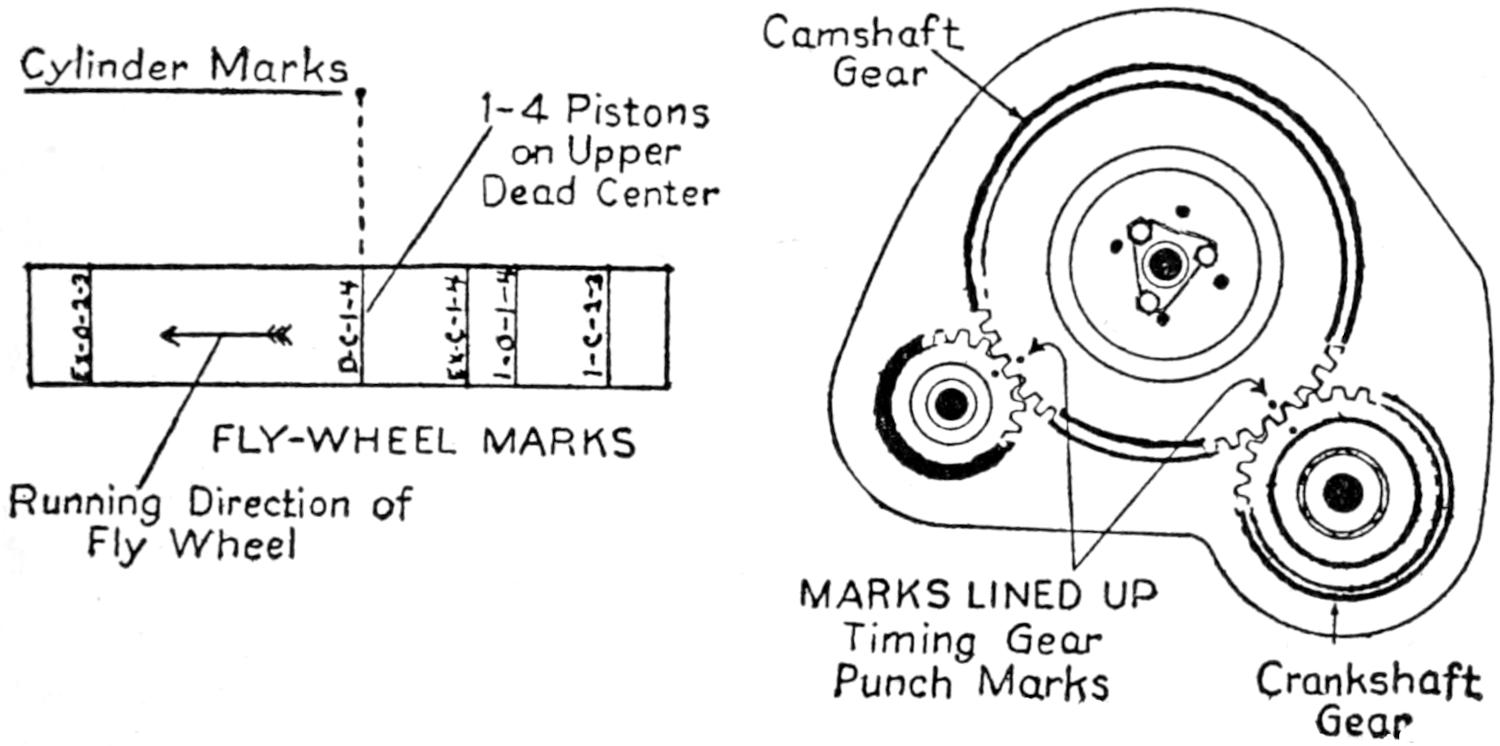
Valve Timing.—Valve timing is usually accomplished by setting the first, or exhaust valve cam, to correspond with a mark on the flywheel and cylinder (shown in Fig. 14).
This is accomplished by lining up the 1⁄4, or 1⁄6 D-C mark on the flywheel rim with the center mark on the cylinder block, and means that 1⁄4, or 1⁄6, pistons are on upper dead center of the compression stroke, the flywheel is then turned a trifle until the marks E-C, or Ex-C, is at upper dead center and in[25] line with the mark on the cylinder block. This means that the exhaust valve closes at this point. The cam shaft is then turned in the running direction and the cam shaft gear meshed at the valve closing or seating point. This is all that is necessary as the other cams take up correct operation when any one cam is set properly.
Another method of valve timing used by some motor manufacturers is shown in Fig. 14. It is simply necessary in this case to line up the prick punch marks on the timing gears—after getting the first position on upper D-C of the compression stroke—to acquire correct valve time. No definite or average scale can be given for valve timing, as all different types of motors are timed differently. These instructions must be secured from the manufacturer when the motor is not marked.
| Cylinder Marks | Camshaft Gear |
||
| 1-4 Pistons on Upper Dead Center |
|||
| FLY-WHEEL MARKS | |||
| Running Direction of Fly Wheel |
|||
| MARKS LINED UP Timing Gear Punch Marks |
Crankshaft Gear |
||
Fig. 14. Valve Timing Marks
Valve Grinding.—A valve-grinding compound can be purchased at any garage or service station or one may be compounded by mixing emery dust with a heavy lubricating oil until a thin paste is formed. The valve spring is released next by forcing up the tension with a screw driver or valve lifter. A small H-shaped washer is drawn from a groove near the end of the stem, which frees the valve; it can then be pushed up and raised through the guide. A small spring[26] is placed over the valve stem. This spring should be strong enough to raise the valve one-half inch above the seat. A thin film of the grinding compound is evenly applied to the seating face of the valve head, a screw driver or ratchet fork is set in the groove on the head of the valve, and the handle rolled between the palms of the hands, covering about one-third of the distance around the valve seat; the valve is let up after the motion has been repeated four or five times, and repeated at another angle until the entire surface of the valve is smoothly ground and allows the valve to seat perfectly.
Valves.—The sleeve valve type of motor was invented several years ago by Charles A. Knight. He met with some difficulty in having it manufactured in this country because the lubrication system was thought to be inadequate and the poppet valve was then at the height of its popularity with the manufacturer of engines.
Knight took his engine to Europe and made some slight improvements on it. It was then taken over and manufactured by one of the large automobile manufacturing companies of that continent and is now being used by many of the celebrated automobile manufacturers of every country.
The principle of operation does not differ in any respect from the ordinary type of four cycle motor, except, that instead of having the poppet type of valves it has a set of sleeves which slide up and down on the piston. The sleeves are operated from an eccentric shaft by a short connecting rod and carry ports which are timed to line up with the ports of the intake and exhaust manifold ports at the proper time in the cycle of operation.
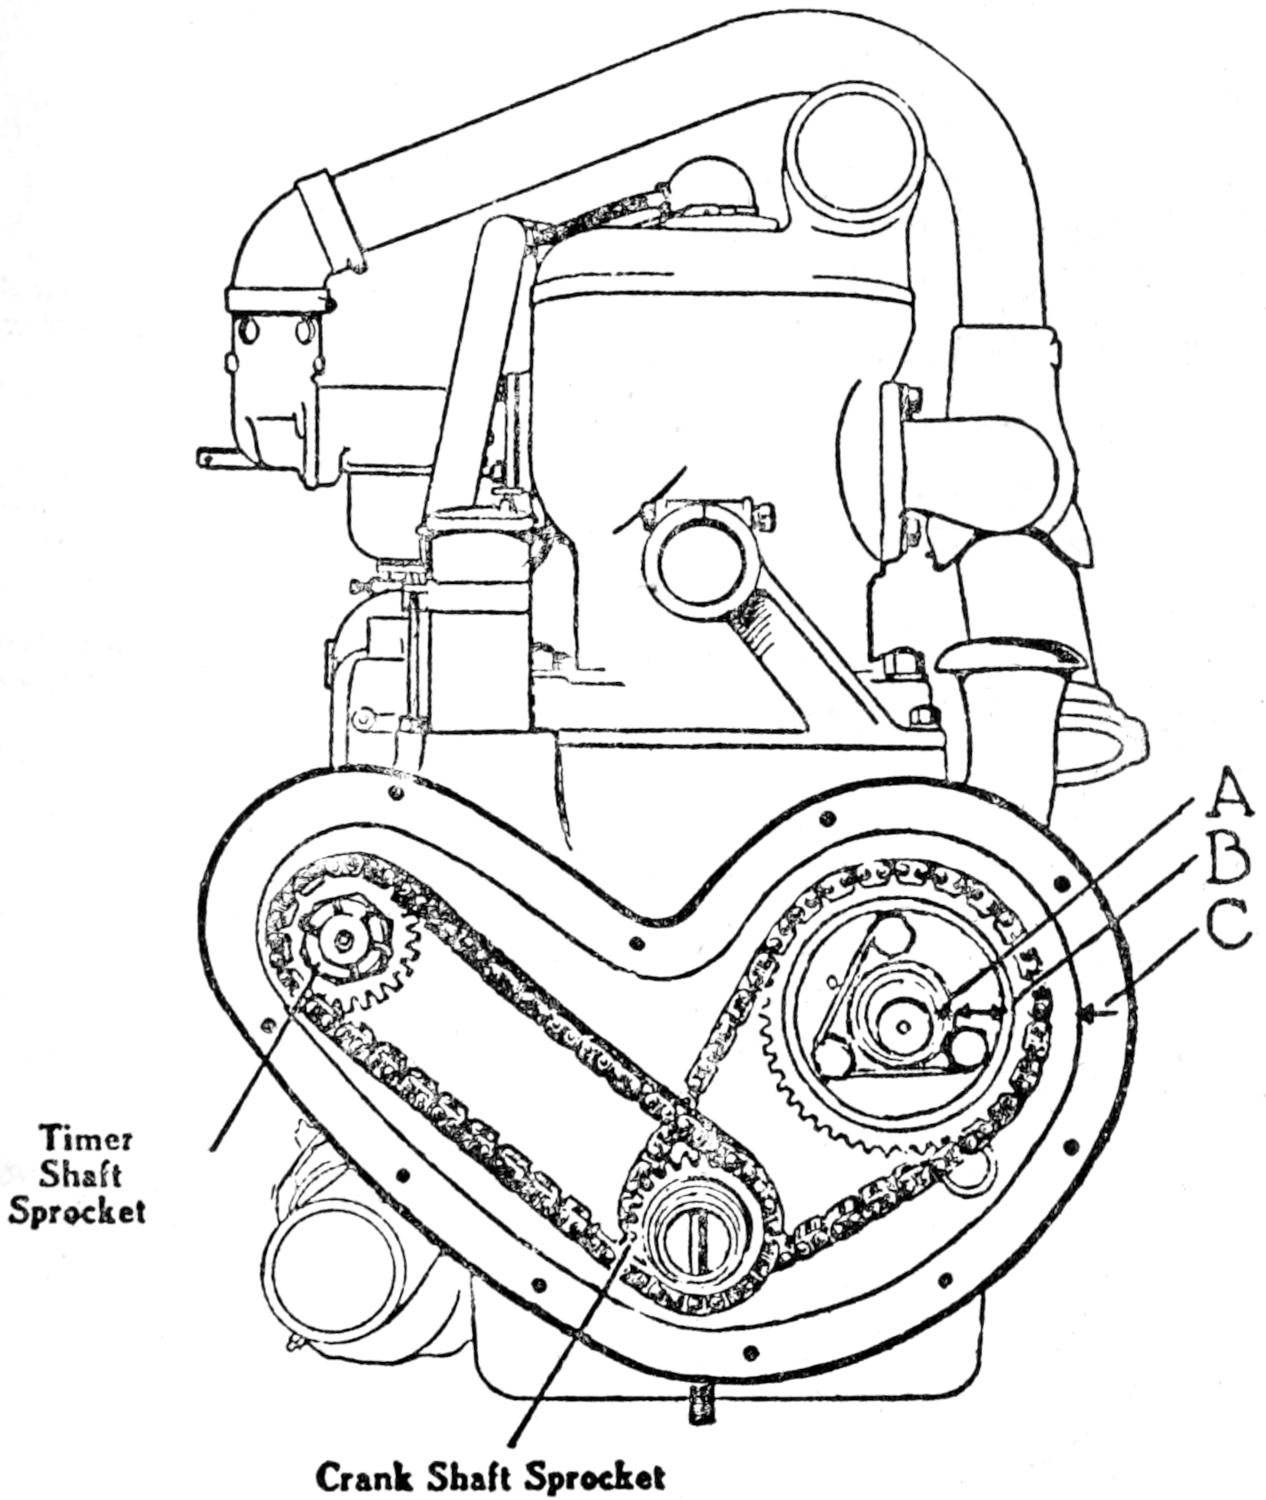
Fig. 15 shows the method of timing the sleeves on the four cylinder engine. First, turn the motor over in the running direction until the marks (I-4-T-C) on the flywheel are in alignment with the marks on the cylinder casting. Turn the eccentric shaft in the running direction until the marks A, B, C, shown in Fig. 15 are lined up, and then apply the chain.
[27]
Timer
Shaft
Sprocket
Crank Shaft Sprocket
Fig. 15. Knight Valve-Timing Marks—4-Cylinder
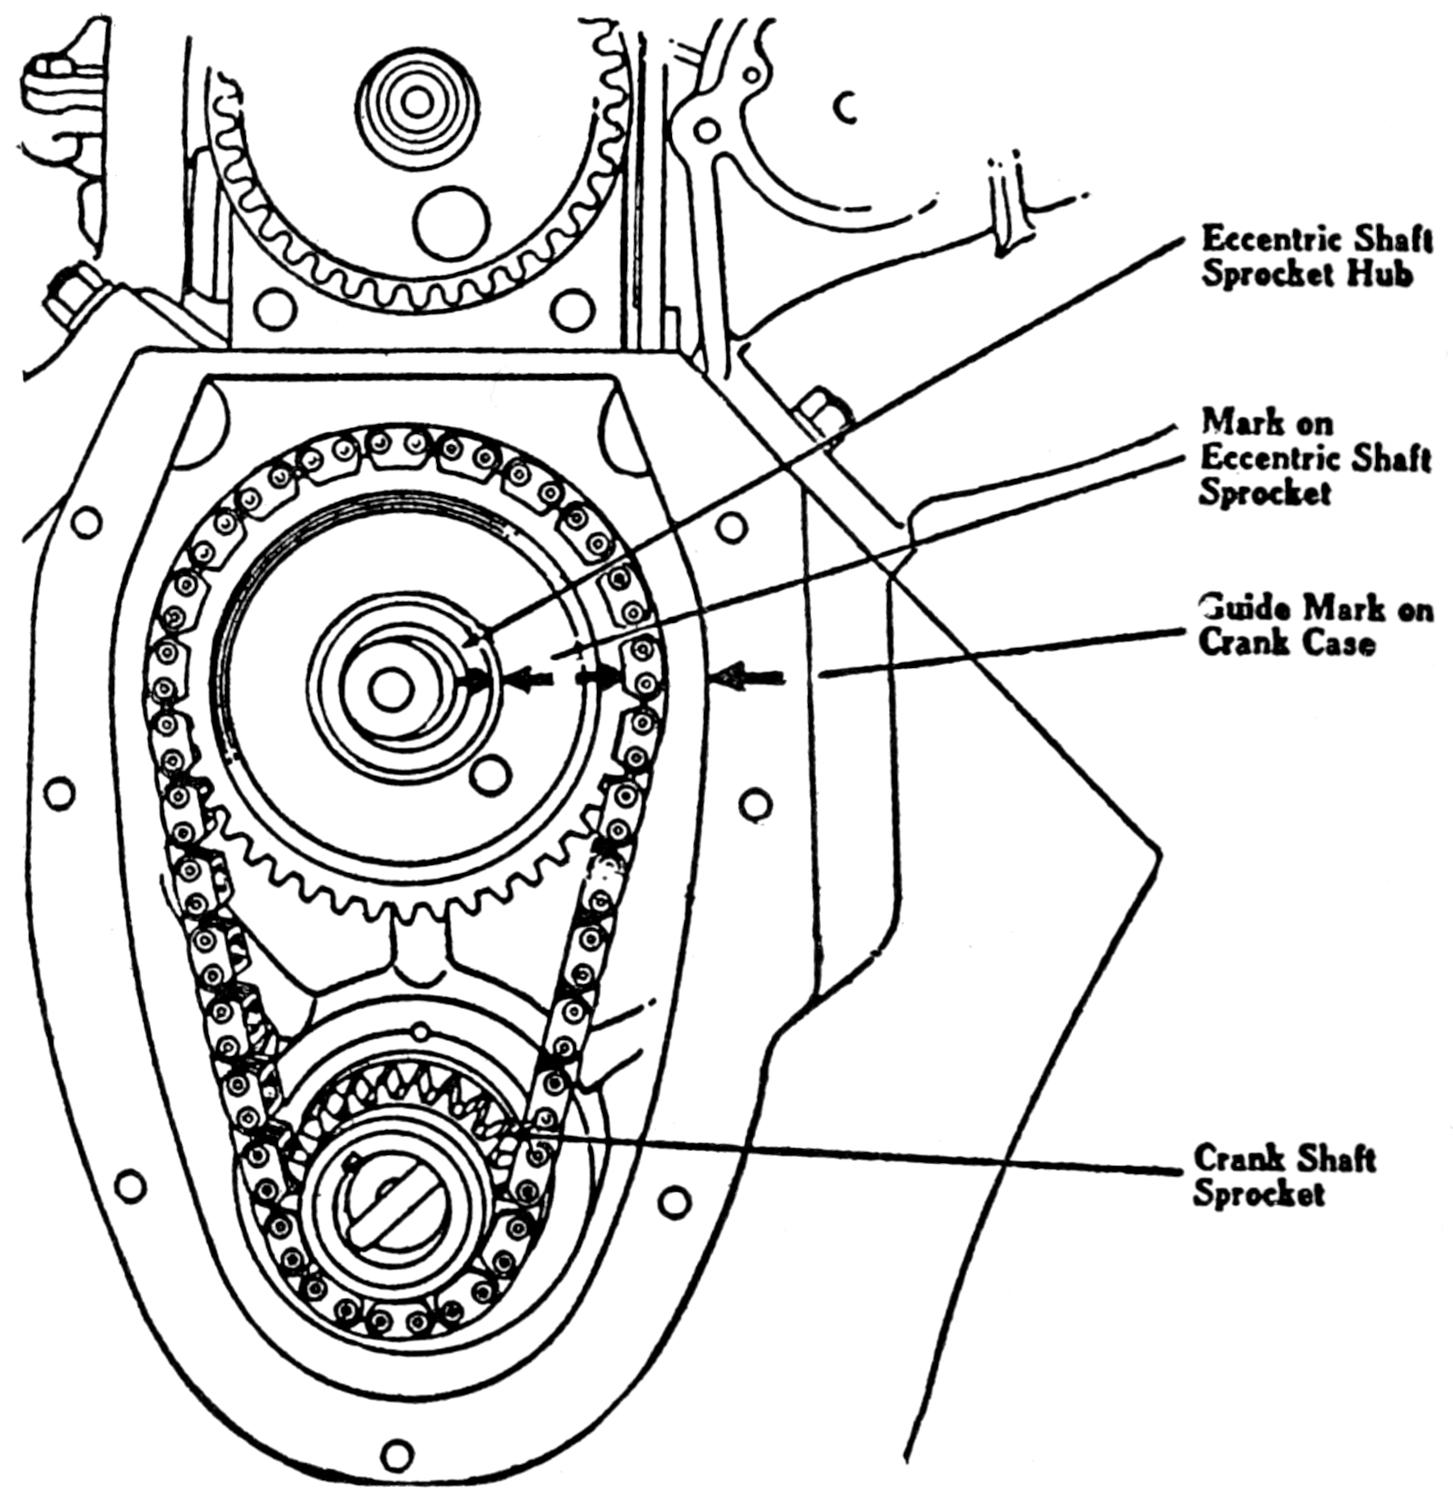
To check up on the timing, back the flywheel up an inch or two and insert a thin piece of tissue paper into the exhaust port and turn the engine in the running direction until the paper is pinched, which signifies that the valve is closed. The marks on the flywheel, timing gears, and the crank case should be in alignment. Fig. 16 shows a diagram of the timing marks on the eight cylinder Knight engine. The method of timing this engine is as follows: (1) Turn the engine over until the marks I-4-R-H—D-C align with the marks on the crank case. (2) Turn the eccentric shaft and[28] sprocket until the arrows shown in Fig. 16 are in line with the guide marks on the front end of the chain housing. Then put on the chain and check up the timing, using the thin piece of tissue paper.
Eccentric Shaft
Sprocket Hub
Mark on
Eccentric Shaft
Sprocket
Guide Mark on
Crank Case
Crank Shaft
Sprocket
Fig. 16. Knight Valve-Timing Marks—8-Cylinder
If the sleeve rods are removed for some reason, the bearings should be fitted very loosely to the eccentric shaft when they are put back. A looseness of about .008 of an inch is permissible.
[29]
The four-cycle or Otto stroke type of gasoline engine should rightly be called the four-stroke-cycle engine, as it requires four strokes and two revolutions of the crank shaft to complete one cycle of operation.
This type of motor is used almost universally by the manufacturers of pleasure cars due to its reliability, and to the ability it has to furnish continuous power at all speeds with the minimum amount of vibration.
| Firing Stroke |
Exhaust Stroke |
Intake Stroke |
Compression Stroke |
| 1 | 2 | 3 | 4 |
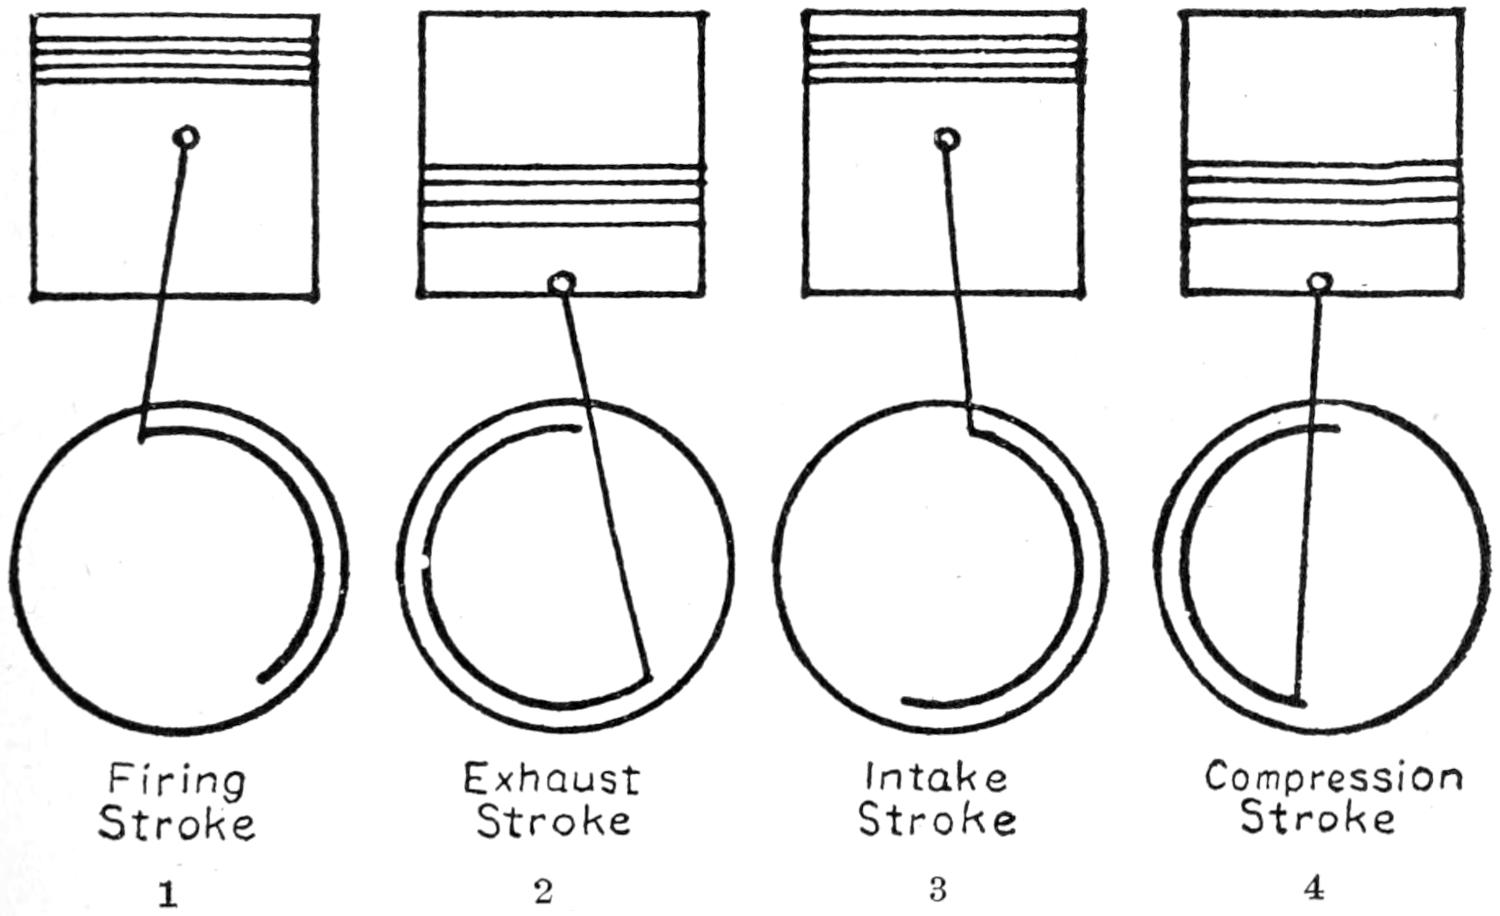
Fig. 17. 4-Stroke Cycle. 1—Cylinder in Action
Fig. 17 shows a diagram of one cylinder in the four strokes of the cycle, and the distance traveled by the crank shaft during each stroke. No. 1 begins with a charge of compressed vapor gas in the cylinder and is called the firing or power[30] stroke. The ignition system (explained in a later chapter) furnishes a spark at from five to fifteen degrees early or before the piston reaches top dead center. Although the stroke theoretically starts before the piston reaches its highest point of ascent, the actual pressure or force of the explosion is not exerted until the piston has crossed dead center. This is due to the fact that the piston travels very rapidly, and that it requires a small fraction of a second for spark to ignite the compressed charge of gas. It may, therefore, be easily seen that, if the spark did not occur until the piston is on or has crossed dead center, the piston would have traveled part of the distance of the stroke, and as it is moving away from the highest point of compression the pressure is reduced by allowing more volume space which causes a weak explosion and a short power stroke. The intake and exhaust valves are closed through the duration of the power stroke.
No. 2. The exhaust stroke begins from fifteen to thirty degrees early, or before the piston reaches lower dead center on the firing stroke. The exhaust valve opens at the start of this stroke allowing the pressure of the burnt or inert gas to escape before the piston begins to ascend on the upward part of the stroke, and closes seven to ten degrees late to allow the combustion chamber to clear out before the next stroke begins.
No. 3. The intake or suction stroke begins with the piston descending from its highest level to its lowest level. The intake valve opens ten or twenty degrees late, and as the piston is traveling on its descent, considerable vacuum pressure has formed which draws suddenly when the valve opens and starts the gas from the carburetor in full volume. The entire length of this stroke creates a vacuum which draws a full charge of vaporized gas into the cylinder through the open intake valve. The intake valve closes from ten to twenty degrees late in order that the full drawing force of the vacuum may be utilized while the piston is crossing lower center.
No. 4. The compression stroke begins at the end of the intake stroke with both valves closed. The piston ascends from its lowest extreme to its highest level, compressing the[31] charge of gas which was drawn into the cylinder on the intake or suction stroke; and at the completion of this stroke the cylinder is again in position to start No. 1, the firing stroke, and begin a new cycle of operation. The cam shaft is driven from the crank shaft through a set of gears or a silent chain, and operates at one-half the speed of the crank shaft as a valve is lifted once through the cycle of operation, or two revolutions of the crankshaft.
| 1 | 2 | 3 | 4 |
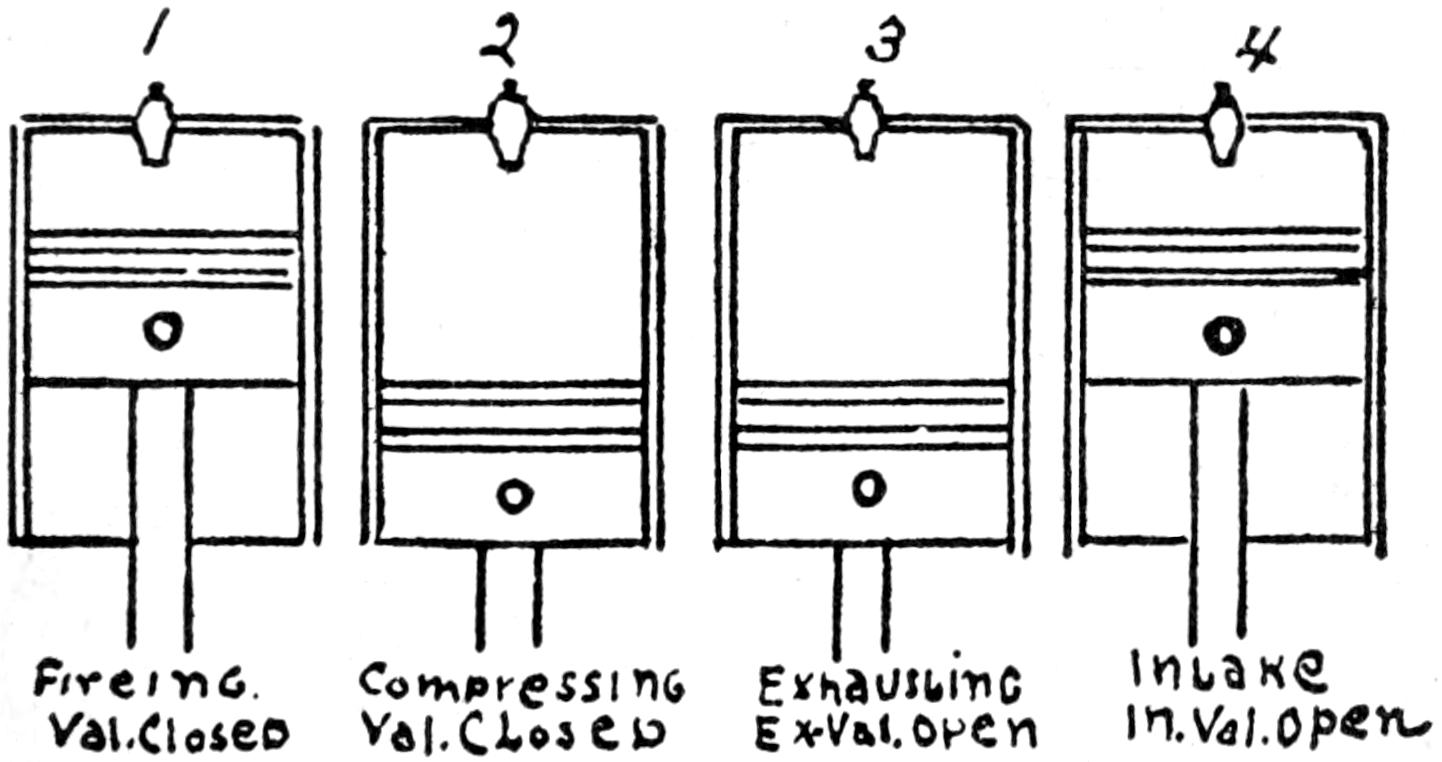
| Firing Val. Closed |
Compressing Val. Closed |
Exhausting Ex. Val. Open |
Intake In. Val. Open |
Fig. 18. Diagram of Action, 4-Cylinder 4-Cycle Engine
Fig. 18 shows the operation of a four-cylindered motor as it would appear if the cylinder block were removed. The timing or firing order of the motor shown in this diagram is 1-2-4-3. No. 1 cylinder is always nearest the radiator and on the left in this diagram. No. 1 cylinder is firing. The intake and exhaust valve remain closed while this stroke is taking place. This causes the entire force of the explosion to be exerted on the head of the receding piston. The cylinders, as may be seen in the diagram, are timed to fire in succession, one stroke behind each other. While No. 1 cylinder is on the firing stroke, No. 2 cylinder is compressing with both valves closed and will fire and deliver another power impulse as soon as No. 1 cylinder completes and reaches the lowest extreme of its firing stroke. No. 3 cylinder, being fourth in the firing order, has just completed the firing stroke and is starting the exhaust stroke which forces the burnt and inert gases out of[32] the cylinder through the open exhaust valve. No. 4 cylinder which is third in the firing order has just completed the exhaust stroke and is about to start the intake or suction stroke with the exhaust valve open. This diagram should be studied and memorized as it is often necessary to remove the wires which may easily be replaced if the firing order is known, or found by watching the action of the exhaust valves and made to conform with the distributor of the ignition system. (Note the running direction of the distributor brush and connect the wires up in that direction.) For the firing order given above connect No. 4 wire to No. 3 distributor post, and No. 3 wire to No. 4 post, as this cylinder fires last.
| 1-CYL. | 2-CYL. |
| 4-CYL. | 8-CYL. |
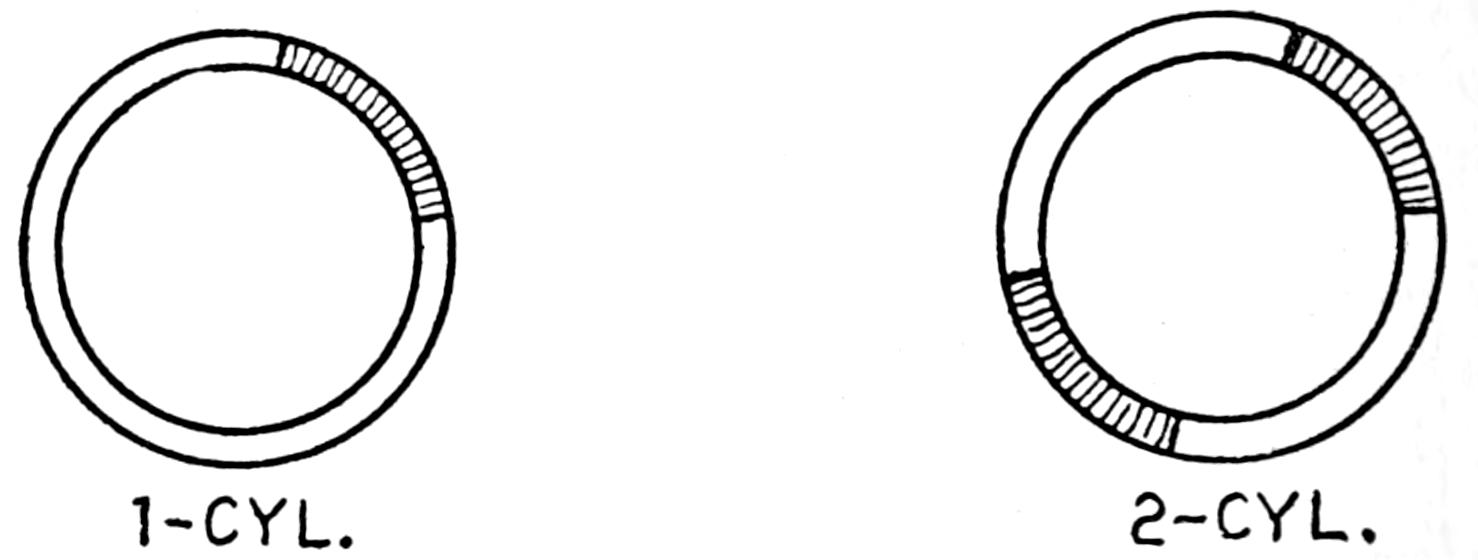
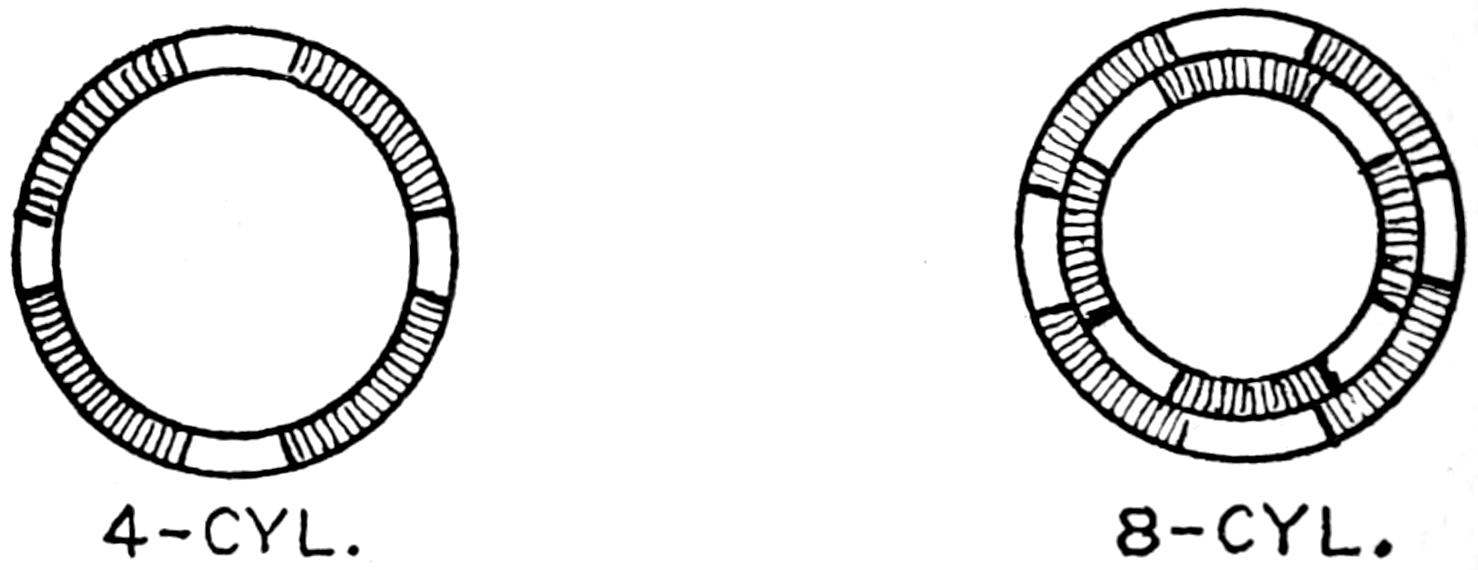
Fig. 19 Power Stroke Diagram
Fig. 19 shows a diagram of the power stroke impulse delivered to the cycle in a one, two, four, and eight cylindered motor. A complete cycle consists of 360 degrees, and as there are four strokes to the cycle an even division would give a stroke of ninety degrees, which is not the case, however, owing to the fact that the valves do not open and close at the theoretical beginning and ending point of each stroke[33] which is upper dead center and lower dead center. The firing or power impulse stroke begins at approximately five to seven degrees before the piston reaches upper dead center on the compression stroke and ends from fifteen to thirty degrees before the piston or cycle of rotation of the crankshaft reaches lower dead center. This results in a power impulse of less than ninety degrees, which varies accordingly with valve timing in the different makes of motors. Consequently we have a power stroke of a little less than ninety degrees in a one-cylinder motor; two power strokes of a little less than 180 degrees in a two cylinder motor, while the power impulse of the four-cylinder motor very nearly completes the cycle. In the six, eight, and twelve cylinder motor the power strokes overlap, thereby delivering continuous power of very nearly equal strength.
Twin, Four, and Six Cylindered Motors.—The operation of the twin cylindered motor varies very little from the single four or six. It is simply a case where two, four, or two six cylindered motors are set to a single crank case at an angle which will allow the piston or connecting rods from the opposite cylinders to operate on a single crank shaft. When the cylinders are set directly opposite each other the connecting rods are yoked and take their bearing on a single crank pin of the crank shaft. This, however, is not always the case, for in some motors the connecting rods take their bearing side by side on the crank pin. The cylinders in this case are set to the crank case in a staggered position to allow the connecting rods from each cylinder to operate in line with the crank shaft.
The cylinder blocks are usually set to the crank case at an angle of ninety degrees and are timed to furnish the power impulse or stroke opposite each other in the cycle of operation. The advantage of this formation is that two power strokes are delivered in one cycle of operation, which increases the power momentum and reduces the jar or shock of the explosion causing a sweet running vibrationless motor.
The valves are usually operated by a single cam shaft located[34] on the upper inside wall of the crank case. Valve timing is accomplished by following the marks on the flywheel or lining up the prick punch marks on the gears, as shown in Chapter II on valves.
When a magneto is used to furnish the current for ignition on an eight cylinder motor it has to be operated at the same speed as the crank shaft, as a cylinder is fired at each revolution of the crank shaft and an interruption of the current is required at the breaker points to produce the secondary or high tension current at the spark plug gaps.
Twelve cylindered motors are usually equipped with two distributors or a dual system, or two magnetos driven separately through a set of timing gears.
Knight or Sleeve Valve Motor.—The Knight or sleeve valve motor operates on the same plan as the ordinary type of motor except that the valves form a sleeve and slide over the piston. The sleeves are operated by an eccentric shaft and are provided with ports which are timed to conform with the ports of the intake and exhaust manifolds at the proper time.
MOTOR HORSEPOWER
S. A. E. Scale
FOUR-CYCLE HORSEPOWER RATING
| Bore | 1 cyl. | 2 cyl. | 4 cyl. | 6 cyl. | |
|---|---|---|---|---|---|
| 2 | 3⁄4 | 3.00 | 6.00 | 12.00 | 18.00 |
| 2 | 7⁄8 | 3.00 | 6.50 | 13.00 | 20.00 |
| 3 | .00 | 3.50 | 7.00 | 14.50 | 21.50 |
| 3 | 1⁄4 | 4.00 | 8.50 | 17.00 | 25.50 |
| 3 | 1⁄2 | 5.00 | 10.00 | 20.00 | 29.50 |
| 3 | 3⁄4 | 5.50 | 11.00 | 22.50 | 34.00 |
| 4 | .00 | 6.50 | 13.00 | 25.50 | 38.50 |
| 4 | 1⁄4 | 7.00 | 14.50 | 29.00 | 43.50 |
| 4 | 1⁄2 | 8.00 | 16.00 | 32.50 | 48.50 |
| 4 | 3⁄4 | 9.00 | 18.00 | 36.00 | 54.00 |
| 5 | .00 | 10.00 | 20.00 | 40.00 | 60.00 |
| 5 | 1⁄4 | 11.00 | 22.00 | 44.00 | 66.00 |
| 5 | 1⁄2 | 12.00 | 24.00 | 48.00 | 73.00 |
| 5 | 3⁄4 | 13.00 | 26.50 | 53.00 | 79.50 |
| 6 | .00 | 14.50 | 29.00 | 57.50 | 86.50 |
This scale gives the nearest equivalent to the whole or half horsepower, as is required by State where licenses are paid at so much per horsepower.
Formula—S. A. E. D2 times N 2.5 equals horsepower.
[35]
For sleeve valve timing see Chapter II on Valves.
There are probably few men operating cars to-day who fully understand what is meant by the term displacement, often used in referring to automobile races. It is one of the main factors or points in determining the class in which a car is qualified to enter under the laws that govern races. In looking over a race program, you will note that there are usually two or more classes, one of which is open, and another with a limited piston displacement, which gives the smaller cars a competing chance in their class.
Consequently piston displacement is merely the volume displaced by all the piston in moving the full length of the stroke. The volume of a single cylinder is equal to the area of the bore multiplied by the length of the stroke, and the total displacement of a four cylinder motor will be four times this and that of a six cylinder motor, six times this.
Piston displacement:
D2 times S times N times 3.14 4
| Where | D equals bore in inches |
| S equals stroke in inches | |
| Where N equals number of cylinders |
| Example: | Required to find the piston displacement of a 31⁄2 × 5 inch four-cylindered motor. D equals 3.5 S equals 5. and N equals 4. |
Piston Displacement
3.52 times 5 times 4 times 3.14 4
3.5 times 3.5 times 5 times 4 times 3.14 4
equals 173.58 cubic inches.
[36]
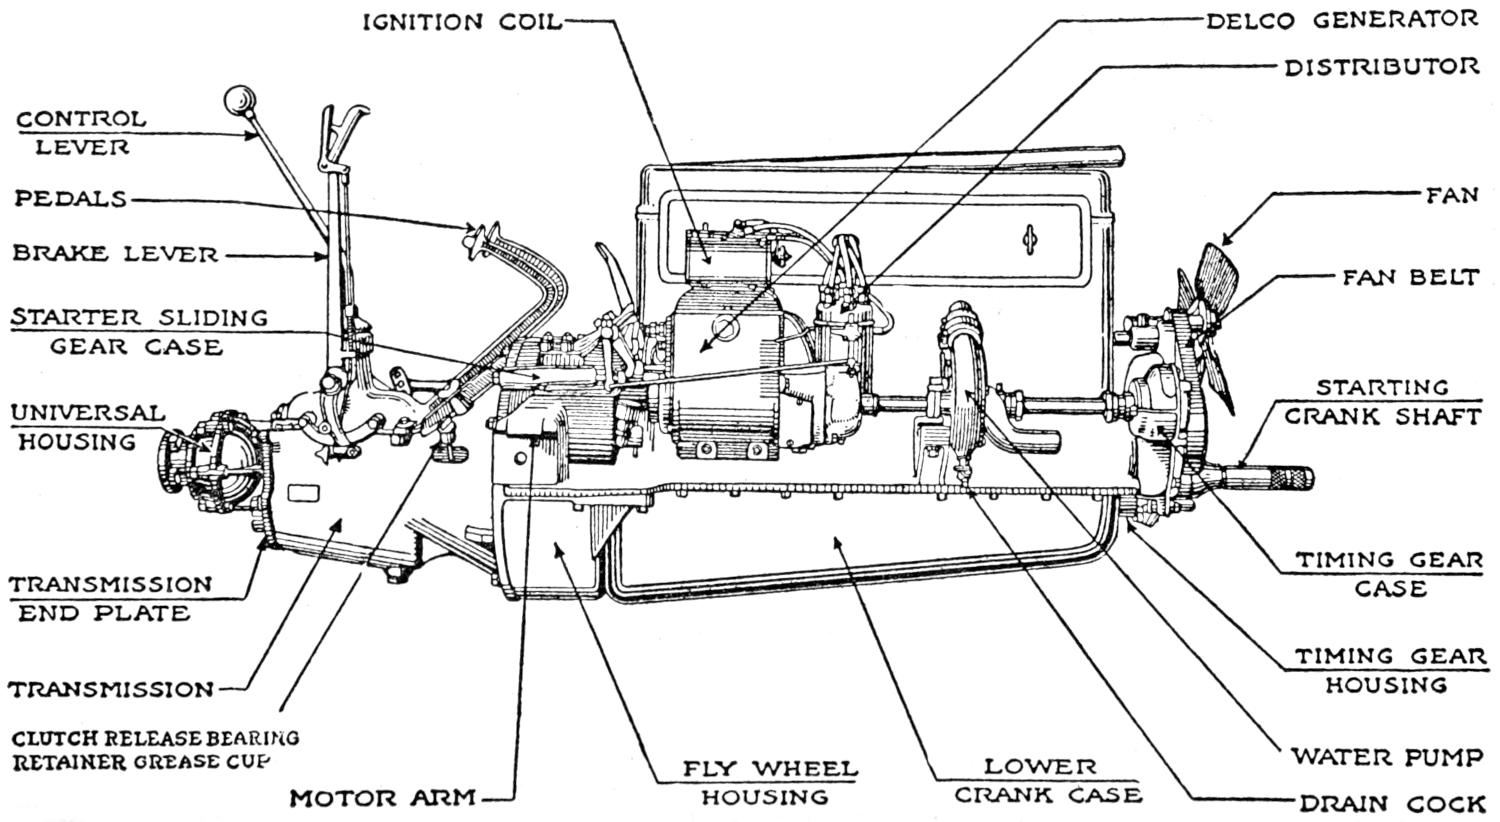
| IGNITION COIL | DELCO GENERATOR | |||
| DISTRIBUTOR | ||||
| CONTROL LEVER |
||||
| PEDALS | FAN | |||
| BRAKE LEVER | FAN BELT | |||
| STARTER SLIDING GEAR CASE |
||||
| UNIVERSAL HOUSING |
STARTING CRANK SHAFT |
|||
| TRANSMISSION END PLATE |
TIMING GEAR CASE |
|||
| TRANSMISSION | TIMING GEAR HOUSING |
|||
| CLUTCH RELEASE BEARING RETAINER GREASE CUP |
WATER PUMP | |||
| MOTOR ARM | FLY WHEEL HOUSING |
LOWER CRANK CASE |
DRAIN COCK | |
Fig. 20. Buick Engine—Parts Assembly
[37]
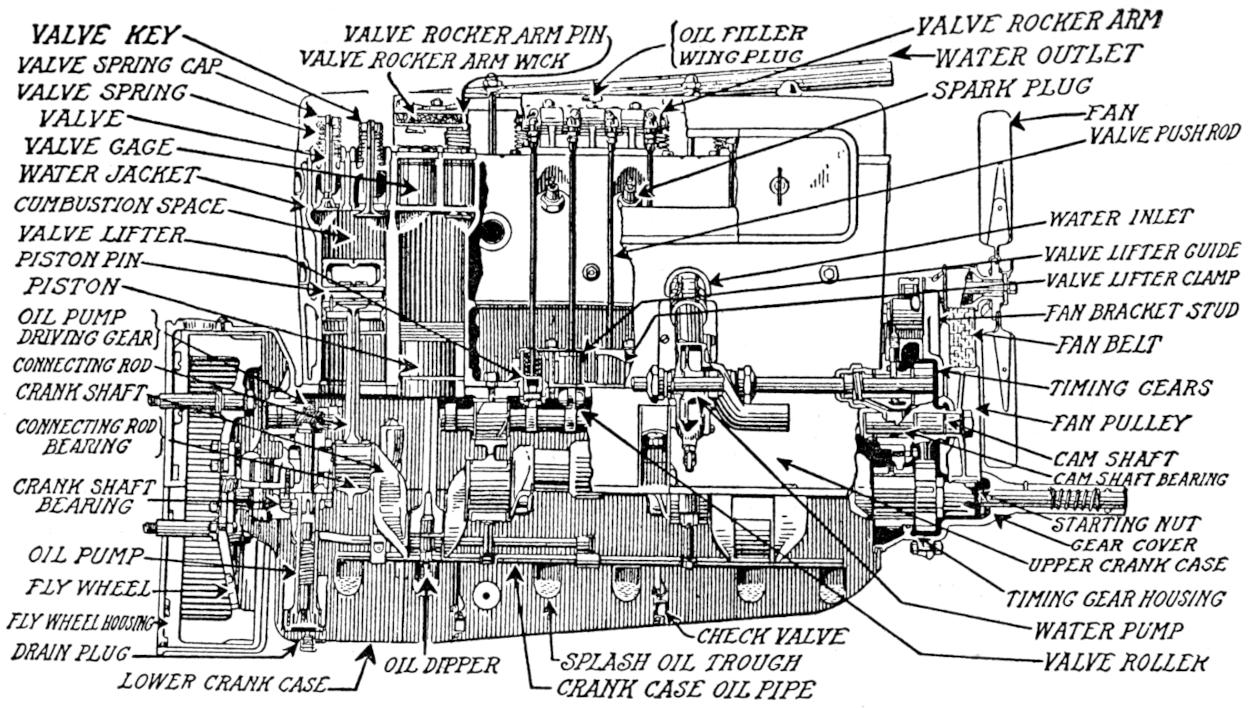
| VALVE KEY | VALVE ROCKER ARM PIN | OIL FILLER WING PLUG |
VALVE ROCKER ARM | |
| VALVE SPRING CAP | VALVE ROCKER ARM WICK | WATER OUTLET | ||
| VALVE SPRING | SPARK PLUG | |||
| VALVE | FAN | |||
| VALVE GAGE | VALVE PUSH ROD | |||
| WATER JACKET | ||||
| COMBUSTION SPACE | WATER INLET | |||
| VALVE LIFTER | VALVE LIFTER GUIDE | |||
| PISTON PIN | ||||
| PISTON | VALVE LIFTER CLAMP | |||
| OIL PUMP DRIVING GEAR |
FAN BRACKET STUD | |||
| FAN BELT | ||||
| CONNECTING ROD | ||||
| CRANK SHAFT | TIMING GEARS | |||
| CONNECTING ROD BEARING |
FAN PULLEY | |||
| CAM SHAFT | ||||
| CRANK SHAFT BEARING |
CAM SHAFT BEARING | |||
| STARTING NUT | ||||
| OIL PUMP | GEAR COVER | |||
| UPPER CRANK CASE | ||||
| FLY WHEEL | TIMING GEAR HOUSING | |||
| FLY WHEEL HOUSING | CHECK VALVE | WATER PUMP | ||
| DRAIN PLUG | OIL DIPPER | SPLASH OIL TROUGH | VALVE ROLLER | |
| LOWER CRANK CASE | CRANK CASE OIL PIPE | |||
Fig. 21. Buick Engine—Location Inside Parts Assembly
[38]
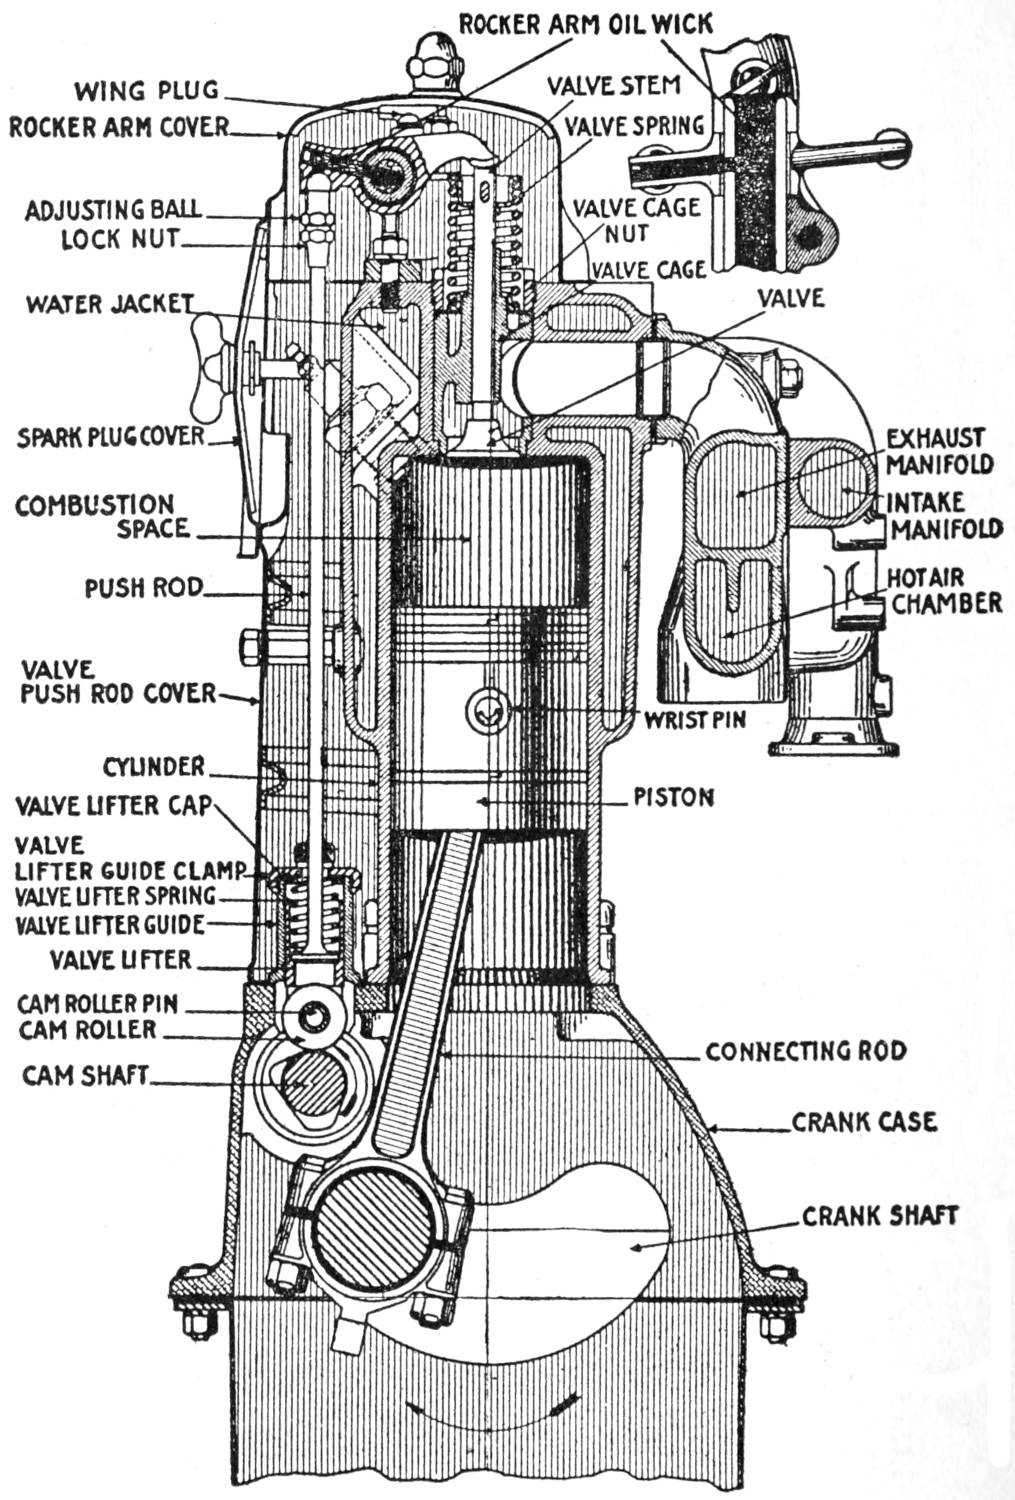
| ROCKER ARM | OIL WICK | |
| WING PLUG | VALVE STEM | |
| ROCKER ARM COVER | VALVE SPRING | |
| ADJUSTING BALL | VALVE CAGE NUT |
|
| LOCK NUT | ||
| VALVE CAGE | ||
| WATER JACKET | VALVE | |
| SPARK PLUG COVER | EXHAUST MANIFOLD |
|
| COMBUSTION SPACE |
INTAKE MANIFOLD |
|
| PUSH ROD | HOT AIR CHAMBER |
|
| VALVE PUSH ROD COVER |
WRIST PIN | |
| CYLINDER | ||
| VALVE LIFTER CAP | PISTON | |
| VALVE LIFTER GUIDE CLAMP |
||
| VALVE LIFTER SPRING | ||
| VALVE LIFTER GUIDE | ||
| VALVE LIFTER | ||
| CAM ROLLER PIN | ||
| CAM ROLLER | CONNECTING ROD | |
| CAM SHAFT | ||
| CRANK CASE | ||
| CRANK SHAFT | ||
Fig. 22. Buick Motor—End View
[39]
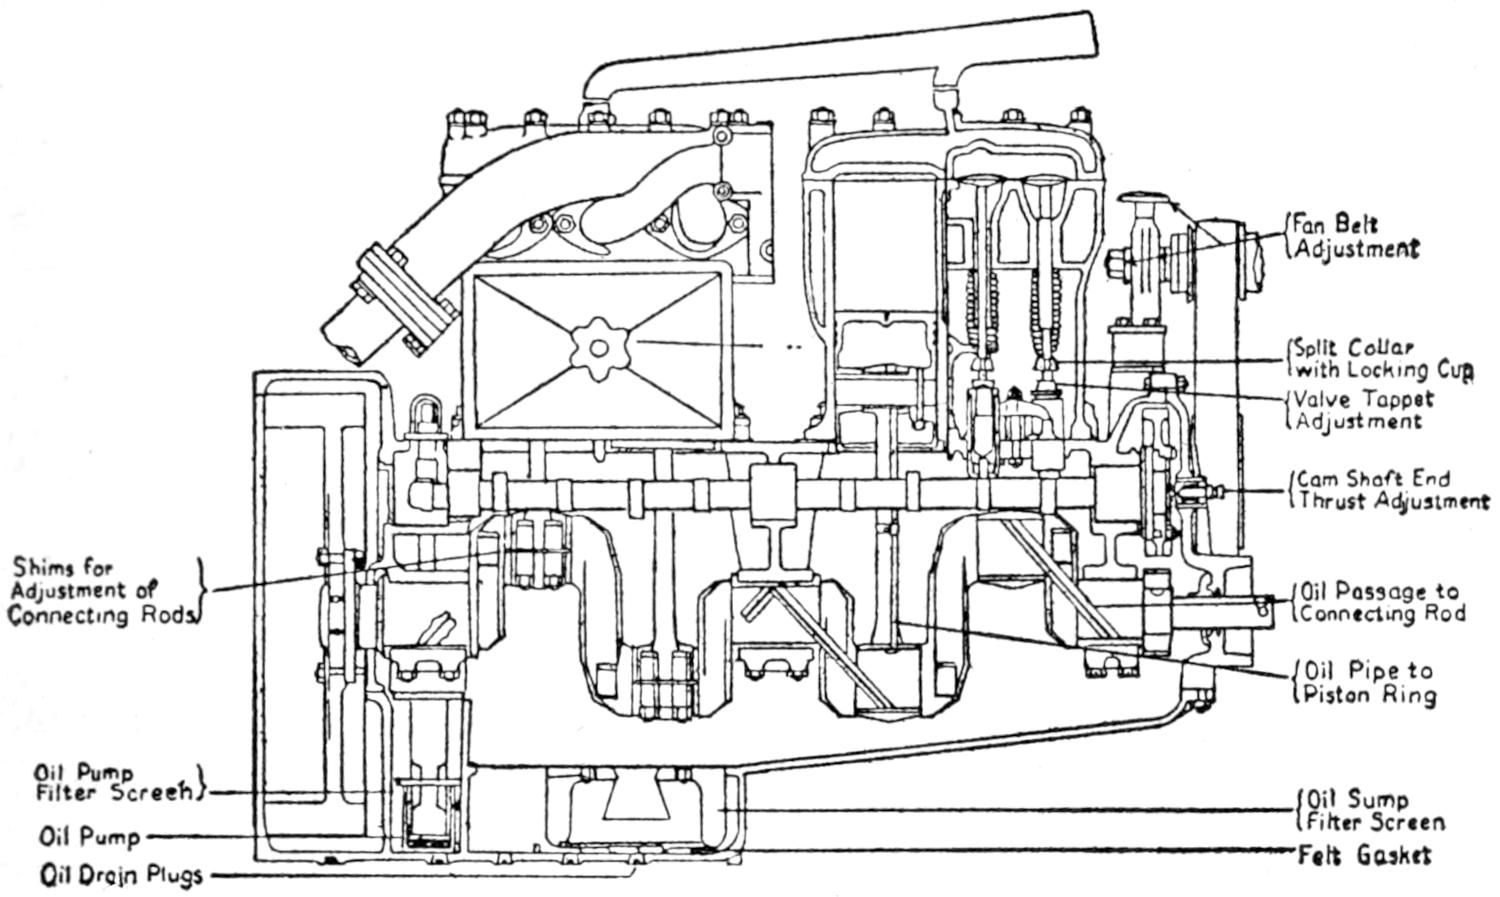
Fan Belt
Adjustment
Split Collar
with Locking Cup
Valve Tappet
Adjustment
Cam Shaft End
Thrust Adjustment
Shims for
Adjustment of
Connecting Rods
Oil Passage to
Connecting Rod
Oil Pipe to
Piston Ring
Oil Pump
Filter Screen
Oil Sump
Filter Screen
Oil Pump
Felt Gasket
Oil Drain Plugs
Fig. 23. Liberty U. S. A. Engine
Special attention should be given to regular lubrication, as this, more than any one thing, not only determines the life but also the economic up-keep of the car.
Whenever you hear an owner say that his car is a gas eater, or that it uses twice or three times as much oil as his neighbor’s, which is the same model and make, you know at once that he, or some one who has used the car before him, either did not give sufficient attention to lubrication, or used a poor grade of oil. It is almost impossible to impress the importance of the foregoing facts upon the minds of the average motorist, and we have, as a direct result, a loss of millions of dollars annually through depreciation.
The manufacturers of automobiles and gasoline engines have earnestly striven to overcome this negligence by providing[40] their products with automatically fed oiling systems which alleviate some of the former troubles. These systems, however, also require some attention to function properly.
Grease.—A medium grade of light hard oil grease is best adapted for use in grease cups, universal joints, and for packing wheel bearings and steering gear housings. The transmission and differential operate more successfully when a lighter grade of grease is used, such as a graphite compound, or a heavy oil known as 600 W.
Oils.—Great care should always be exercised in purchasing lubricants. None but the best grades should be considered under any circumstances. The cheaper grades of oil will always prove to be the most expensive in the end. The ordinary farm machinery oils should never be used in any case as an engine lubricant, for in most cases they contain acids, alkalies, and foreign matter which will deteriorate and destroy the bearings of the motor.
An oil to give the best satisfaction must be a purely mineral or vegetable composition which will flow freely at a temperature of 33° Fahrenheit and also stand a temperature of 400° Fahrenheit without burning. Always choose an oil which is light in color as the darker oil usually contains much carbon.
Lubrication (Lat. Lubricus, meaning slippery).—-Lubrication is provided on all types of automobile engines, and at various other places where moving parts come in contact or operate upon each other.
Three different types of lubricating systems are found in common use.
Fig. 24 shows the splash system. The oil is placed into the crank case and maintained at a level between two points, marked high and low, on a float or glass gauge at the lower left-hand side of the crank case. The oil is usually poured directly into the crank case through a breather pipe provided to prevent excessive vacuum pressure.
The lower end of the connecting rod carries a spoon or paddle which dips into the oil at each revolution and splashes[41] it to the cylinder walls and various bearing surfaces within the motor.
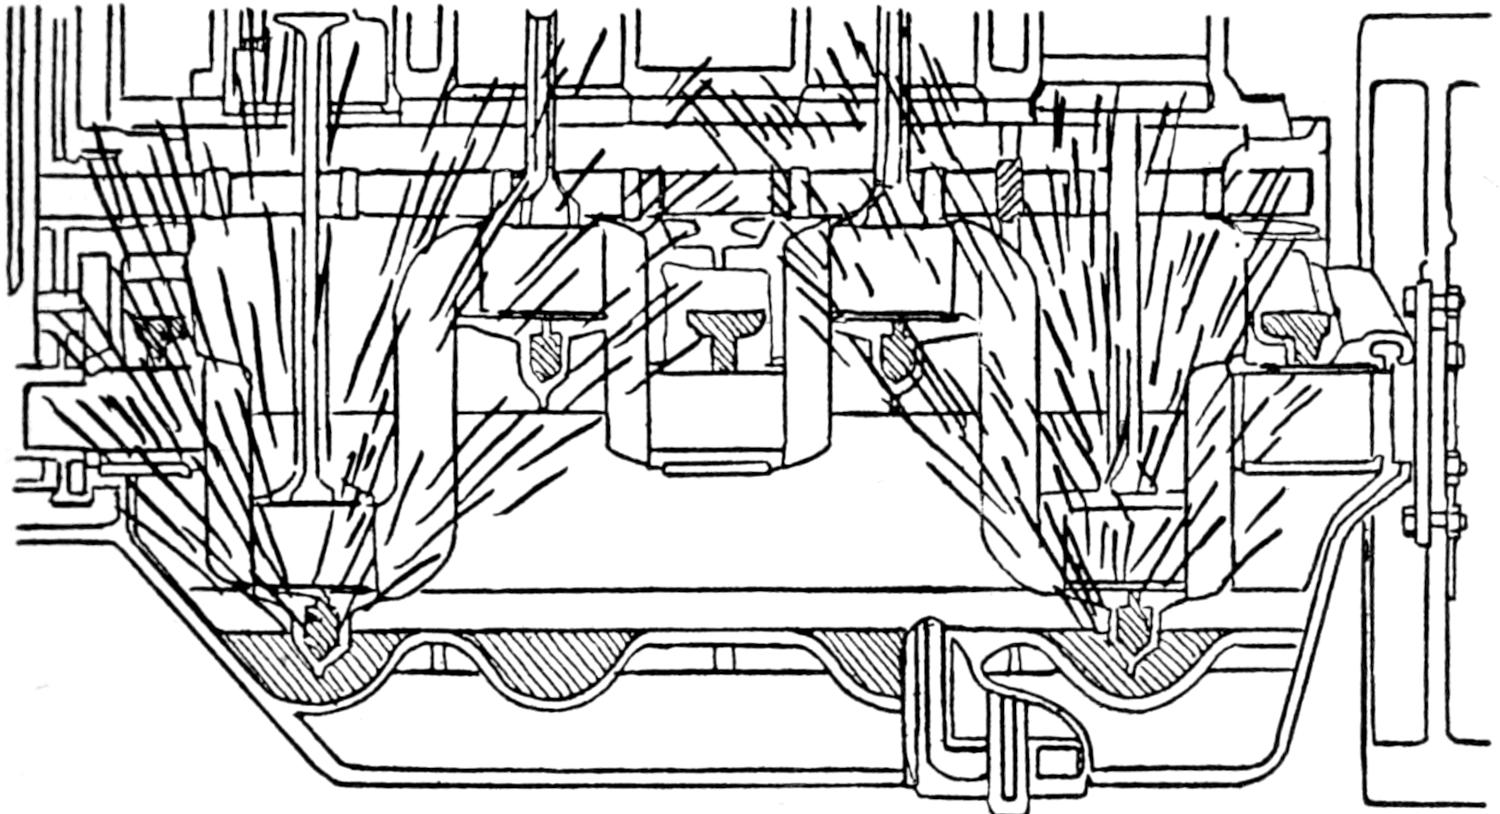
Fig. 24. Splash Oiling
Care of the Splash System.—This type of oiling system does not require any adjustments, or special care, except that the oil level be constantly kept between the high and low level marked on the gauge.
Cleaning the Splash System.—Lubricating oils lose their effectiveness and become thin and watery after a certain period of use due to a fluid deposit called residue which remains in the combustion chambers after the charge of gas has been fired. This fluid generally works its way into the crank case, thinning the oil.
The crank case should, therefore, be drained, cleaned, and refilled with fresh oil every fifth week or thousand miles that the car is driven. This will prevent much wear and give a quiet and satisfactory running motor. Draining and washing out the crank case is accomplished by removing a drain plug at the bottom of the crank case. The old oil is drained off and thrown away. Kerosene is then poured into the crank case through the breather pipe until it flows out of the drain clear in color. The plug is then replaced and the crank case replenished with fresh oil until the three-quarter from low level[42] is reached on the gauge. The oil level should be carried as near this point as possible to obtain the most satisfactory result.
Fig. 25 shows the plunger or piston pump pressure system usually used in conjunction with the splash system. The oil is carried in a reservoir at the bottom of the crank case and is drawn through a fine meshed screen by the oil pump, which is of the plunger type operated off the cam shaft. It forces the oil through copper tubes in the three main bearings. The front and center bearings have an outlet which furnishes the oil to the gears in front and to the troughs in which the connecting rods dip. The troughs have holes drilled to keep the level of the oil, the surplus being returned to the reservoir.
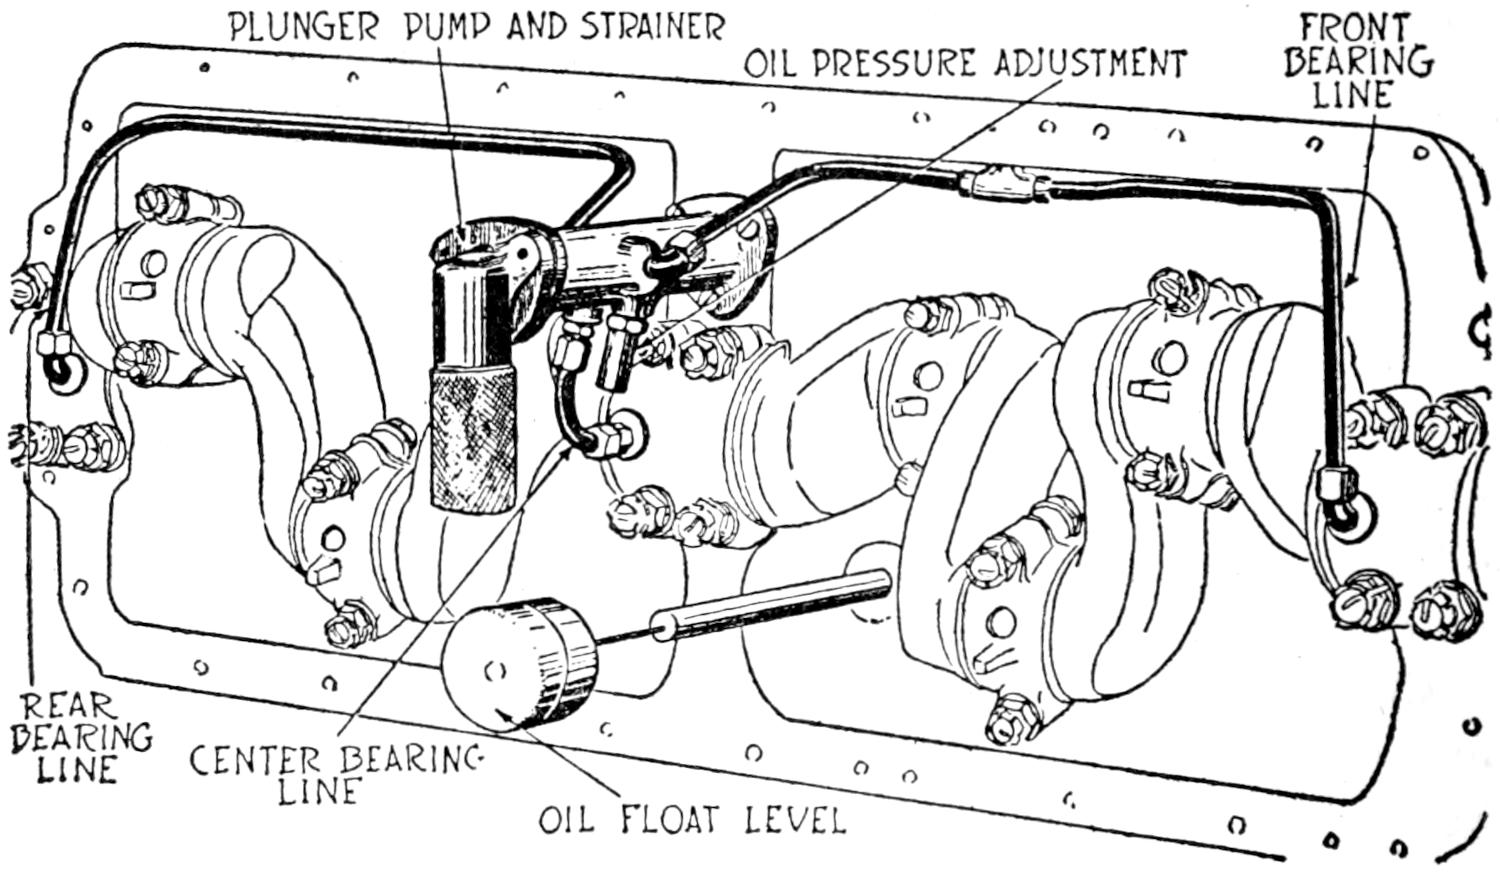
| PLUNGER PUMP AND STRAINER | OIL PRESSURE ADJUSTMENT | FRONT BEARING LINE |
||
| REAR BEARING LINE |
CENTER BEARING LINE |
OIL FLOAT LEVEL | ||
Fig. 25. Plunger Pump Oiling System
There is a pipe line running from the pump to the gear case with a screw adjustment to regulate the oil pressure by turning either in or out. There is a pipe line running to a gauge on the dash which gives the pressure at all times. The cam shaft and cylinder walls get the oil by the splash from the connecting rods. The bottom rings of the pistons wash the oil back into the crank case. The overflow from the front[43] bearings falls into a small compartment immediately under the crank shaft gear where it is picked up by this gear and carried to the other gears and the bearings of the water pump shaft. A small oil throw washer on the pump shaft prevents any surplus oil from being carried out on the shaft or the hub of the fan drive pulley. Any overflow from the gear compartment is carried immediately to the splash pan where it provides for the splash lubrication of the connecting rod bearings and the cylinder walls. The dippers on the connecting rod bearings should go 1⁄4 in. beneath the surface of the oil. The upward stroke of the oil pump plunger draws the oil through the lower ball check into the pump body and the downward stroke discharges it through the upper ball check into the body of the plunger which is hollow and has outlets on either side. This allows the oil to flow from the plunger into the by-pass in the oil pump body and then into the lines running to the main crank shaft bearings. The next upward stroke forces the oil through the lines to the main bearings.
The oil pressure regulator is located on the body of the pump and connects to the by-pass. It consists of a hollow sleeve screwed into the body of the pump which has a small ball check held by a short coiled spring the tension of which determines the oil pressure. The tension and the pressure may be increased by turning the nut to the right. The nut should not be given more than one turn at a time in either direction as it is very sensitive. A loose main bearing will allow more oil to pass through it. Consequently the pressure registered on the oil gauge will be reduced. This will come about gradually. It is not advisable to attempt to adjust the oil pressure without first noting the condition of the main crank shaft bearings.
The most common cause of failure to operate is the collection of dust and dirt on the sleeve at the lower end of the pump or from an accumulation of sediment back of the ball check. This needs to be cleaned from time to time.
Force and Gravity Oiling System.—The force and gravity[44] oiling system operates in much the same manner as the plunger pump system, except that the oil is pumped into an elevated tank from which it flows through lines by gravity to the various bearings. Oil pumps, however, differ in construction and some manufacturers use eccentric, centrifugal, and gear pumps. Oil pumps are very simple in construction and action and can be readily understood by recalling their functional action.
Oil pumps rarely give any trouble, and if they fail to function properly, dirt should be immediately suspected, and the ball valves and pipes inspected and cleaned.
[45]
A carburetor is a metering device whose function is to mechanically blend liquid fuel with a certain amount of air to produce as nearly a homogeneous mixture as possible, and in such proportions as will result in as perfect an explosive mixture as can be obtained.
If a gas is used as a fuel it is of course not so difficult to obtain a homogeneous mixture due to the intimacy with which a gas will mechanically mix with air. This intimacy is a result of the minuteness of the molecules of both the gas and the air. With a liquid fuel, such as gasoline, however, it is quite different, especially with low test gasoline. If it were possible to completely transfer the liquid fuel into its vapor the latter would act as a gas and would, therefore, mix with the air to form a homogeneous mixture. It should be, and is, therefore, the aim of the carburetor designer to produce an instrument which will atomize the fuel and break it up into small particles so that every minute particle of the fuel will be surrounded by a correct proportion of air when it is discharged into the intake manifold of the motor. To facilitate the vaporization of these minute particles of fuel it is advisable to preheat the air taken into the carburetor, thereby furnishing the necessary heat units required to vaporize the fuel by virtue of its physical property known as its latent heat of evaporation.
There is a range of proportions of air to vapor, for a given fuel, between which combustion will obtain. This range extends from that proportion known as the upper limit of combustion to that known as the lower limit of combustion. The upper limit is reached when the ratio of air to vapor is[46] a maximum at which combustion will take place; that is to say, any addition of air in excess of this maximum will render the mixture non-combustible. The lower limit is reached when the ratio of air to vapor is a minimum at which combustion will take place, any decrease of air below this minimum producing a non-combustible mixture. It should be remembered that the limits of combustion of any fuel with air are dependent upon the temperature and pressure.
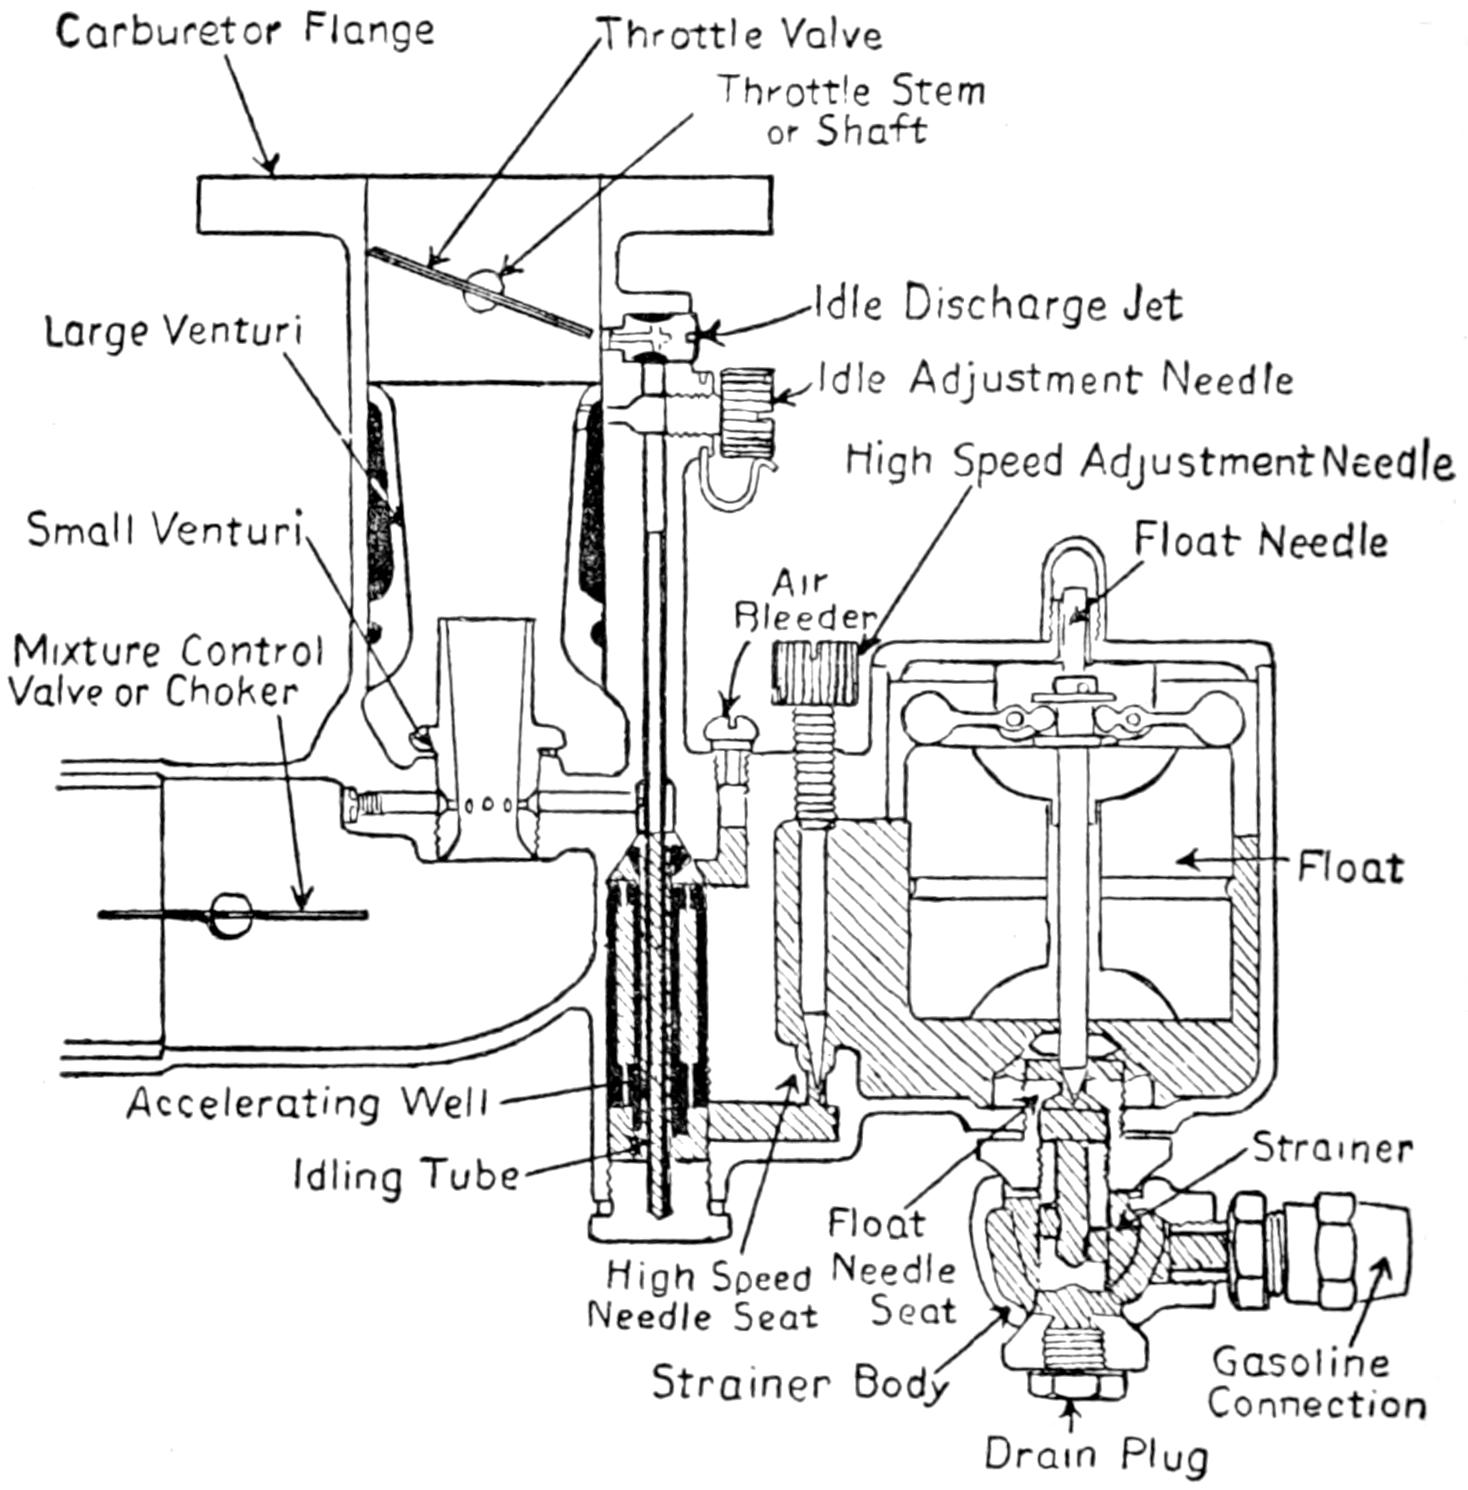
| Carburetor Flange | Throttle Valve | ||||
| Throttle Stem or Shaft |
|||||
| Large Venturi | Idle Discharge Jet | ||||
| Idle Adjustment Needle | |||||
| High Speed Adjustment Needle | |||||
| Small Venturi | Float Needle | ||||
| Air Bleeder |
|||||
| Mixture Control Valve or Choker |
|||||
| Float | |||||
| Accelerating Well | |||||
| Idling Tube | Strainer | ||||
| Float Needle Seat |
|||||
| High Speead Needle Seat |
|||||
| Strainer Body | Gasoline Connection |
||||
| Drain Plug | |||||
Fig. 26. Stromberg Model M Carburetor—Sectional View
Under given temperature and pressure the rate at which the combustible mixture will burn depends upon the ratio of air to vapor. This rate of burning is known as the rate of propagation, and it is apparent that it is desirable to obtain a mixture whose rate of propagation is a maximum, because the force of the explosion will depend upon the rapidity with which the entire mixture is completely ignited.
[47]
The limits of combustion of gasoline (.70 sp. gr.) can be taken approximately as follows: lower limit, 7 parts air (by weight) to 1 part gasoline, upper limit, 20 parts air to 1 part gasoline.
The Stromberg Plain Tube Model M Carburetor.—A plain tube carburetor is one in which both the air and the gasoline openings are fixed in size, and in which the gasoline is metered automatically, without the aid of moving parts by the suction of air velocity past the jets.
Fig. 26 shows a longitudinal section of a type M plain tube carburetor, and shows the location of the gasoline when the motor is at rest. The various parts are indicated by names and arrows. An elementary requirement of a carburetor is that as a metering device it shall properly proportion the gasoline and air throughout the entire operating range.
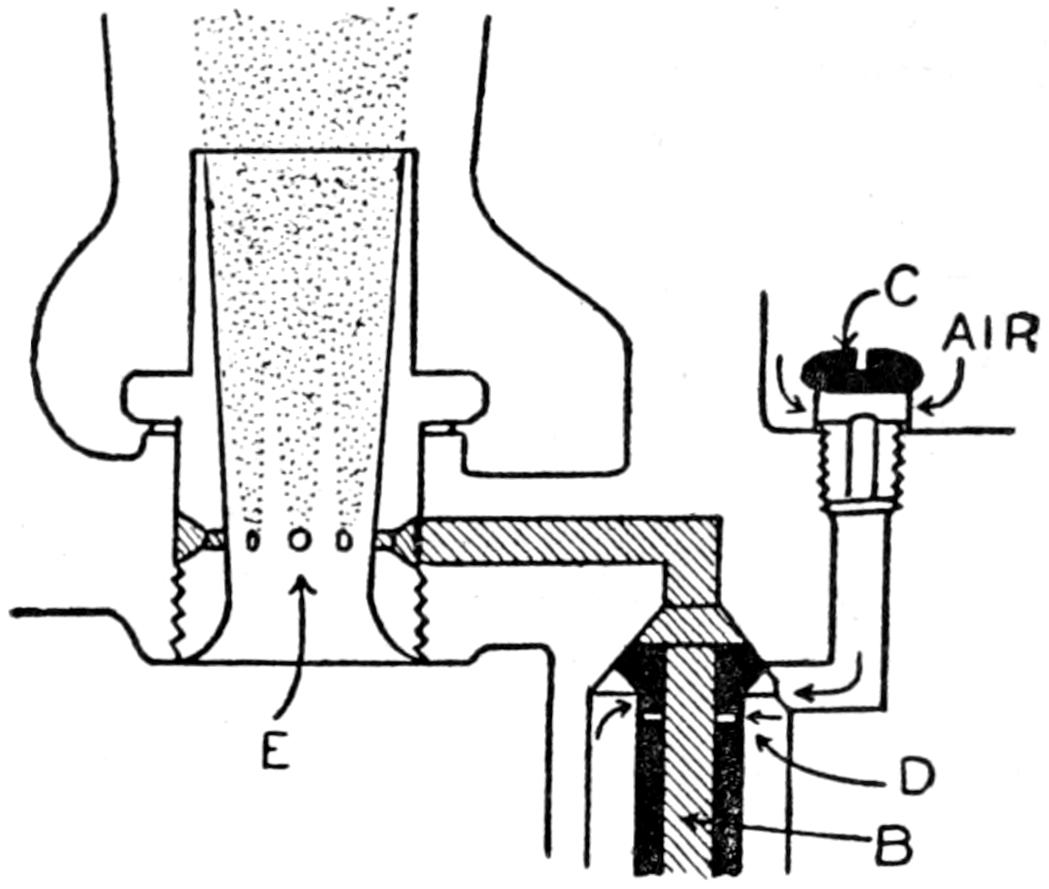
Fig. 27. Stromberg Carburetor Model M—Air Bleeder Action
In the carburetor under discussion this mixture proportioning is properly maintained by the use of what is termed the air bleed jet. Fig. 27 shows the principle of the action of the air bleeder. The gasoline leaves the float chamber, passes the point of the high speed adjusting needle, and rises through a vertical channel “B.” Air is taken in through the air bleeder “C,” and discharged into the gasoline channel before the[48] latter reaches the jet holes in the small venturi tube “E.” The result is that the air thus taken in breaks up the flow of gasoline and produces a finely divided emulsion. Upon reaching the jet holes of the small venturi tube this emulsion is discharged into the high velocity air stream in the form of a finely divided mist. If the reader will recall how thoroughly a soap bubble divides itself when it bursts, he will readily appreciate how completely the air bleed jet will atomize the fuel.
Before explaining the operation of the accelerating well it is advisable to know the reason for its existence. Suppose we had a large tube such as the intake manifold of a motor through which air and particles of gasoline were flowing due to a certain suction at one end. What would be the result if we suddenly increased the suction? It would be this: Due to the fact that air is so much lighter than gasoline, the air would respond almost instantly to the increased suction and its flow would be accelerated very suddenly, whereas the particles of gasoline, owing to that characteristic known as inertia, would not respond so rapidly, and due to its heavier weight its flow would not accelerate as much as the air. This would mean that the air would rush ahead of the gasoline particles, and the proportion of air to gasoline would be greater until the inertia forces had been overcome and the gasoline particles responded completely to the increased suction. This very thing will take place in a carburetor unless provision is made for it. That is to say a sudden opening of the throttle will tend toward producing a very lean mixture at the motor due to the lagging of the gasoline explained above. A lean mixture at this time, when acceleration is desired, would obviously be detrimental to the result wanted. It is at this particular time that additional gasoline is most desirable in order to compensate for the lagging gasoline and maintain the proper mixture at the motor. In the Stromberg carburetor this is accomplished by means of the accelerating well shown in Fig. 28. The operation is as follows: The action is based upon the principle of the ordinary U tube. If a U tube contains a liquid,[49] and if pressure is applied to one arm of the tube, or what is the same, if suction is applied to the other arm, it is self-evident that the level of the liquid will rise in the arm on which the suction is applied and will drop in the other arm. So it is in the construction of the accelerating well. Referring to the illustration, Fig. 28, the space “F” forms the one arm of the U tube, and the space “B” the other arm. These spaces communicate with each other through the holes “G” thus forming a modified form of U tube.
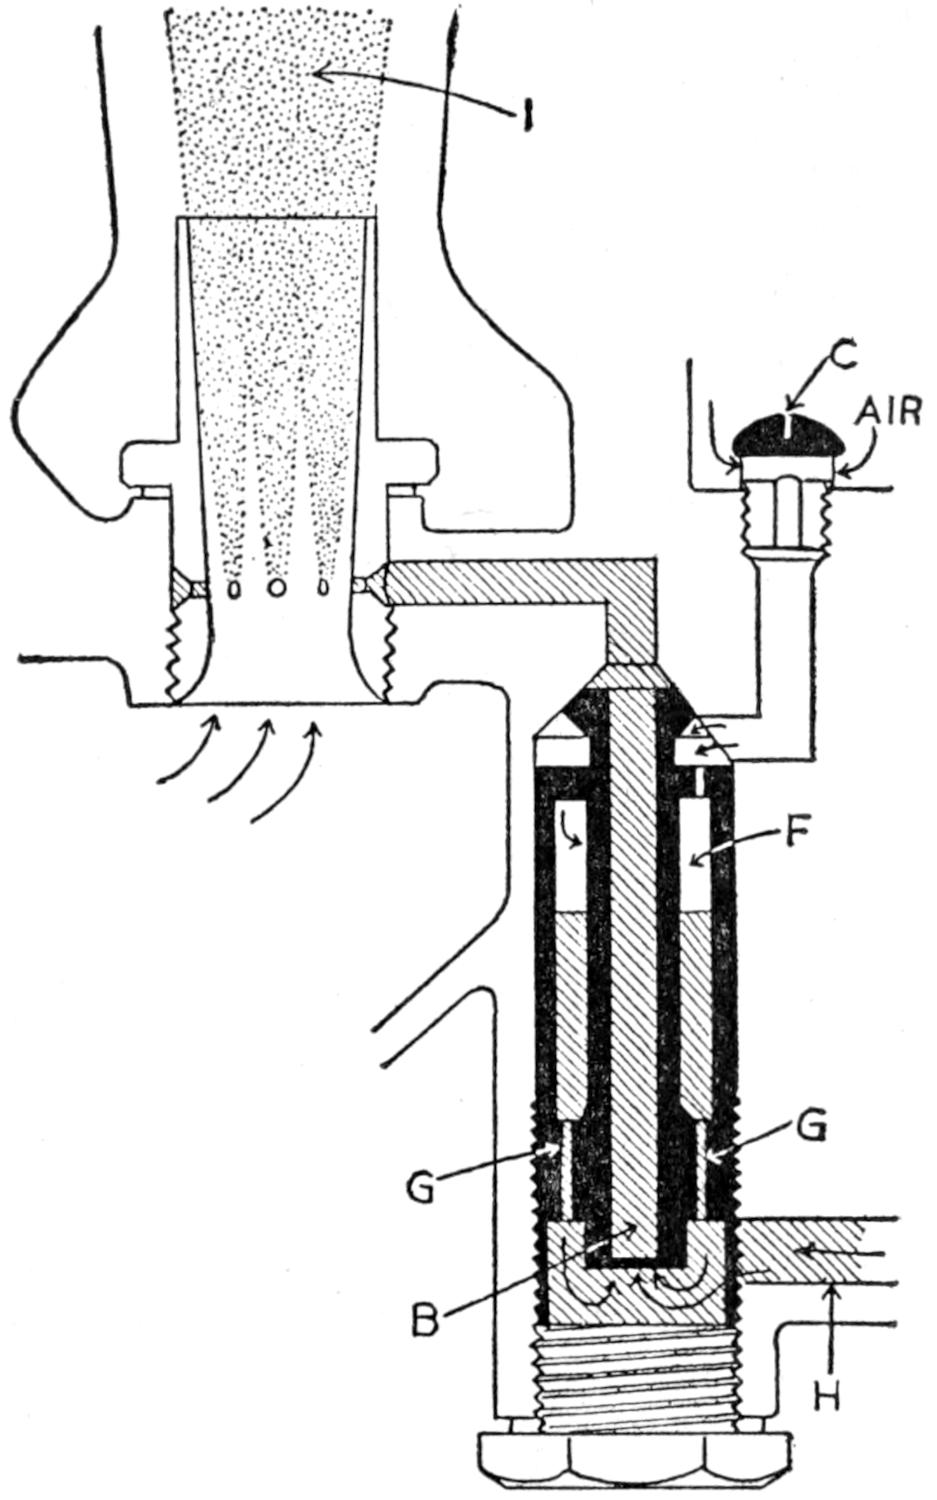
Fig. 28. Stromberg Carburetor Model M—Accelerating Well
When the motor is idling or retarding in speed, the accelerating well or space “F” fills with gasoline. Now when the throttle is opened, thereby increasing the suction in the[50] venturi tube, the following takes place: atmospheric pressure at the bleeder “C” exerts itself on the gasoline in the space “F” forcing the liquid down to join the regular flow from “H” and passing up the space “B” and out into the high velocity air stream through the small venturi tube. While the well acts the flow of gasoline is more than double the normal rate of flow, thereby compensating for the lagging of the gasoline referred to previously.
Upon close observation it will be noticed that there is a series of small holes down the wall of the well. Referring to the analogy of the U tube, these holes directly connect the two arms of the U tube. It is obvious that the smaller and fewer these holes, the faster will the well empty, due to the U tube suction, and the larger and more these holes, the slower will the well empty. It is therefore apparent that the rate of discharge of the well can be regulated as required by different motors, different grades of gasoline, different altitudes, etc., by inserting wells of different drillings. The action of the well is also dependent upon the size of the hole in the bleeder “C” because it is the relative area of this hole in the bleeder as compared to the area of the holes in the well which determine the rate at which the well will empty.
The foregoing characteristics of the model M carburetor have dealt more with the open throttle or high speed operation. We shall now consider the operation when the motor is idling. Earlier types of carburetors, when high test and very volatile gasoline was employed, were designed with a mixing chamber in which the gasoline, after being discharged from the nozzle, would mix with the air and evaporate very freely. Present day gasoline, however, is considerably heavier and very much less volatile, and we therefore cannot depend upon its volatility to accomplish its vaporization.
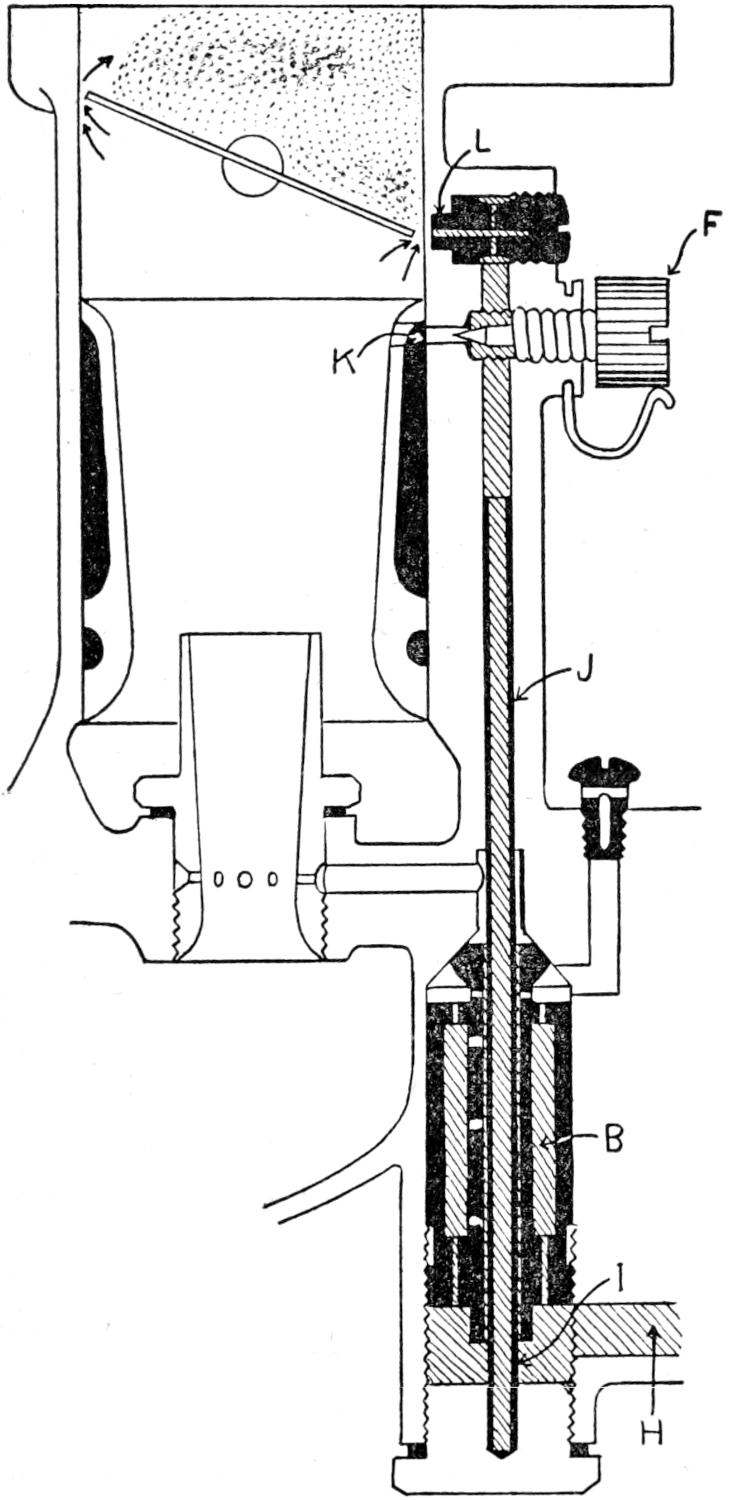
Fig. 29. Stromberg Carburetor Model M—Idling Operation
Fig. 29 shows the arrangement and idling operation of the model M Stromberg carburetor. Concentric and inside of the passage “B” is located the idling tube “J.” When the motor is idling, that is, when the throttle is practically closed, the action which takes place is as follows: the gasoline leaves the[51] float chamber, passes through the passage “H” into the idling tube through the hole “I,” thence up through the idling tube “J” to the idling jet “L.” Air is drawn through the hole “K” and mixes with the gasoline to form a finely divided[52] emulsion which passes on to the jet “L.” It will be noted that this jet directs the gasoline-air emulsion into the manifold just above the lip of the throttle valve. Inasmuch as this throttle valve is practically closed the vacuum created at the entrance of the jet “L” is very high and exceeds 8 pounds per square inch. It is obvious, therefore, with this condition existing, that the gasoline will be drawn into the manifold in a highly atomized condition. It is well to call attention here to the fact that the low speed adjusting screw “F” operates a needle valve which controls the amount of air which passes through the hole “K,” and it is the position of this needle valve which determines the idling mixture.
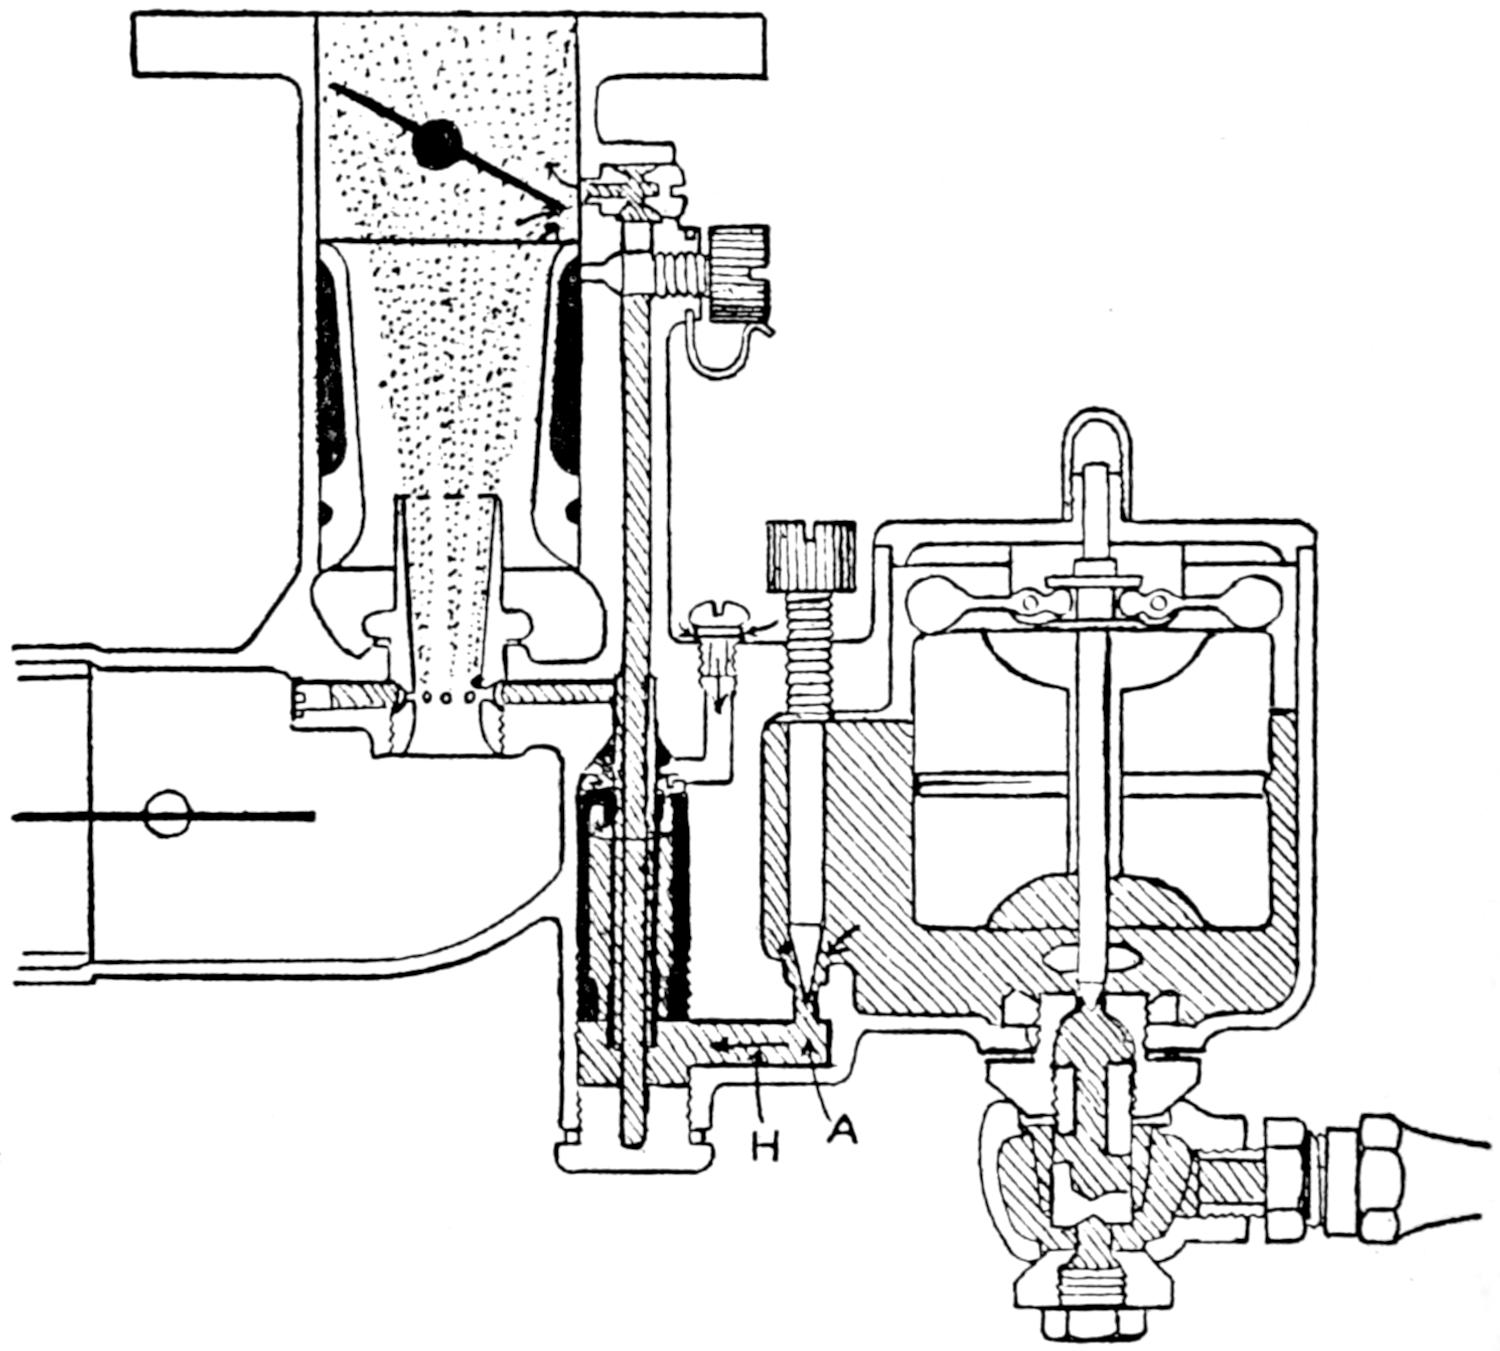
Fig. 30. Stromberg Carburetor—Throttle 1⁄5 Open
As the throttle is slightly opened from the idling position a suction is created in the throat of the small venturi tube as well as at the idling jet. When idling the suction is greater at the idling jet, and when the throttle is open the suction is greater at the small venturi tube. At some intermediate position[53] of the throttle there is a time when the suction at the idling jet is equal to that at the small venturi, and, therefore, at this particular time the gasoline will follow both channels to the manifold. This condition which is illustrated in Fig. 30 lasts but a very short while, because as the throttle is opened wider the suction at the small venturi tube rapidly becomes greater than that at the idling jet. The result is that the idling tube and idling jet are thrown entirely out of action, the level of the gasoline in the idling tube dropping as illustrated in Fig. 31, where the throttle is shown to be wide open, in which case all of the gasoline enters the manifold by way of the holes in the small venturi tube.
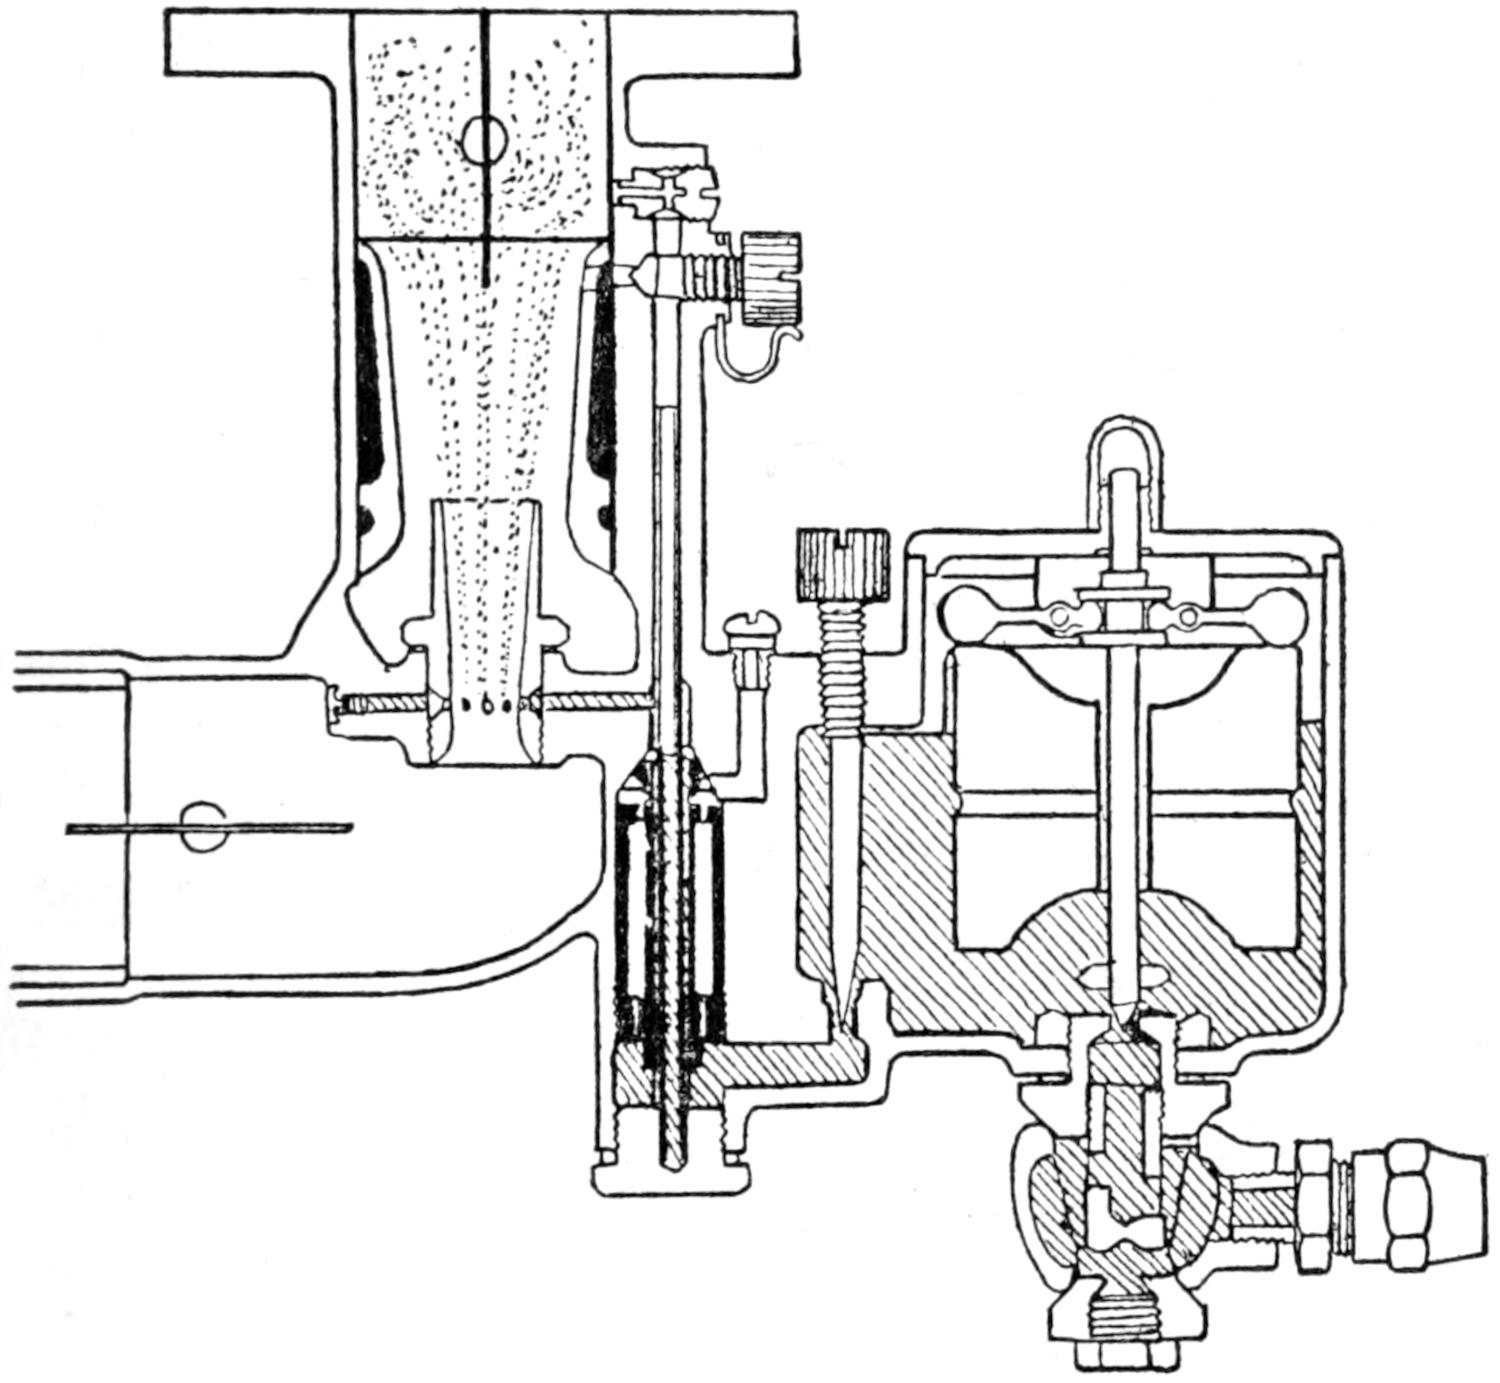
Fig. 31. Stromberg Carburetor—Throttle Wide Open
It will be remembered that at this position of the throttle the accelerating well has emptied, and therefore there is a direct passage for air from the bleeder to the gasoline in the main passage giving the air bleed jet feature explained before. This is being mentioned again in order to call attention[54] to the fact that care should be taken not to use too large a bleeder, because the air which enters through the bleeder partly determines the mixture, and if the bleeder hole is too large the mixture is very apt to be too lean at high speeds.
Fig. 32 shows an exterior photograph of one of the type M Stromberg carburetor. Before discussing the installation and adjusting of this carburetor it will be well to say a few words concerning the use of the venturi tube and its construction.
The object in using the venturi tube in carburetor design is to produce a maximum air velocity at the jet and at the same time not cause undue restriction. This high air velocity creates the suction necessary to properly atomize the gasoline. The use of the double venturi tube construction has developed the best possible results. In this construction the mouth of the smaller venturi tube is located at the throat of the larger one, and with this arrangement the highest degree of atomization is attainable, and at the same time the air restriction is held down to a minimum.
In order that any carburetor may do justice to what is claimed for it, it is absolutely essential that the motor on which it is installed is in good condition in other respects because, besides poor carburetion, there are numerous things about an internal combustion engine which will cause its poor operation. Therefore, assuming that the following conditions exist, we can proceed with the installation of the carburetor and after adjusting it we can expect very good results as to the operation of the motor.
1. The ignition should be properly timed so that with a retarded spark the explosion takes place when the piston of the cylinder in which the explosion occurs is at its upper dead center.
2. The inlet and exhaust valves should be so timed that they open and close at the proper time during the cycle. In this respect a motor is usually timed when it comes from the manufacturer.
3. The valves should be ground in so that they form a perfect[55] seal with the valve seat. Any accumulation of carbon on the upper part of the exhaust should be removed so as to prevent the valve stem from sticking in the guide and thereby not permitting the valve to close upon its seat.
4. Any undue wear of the valve stem guides should be corrected because the clearance between the stem and the walls of the guide will permit air to be drawn up into the motor thus ruining the mixture from the carburetor. Similarly any leaky flange at any joint along the intake system will produce the same detrimental result.
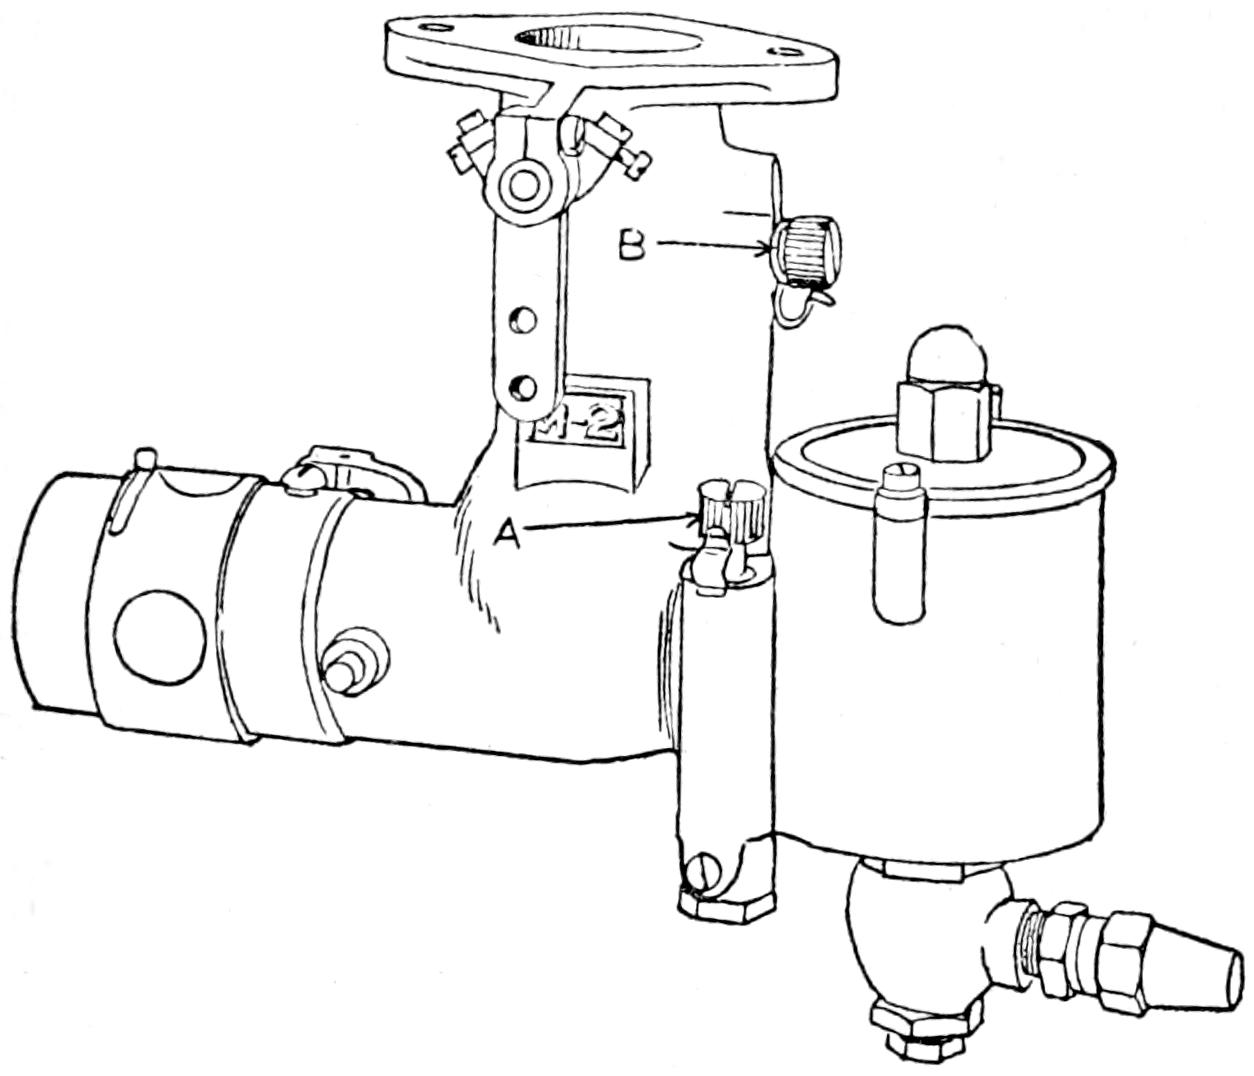
Fig. 32. Stromberg Model M—Adjustment Points
5. All piston rings should be tight and leak proof in order to insure good and even compression in all the cylinders. Without good and even compression in all the cylinders it is impossible to obtain the maximum power from the motor, and it is also impossible to obtain good idling of the motor.
6. It should be seen that the ignition system is delivering a spark to each spark plug without missing.
7. The spark plugs should be clean, and the accumulation of carbon on the inside of the plug should not be sufficient to cause fouling or short-circuiting of the plug. In the case of[56] a short circuited plug it is impossible to obtain a spark at the end of the high tension cable, but this does not indicate that the plug is firing. For best results the gap of the spark plug should never be less than .020″ nor more than .032″. A good setting is at about .025″.
The foregoing constitute some of the more important troubles to look for when the motor is not performing satisfactorily.
Installation and Adjusting.—We are finally ready to proceed with instructions for installing and adjusting Model M carburetors.
1. Try the throttle lever and the air horn lever by moving same with the hand before the carburetor is installed, and be sure that the butterfly valves are open to the limit when the respective levers come in contact with their stops. Also be sure that when the throttle valve is closed, the lower side of the butterfly is adjacent to the hole through which the idling jet projects.
2. Prepare a paper gasket about .020″ thick to fit the flange of the carburetor. Shellac same and then attach the carburetor to the flange of the intake manifold very securely by means of proper cap screws.
The attaching of the gasoline line, hot-air stove, hot air flexible tubing, and choke control need not be discussed in detail as these installations are very simple.
After having properly installed the carburetor on the motor, turn both the high and low speed adjusting screws, A and B, completely down clockwise so that the needle valves just touch their respective seats. Then unscrew (anti-clockwise) the high speed adjusting screw A about three turns off the seat, and turn the low speed adjusting screw B anti-clockwise about one and one-half turns off the seat. These settings are not to be considered as final adjustments of the carburetor. They are merely to be taken as starting points because the motor will run freely with these settings.
After the motor has been started, permit it to run long enough to become thoroughly warm then make the high speed[57] adjustment. Advance the spark to the position for normal running. Advance the gas throttle until the motor is running at approximately 750 r. p. m. Then turn down on the high speed screw A gradually notch by notch until a slowing down of the motor is observed. Then turn up or open the screw anti-clockwise until the motor runs at the highest rate of speed for that particular setting of the throttle.
To make the low speed adjustment B proceed as follows: Retard the spark fully and close the throttle as far as possible without causing the motor to come to a stop. If upon idling the motor tends to roll or load it is an indication that the mixture is too rich and therefore the low speed screw B should be turned away from the seat anti-clockwise, thereby permitting more air to enter into the idling mixture. It is safe to say that the best idling results will be obtained when the screw B is not much more or less than one and one-half turns off the seat.
After satisfactory adjustments have been made with the motor vehicle stationary, it is most important and advisable to take the vehicle out on the road for further observation and finer adjustments. If upon rather sudden opening of the throttle the motor backfires, it is an indication that the high speed mixture is too lean, and in this case the high speed screw A should be opened one notch at a time until the tendency to backfire ceases. On the other hand if when running along with throttle open, the motor rolls or loads, it is an indication that the mixture is too rich, and this condition is overcome by turning the high speed screw A down (clockwise) until this loading is eliminated.
There are three adjustments; the high speed, the extremely low speed or idle, and the “economizer.”
The high speed is controlled by the knurled nut “A” which locates the position of the needle “E” past whose point is taken all the gasoline at all speeds. Turning nut “A” to the[58] right (clockwise) raises the needle “E” and gives more gasoline, to the left, or anticlockwise, less.
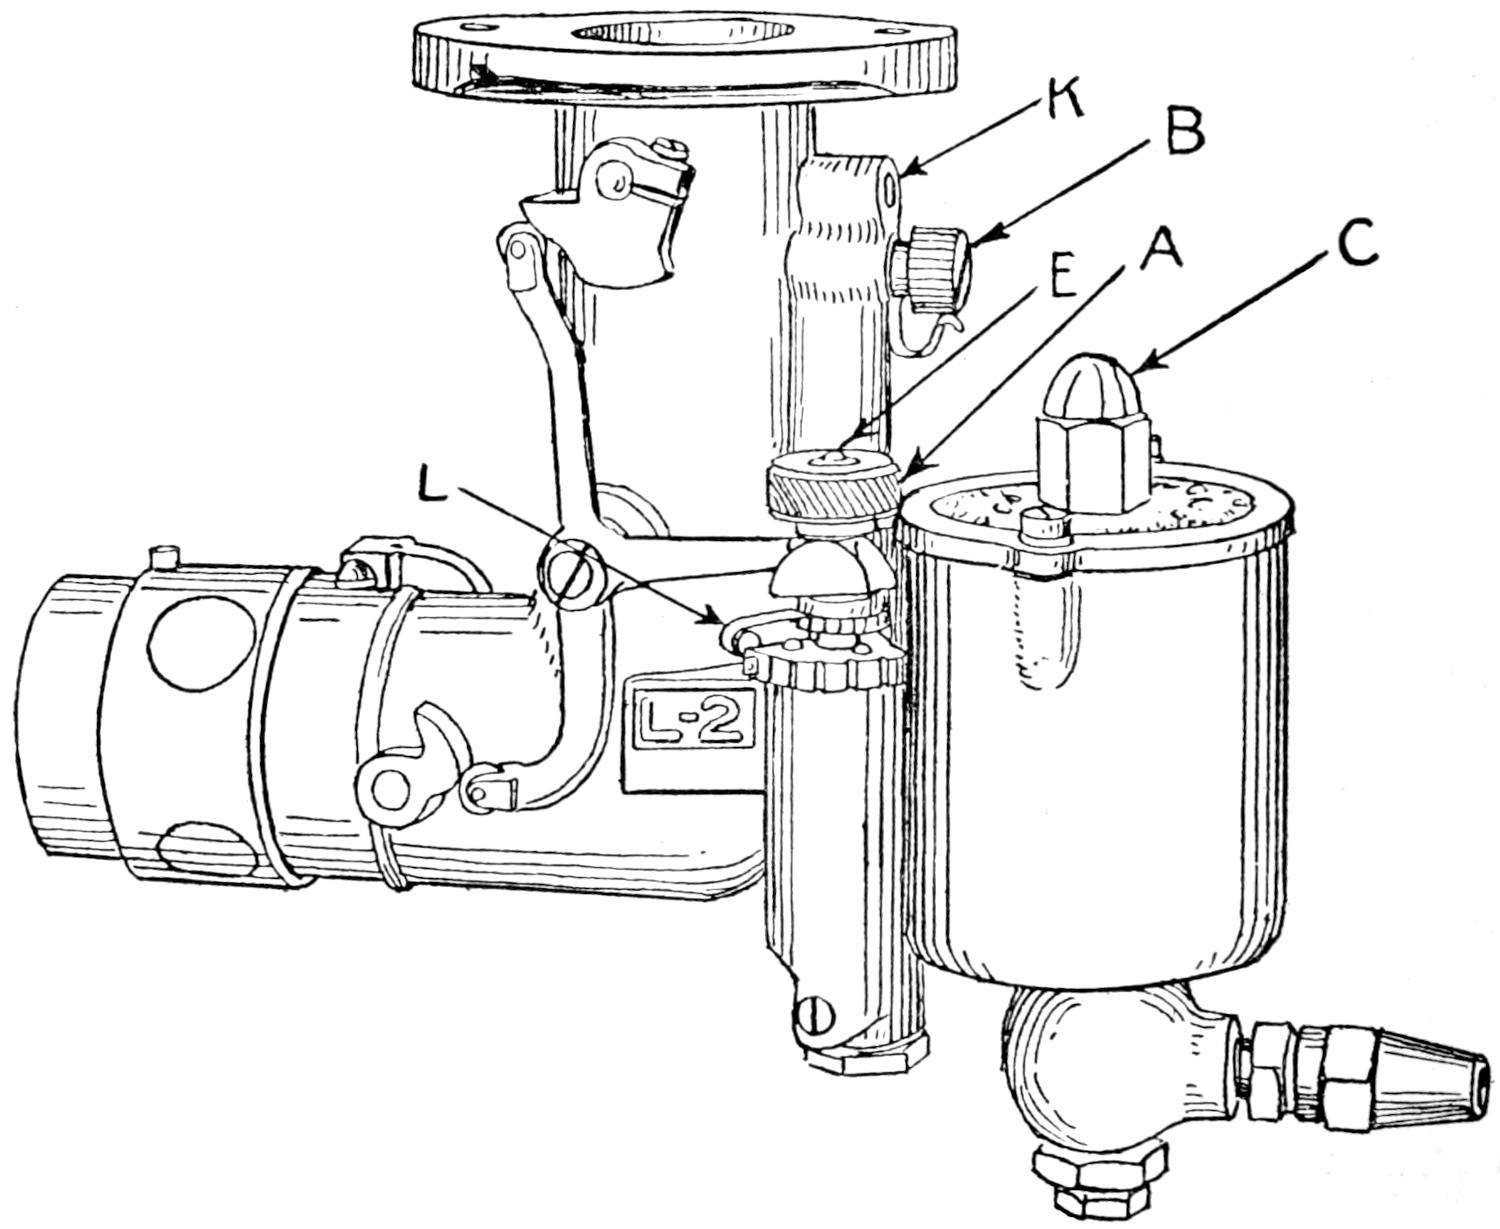
Fig. 33. Stromberg Model “L”—Adjustment Points
If an entirely new adjustment is necessary, use the following practice. Put economizer “L” in the 5th notch (or farthest from float chamber) as an indicator, turn nut “A” to the left, anticlockwise, until needle “E” reaches its seat, as shown by nut “A” not moving when throttle is opened and closed. When needle “E” is in its seat it can be felt to stick slightly when nut “A” is lifted with the fingers. Find adjustment of “A” where it just begins to move with the throttle opening, then give 24 notches to the right or clockwise (the notches can be felt). Then move the economizer pointer “L” back to the 0 notch (toward float chamber). This will give a rich adjustment. After starting and warming up the motor, thin out the mixture by turning “A” anticlockwise, and find the[59] point where the motor responds best to quick opening of the throttle, and shows the best power.
The gasoline for low speed is taken in above the throttle through a jet at “K” and is regulated by dilution with air as controlled by the low speed adjusting screw “B.” Screwing “B” in clockwise gives more gasoline; outward, less. The best adjustment is usually 1⁄2 to 3 turns outward from a seating position. Note that this is only an idling adjustment and does not effect the mixture above 8 miles per hour. When motor is idling properly there should be a steady hiss in the carburetor; if there is a weak cylinder or manifold leak, or if the idle adjustment is very much too rich, the hiss will be unsteady.
The economizer device operates to lean out the mixture by lowering the high speed needle “E” and nut “A” a slight but definitely regulated amount at throttle positions corresponding to speeds from 5 to 40 miles per hour. The amount of drop and consequent leaning is regulated by the pointer “L.”
After making the high speed adjustment for best power, with pointer “L” in 0 notch, as above described, place throttle lever on steering wheel to a position giving about 20 miles per hour road speed. Then move pointer “L” clockwise (away from float chamber), one notch at a time, till motor begins to slow down. Then come back one notch.
The amount of economizer action needed depends upon the grade of gasoline and upon the temperature.
In the mid-west the best economizer adjustment will usually be the third or fourth notch. With Pennsylvania gasoline and in the South, the 2nd notch; while on the Pacific coast no economizer is necessary unless distillate (which should not be below 59 degrees Baume) is used. Also fewer notches economizer action will be necessary in summer than in winter.
[60]
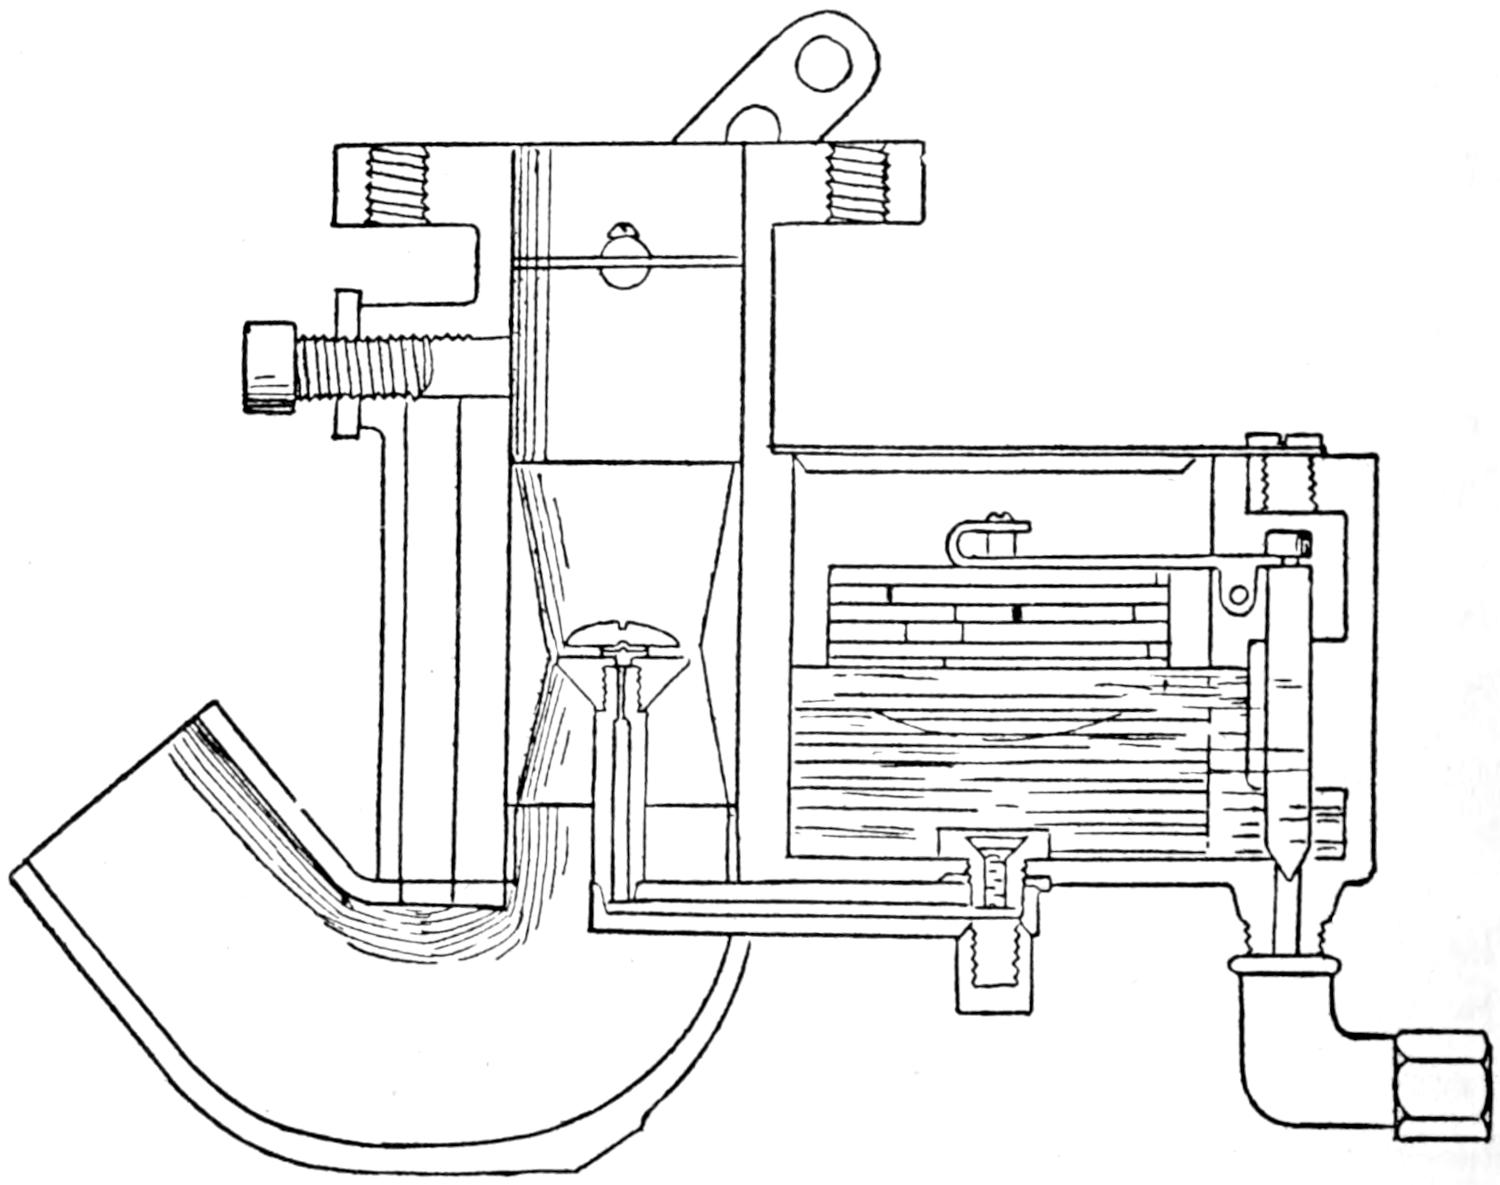
Fig. 34. Sunderman Carburetor
Fig. 34 shows a through section of the new “Nitro”-Sunderman carburetor. This is practically a new model presented to the automobile industry for 1919 and 1920. It is claimed that it is an exact fulfillment of the long sought method of accurate compensation. It is of the single plain tube design with a single gasoline nozzle in the shape of a mushroom placed in the center of the air passage. Around this nozzle, however, rests the floating venturi which is a large end and[61] small center floating air tube seen in Fig. 35 which hurries the air at low speeds and checks the rush at high velocities. Fig. 35 shows the commencement of action at idling speeds, and as the gasoline for idling comes from the same nozzle which furnishes the maximum power, an air by-pass is provided to reduce the suction on the nozzle at low speeds. The one single adjustment on this type of carburetor is shown at (X) in Fig. 36, and is used only to control the passage of air through the by-pass at idling or low speeds. In Fig. 34 the engine’s demand has increased to a point where the suction is greater than the weight of the venturi, which causes it to rise on the air stream, and open up the air passage around the head of the nozzle. This allows the compensation for the correct ratios of the air and gasoline mixtures.
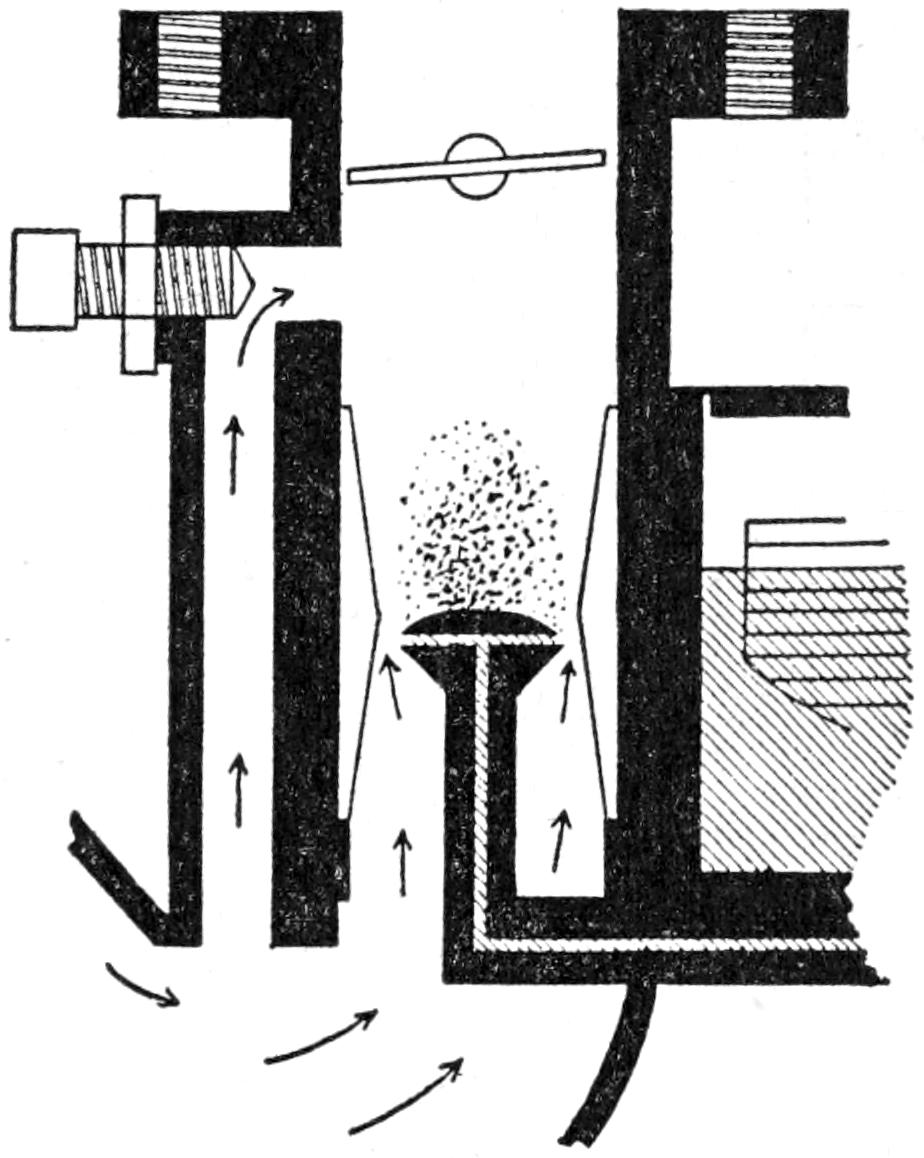
Fig. 35. Sunderman Carburetor
In Fig. 37 the venturi closes the air by-pass and under full suction, gives the maximum area around the nozzle for leaner mixtures and full volumetric. The unrestricted air passage[62] in the plain tube type of carburetor is here worked out to its fullest development.
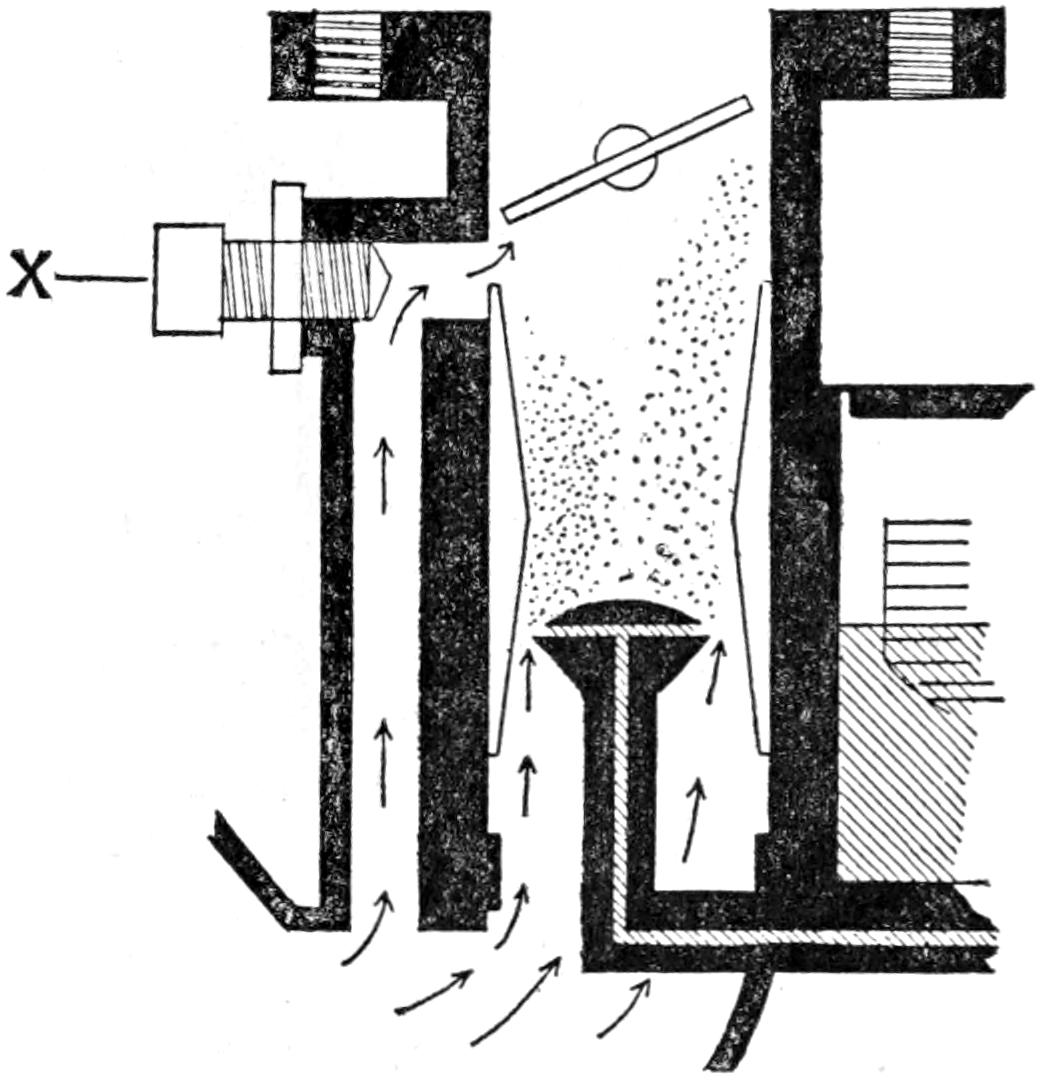
Fig. 36. Sunderman Carburetor
The Venturi.—This is a stream line air passage tapered to a narrow throat near the center which increases the velocities without offering a restriction to the free air passage, and being of a very loose fit in the carburetor, is allowed to float up and down on the air stream around the nozzle over which it automatically centers at all times. The venturi goes into action slowly as it is retarded by the action of the air by-pass, but rises fast when the latter is cut off. It rides on the air stream at a perfect balance and offers no resistance to the air passage because of its stream line taper, and as the venturi float is sensitive to a fine degree, it is ready for any change in the motor suction and compensates accordingly. The jet tube running up into the mushroom head contains a jet which is drilled for the particular requirements of the motor on which the carburetor is installed. This jet feeds into the mushroom head which is drilled with four small holes which spread the gasoline by capillary action in a fine fan film to all sides of the under surfaces of the slot. Here[63] the ascending air picks it off at right angles to its path in a very fine vapor. This vapor is carried up the stream line venturi without cross currents and is in a finely mixed state of flame-propagation. The heavier fuels are readily broken up with this nozzle and straight kerosene has been used with success. This carburetor does not require any other care than a thorough cleaning out once or twice in a season.
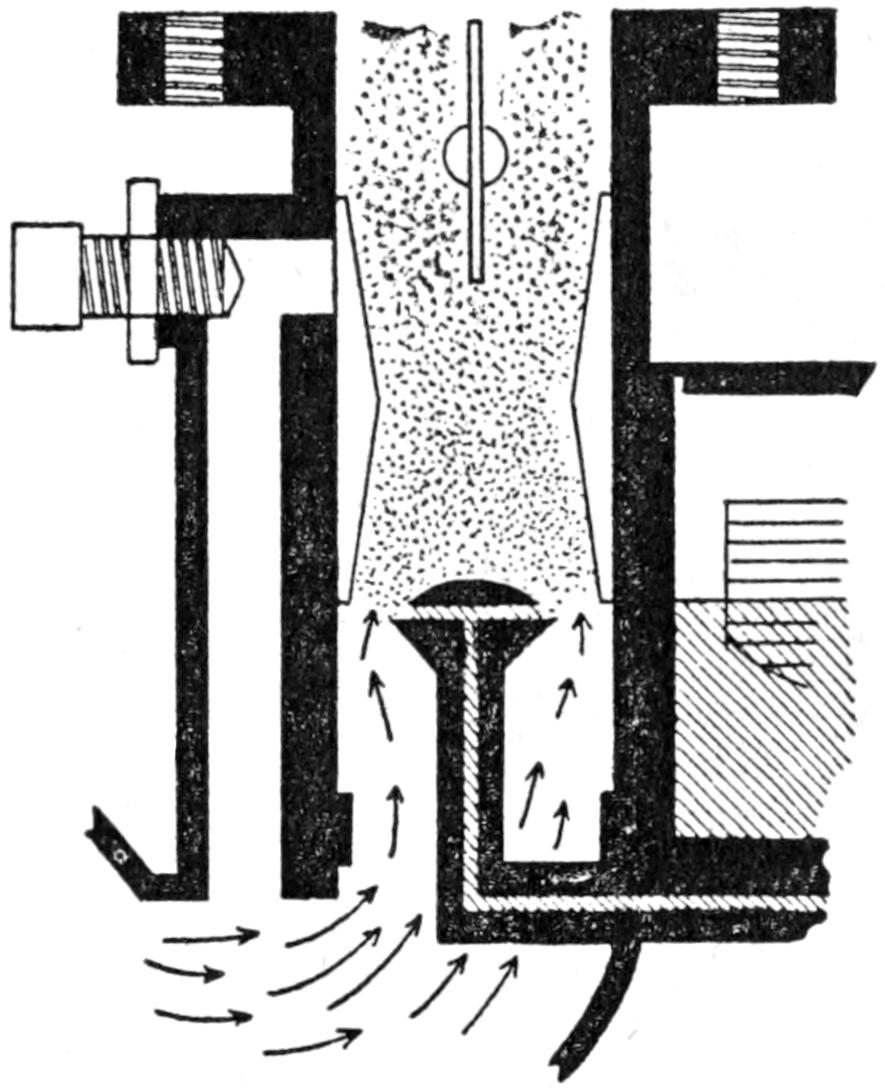
Fig. 37. Sunderman Carburetor
Fig. 38 shows a section view of operation and adjustment on the model “R” Schebler carburetor. This carburetor is designed for use on both four and six cylindered motors. It is of the single jet raised needle type, automatic in action, the air valve controlling the needle valve through a leverage arrangement. This leverage attachment automatically proportions the amount of gasoline and air mixture at all speeds. This type of carburetor has but two adjustments. The low speed adjustment which is made by turning the air valve cap and an adjustment on the air valve spring for[64] changing its tension. (A) shows the air valve adjusting cap. (B) is the dash control leverage attachment. (C) is the air valve and jet valve connection. (D) is the boss that raises the jet valve needle and lowers the spring tension on the air valve giving a rich mixture in starting. The needle valve seats in E and controls the nozzle spray. (F) is the air valve spring tension adjusting screw.
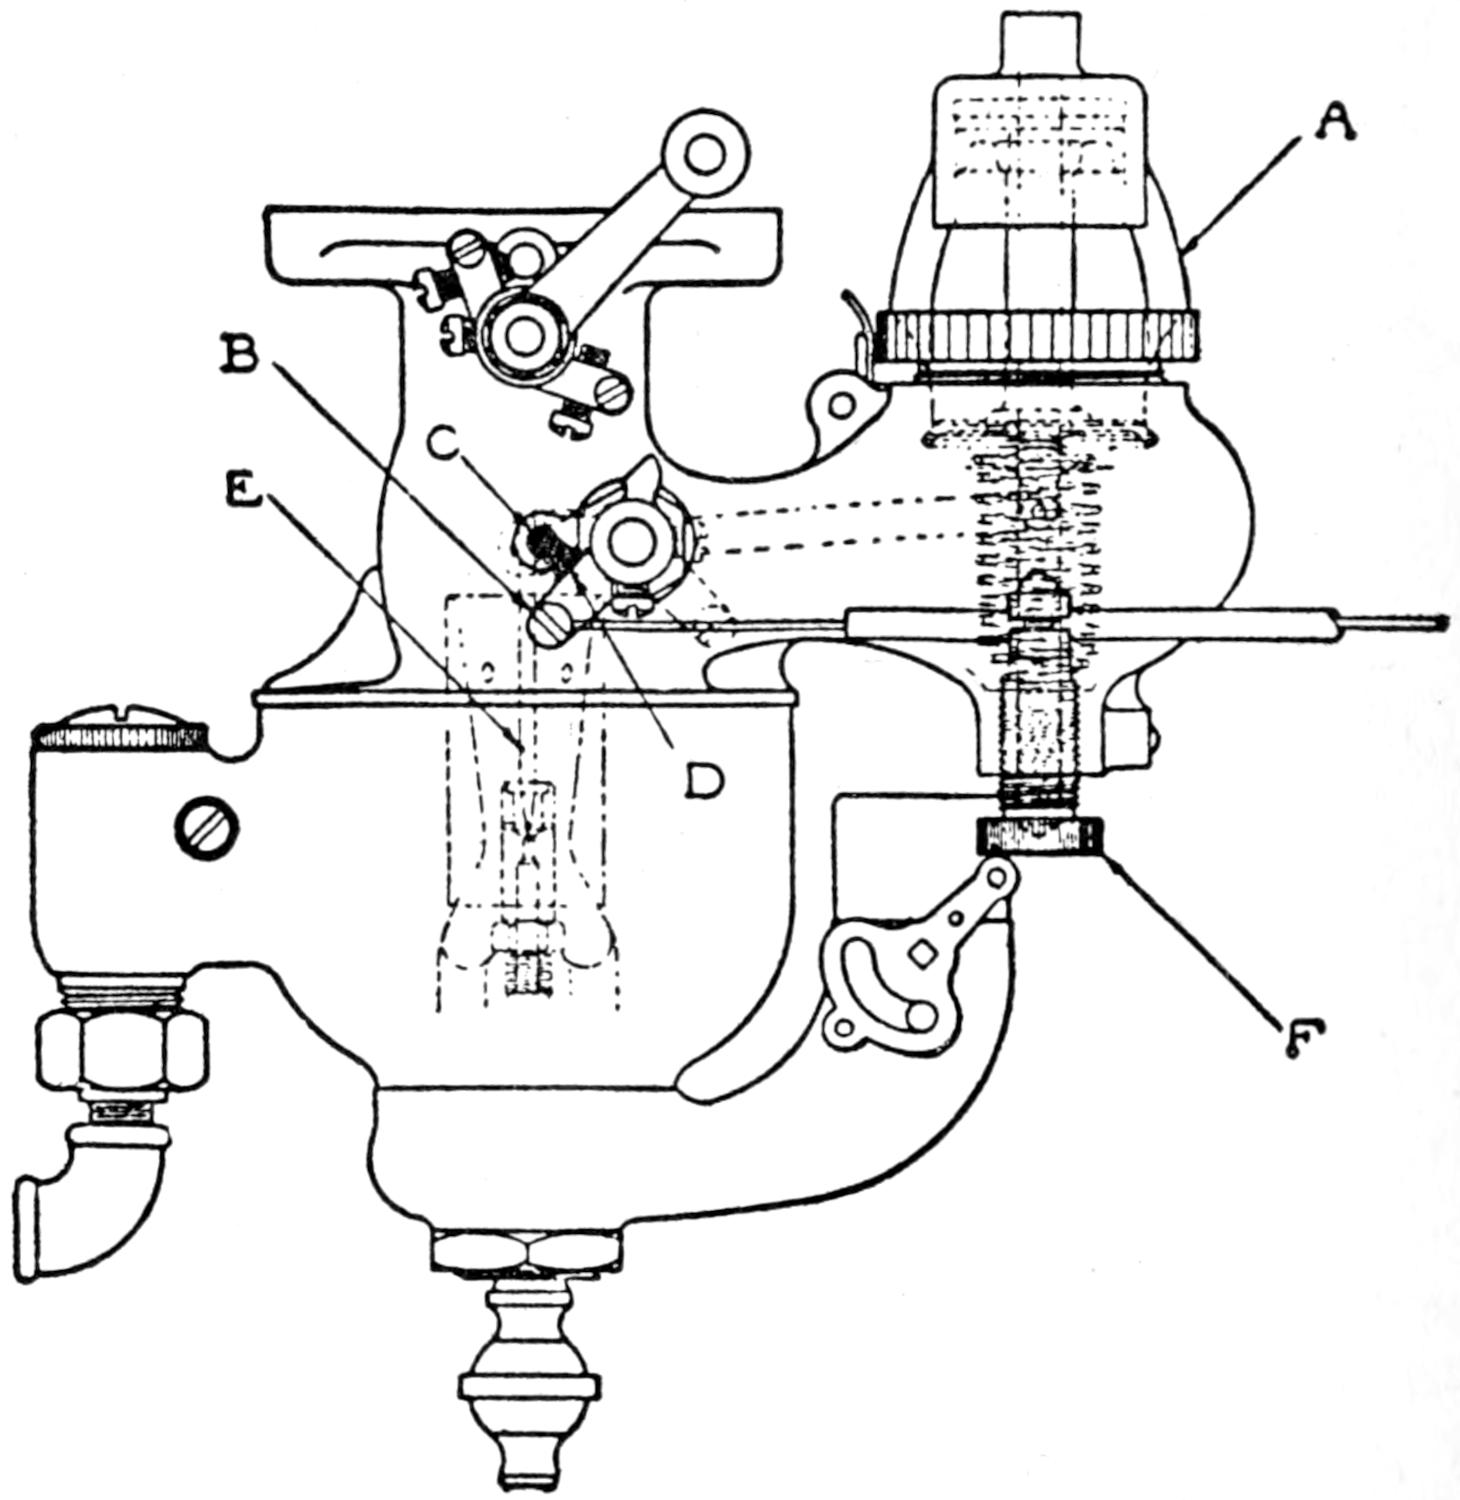
Fig. 38. Schebler Model R Carburetor Assembled
Model R Adjustment.—To adjust this carburetor turn the air valve cap to the right until it stops, then to the left one complete turn, start the motor with the throttle 1⁄4 open; after it is warmed up turn the air valve cap to the left until the motor hits perfectly. Advance throttle 3⁄4 on quadrant. If the engine backfires turn screw (F) up, increasing the tension on the air spring until acceleration is satisfactory.
[65]
Fig. 39 shows the Stewart carburetor used on Dodge Brothers cars, which is of the float feed type in which a fine spray of gasoline is drawn from an aspirating tube by a current of air induced by the engine pistons. The supply of gasoline being regulated by a float which actuates a needle valve controlling the outlet of the feed pipe. This tube is also called the spray nozzle. This type of carburetor is commonly used on automobile engines.
It consists of a float chamber containing a float, functions of which are described below, a mixing chamber in which the gasoline spray is reduced to vapor and mixed with air (i. e., “carbureted” in proper proportion).
The float and valve maintain a constant or even supply of gasoline for the carburetor.
The gasoline flows from the filter Z into the float chamber C through the inlet valve G, which is directly actuated by the float F, so that it closes or opens as the float rises or falls. As the float rises the valve is closed until the float reaches a certain predetermined level, at which the valve is entirely closed. If the float falls below this level because of a diminishing supply of gasoline in the float chamber, the valve is automatically opened and sufficient fresh gasoline is admitted to bring the level up to the proper point. From the foregoing it will be seen that the float chamber in reality serves as a reservoir of constant supply, in which any pressure to which the gasoline has been subjected in order to force it from the tank is eliminated. When the engine is running gasoline is, of course, being constantly drawn off from the float chamber through the aspirating tube L, as will be described later, to[66] meet the requirements of the motor, but in practice the resulting movement of the inlet valve is very slight and hence the flow of gasoline into the float chamber is nearly constant.
The gasoline inlet valve is also called the “needle valve.”
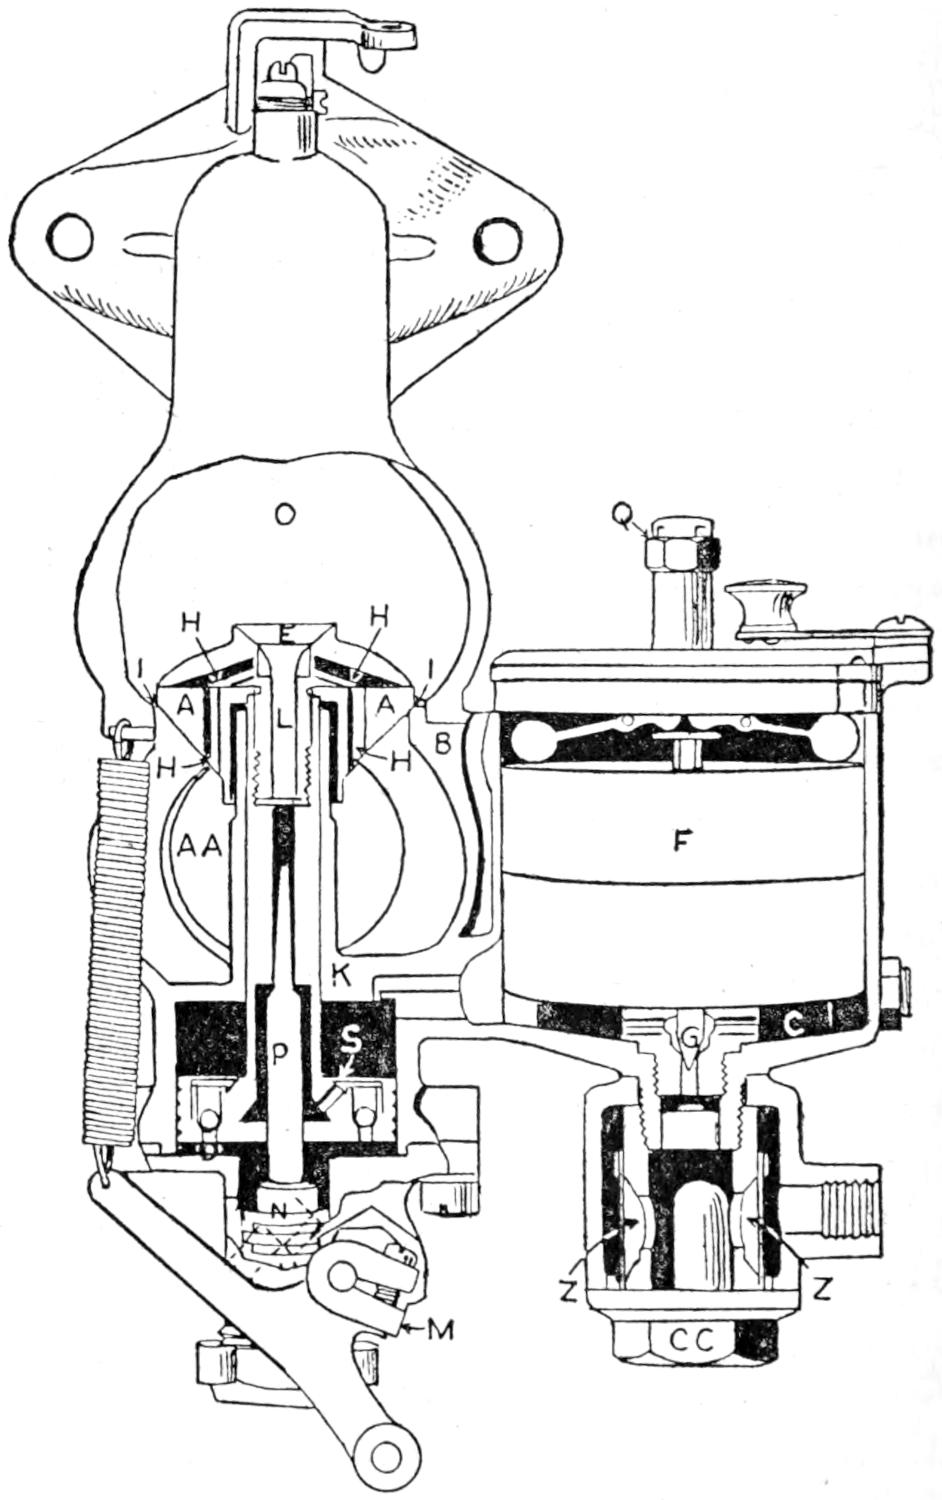
Fig. 39. Stewart Carburetor
Between the float chamber C and the engine connection of the carburetor is an enclosed space called the mixing chamber O. This compartment is provided with a valve for the ingress of free air.
[67]
Extending into the mixing chamber from a point below the surface of the gasoline in the float chamber is a passage, L for gasoline, ending with a nozzle, so constructed that gasoline drawn through it will come forth in a very fine spray. This is called the aspirating tube, atomizer, or more commonly, the spray nozzle.
The air inlet AA to the mixing chamber on the carburetor used on the Dodge is in the shape of a large tube extending from the carburetor to a box on the exhaust manifold. Air supplied from this source is heated in order that vaporization of gasoline may be more readily accomplished.
A cold air regulator is interposed between this tube and the carburetor proper so that in hot weather cool air may be admitted. This should always be closed when the temperature of the atmosphere is below 60 F.
The action of the carburetor is as follows: The suction created by the downward stroke of the pistons draws air into the mixing chamber through the air ducts (drilled holes HH). The same suction draws a fine spray of gasoline through the aspirating tube L (spray nozzle) into the same compartment, and the air, becoming impregnated with the gasoline vapor thus produced, becomes a highly explosive gas. In order that the proportion of air and gasoline vapor may be correct for all motor speeds, provision is made by means of a valve A for the automatic admission of larger quantities of both at high motor speeds. The ducts are open at all times, but the valve is held to its seat by its weight until the suction, increasing as the motor speed increases, is sufficient to lift it and admit a greater volume of air. The valve A is joined to the tube L, hence the latter is raised when the valve is lifted and the ingress of proportionately larger quantities of gasoline is made possible. This is accomplished by means of a metering pin P normally stationary, projecting upward into the tube L. The higher the tube rises the smaller is the section of the metering pin even with its opening, and hence the greater is the quantity of gasoline which may be taken into the tube. The carburetor thus automatically produces[68] the correct mixture and quantity for all motor speeds.
The metering pin is subject to control from the dash, as will be explained later, by means of a rack N, and pinion M. To change the fixed running position of the pin, turn the stop screw to the right or left. Turning this screw to the right lowers the position of the metering pin and turning it to the left raises it. As the pin is lowered more gasoline is admitted to the aspirating tube at a given motor speed, thus enriching the mixture.
A wider range of adjustment of the position of the metering pin may be had by releasing the clamp of the pinion shaft lever and changing its position with relation to the shaft. This should never be attempted by any save experts in this class of work.
The carburetor used on the Dodge Brothers car is so nearly automatic in its action that it is not effected by climatic conditions, or changes in altitude or temperature. It automatically adjusts itself to all variations of atmosphere. It is, therefore, wise to see if the causes of any troubles which may develop are not due to derangements elsewhere than at the carburetor before attempting any changes of its adjustment.
Make all adjustments with dash adjustment all the way in.
The metering pin should not be tampered with unless absolutely necessary.
If replacement of this pin should become necessary, it may be accomplished as follows: First, remove the cap nut at the bottom of the rack and pinion housing. Next, turn pinion shaft slowly from right to left (facing toward the carburetor) until the bottom of the metering pin appears at the bottom of the pinion shaft housing. Continue to turn the shaft slowly in the same direction, releasing the connection to the dash control if necessary, until the rack to which the pin is fastened drops out. The palm of the hand should be held to receive this as the parts are very loosely assembled. The pinion shaft should be retained at the exact position at which the rack is released. Install a new metering pin, the way to[69] do this will be obvious, and return the rack to its proper mesh with the pinion. Replace dash attachment (if detached), replace cap, adjust per instructions given on previous page.
The loose assembling of the metering pin in the rack is for the purpose of providing for freedom of movement of the metering pin and in order that binding in the aspirating tube may be avoided.
The gasoline filter is installed on the carburetor at a point where the fuel pipe is connected.
The pressure within the gasoline tank forces the fuel through the pipe, through the filter screen (ZO in the filter) and thence out through the opening to the carburetor.
The filter cap CC may be removed by turning the flanged nut on the bottom of carburetor to the left, thus releasing the inlet fitting.
The filter screen or strainer should occasionally be cleaned. This may be readily accomplished by removing the filter cap to which the screen is attached.
The filter should be screwed up tight when replaced.
[70]
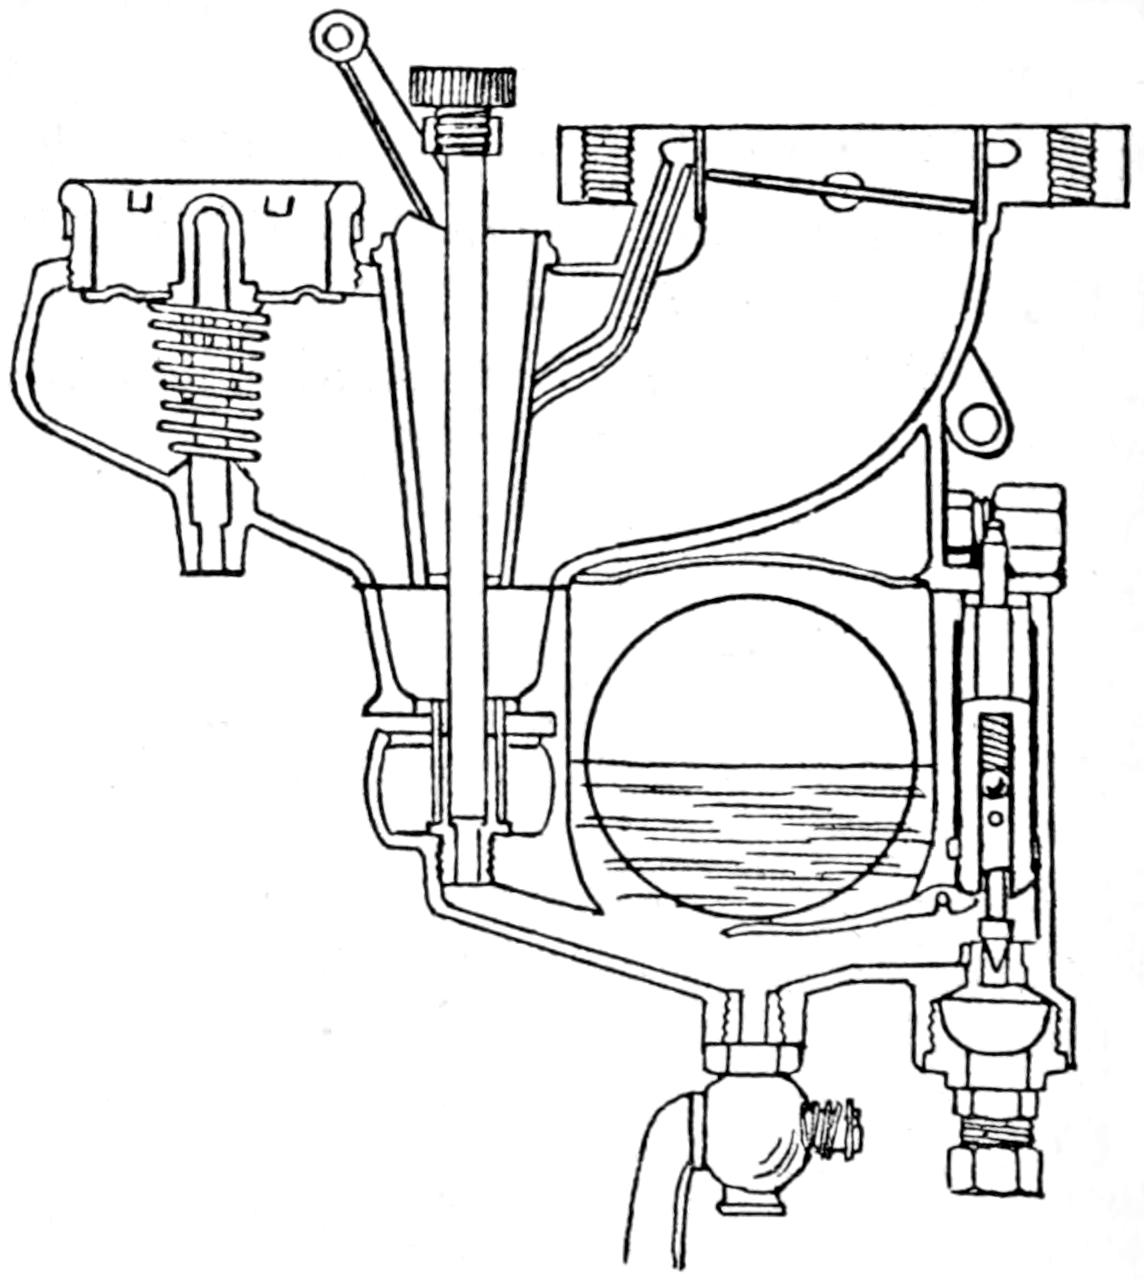
Fig. 40—Carter Carburetor
Fig. 40 shows the Carter carburetor which embodies a radically new principle. It belongs to the multiple-jet type, but possesses this striking difference, variations in fuel level are utilized to determine the number of jets in action at any time. The variations in fuel level occur in a vertical tube known as the “stand pipe.” They take place in instant response to the slightest change in the suction exerted by the engine. As this suction depends directly on the engine’s speed, it can clearly be seen that this provides a marvelously[71] sensitive means of automatic control. A large number of exceedingly small jets are bored spirally around the upper portion of this tube. As a result, the level at which the fuel stands within it, determines the number of jets from which delivery is being made at any instant and the gasoline supply is always directly proportioned to the engine speed, however suddenly changes in speed take place. Owing to the comparatively large number of these jets, their exceedingly small size, and their correspondingly short range of action, the flow of fuel is absolutely uninterrupted.
The instrument is permanently adjusted for low and intermediate speeds at the time of installation. An auxiliary air valve controlled from dash or steering post forms the high speed adjustment as well as affording a means of securing absolute uniformity of mixture under widely varying conditions of weather, temperature, or altitude, directly from the driver’s seat. A simple method of enabling each cylinder to such a rich priming charge direct from the float chamber is another valuable feature that obviates all need of priming and insures easy starting in the coldest winter weather.
[72]
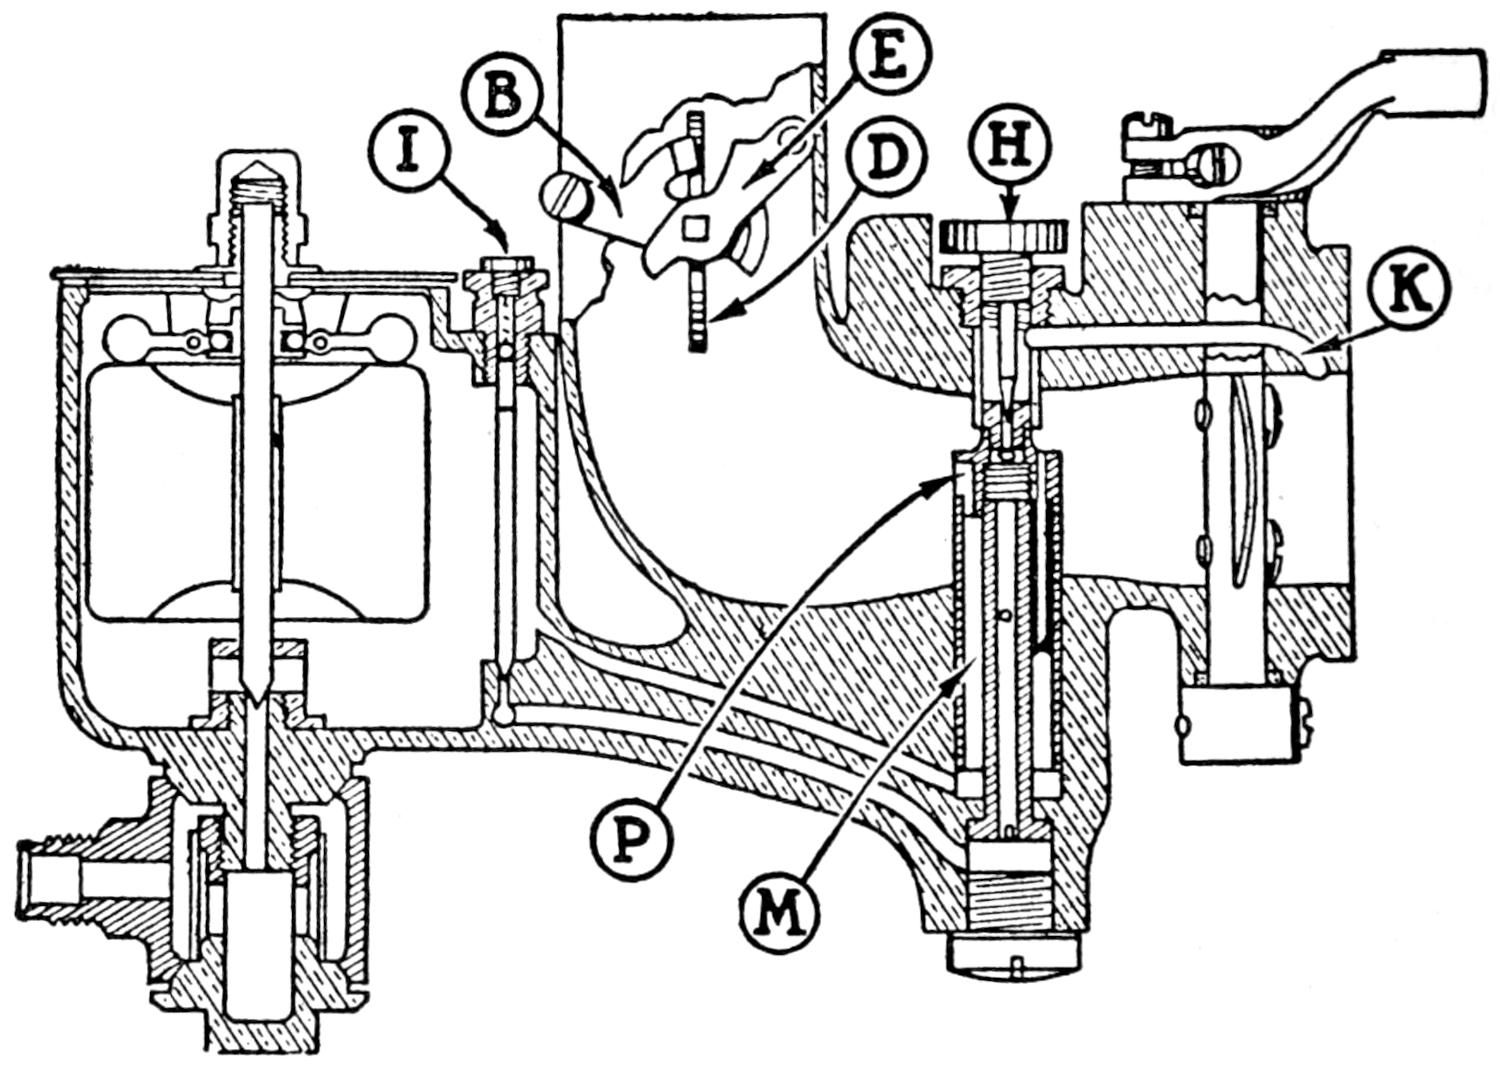
Fig. 41. Schebler Carburetor Model Ford A—Sectional View
| D | — | CHOKER OR SHUTTER IN AIR BEND. |
| BE | — | LEVERS CLOSING CHOKER, OPERATED FROM STEERING COLUMN AND FRONT OF RADIATOR. |
| H | — | LOW SPEED GASOLINE ADJUSTING NEEDLE. |
| I | — | HIGH SPEED GASOLINE ADJUSTING NEEDLE. |
| K | — | IDLE AND LOW SPEED BYPASS. |
| M | — | ACCELERATION WELL. |
| P | — | PILOT OPENING. |
The Pilot tube principle is introduced for the first time in the carburetor and this Pilot tube or improved type of gasoline nozzle is so designed or built that it automatically furnishes a rich mixture for acceleration and thins out this[73] mixture after the normal motor speed has been reached. This furnishes a very economical running mixture at all motor speeds, together with a smooth and positive acceleration.
The importance of this Pilot tube or nozzle principle cannot be over emphasized, as it furnishes a flexible, powerful and economical mixture, without the addition of any complicated parts. The Ford “A” carburetor has no parts to wear or get out of adjustment.
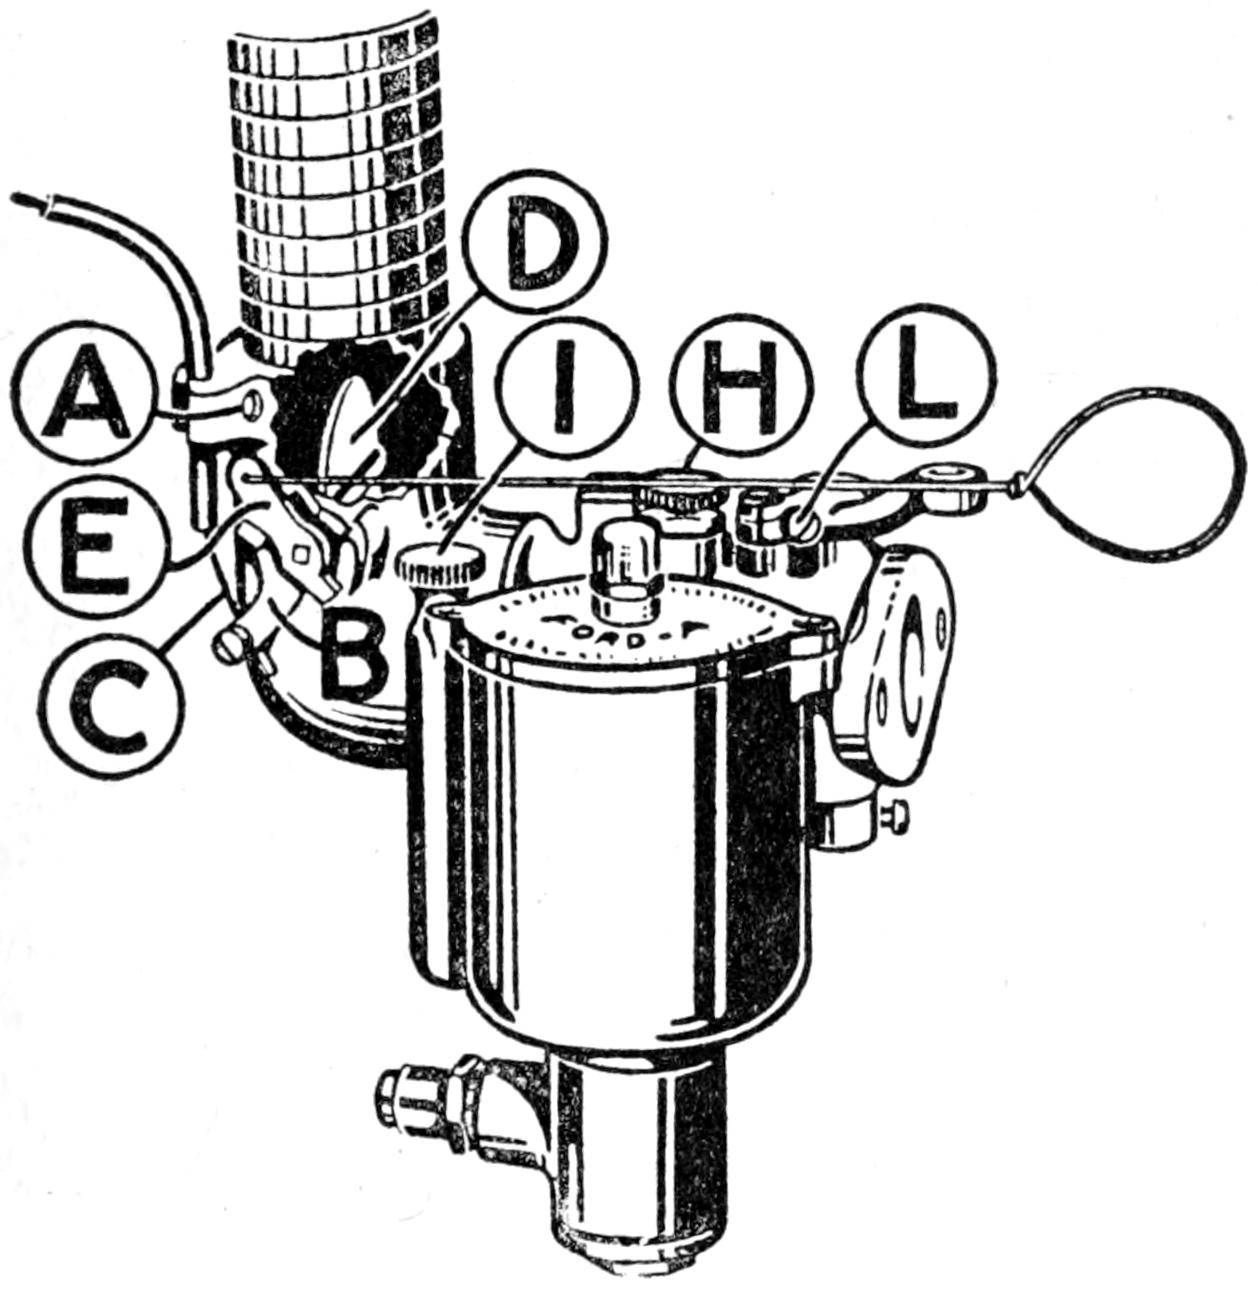
Fig. 42. Schebler Carburetor Model Ford A—Adjustment Points
Two gasoline needle adjustments are furnished. One for low speed and idling and one for high speed. These adjustments have been found advisable and necessary to properly handle the present heavy grades of fuel and the variations in the motor due to wear, etc. Those adjustments also insure the attaining of the widest range of motor speed.
A double choker is furnished, and with these controls the Ford can be easily started under the most severe weather conditions and the mixture controlled from the driver’s seat.
With the Ford “A” carburetor a low speed of four to five[74] miles an hour can be secured without any loading or missing. Also, with this carburetor the maximum speed and power of the motor are obtained.
First, remove the Ford carburetor from the manifold, also the dash board control, the hot air drum, and tubing, and the radiator choke wire. Be sure to save the cotter pin used in the throttle control.
Install the Schebler carburetor, using gasket and cap screws which are furnished with the equipment. The gasoline connection is the same as regularly furnished on the Ford equipment and no other connections are necessary. Screw the connections on the Ford gasoline line onto the connection furnished on the carburetor. Attach the hot air drum and the tubing to the exhaust manifold and run the choke wire through the radiator.
Before adjusting carburetor, see that the spark plugs are clean and set about .035, or nearly the thickness of a new dime. See that the compression is good and equal on all four cylinders. See that the timer is clean and in good shape, as an occasional miss is due to the roller in the timer becoming worn. Also, be sure that there is no leak in the intake manifold.
The steering post control must be set so that the tubing is fastened into set screw (A) and the control wire is fastened through the binding post in lever (B) with steering post control or plunger pushed clear in and the butterfly shutter (D) in the hot air horn or bend open, so that when the plunger control is pulled out the wire (C) in the binding post (B) on lever closes the shutter (D) almost completely. This will furnish a rich mixture for starting and warming up the motor under normal weather conditions.
The wire running to the front of the radiator must be attached to lever (E) so that when the motor is cold, the shutter (D) can be closed tight, thus insuring positive starting.[75] However, this wire must be released immediately upon starting the motor or the motor will be choked by excess of gasoline.
To start the motor, open low speed needle (H) and high speed needle (I) about four or five complete turns. You will note that the needles have dials which indicate turning needle to the right cuts down the gasoline supply.
Pull out steering post control, open throttle about one-quarter way, retard the spark, pull out radiator choke wire which will close shutter and crank the motor. After motor is started, immediately release radiator choke wire and gradually push in the steering post control or plunger and let the motor run until it is warmed up. Then first adjust the high speed needle (I) until the motor runs smoothly and evenly with retarded spark. Close throttle part way and adjust idle needle until motor runs smoothly at low speed.
In order to get the desired low throttle running, use the throttle stop screw (L) which will control the throttle opening and give you the desired low speed running.
A strainer is furnished on the carburetor which prevents dirt or sediment getting into the bowl of the carburetor and choking up the gasoline nozzle or causing flooding.
[76]
Experiments have been carried on for quite some time pertaining to the development of a more successful carburetor which will burn the heavier fuels. The chief difficulty encountered is to find a more suitable way to vaporize these low grade fuels.
Kerosene can be used, only with an application of heat to the manifold to aid in the evaporation of the heavier parts of this fuel. The exhaust pipes are available for this source of heat, but as there is no heat from this source until the engine is running, it is necessary to start the engine on gasoline and switch over to the heavier fuels after the warming-up process.
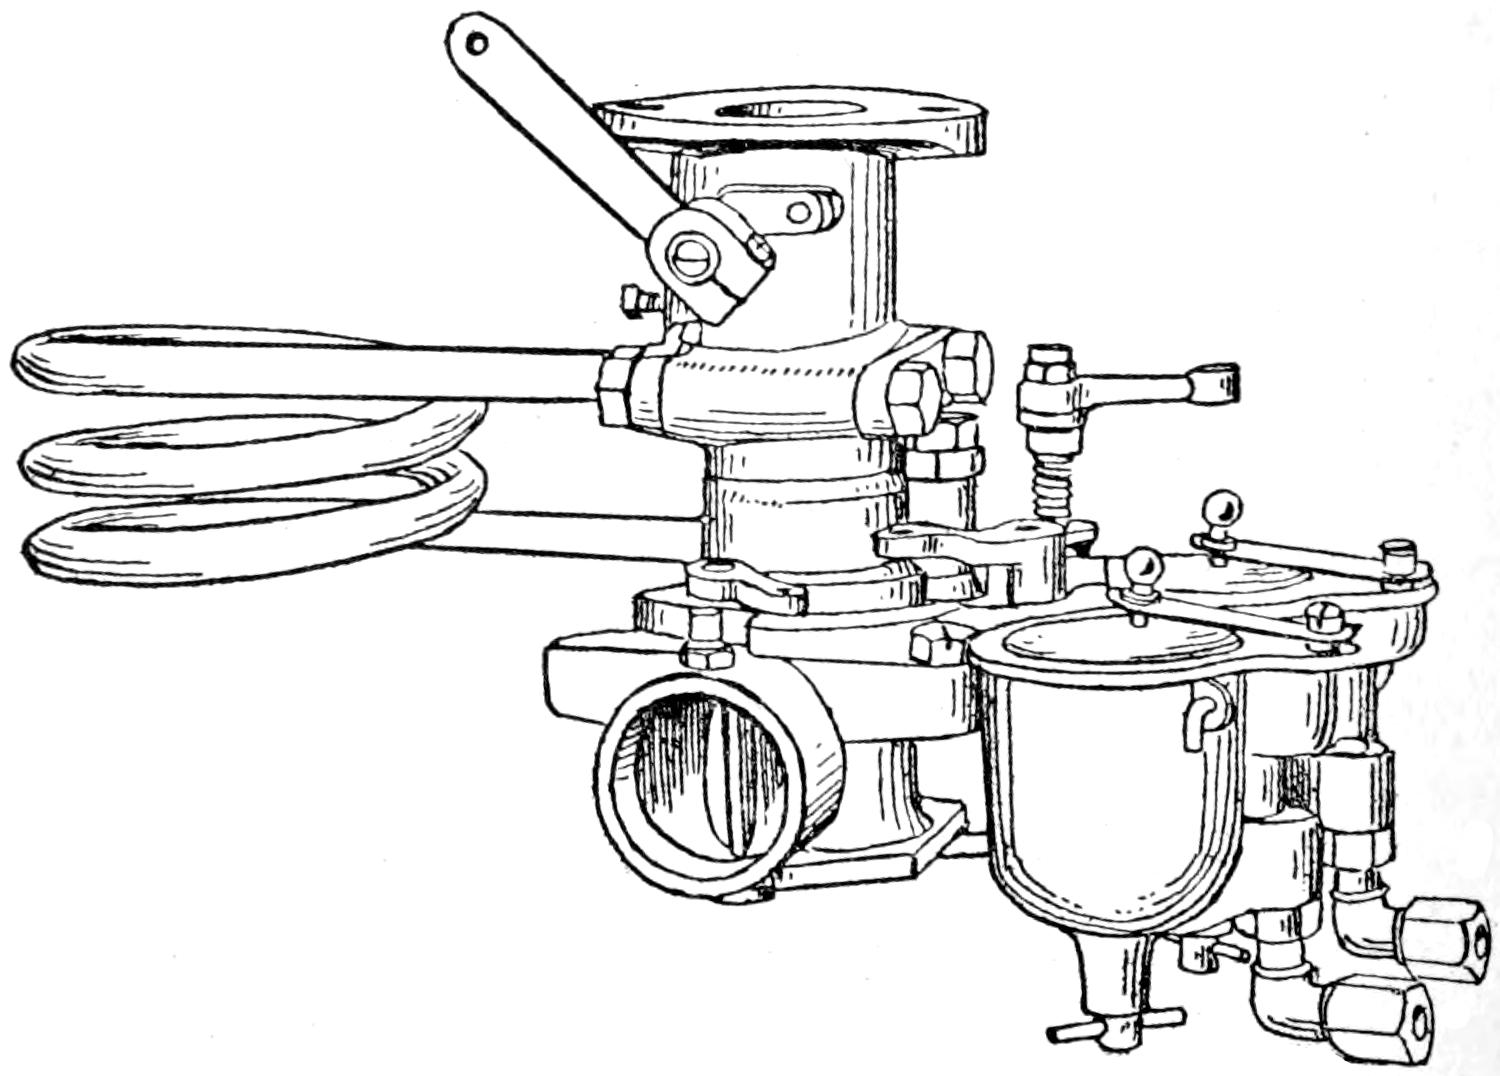
Fig. 43. Holley Kerosene Carburetor
Fig. 43 shows the Holley kerosene carburetor which is adaptable to any type of engine by making simple changes in[77] the exhaust manifold to include the heating coil tube. This carburetor will operate successfully on any hydro-carbon fuel with a boiling point below 600° F. Two float chambers are provided to take care of the starting and running fuels. The engine is started on the gasoline part of the carburetor and after a short warming-up period the feed is switched to the kerosene part of the device.
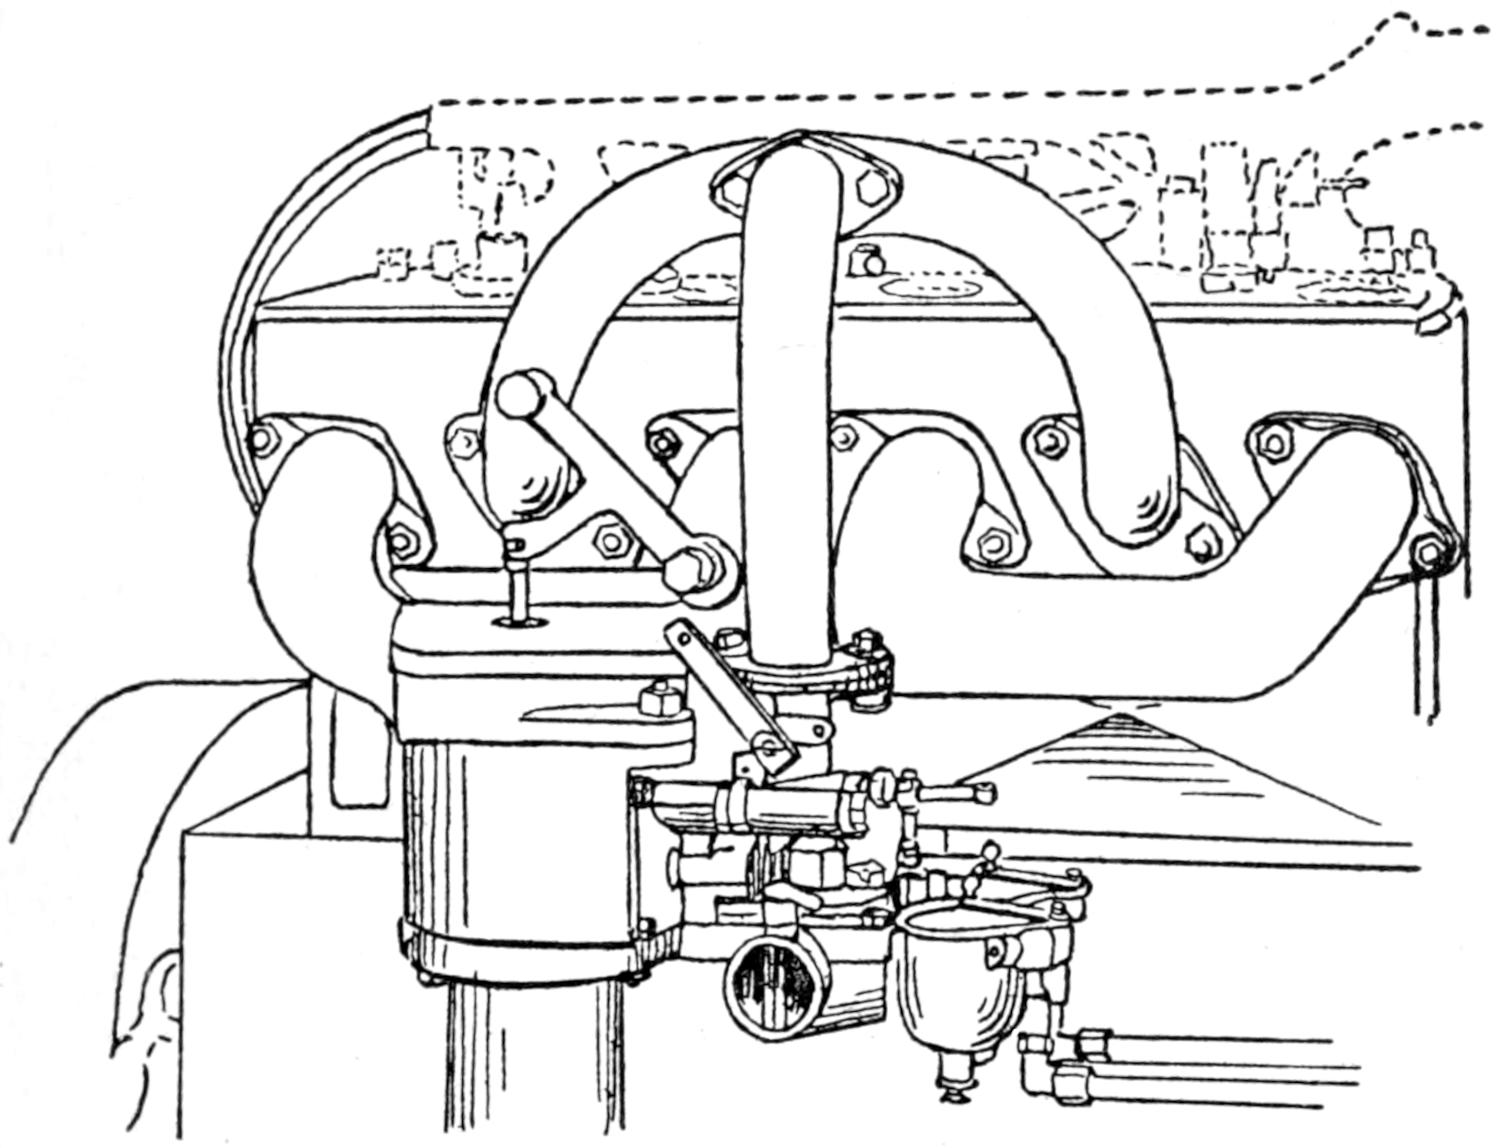
Fig. 44. Holley Kerosene Carburetor Installment
The principle upon which this device operates is to provide a primary mixture by means of a needle valve and a very small aspirating jet which gives a mixture that is too rich for combustion. This rich mixture of atomized fuel is carried through a coil tube of very thin wall thickness, which is exposed to the exhaust gases, directly in the exhaust manifold.
The temperature in this coil tube reaches as high as 500 degrees F. The globules of the over rich mixture are broken up here and flow directly into the mixing chamber, where additional air enters, diluting the mixture to make it combustible. The opening of the air valve is controlled by the suction[78] of the engine and by the throttle valve. The shifter valve for changing the operation from gasoline to kerosene is conveniently arranged for dash control, when the engine becomes warm. A primer is arranged in the manifold just above the carburetor and aids in cold weather starting.
Fig. 44 shows the installation of the Holley kerosene carburetor. In this case it was necessary to add a compartment on the exhaust manifold to contain and heat the coil tube. There are some details that must be taken care of on installation. A small auxiliary tank must be provided to hold the gasoline for starting, while a larger tank must be provided to carry the main supply of kerosene.
The adjustments of this type of carburetor is through a needle valve located in each fuel chamber, and as it is impossible to give any set adjustment that would apply to the many different types of motors, the proper adjustment must be worked out. This is done by shifting to the gasoline and turning the needle valve to the right and left and noting the point at which the engine runs the smoothest. The needle valve is then set at this point. The fuel shifter valve is turned to feed the kerosene, and this adjustment is made in the same manner.
[79]
Heat added to the manifold is the probable solution of the present low-test fuel supplied to the motorist. In the first place you may be satisfied if your motor runs and does not give any noticeable loss of power. But the question is, are you getting full power out of your motor in accordance with the amount of fuel consumed? And are you getting the proper amount of mileage out of each gallon? The answer to both questions would probably be in the negative, if both questions were taken up individually by owners.
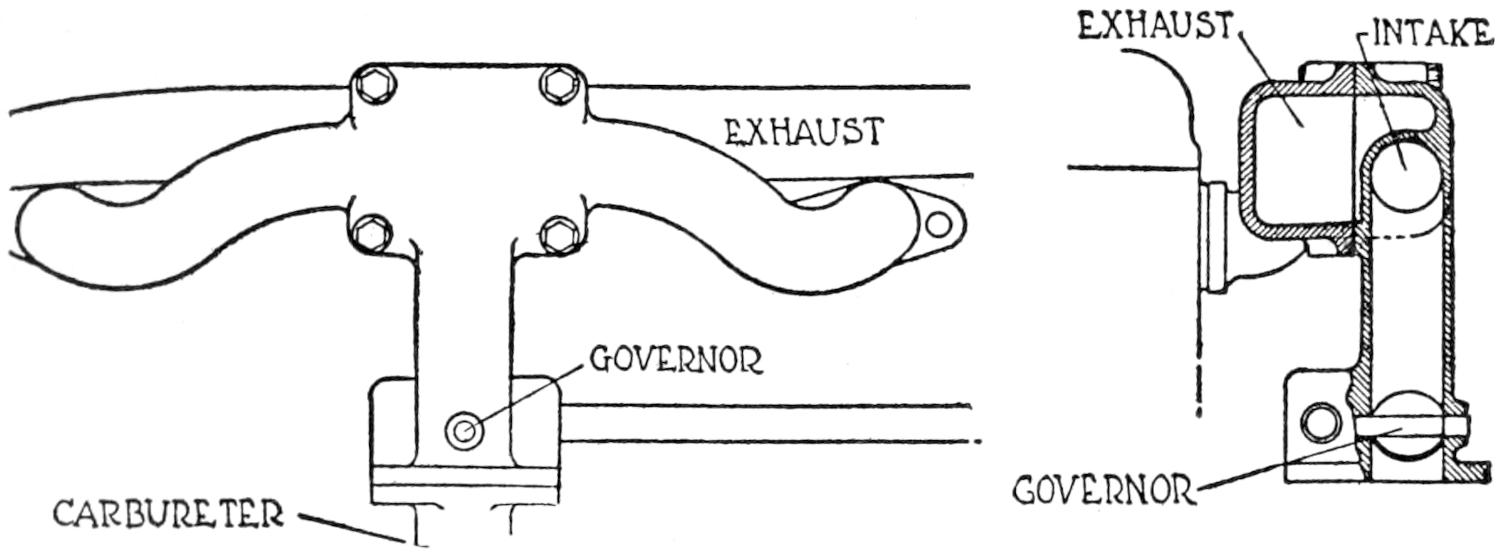
| EXHAUST | INTAKE | |||
| EXHAUST | ||||
| GOVERNOR | ||||
| GOVERNOR | ||||
| CARBURETOR | ||||
Fig. 45. Hot Spot Manifold
One of the best solutions, if not the best, is the new hot-spot manifold used on the Liberty engine, which was designed for Army use. Fig. 45 shows the hot-spot Liberty engine manifold. The intake manifold is external but short, therefore does not offer much opportunity for the liquid to condense. From the carburetor it rises up straight to a point well above the valve ports and the cylinder blocks, and at the top of the rise it touches the exhaust pipe and divides,[80] the two branches sweeping downward quite clear of the exhaust manifold to each block of cylinders. About three inches of the intake passage is exposed to the exhaust manifold top.
The advantage of this design is that the heating element affects practically only the liquid fuel and does not have much effect on the fuel already vaporized. Naturally the liquid fuel is heavier than the vapor, and as the mixture rushes up the manifold at a high rate of speed and turns to the right or left, the heavier liquid particles are thrown straight against the hot-spot, where they are boiled off in vapor.
Thus, although the total amount of heat supplied to the incoming charge is small, vaporization is good, since pains have been taken to supply the heat where it is needed.
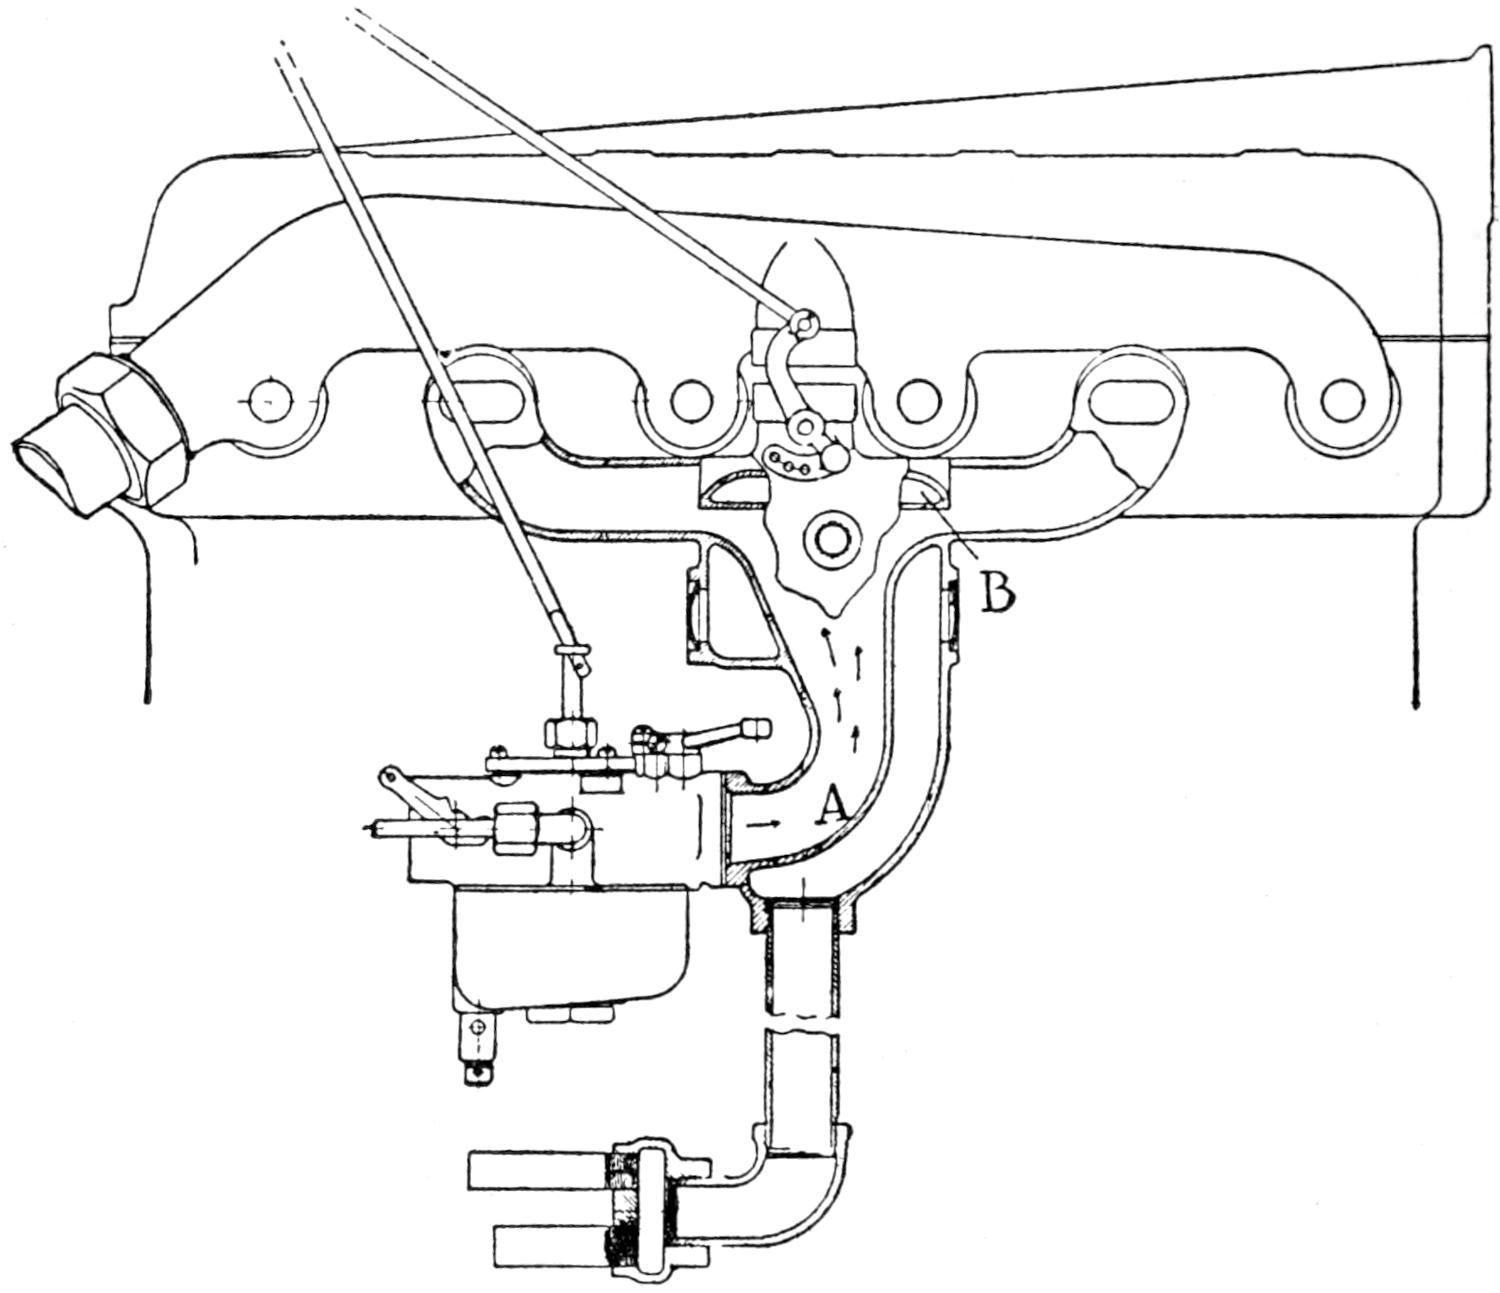
Fig. 46. Holley Vapor Manifold—Ford Cars
Fig. 46 shows the Holley vapor manifold for Ford cars[81] which is intended to completely vaporize gasoline by applying heat at the proper point. As will be noted by the arrows, the exhaust gases pass down, striking a hot-spot at the top of the internal intake passage. The exhaust gases flow along this passage and finally pass out at the bottom. The heavier particles of fuel, after leaving the carburetor, strike against the wall at point (A) and there are broken up by the exhaust gases. Should any of the globules not be broken up at this point, they will be vaporized when they strike the hot-spot at (B) as this is directly in contact with the exhaust gases. It will be noted that the heavier globules are subjected to a rising temperature. Starting at (A) and finishing at (B) a control valve regulates the amount of heat supplied to the intake manifold.
[82]
Cooling systems are provided on all types of gasoline engines. As the heat generated by the constant explosions in the cylinders would soon overheat and ruin the engine were it not cooled by some artificial means.
Circulation Systems.—There are two types of water circulating systems. The Thermo Syphon, and the Force Pump circulating systems.
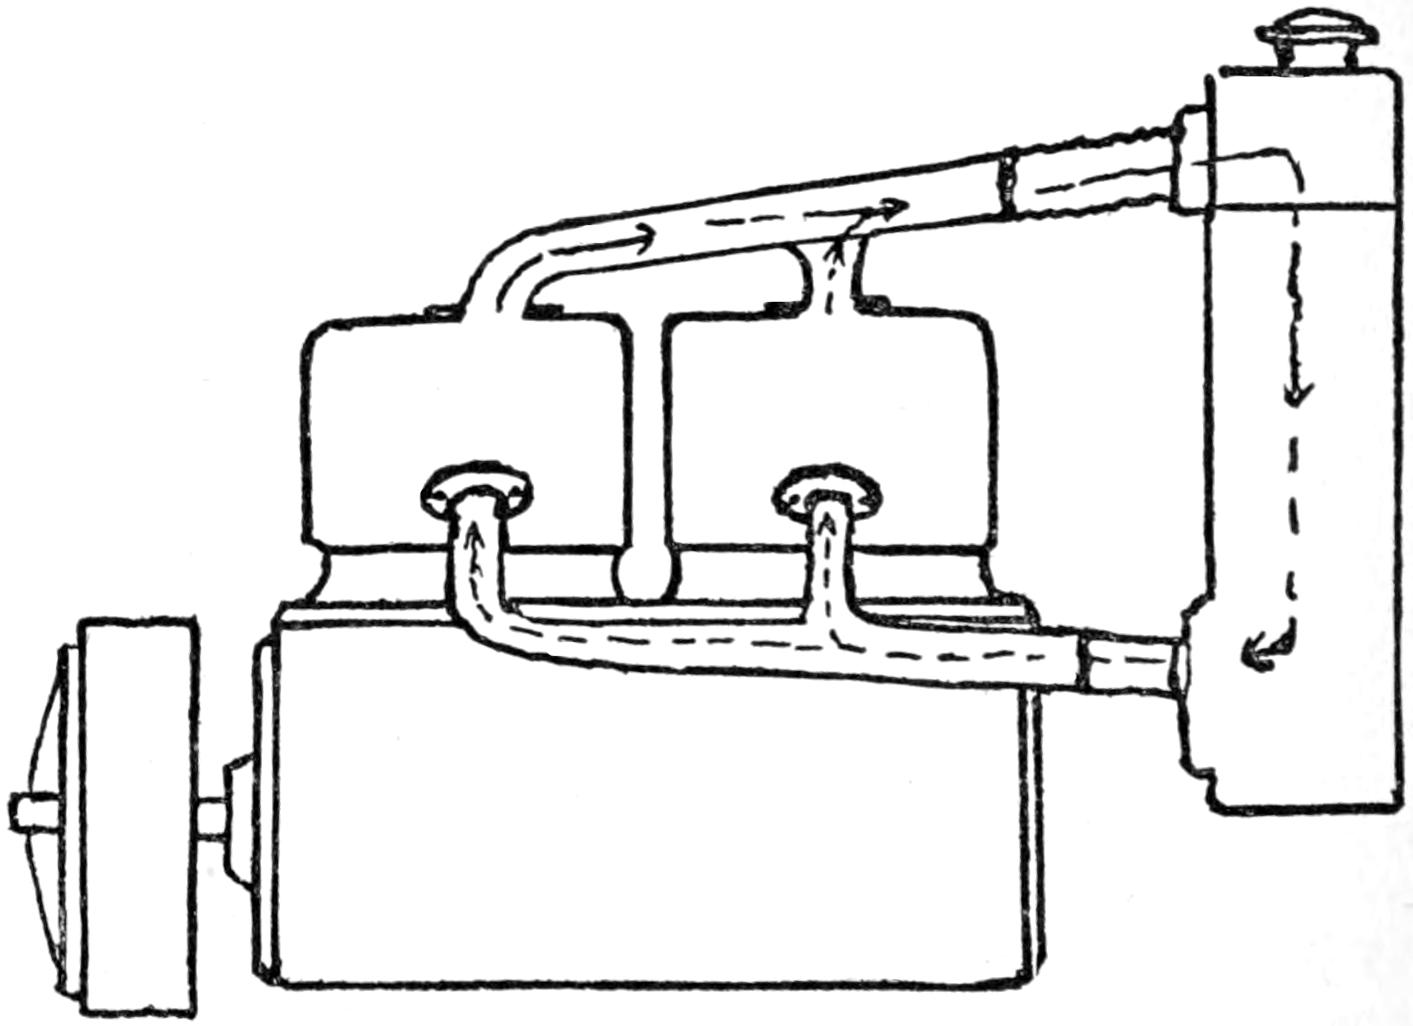
Fig. 47. Thermo-Syphon Cooling System
Fig. 47 shows how the water circulates in the Thermo-Syphon system. It acts on the principle that hot water seeks a higher level than cold water, consequently when the water reaches a certain temperature, approximately 180° F., circulation commences and the water flows from the lowest radiator[83] outlet pipe up through the water jackets into the upper radiator water tank, and down through the thin tubes to the lower tank to repeat the process.
The heat is extracted from the water by its passage through the thin metal tubing of the radiator to which are attached scientifically worked out fins which assist in the rapid radiation of the heat. The fan just back of the radiator sucks the air through the small tubes which connect the upper and lower radiator tanks. The air is also driven through between these tubes by the forward movement of the car.
The Force Pump Circulation System.—The Force Pump circulating system is constructed in the same manner as the Thermo Syphon Cooling System. The only difference in the two systems is that a small pump is attached to the lower radiator pipe to force the circulation of the water.
The pump is usually of the centrifugal type and consists of a fan-shaped wheel operated in a snugly fitted housing. The water enters at the hub and is thrown out against the housing and is forced on by the rapid action of the fan blades. Another type of pump is used by some manufacturers which consist of two meshed gears of the same size, which operate in a snugly fitted housing. These gears operate in a direction toward each other, the water is carried forward or upward in the space between the teeth, and is forced on when the teeth mesh and fill the space.
Overheating.—Overheating may be caused by carbonized cylinders, too much driving on low speed, not enough or a poor grade of lubricating oil, spark retarded too far, racing the engine, clogged muffler, poor carburetor adjustment, a broken or slipping fan belt, jammed radiator tube, leaky connection, or low water.
Radiator Cleaning.—The entire circulation system should be thoroughly cleaned occasionally. A good cleaning solution is made by dissolving one-half pound of baking soda in three and one-half to four gallons of soft water. The radiator is filled with the solution and left to stand for twenty to thirty minutes. The hose is then removed from the lower[84] pipe, water is then turned into the radiator through the filler spout until the system is thoroughly flushed out.
Freezing.—Unless an anti-freezing solution is used through the cold months you are bound to experience trouble. The circulation does not commence properly until the water becomes heated. It is apt to freeze at low temperatures before circulation commences. In case any of the small tubes are plugged or jammed they are bound to freeze and burst open if the driver attempts to get along without a non-freezing solution.
Freezing Solution.—Wood or denatured alcohol can be used to a good advantage. The following table gives the freezing point of solutions containing different percentages of alcohol.
20% solution freezes at 15° above zero.
30% solution freezes at 8° below zero.
50% solution freezes at 34° below zero.
A solution composed of 60% of water, 10% of glycerine, and 30% of alcohol is commonly used, its freezing point being 8° below zero.
Evaporation.—On account of evaporation, fresh alcohol must be added frequently in order to maintain the proper solution.
Radiator Repairs.—A small leak may be temporarily repaired by applying brown soap, or white lead, but the repair should be made permanent with solder as soon as possible. A jammed radiator tube is a more serious affair. While the stopping up of one tube does not seriously interfere with circulation, it is bound to cause trouble sooner or later, and the tube will freeze in cold weather. Cut the tube an inch above and below the jam and insert a new piece soldering the connection. If the entire radiator is badly jammed or broken, it will probably be advisable to install a new one.
Air Cooling System.—Air cooling has been developed to a point where fairly good results are attained. This system has an advantage over the circulating systems, in that the[85] weight of the radiator and water is done away with, and no trouble is experienced with stoppage of circulation and leaky connection. This system, however, has its drawbacks, in that it cannot be used successfully on the larger and more compact engines. In order to allow the necessary large space for radiation, the cylinders are heavily flanged and set separately. The fan is placed in a much higher position than usual, in order that the air current may strike the heads of the cylinders and circulate downward. Compression is also lowered considerably to prevent heat generation and pre-ignition. On account of the small size of the cylinders and low compression, it is necessary to operate an air cooled engine at a very high rate of speed to produce sufficient power for automobile locomotion.
The fan must be kept in good working condition, and care should be exercised in not allowing the engine to run idle for any length of time.
[86]
The muffler was designed to silence the otherwise loud report of the exploding charge of gas, which is released from the cylinders by the sudden opening of the exhaust valves.
While these devices are differently shaped and formed, the functional purpose and action is practically the same in all designs.
The burnt or inert gases are forced from the cylinders on the exhaust stroke. It passes into the exhaust manifold which absorbs some of the heat before it reaches the muffler.
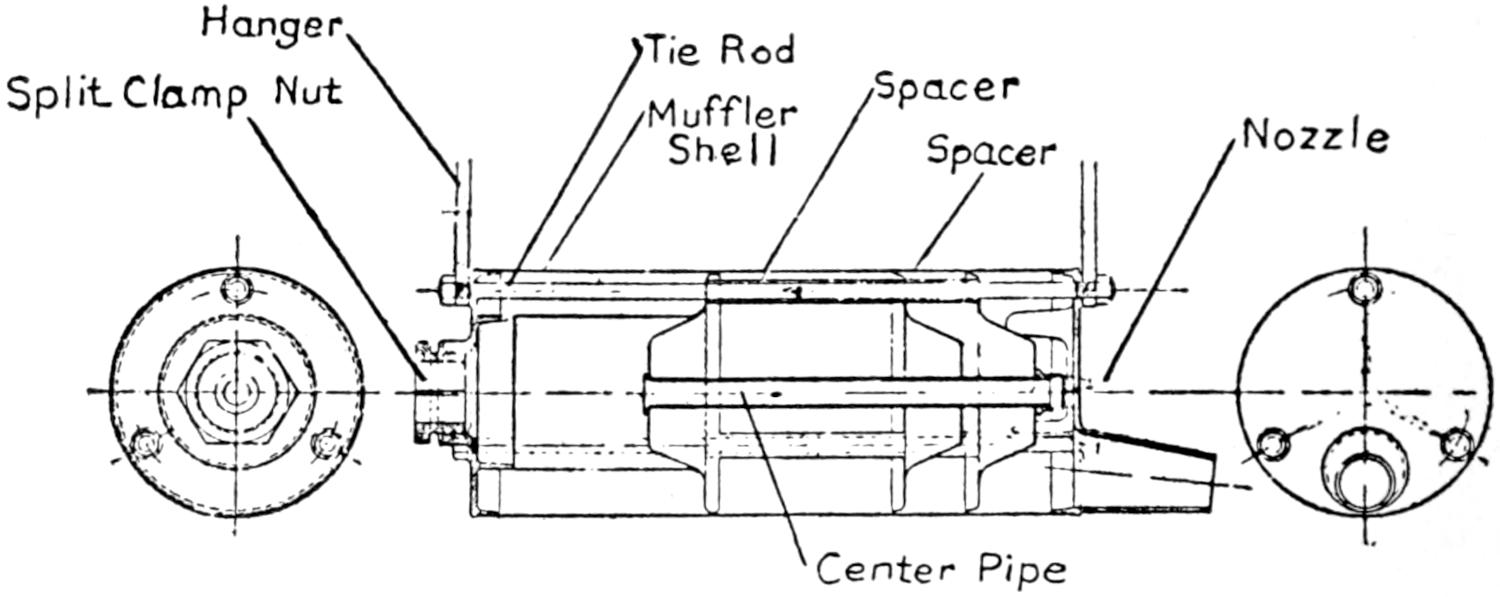
| Hanger | Tie Rod | ||
| Split Clamp Nut | Muffler Shell |
Spacer Spacer |
Nozzle |
| Center Pipe | |||
Fig. 48. Muffler—Three Compartment
Fig. 48 shows a three compartment muffler. The burnt gases enter compartment No. 1 from the exhaust pipe. This compartment is sufficiently large to spread the volume which lessens the pressure and force. It then enters the rear compartment No. 3, through the center pipe; it expands again and passes through the perforated spacer plate, enters compartment No. 2, and escapes through the nozzle in an even silent flow.
[87]
The muffler at all times produces a certain amount of back-pressure on the engine which results in a slight loss of power. The back pressure exerted by the majority of mufflers, however, is very slight and has a tendency to counter balance or equalize the sudden shock delivered to the bearings by the explosion over the piston head.
The muffler may also become fouled by the use of too much or too heavy a grade of lubricating oil, which will cause the expansion space and the small holes in the spacer plates to become clogged with carbon and soot. This carbon and soot soon bakes into a hard crust causing much back pressure which results in a considerable loss of power. This condition will become noticeable first by a loss of considerable power caused by an overheated motor. If this condition is not remedied, the exhaust manifold and pipe leading to the muffler will soon become red-hot, causing much danger of a serious damage loss to the car from fire.

Fig. 49. Muffler
Muffler.—To eliminate or remedy this condition, disconnect manifold pipe from the muffler, remove the muffler from hangers, and disassemble it by removing the nuts from the tie rods which release the end plates. This will allow the compartment walls and spacer plates to be drawn from the sleeve. Each compartment and spacer plate should be removed sectionally, and its position carefully noted, in order that it may be replaced correctly in re-assembling. The walls of the sleeve, and the compartment end plates are scraped and rubbed with a piece of sandpaper. A small round file may be used in cleaning the center pipe. The spacer plates are scraped and sandpapered. The small holes in the spacer[88] plates may be opened by using the tapered end of a small file. Fig. 49 shows a muffler of another design. The burnt gas enters a compartment containing three saucer shaped spacers which retard and break up the volume. It then passes through an open compartment and enters reversed spacers through small holes near the sleeve wall. It centers or forms slightly in volume and escapes to the next compartment through a small hole in the center of the second spacer. This action of forming and breaking is kept up until the outlet is reached.
[89]
The vacuum systems have proved to be one of the important inventions pertaining to successful motor operation. They are self contained, simple in construction and automatic in operation. They do away with the troublesome power and hand pressure pumps and their connections.
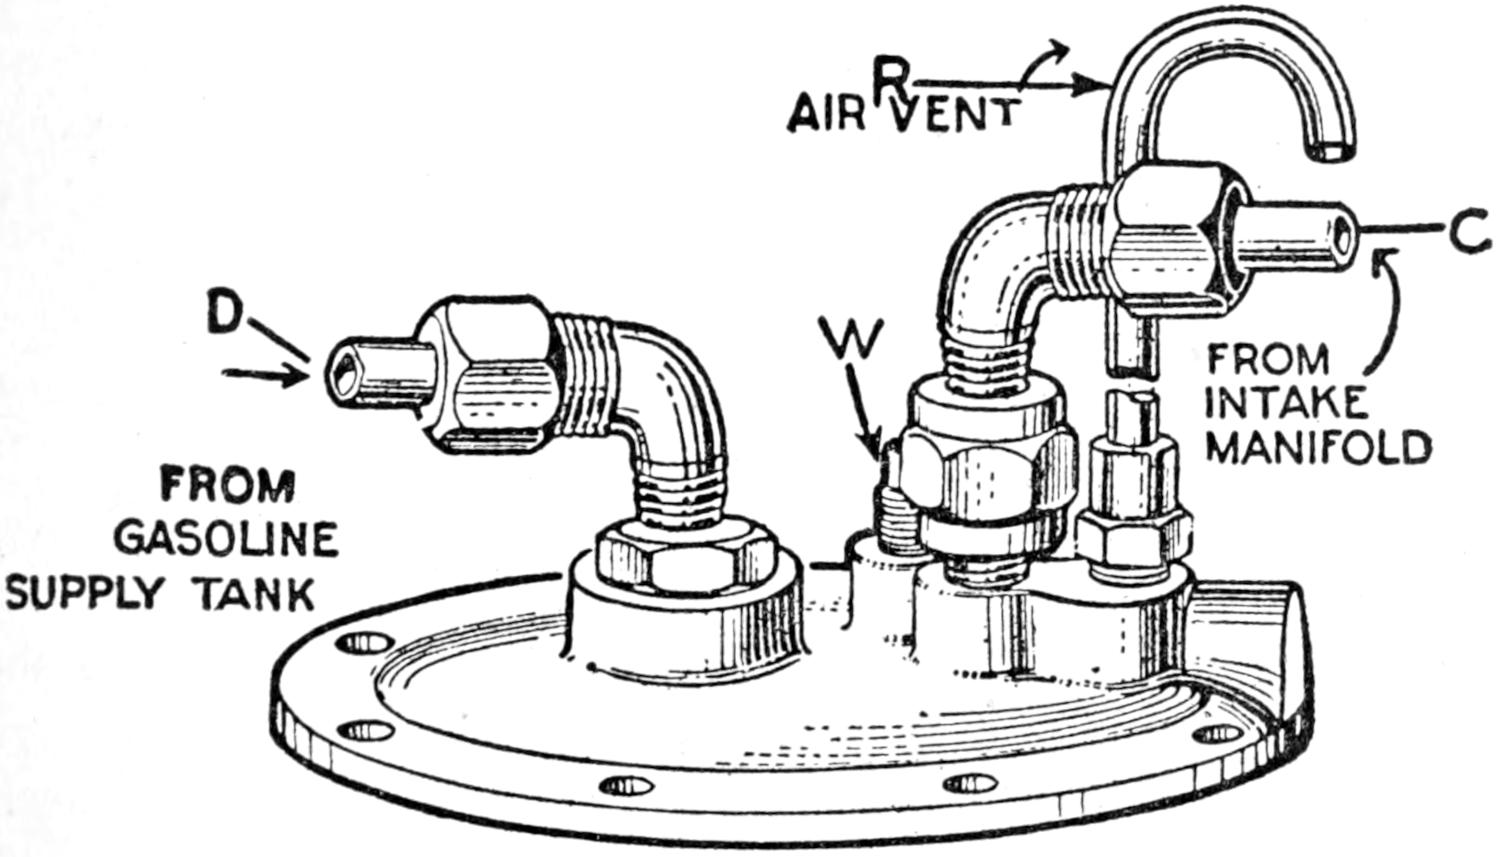
| AIR VENT | |||
| FROM INTAKE MANIFOLD |
|||
| FROM GASOLINE SUPPLY TANK |
|||
Fig. 50. Vacuum System—Top Arrangement
Fig. 50 shows the top arrangement and connections. R is the air vent over the atmospheric valve. The effect of this is the same as if the whole tank were elevated, and is for the purpose of preventing an overflow of gasoline, should the position of the car ever be such as to raise the fuel supply tank higher than the vacuum tank. D shows the pipe connection from the fuel supply tank. C shows the pipe connection to[90] the intake manifold. W shows a tap or vent through which gasoline may be fed into the upper chamber, in case the fuel supply tank is damaged or put out of commission. R shows the air vent connection from the lower tank.
Fig. 51 shows a general diagram of vacuum system installation. One of the chief advantages is that it allows the carburetor to be placed near the head of the motor and does away with the long manifold connections required with the gravity feed systems. This also reduces the frictional resistance, gives a richer mixture and greater volume of flow.
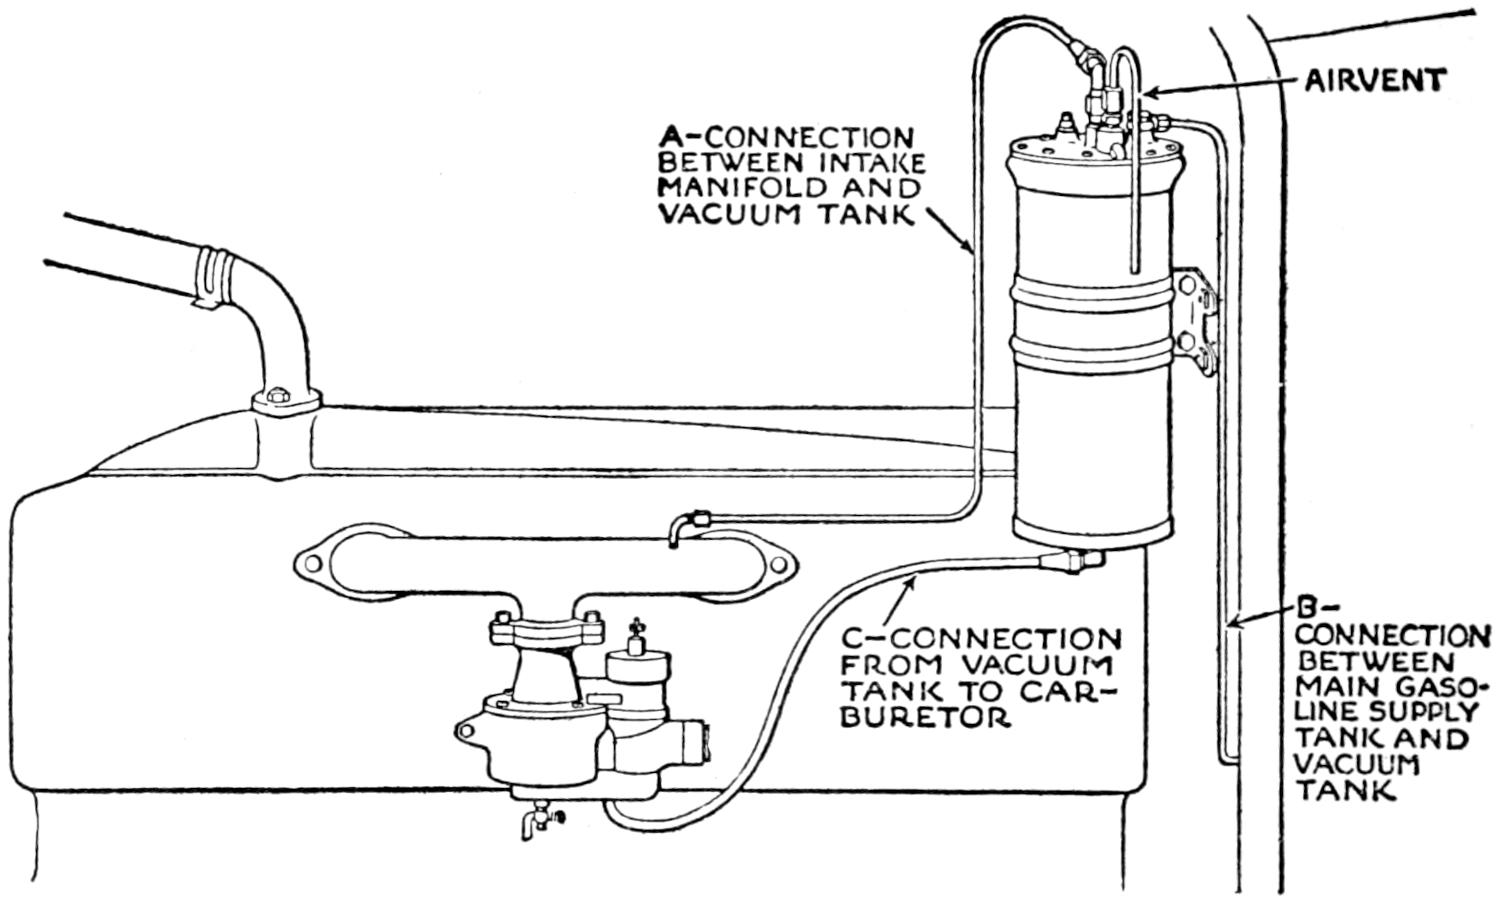
| AIRVENT | ||
| A—CONNECTION BETWEEN INTAKE MANIFOLD AND VACUUM TANK |
||
| C—CONNECTION FROM VACUUM TANK TO CARBURETOR |
B— CONNECTION BETWEEN MAIN GASOLINE SUPPLY TANK AND VACUUM TANK |
|
Fig. 51. Vacuum System Installation
Fig. 52 shows a sectional view of the Stewart Vacuum System and explains the operative value of each part. A is the suction valve for opening and closing the connection to the manifold through which a vacuum is extended from the engine manifold to the gasoline tank. B is the atmospheric valve, and permits or prevents an atmospheric condition in the upper chamber. When the suction valve A is open and the suction is drawing gasoline from the main supply tank, the atmospheric valve B is closed. When the suction valve A is closed, the atmospheric valve B must be open, as an atmospheric condition is necessary in the upper tank in order[91] to allow the gasoline to flow through the flapper valve H into the lower chamber. C is a pipe connecting the tank to the intake manifold of the engine. D is a pipe connecting the tank to the main fuel supply tank. E is the valve control lever and has two coil tension springs S attached to operate the short valve lever F. G is the metallic air-containing float, which controls the action of the valves through the spring and lever arrangement. H is the flapper valve at the outlet of T, and it closes by suction when the vacuum valve A is open.[92] When the vacuum valve A closes, the atmospheric valve B opens and relieves the suction in the upper tank, the flapper valve H opens and allows the fuel to flow from the upper tank into the lower chamber.
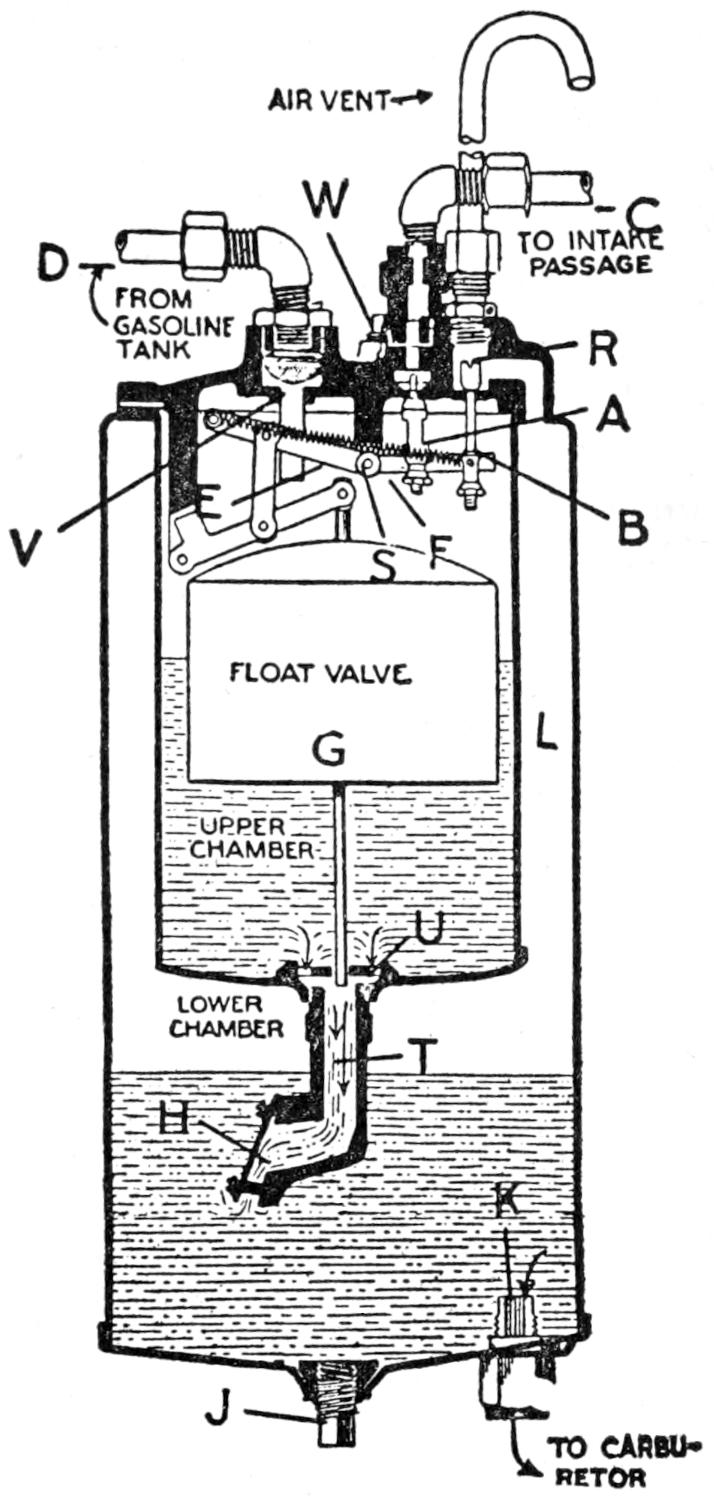
| AIR VENT | |||
| TO INTAKE PASSAGE |
|||
| FROM GASOLINE TANK |
|||
| FLOAT VALVE | |||
| UPPER CHAMBER |
|||
| LOWER CHAMBER |
|||
| TO CARBURETOR | |||
Fig. 52. Vacuum System Diagram—Stewart Warner
J is a plug in the bottom of the tank which can be removed to clean or drain the tank. This plug can be removed and replaced with a pet-cock for drawing off gasoline for priming or cleaning purposes. K is the line to the carburetor. It is extended on the inside of the tank to form a pocket for trapping water and sediment. L is a channel space between the inner and outer shells and connects with the air vent R, thus admitting an atmospheric condition to exist in the lower chamber at all times, and thereby permitting an uninterrupted flow of gasoline to the carburetor. R is an air vent over the atmospheric valve; the effect of this valve is the same as if the whole tank was elevated. It is also for the purpose of preventing an overflow of gasoline should the position of the car ever be such as would raise the fuel supply tank higher than the vacuum tank. Through this tube the lower or reservoir chamber is continually open to atmospheric pressure. T is the outlet at the bottom of the float chamber in which the flapper valve H is located. U is the float stem guide. V is a strainer which prevents foreign matter from passing into the vacuum chamber. W is a tap or vent through which gasoline may be fed into the upper chamber if the fuel tank is damaged or put out of commission.
The simple and durable construction of this system makes it unlikely that the car owner will ever need to make internal repairs. Before attempting to repair this tank make sure that the trouble is not due to some other cause.
Air Vent.—A small amount of gasoline may escape through the air vent occasionally. This will do no harm and no adjustment is needed. However, if the vent tube continues to overflow, one of the following conditions will be responsible: 1. The air hole in the main supply tank is stopped up, or the hole is too small. Enlarge the hole or clean it out. 2. If gasoline leaks from the system except from the vent tube,[93] it can only do so from one of the following causes: a. A leak may exist in the outer wall of the tank. If so soldering it up will eliminate the trouble. b. The carburetor connection on the bottom of the tank may be loose. c. There may be a leak in the tubing at the head of the tank. d. The cover of the tank may be loose.
Failure to Feed Gasoline to the Carburetor.—This condition may be due to other causes than the vacuum system. Do not tinker with it until you are sure that the trouble is not elsewhere. Flood the carburetor. If gasoline runs out of the float chamber you may be sure that the vacuum system is performing its work properly.
To Remove Cover.—To remove the cover for inspection, take out the screws and run a knife blade carefully around the top to separate the gasket without damaging it. Shellac the gasket before you replace it to make the tank air-tight.
Faulty Feed.—If faulty feed is traced to the vacuum tank, one of the following conditions may be the cause. The float valve G may have developed a leak. To repair, remove the top of the tank to which it is attached. Dip the float into a pan of hot water. Bubbles will show the leak. Punch two small holes, one at the top, and one at the bottom, and blow the gasoline out. Then solder up the holes and the leak. Use solder carefully in order not to add too much weight to the float. A small particle of dirt may be lodged under the flapper valve. This trouble can usually be remedied by tapping the side of the tank. In order to determine whether or not the flapper valve is working properly, plug up the air vent tube and remove the pipe extending from the bottom of the tank to the carburetor. Start the engine and place a finger over the opening (from which you removed the tube). If continual suction is felt, it is evident that the flapper valve is being held off its seat. If tapping the side of the tank will not remedy this condition, remove the cover and withdraw the upper chamber. The valve is attached to the pipe projecting from the bottom.
Strainer.—Remove and clean the strainer screen located at[94] V, Fig. 52, every five or six weeks. This screen collects all the dirt and foreign matter in the gasoline, and often becomes stopped up.
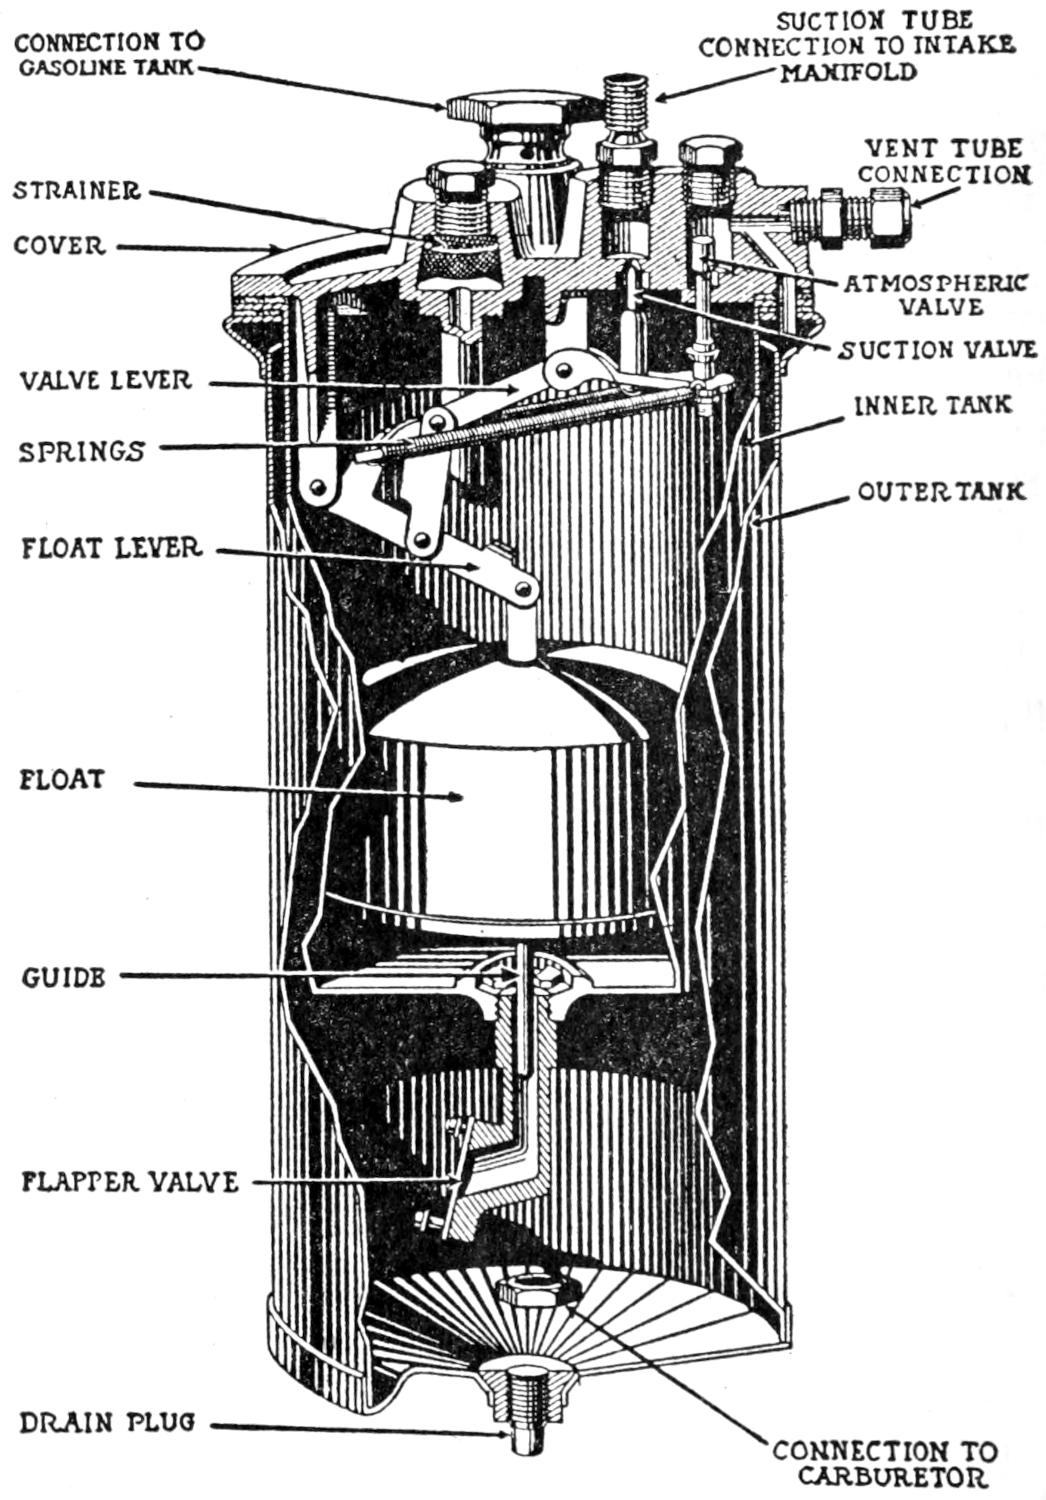
| CONNECTION TO GASOLINE TANK |
SUCTION TUBE CONNECTION TO INTAKE MANIFOLD |
| STRAINER | VENT TUBE CONNECTION |
| COVER | |
| ATMOSPHERIC VALVE |
|
| SUCTION VALVE | |
| VALVE LEVER | |
| INNER TANK | |
| SPRINGS | |
| OUTER TANK | |
| FLOAT LEVER | |
| FLOAT | |
| GUIDE | |
| FLAPPER VALVE | |
| DRAIN PLUG | CONNECTION TO CARBURETOR |
Fig. 53. Vacuum System—Inside View of Parts—Stewart Warner
Filling the Vacuum Tank.—To fill the tank after it has been cleaned or repaired, leave the spark off, close the gas throttle, and crank the engine over a few times with the starter or by hand. It takes less than ten seconds to create sufficient vacuum to fill the tank.
[95]
Before taking up the study of automobile ignition systems and electrical appliances, we will first devote a little time to study, in order to become familiar with the different electrical parts, functions, terms and names applied to the various units, and machines.
In the first place electricity is not a juice or fluid that flows through a wire, but is a generated electro-motive force that may be held in storage or conducted from one place to another. It will not flow without a round circuit and seeks ground return at the slightest opportunity. It is designated in terms which express quality, quantity, force and action.
Voltage.—A volt is an electrical unit, expressing the force or pressure of the current. The voltage of a system simply means the difference of pressure exerted on the system measured in volts.
Ampere.—An ampere is an electrical unit expressing the quality or intensity of the current.
Ohm.—An ohm is an electrical unit expressing resistance; or the resistance of conductors to the flow of current.
Current.—The current is the generated electro-motive force.
Circuit.—Electricity will not flow unless there is a circuit or ground return to its original source.
Low Tension Current.—Low tension current is generated in the primary winding or coil by placing it in a magnetic field. It will flow from one point to another but has very little strength and will not jump the gap at the spark plug. It is used for lighting purposes, or conducted to an induction coil which transforms it into a high tension alternating current.
High Tension Current.—High tension current is generated[96] in the secondary coil by interruption of the primary current or by the rapid magnetization and demagnetization of the core and primary coil.
Direct Current.—Direct current is produced by placing a coil or wire in a magnetic field. It is usually conducted to an induction coil where it is transformed into a high tension alternating current.
Alternating Currents.—Alternating currents are produced by the rapid breaking down and building up of the primary current. An alternating current flows forward from zero to its highest point of strength and back again to zero. The alternating action takes place so rapidly that a light can be connected in this circuit and it will burn steadily without any noticeable fluctuation.
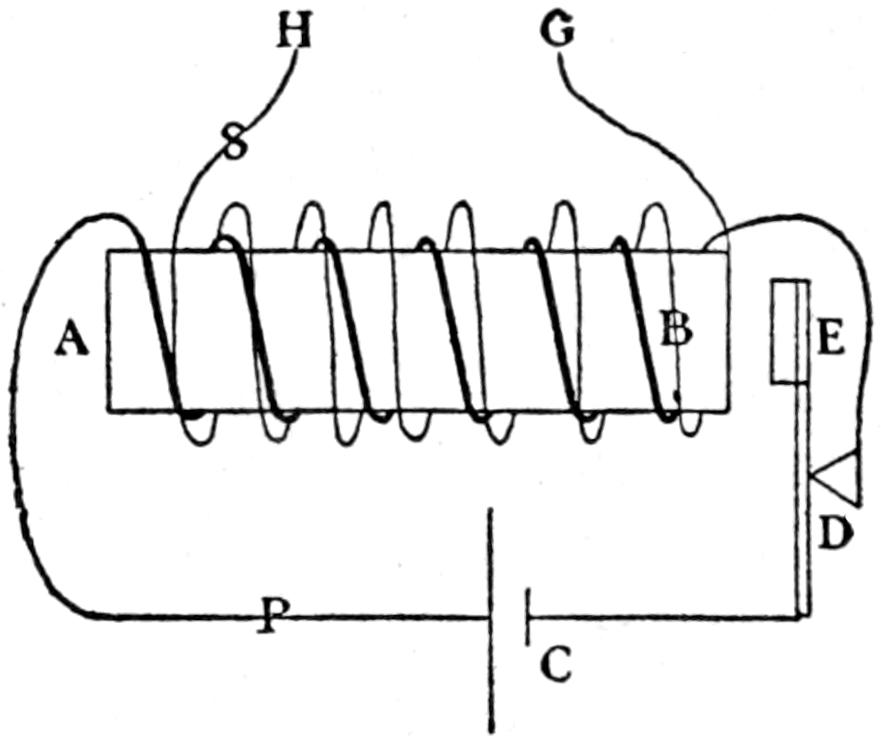
Fig. 54. Coil Diagram
Induction Coil.—An induction coil consists of a soft iron core; a primary and secondary winding, and a set of platinum points. The primary winding is wound directly over the core and consists of a few turns of thick wire. The secondary wire is wound over the primary and consists of a great many turns of thin wire. Fig. 54 shows the functional action of an induction coil. Both of the coils are wound on the soft iron core A-B. The primary current which is supplied in this case by a cell or number of cells, C and D, is broken at frequent intervals of time. The method of doing this is as follows: One terminal of the primary coil is connected to the[97] fixed platinum stud D, the other terminal to a spring which carries a piece of soft iron, E. When the spring is unbent it touches the stud D, and a current passes in the primary. The core of soft iron becomes magnetized and attracts the soft iron disc, E, thus breaking contact at D. The current is stopped and the core immediately becomes unmagnetized, the spring flies back and the contact is again made. The process is then repeated. When the contact in the primary is broken the current flows in one direction in the secondary coil, when it is made the current flows in the opposite direction in the secondary. Thus an alternating current is set up in the secondary current of great frequency.
Commutator.—The commutator or timer as it is commonly called is used only in connection with the induction coil to complete the circuit when a spark is required at the plug in the cylinder.
Insulation.—Insulating is the act of covering a conductor with a non-conducting substance to prevent the spark from jumping or seeking ground.
Choking Coil.—A choking coil in simple form consists of a coil and iron core to increase self-induction. It is used to reduce currents of high pressure and is commonly called a bucking coil.
Fuse.—A fuse is used to prevent conductors or coils from being damaged by heat generated from high pressure currents. It consists of a metal and glass tube which contains a fine wire. This wire being much thinner than the wire of the cable, the heat naturally develops faster at this point, and is soon high enough to melt the wire and break or open the circuit, and thus any further damage to the insulation is prevented.
Condenser.—A condenser usually consists of a few strips of folded tin foil insulated from each other with paraffined or oiled paper. It absorbs, restricts and distributes high pressure currents and also prevents excessive sparking at the contact points.
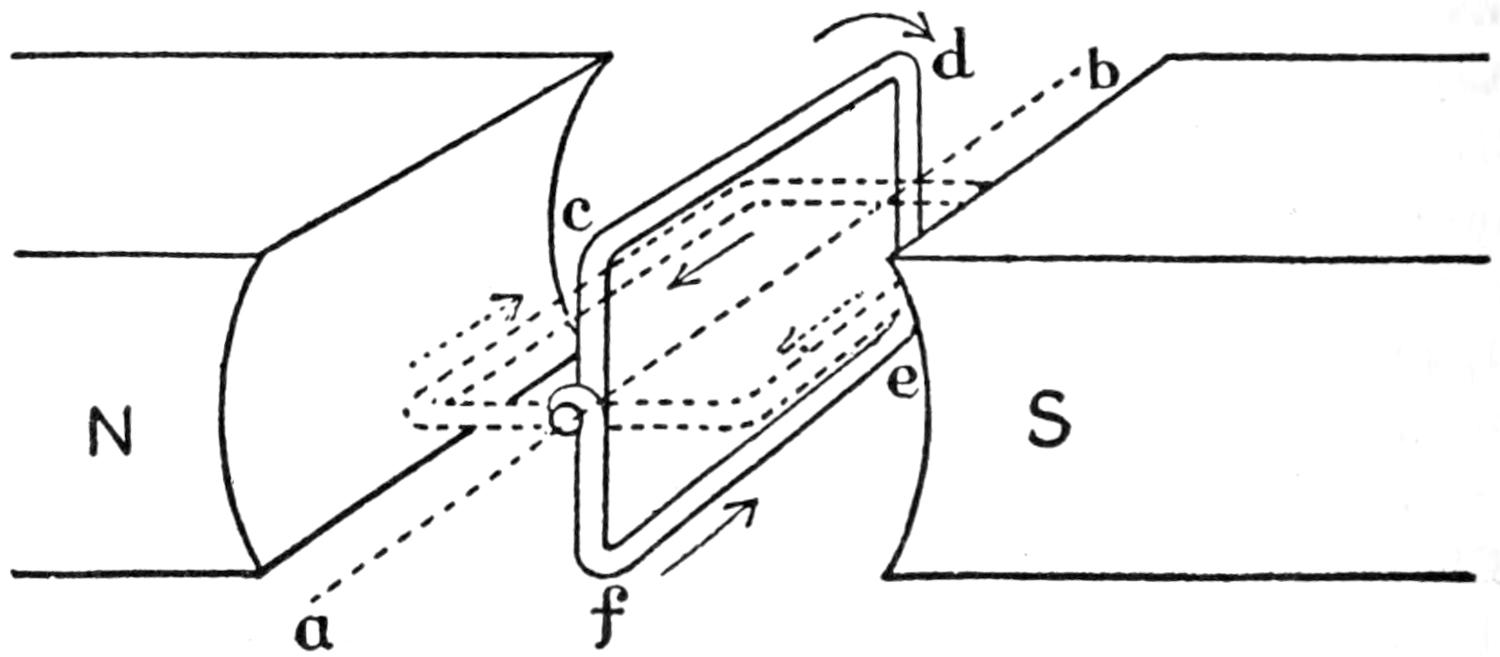
Fig. 55. Dynamo—Diagram of Action
Dynamo.—A dynamo is a machine which converts mechanical[98] energy into electric energy, and must consist of at least two separate parts; the field magnets to create the magnetic field, and the armature or conductor in which the current is generated. One or the other of these must be in motion in order to cut the lines of magnetic force crossing the field. Fig. 55 shows the operation of the most common or simplest type of alternating current producing machine, which is similar and conforms in action to the high tension magneto and generator. Field pieces magnetize the pole pieces N and S. A wire coil is placed in the field at right angles to the magnetic lines of force turned to the right. It takes up the position of the dotted lines and no lines of force are cut, whereas in its original position, as many lines of force as possible are cut. Turning the coil on its axles, a-b, causes the lines of force cut by c-d, and e-f to vary from the highest number of lines that it is possible to cut to zero and back again, thus constantly changing the flowing direction of the current. The reversal of the current takes place at the instant that the coil passes the point where it cuts the greatest number of lines of force. The ends of the coil are connected to a commutator on the shaft a, b. Steel insulated brushes pick the current from the commutator ring and conduct it to the brush post; an insulated wire conductor is attached to this post and conducts the current to the place of use or storage.
[99]
Voltaic Cell.—The source of energy of a voltaic cell is the chemical action. (See accumulator).
Accumulator.—The standard accumulator or storage battery is composed of three cells or hard rubber jars in which a number of lead plates are immersed in a solution of sulphuric acid and water known as electrolyte. The plates are stiff lead grids which hold a paste made of various oxides of lead. Six plates in each cell are joined to the positive terminal, and seven plates in each cell are joined to the negative terminal. Thin wooden separators are inserted between the plates to prevent them from touching one another. In the forming process the material on the positive plates becomes converted into brown peroxide of lead; the negative plates assume the form of gray metallic lead. The material on both plates is known as active material. When current is taken from the cells the sulphuric acid in the electrolyte combines with the active material of the plates to form sulphate of lead, and when the battery is recharged the lead sulphate is again converted into the original active material and the acid set free in the solution.
Storage Battery.—For construction and action see Accumulator. For care see chapter on storage batteries.
Electrolyte.—A chemical solution used in voltaic cells consisting of two parts sulphuric acid added to five to seven parts of water by volume.
Hydrometer.—A hydrometer is used to test the electrolyte solution in the cells of storage batteries. It consists of a weighted float and a graduated stem, and as sulphuric acid is heavier than water, the specific gravity reading will be proportional to the amount of acid. The hydrometer thus measures the relative amount of acid in the electrolyte and consequently reveals the condition of the battery.
Ammeter.—An ammeter is an electrical instrument which indicates the amount of current that the generator is supplying to the storage battery, or the amount of current that the storage battery is supplying for ignition, lights and horn.
Circuit Breaker.—The circuit breaker is a device which prevents[100] excessive discharging of the storage battery. All the current for lights is conducted through the circuit breaker (Delco system). Whenever an excessive current flows through the circuit breaker it intermittently opens the circuit causing a clicking sound. This will continue until the ground is removed or the switch is operated to open the circuit on the grounded wire. When the ground is removed the circuit is automatically restored, there being nothing to replace as is the case with fuses.
Switch.—A switch opens and closes the various circuits and is for the purpose of controlling the light, ignition, generator and storage battery circuits.
Generator.—See chapter on electrical starting systems.
Regulation.—(Delco). On account of the various speeds at which the generator must operate it is necessary that the output be regulated so that sufficient current is obtained at the low engine speeds without excessive current at the higher speeds. The regulation in this case is what is known as the third brush excitation in which the current for magnetizing the frame is conducted through the auxiliary or third brush on the generator commutator. With this arrangement the natural function of the generator itself causes less current to flow through the shunt field winding at the higher engine speeds. This weakens the magnetic field in which the armature is rotating and decreases the output of the generator.
Contact-breaker.—See chapter on Atwater Kent ignition systems.
Coil, nonvibrating.—See chapters on Atwater Kent ignition systems and Philbrin electrical systems.
Distributors.—See chapters on Magnetos and Atwater Kent ignition systems.
[101]
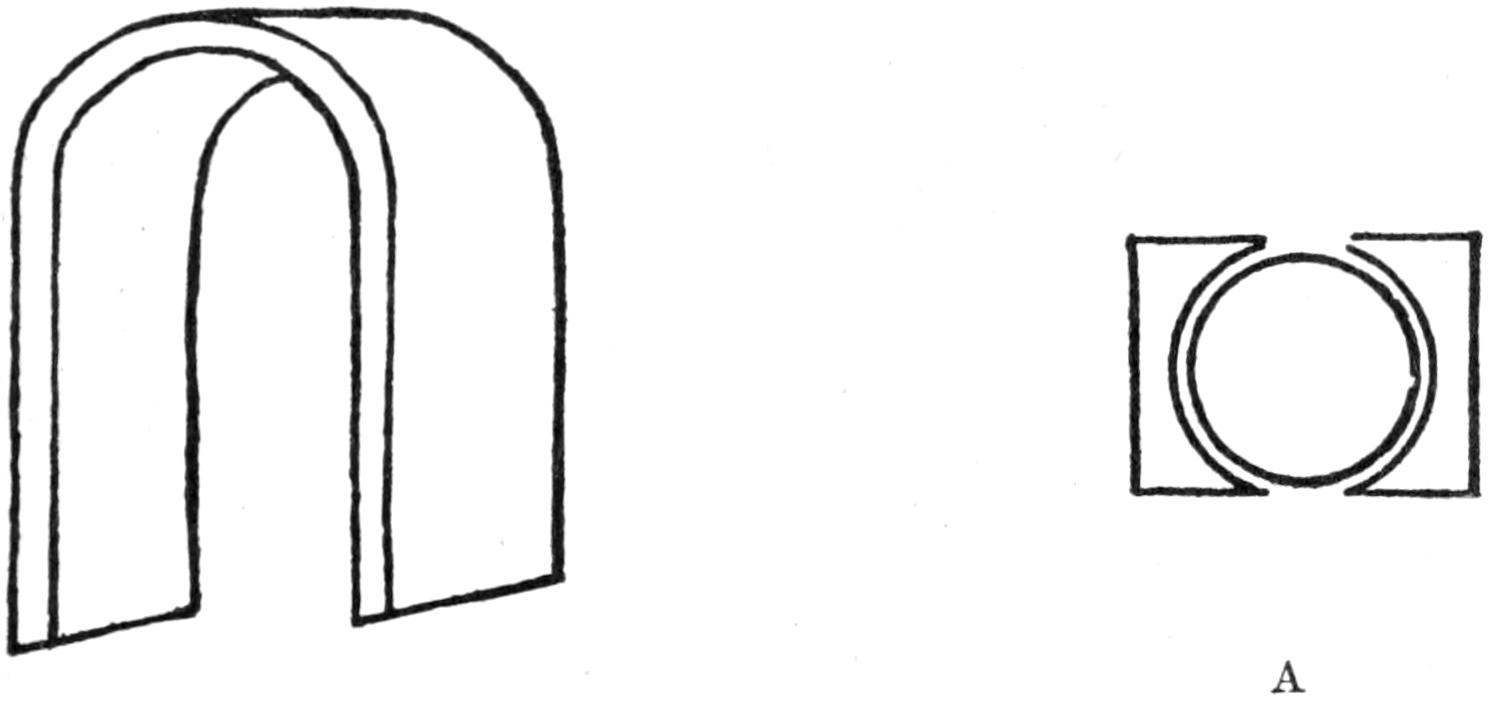
Fig. 56. Magnets—Pole Blocks
The purpose of the magneto is to furnish electrical current at regular intervals, to jump the spark plug gaps and to ignite the gas which has been compressed in the combustion chambers. The discovery was made years ago that, by placing a coil of wire between two magnetic poles, current would be present at once. But it is only while the wire coil is in motion that the current will flow or circulate, and while there are many theories why this takes place only while the coil is in motion, none seem to explain the fact satisfactorily. The strength of the current depends on the size of the magnetic field, and the number of wraps of wire in the coil. Consequently the larger the coil the more intense the current. Fig. 56 represents the magnets, of which there are from three to six. The U-shaped pieces are made of steel which has been case hardened and charged with electricity which causes them to become magnetized. Magnets have two poles or axes, one of which is positive from which the current flows, and one of which is negative to which the current flows or passes.[102] Fig. 56A shows the pole pieces which are located on the inside of the lower or open end of the magnets. The pole pieces are channel ground, leaving a round space or tunnel in which the armature revolves.
Fig. 57 shows the soft iron core which is shaped like the block letter H, and wound with fine wire, making up the coil shown in Fig. 57A of the wound armature.

Fig. 57. Armature Core—Wound Armature
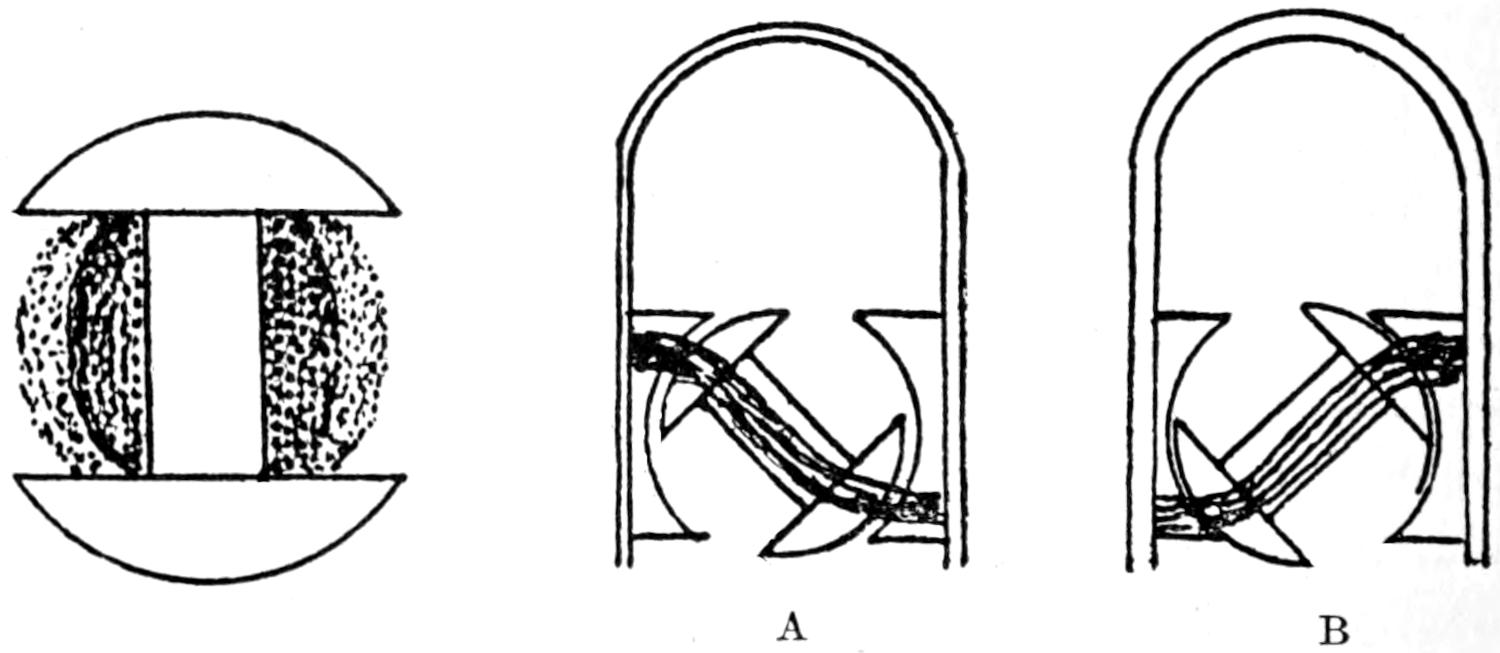
Fig. 58. Primary and Secondary Winding and Current Direction
Fig. 58 shows the primary and secondary winding. The primary or heavy wire is wound on the core lengthwise, each strand being separated from the other with rubber or tin foil insulation. The current passes from the top of the left pole piece to the top of the core until it passed out of range, crossing the upper gap between the two pole pieces. As the top of the core leaves or breaks the contact flow of current, the bottom of the core comes in contact range, leaving an open space which breaks the current and changes the direction of flowage as shown in Fig. 58A and 58B. This current is of a low tension nature, and will not jump the gap at the[103] spark plugs when the engine is running slow. The secondary winding, shown in Fig. 58, is made up of many more windings of a finer wire. The low tension or primary current is led through the armature shaft to a contact breaker at the rear of the magneto.
Fig. 59 shows the contact breaker, which consists of a housing in which two platinum points are arranged, one point stationary, the other attached to an arm on a pivot. The points are held together by spring tension.
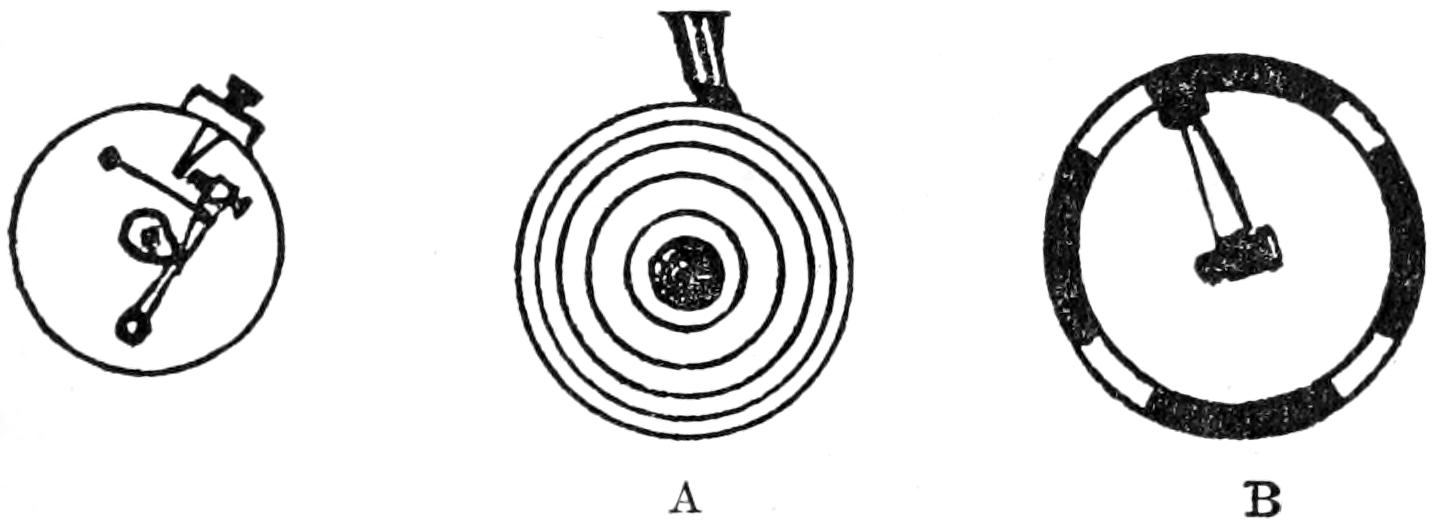
Fig. 59. Breaker—Slip Ring—Distributor
A cam on the armature shaft comes into contact with the arm on which the second point is located, forcing it from the stationary point, thus breaking the low tension current which returns to the secondary coil, the magnetizing and demagnetizing caused by the break in the low tension current, and sets up a rapid alternating current. One end of the secondary is led to a collector ring on the front of the magneto. Fig. 59A shows the collector ring. A carbon brush collects the current from the ring and conducts it to the distributor’s centrally located arm. Fig. 59B shows the distributor. The centrally located arm is timed to deliver the current, or comes into contact with one of the segments or brushes and allows the current to flow from the segment to the gap at the spark plug, where it jumps the gaps and ignites the gas in the cylinders at the proper time. Then it returns through the ground (the engine and the frame) to the magneto, where it passes back into the secondary coil, passing through an insulated condenser consisting of small plates of steel insulated from one another. This regulates the flowage of the returning[104] current, by reducing it through resistance, and prevents the armature from heating.
A safety spark gap is provided on some magnetos which causes the spark to jump and lose some of its force through resistance when the plugs become shorted. This also restricts the current and greatly aids the condenser in performing its purpose.
[105]
Like all other types of high tension magnetos, the Bosch Type ZR. Ed. 16 explained in this chapter, generates its own current and is usually employed as sole ignition on an engine.
The timer and distributor are integral; and the rotation of the armature, between the poles of strong permanent field magnets, sets up or induces a current in the armature primary circuit, which is farther augmented at every one hundred and eighty degrees of revolution of the armature shaft, by the abrupt interruption of the primary circuit by means of the magneto interruptor. At the opening of the primary circuit the resulting discharge of current from this circuit induces a current of high voltage in the armature secondary circuit. The high tension current thus created is collected by a slip ring on the armature and passes to the slip ring brush then to the various magneto distributor terminals each of which is connected to a spark plug in its respective cylinder.
The operation of the instrument will be more clearly understood from a study of the complete circuits, primary and secondary, which follows.
The Primary or Low Tension Circuit.—The beginning of the armature primary circuit is in metallic contact with the armature core, and the end of the primary circuit is connected by means of the interruptor fastening screw to the insulated contact block supporting the long platinum contact on the magneto interruptor. The interruptor lever carrying a short platinum contact, shown in Fig. 60 at C is mounted on the interruptor disc, which in turn, is connected to the armature[106] core. The primary circuit is completed whenever the two platinum contacts of the interruptor are brought together, and separated whenever these contacts are separated.
From the latter point the high tension current passes to the distributor brush (shown at D) which is held in a brush holder on the distributor gear, and consequently rotates with the distributor gear. Metal segments are imbedded in the distributor plate and as the distributor brush rotates it makes successive contacts with the segments, passing the current onto the spark plug gaps through the high tension cables which are attached to the segment terminal posts.
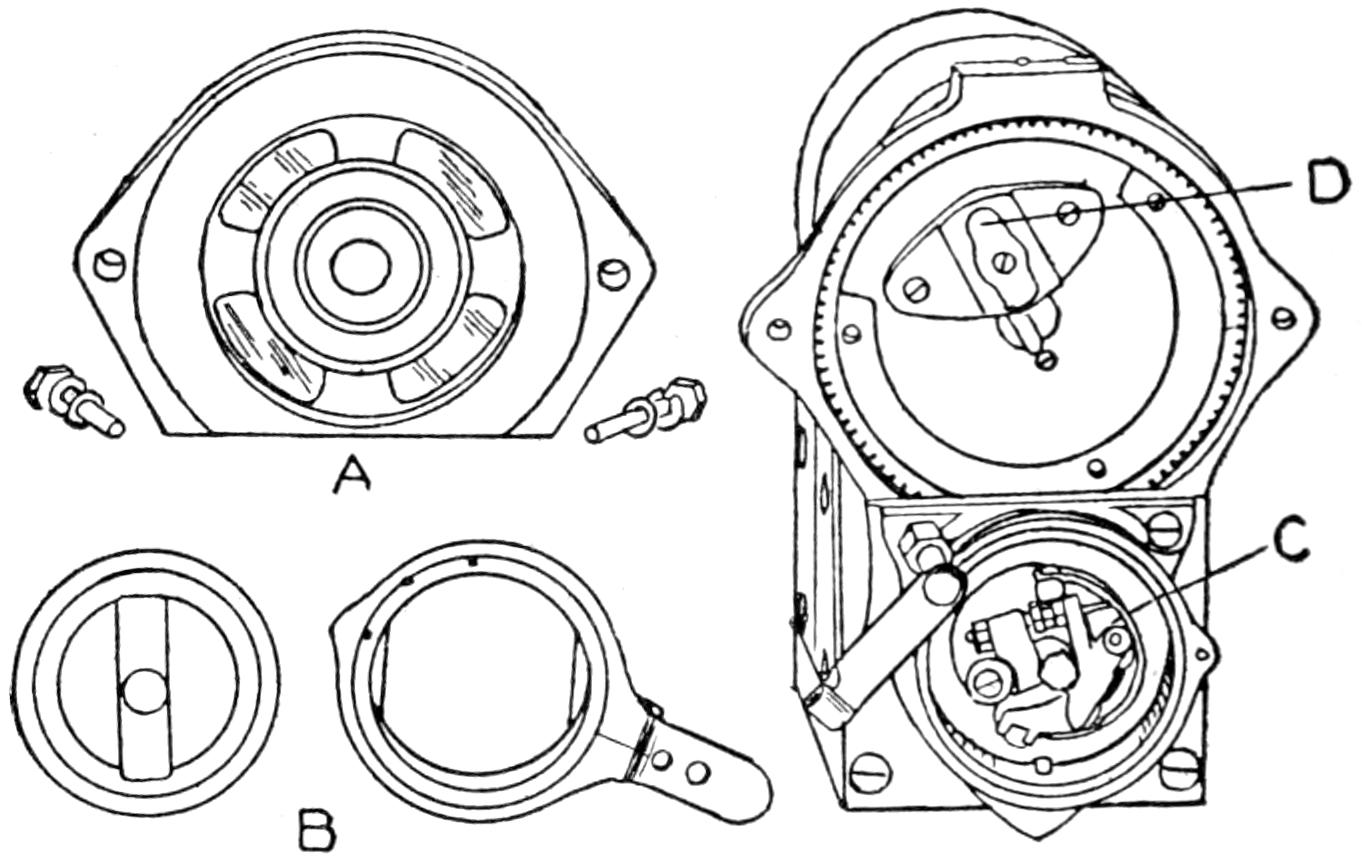
Fig. 60. Bosch M Distributor and Interruptor—Housing Removed
Fig. 61 shows a circuit diagram of the Type ZR. Ed. 16. Bosch Magneto. Note that the spark plugs must be connected up in accordance with the firing order of the engine. The metal segments imbedded in the distributor plate are connected with the terminal studs on the face of the plate, and the latter are connected by cable to the spark plugs in the various cylinders. In the cylinders the high tension current produces a spark which produces ignition, and then returns through the ground and the engine to the magneto armature, thus completing the circuit.
Timing the Magneto.—With the average four cycle engine the proper operating results are obtained by timing the magneto[107] as follows: The crank shaft is rotated to bring the piston in No. 1 cylinder (in automobile practice this is the cylinder nearest the radiator) exactly on top dead center of the compression stroke. The timing control lever on the housing is then placed in the fully retarded position. With this done, the magneto distributor plate should be removed by withdrawing the two holding screws, or by releasing the two holding springs as the case may be.
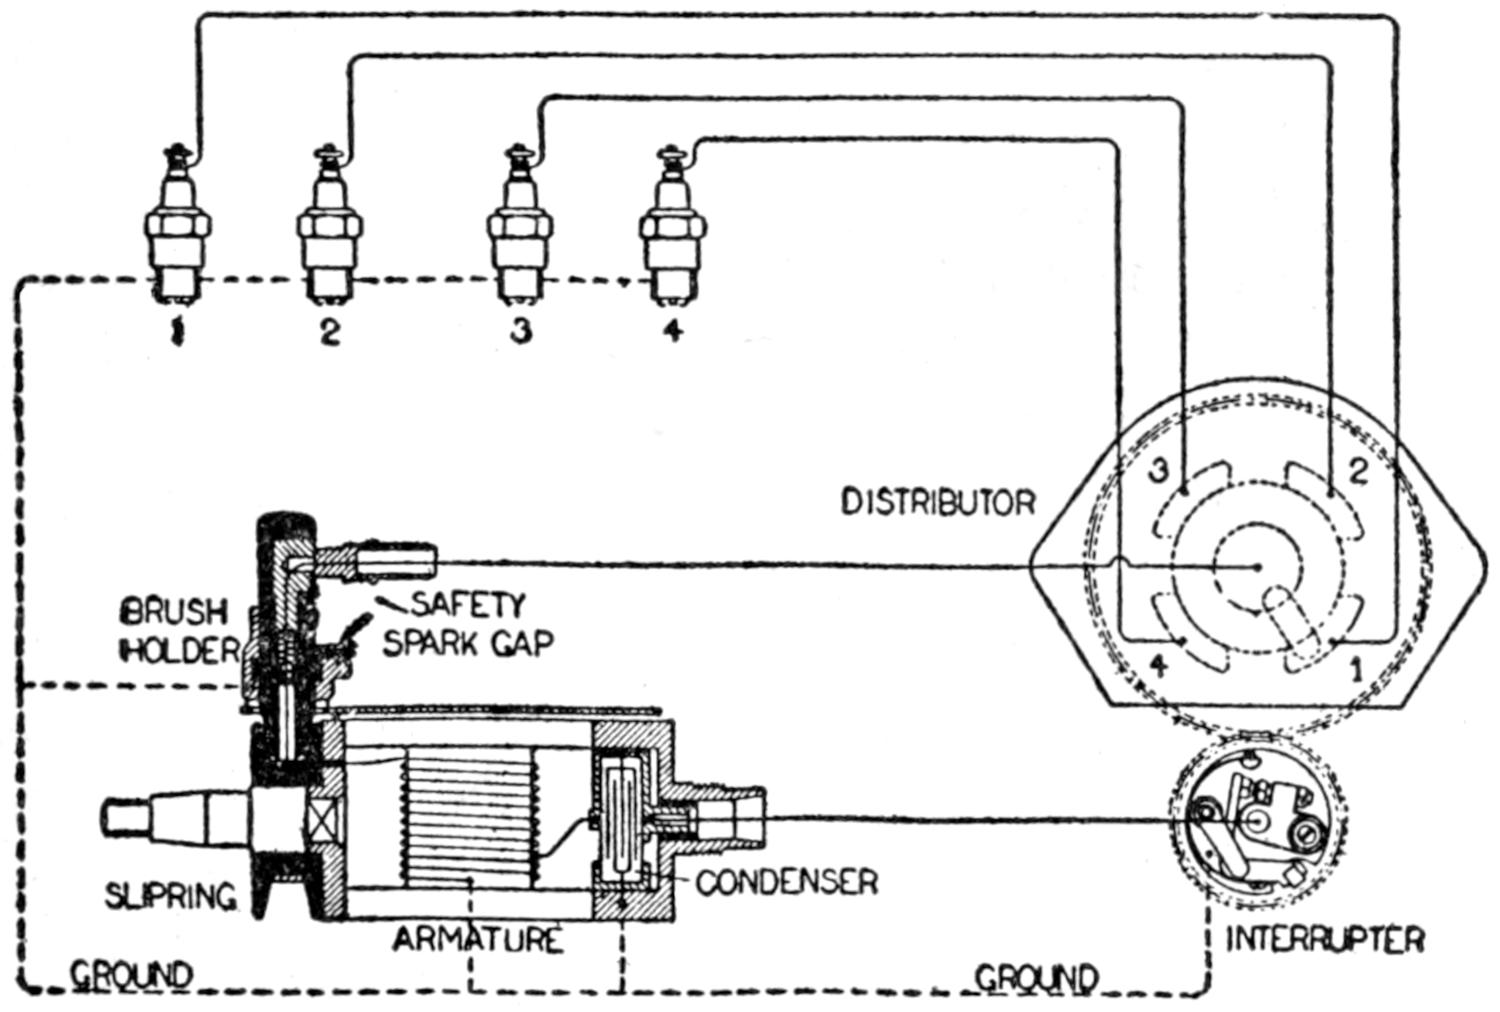
| DISTRIBUTOR | ||||
| BRUSH HOLDER |
SAFETY SPARK GAP |
|||
| SLIPRING | CONDENSER | |||
| ARMATURE | INTERRUPTER | |||
| GROUND | GROUND | |||
Fig. 61. Wiring Diagram Bosch Magneto, Type ZR-4
The operation of the platinum contact points is controlled by the action of the interruptor lever as it bears against the two steel segments secured to the inner surface of the interruptor housing.
In Fig. 60, A shows the distributor with the face plate removed to show the position of the distributor segments which are connected to the terminal posts on the back of the plate. B shows the interruptor housing and cover removed from its position on the magneto. C shows the complete assembly of the distributor and interruptor. Note that the face plate of the distributor is fastened on with a set of screws while the interruptor cover is held in position with a latch.
The Secondary or High Tension Current.—The high tension[108] current is generated in the secondary circuit only when there is an interruption of the primary circuit, the spark being produced at the instant the platinum interruptor contact points separate. The armature secondary circuit is a continuation of the armature primary circuit, the beginning of the secondary circuit being connected to the primary, while the end of the secondary is connected to the insulated current collector ring mounted on the armature just inside the driving shaft end plate of the magneto. The slip ring brush is held in contact with the slip ring by a brush holder at the shaft end of the magneto which receives the high tension current collected by the slip ring by means of a connecting bar which passes under the arch of the magnets, and passes the current to the center of the distributor plate, thus exposing the distributor brush and gear. The cover of the interruptor housing is also to be removed to permit observation of the interruptor points.
The armature should then be rotated by means of the exposed distributor gear in the direction in which it is driven until the platinum contact points are about to separate, which occurs when the interruptor lever begins to bear against one of the steel segments of the interruptor housing. Timing or installation is completed by replacing the interruptor housing cover and distributor plate, and connecting the cables between the magneto and the spark plugs.
Exact Magneto Timing.—The foregoing will establish the desired relationship between the magneto armature shaft and the engine crank shaft. It should be noted, however, that while these instructions cover the average engine, the exact magneto timing for individual engines is best determined by trial.
When specific instructions for magneto timing are given by the engine manufacturer, it is recommended that such instructions be followed in preference to those herein given.
It must always be borne in mind that while making connections the distributor brush travels in the opposite direction to the rotation of the armature shaft.
[109]
The Condenser.—The condenser consists of a set of metal discs, insulated from one another with tin foil. It is carried at the interruptor end of the magneto. It is connected in the primary current and forms a shunt connection with the interruptor contact points, and through resistance to the returning ground current prevents excessive sparking at the interruptor contact points which would soon burn the points and ruin the coils.
The Safety Spark Cap.—A safety spark cap is provided to protect the armature and other current carrying parts. Under normal conditions the current will follow its path to the spark plug, but if for any reason the resistance in the secondary wire is increased to a high point, as when a cable becomes disconnected, or a spark gap too wide, the high tension current will discharge across the safety spark gap.
Caution.—The current should never be allowed to pass over the safety spark gap for any length of time, and if the engine is operated on a second or auxiliary ignition system, the magneto must be grounded in order to prevent the production of high tension current. The snapping sound by which the passage of current across the safety spark gap may be noted should always lead to an immediate search for the cause of the difficulty.
The Safety Spark Gap.—The safety spark gap consists of a pointed metal electrode projecting from the mounting flange of the slip ring holder, inside the shaft end hood. The tip of the electrode extends to within a short distance of the connecting bar, extending from the brush holder to a magneto distributor plate center post.
Timing Range.—The magneto interruptor housing is arranged so that it may be rotated through an angle of thirty-four to thirty-seven degrees with respect to the armature shaft. The movement of this housing in one direction or another causes the interruptor lever to strike the steel segments earlier or later in the revolution of the armature, the spark occurring correspondingly earlier or later in the cylinder. The spark can be advanced by means of moving the interruptor housing[110] which is connected to the spark lever on the steering gear, in the direction opposite the rotation of the armature. The armature rotation is usually indicated by an arrow on the cover at the driving end of the magneto.
Cutting Out Ignition.—Since a high tension current is generated only on the interruption of the primary circuit, it is evident that in order to cut out the ignition, it is merely necessary to divert the primary current to a path that is not affected by the action of the magneto interruptor. This is accomplished as follows: An insulated grounding terminal is provided on the cover of the magneto interruptor housing with its inner end consisting of a spring with carbon contact pressing against the head of an interruptor fastening screw. The outer end of the grounding screw is connected by low tension cable to one side of the switch, and the other side of the switch is grounded by connecting a cable between it and the engine or frame. When the switch is open the primary current follows its normal path across the interruptor points, and is interrupted at each separation of these contact points. However, when the switch is closed, the primary current passes from the head of the interruptor fastening screw to the carbon contacts of the grounding terminal, thence through the switch to the engine and back to the magneto, and as the primary current remains uninterrupted when following this path, no ignition current is produced.
Care and Maintenance.—Aside from keeping the magneto clean externally, practically the only care required is the oiling of the bearings. Of these there are two sets supporting the armature, and a single plain bearing supporting the shaft of the distributor gear. Any good light oil may be used for this purpose (never cylinder oil), and each of the bearings should receive not more than two or three drops about every thousand miles. Apply the oil through the oil ducts at each end of the armature shaft. The interruptor is intended to operate without oil, as oil on the interruptor platinum points prevents good contact, and causes sparking, burning, and misfiring. Care should be taken to prevent oil entering these parts.
[111]
One point that cannot be over sufficiently emphasized is the warning that only those who are thoroughly familiar with the magneto should attempt to disassemble it. Therefore every part should be studied, and its functional action fully understood before any repairs or adjustments are undertaken.
The manufacturers of magnetos have developed their product to a point of high efficiency and dependability, and if they are properly lubricated and washed occasionally to prevent gumming up, very little trouble may be expected from this type of ignition system.
Magneto Cleaning.—Magneto parts should be washed with gasoline as it has the ability to remove grease and dirt and evaporates rapidly leaving a perfectly dry surface. Care should be exercised to prevent fire, for the present grade of gasoline does not evaporate as readily as it did some time ago when refiners furnished a high test grade of fuel and the surface of the armature and indentures of the magneto may retain a pool or film which may be ignited by a short circuit, or from the breaker box, and cause a fire which would ruin the magneto. There is, however, little danger from fire if the gasoline is used sparingly, and each part wiped dry before reassembling the magneto.
It is considered a good point when the magneto has been taken apart to be cleaned to go over every part with a cloth dampened in kerosene, because gasoline leaves a very dry surface which is liable to rust. The bearings especially are most easily affected in this way.
The armature may be washed with a brush which has been[112] dipped into gasoline, but should not be immersed as that would soften the insulation and cause it to rot.
The way in which the parts come off should be carefully noted in order to avoid trouble in reassembling, and the gears operating the distributor should be carefully marked to assure correct timing, which will result in a saving of time and trouble.
When the magnets are removed, close the ends with a file or piece of steel to prevent them from becoming demagnetized.
Magneto Repairing.—As previously stated, it is not likely that a magneto will require any further attention than the regular monthly oiling. Two or three drops of light sewing machine oil should be dropped into the oil wells which supply the bearings at each end of the armature shaft.
If any trouble arises that can be traced directly to the magneto, examine the breaker box mechanism first; the locknut at the point adjustment may have worked loose, and the points may be closed, or some abnormal condition may exist that has caused the points to pit and stick.
Breaker point adjustment varies from the thickness of a sheet of writing paper to one sixty-fourth of an inch; an adjustment anywhere between these two points usually results in satisfactory operation.
If the magneto does not function properly after the breaker box and external wire connections have been examined, the trouble is probably due to an internal short circuit, and repairs of this nature should only be undertaken by an expert magneto mechanic.
To remove the magneto, disconnect the high tension wires leading to the spark plugs from the distributor terminal posts, tag and number each wire to correspond with the number stamped below the post. If the engine fires 1-2-4-3, number three wire will be attached to number four terminal post. Then remove the ground wire and disconnect the universal joint and remove the metal strap, or the set screws, from the base.
To Time the Magneto.—Place the timing control lever in[113] a fully retarded position; remove the plates from the distributor housing to expose the distributor brush and gear, then remove the cover from the interruptor housing to permit observation of the points, and rotate the armature in the direction which it is driven until the point begins to open. At this point mesh the distributor gear so that the distributor lever will just be touching one of the segments which connect to the distributor terminal posts.
Timing the Magneto with the Engine.—Rotate the crank shaft until No. 1 cylinder is up on dead center on the compression stroke; rotate the armature, with the spark lever in full retard until the distributor arm begins to make contact with No. 1 segment, and mesh the timing gear at this point.
[114]
The N.-E. Model O Distributor Ignition System is used on Dodge Brothers cars. This system provides high tension ignition for the engine by transforming the low voltage of the starter generator or the battery into a high voltage capable of jumping freely between the spark plug electrodes. This is accomplished through the agency of an induction coil, the primary winding of which, in series with an interruptor or contact breaker, receives current under normal running conditions from the starter generator. The starting and lighting battery, however, supplies this current instead of the generator whenever the engine is starting or running very slowly.
At each interruption of the primary current there is set up in the secondary winding of the coil a high tension current, and this current flows from the coil through a high tension cable to the distributor rotor from which point it is selectively conducted to the proper spark plug. Upon reaching the spark gap in the plug, it jumps from the inner electrode to the outer one, which is grounded, and then returns through the engine frame to the grounded end of the secondary winding on the ignition coil. The high tension spark thus produced in the cylinder ignites the gas and so brings about the necessary combustion.
Wiring (Fig. 62).—As will be evident upon reference to the accompanying wiring diagram, the primary circuit of the ignition system leads from the positive terminal of the battery through the charging indicator to the ignition switch binding post marked “Bat.,” thence, when the switch is turned on, through the switch to one of its binding posts marked “Ign. Coil.” Continuing on from this point through the ignition coil and the breaker contacts, it returns to the second switch binding post marked “Ign. Coil,” where it passes through the switch again. It then finally reaches the grounded negative terminal of the battery through the grounded terminal of the switch and the car frame.
[115]
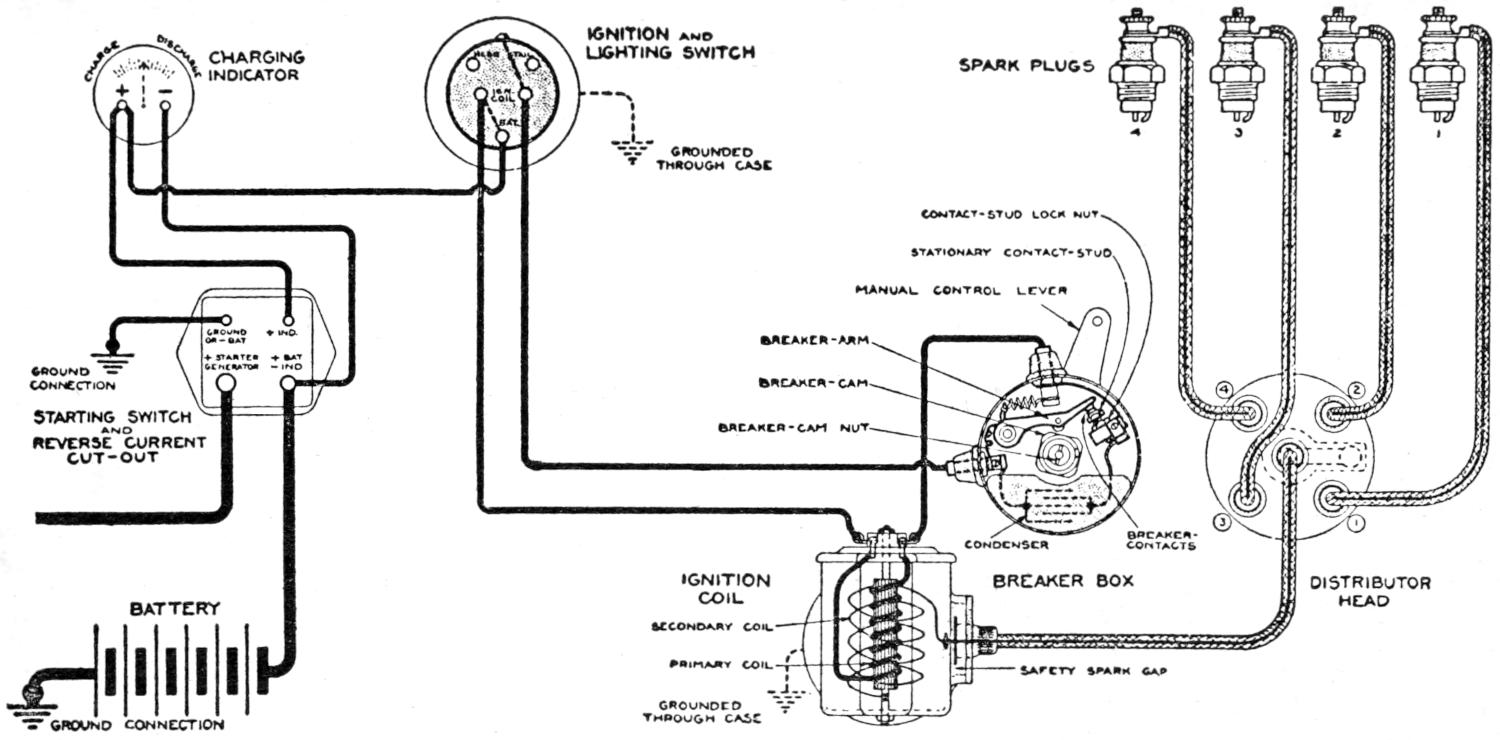
| CHARGING INDICATOR |
IGNITION AND LIGHTING SWITCH |
SPARK PLUGS | |||||
| GROUNDED THROUGH CASE |
|||||||
| CONTACT-STUD LOCK NUT | |||||||
| STATIONARY CONTACT-STUD | |||||||
| MANUAL CONTROL LEVER | |||||||
| BREAKER-ARM | |||||||
| GROUND CONNECTION |
BREAKER-CAM | ||||||
| STARTING SWITCH AND REVERSE CURRENT CUT-OUT |
BREAKER-CAM NUT | ||||||
| CONDENSER | BREAKER- CONTACTS |
||||||
| IGNITION COIL |
BREAKER BOX | DISTRIBUTOR HEAD |
|||||
| BATTERY | SECONDARY COIL | ||||||
| PRIMARY COIL | SAFETY SPARK GAP | ||||||
| GROUND CONNECTION | GROUNDED THROUGH CASE |
||||||
Circuit Diagram of the Model O Ignition System on the Dodge Brothers Motor Car
Fig. 62. Wiring Diagram, North-East System—on Dodge Car
[116]
The ignition switch is so constructed that it produces a reversal of polarity in the distributor circuit each time the switch is turned off and then on again. For this reason there is no necessity of making a distinction between the two wires leading from the distributor to the two switch binding posts marked “Ign. Coil,” because the operation of the system cannot be affected by the transposition of these wires. With this one exception, however, the ignition circuit connections must always be made exactly as indicated in the diagrams, if satisfactory operation of the system is to be maintained.
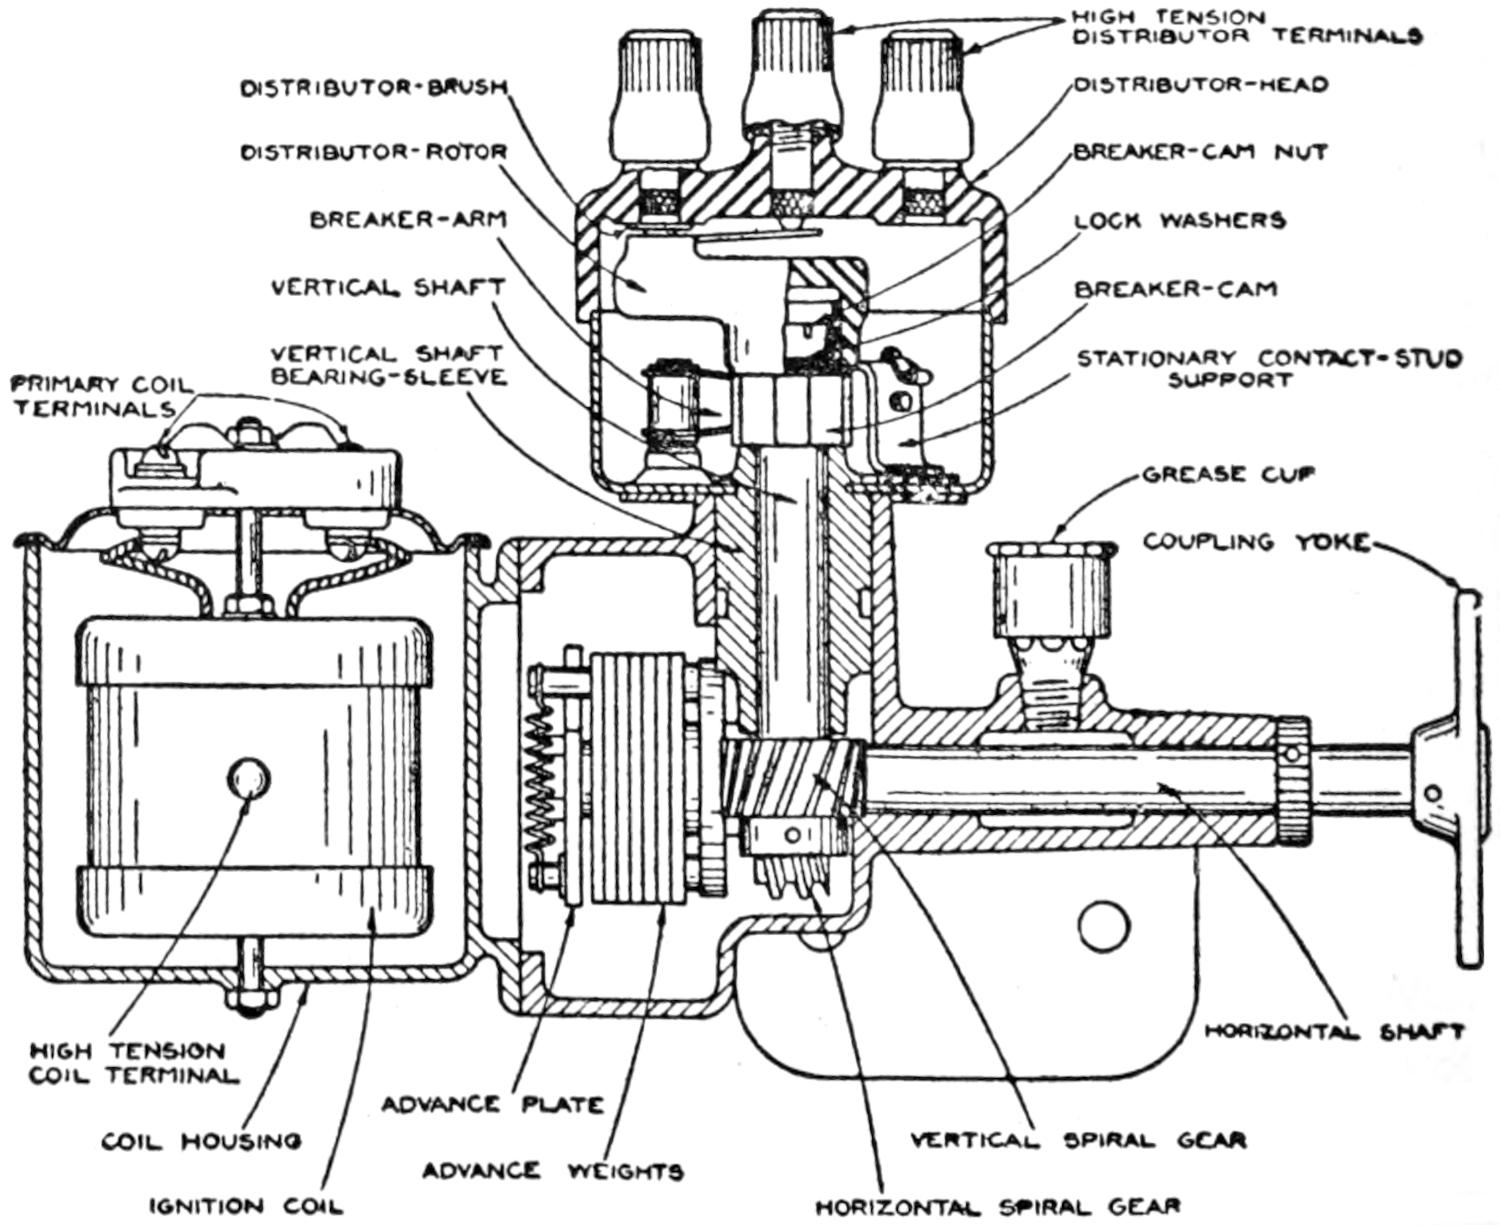
| HIGH TENSION DISTRIBUTOR TERMINALS |
||||||||
| DISTRIBUTOR-BRUSH | DISTRIBUTOR-HEAD | |||||||
| DISTRIBUTOR-ROTOR | BREAKER-CAM NUT | |||||||
| BREAKER-ARM | LOCK WASHERS | |||||||
| VERTICAL SHAFT | BREAKER-CAM | |||||||
| VERTICAL SHAFT BEARING SLEEVE |
STATIONARY CONTACT-STUD SUPPORT |
|||||||
| PRIMARY COIL TERMINALS |
||||||||
| GREASE CUP | ||||||||
| COUPLING YOKE | ||||||||
| HIGH TENSION COIL TERMINAL |
HORIZONTAL SHAFT | |||||||
| ADVANCE PLATE | ||||||||
| COIL HOUSING | VERTICAL SPIRAL GEAR | |||||||
| ADVANCE WEIGHTS | ||||||||
| IGNITION COIL | HORIZONTAL SPIRAL GEAR | |||||||
Fig. 63. North-East Distributor—Model O—Ignition
Ignition Distributor. (Fig. 63).—The model O ignition distributor is mounted on the right-hand side of the Dodge Brothers engine where it is held rigidly in position by means of four bolts. The horizontal shaft of the distributor is connected[117] directly to the engine pump shaft through a flexible coupling, and runs, therefore, at engine speed. The vertical distributor shaft is driven from the horizontal shaft by means of spiral gears which reduce its speed to one-half that of the engine.
The complete distributor unit consists essentially of three self-contained assemblies: The ignition coil, the breaker box and distributor base assembly which include the automatic spark advancing mechanism. Each one of these three elements is so constructed as to be readily detachable from the distributor unit independently of the others.
Ignition Coil.—The ignition coil, which is contained in a separate housing, forming part of the distributor unit, is constructed for 12 volt service and operates directly on the starting and lighting circuit. The coil housing is attached to the distributor base by means of four screws and serves also as a cover for the automatic advance compartment. The high tension terminal located on the coil housing is designed to provide a safety spark gap, as well as to act as a binding post for the high tension cable which connects the coil to the distributor head.
Breaker Box and Distributor Head Assembly. (Fig. 64).—The breaker box and distributor head assembly is mounted in an upright position near the center of the distributor base and is secured in place by a large-headed screw in the vertical portion of the base. This screw projects into the annular groove in the vertical shaft bearing sleeve, thereby preventing the breaker box assembly from becoming detached from the distributor base and yet at the same time permitting it to turn freely from side to side. The short lug projecting downward from the manual control lever on the breaker box extends into the round hole near the middle of the distributor base and acts as a stop to limit the travel of the breaker box.
In case it should become necessary to remove the breaker box and distributor head assembly, the distributor head should first be detached from the breaker box and then, with the breaker box in the position of full retard, the exact location[118] of the distributor rotor should be marked accurately on the edge of the box. This mark should be made with special care, because it has to serve as the sole guide for the correct position of the vertical shaft when the assembly is put back in place again on the distributor base. Moreover, while the breaker box assembly is separated from the base, the horizontal shaft in the base must not be turned from the position it occupied at the time when the location of the rotor was marked. If either of these precautions is neglected, the correct relationship between the several moving parts of the system will be likely to be disturbed to such an extent that the complete retiming of the distributor will become necessary.
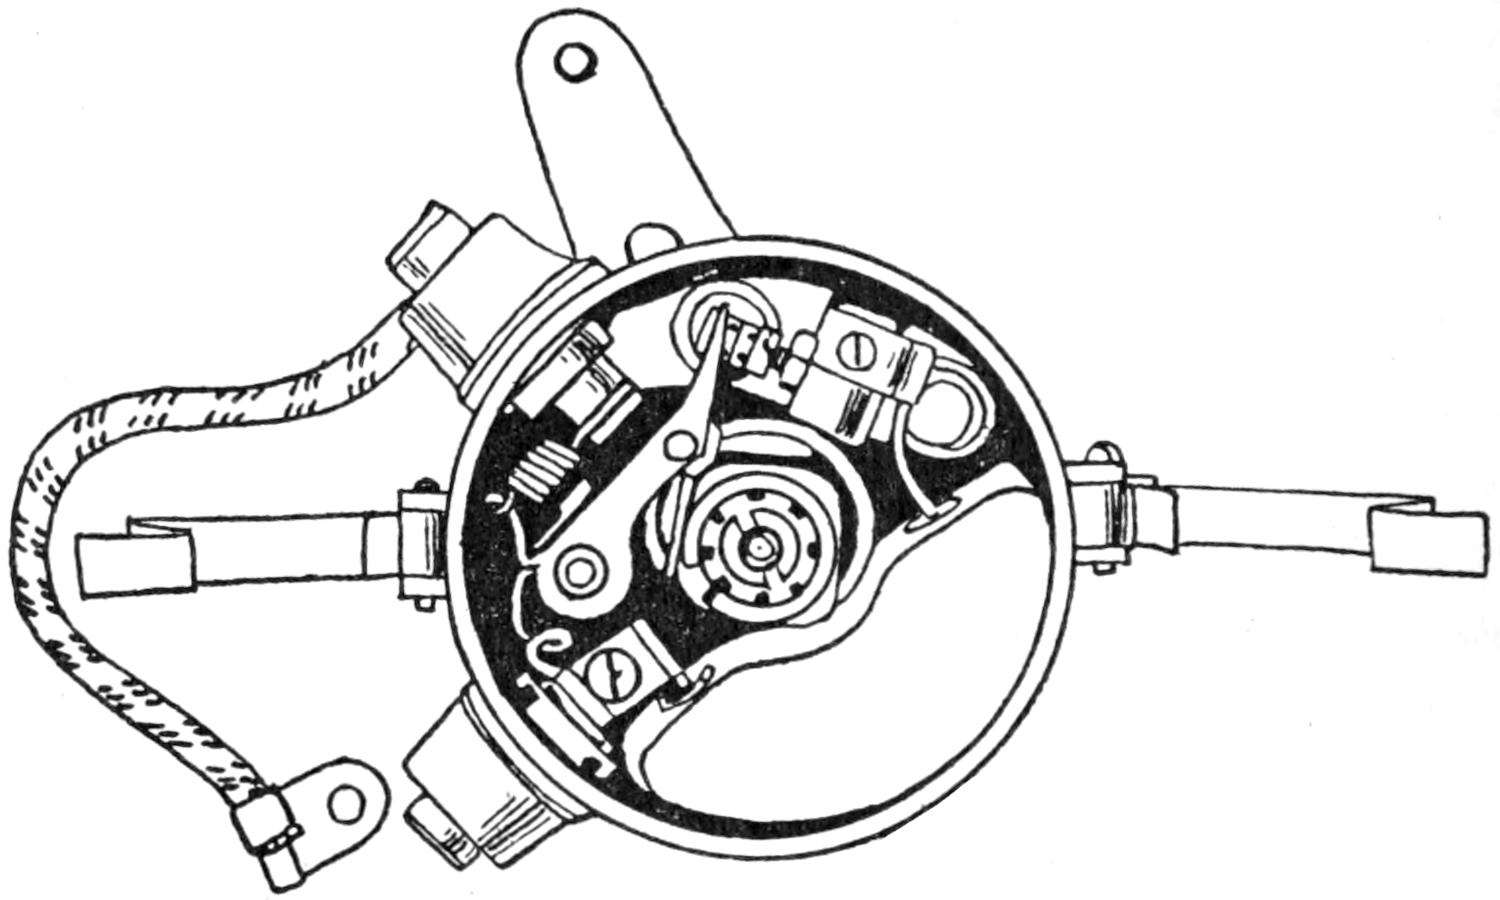
Fig. 64. North-East Breaker-Box
Condenser.—The condenser, shunted across the breaker contacts to absorb the inductive surges that occur in the primary circuit at each interruption, serves to intensify the effect produced in the secondary circuit by these interruptions, and also to protect the breaker contacts from injurious arcing. It is contained in a sealed case which protects it against possible external injury, and is located in the breaker box close to the breaker contacts where its maximum effectiveness is obtained.
Being very substantially constructed, the condenser ordinarily[119] requires no attention. If for any reason it should become inoperative, the best course is always to replace it with a new one, because condenser repairs are not economically practicable. The entire condenser unit can be easily removed, whenever desired, by disconnecting the two condenser leads from the breaker box binding posts, and then unscrewing the two nuts on the under side of the breaker box that hold the condenser case in place.
Breaker Contacts.—The breaker arm, which carries one of the two breaker contacts, is mounted on a pivot post from which it is thoroughly insulated by a fiber bushing. The helical spring, which is attached to the lug at the pivot end of the arm, holds it normally in such a position that the breaker contacts are kept closed. But the fiber block near the middle of the breaker arm lies in the path of the breaker cam and is consequently struck by each lobe of the cam as the vertical shaft revolves. Each of these blows from the cam cause the breaker contacts to be forced apart, and thereby produce the necessary interruptions in the primary circuit. The second contact is carried by the stationary contact stud, which is adjustably mounted in an arched support. With this stud properly adjusted the difference between the contact points when they are fully separated by the cam, is twenty thousandths of an inch (.020″).
If it should ever become necessary to renew the breaker contacts, a complete replacement of the entire breaker arm and the contact stud assemblies will in general be found to be the most effectual method of handling the work. The breaker arm can be removed by simply lifting it off its pivot bearing after its pigtail has been disconnected from the breaker box binding post. The spring attached to the breaker arm lug will slip off of its own accord as soon as the arm is raised sufficiently from its normal position. After the breaker arm has been taken off, the stationary contact stud can be removed by releasing its lock nut and unscrewing it from its support. To replace the breaker arm it is merely necessary to insert the lug in the spring, and then, with the spring held taut, to push[120] the arm firmly down upon its pivot post until it snaps into position.
Breaker Cam.—The breaker cam, by which the interruptions in the primary circuit are produced has four projections on its working surface, so spaced that one of them strikes the breaker arm and causes the breaker contacts to be abruptly separated each time a spark is required. The cam is held in place on the upper end of the vertical shaft by means of a slotted nut and set of special lock washers. It should never be disturbed if avoidable, because its accurate setting is absolutely essential to the correct operation of the entire system. If, at any time, however, its position should become altered accidentally, it must be carefully reset at once in accordance with the timing directions given later on.
The breaker cam and the distributor rotor are both mounted on the vertical shaft and are rotated at exactly one-half engine speed. Accordingly, since the engine is of the usual four-cycle type requiring two revolutions of the crank shaft for one complete cycle of operation, the distributor rotor and breaker can make one revolution during the completion of each full cycle of the engine.
Distributor Head.—The distributor head contains five high tension terminals. The central terminal receives the current from the secondary winding of the ignition coil and transmits it to the rotor arm by which it is distributed to the four outer terminals. These outer terminals are numbered 1, 2, 3, 4 respectively, corresponding to the firing order of the engine, and are connected to the four spark plugs in accordance with their markings. The distributor rotor in completing one full revolution establishes contact successively between the rotor brush and each one of these four outer distributor terminals, each contact being made at the same moment that the primary circuit is interrupted by the action of the breaker cam. Thus when the spark plug leads are properly connected, the high tension current, as soon as produced in the secondary circuit, is conducted to the spark plug of the proper cylinder just at the moment when the gas in that particular cylinder is ready[121] for firing. If, therefore, the spark plug leads ever have to be removed from the distributor head, they must always be attached again carefully in the correct order.
Automatic Advance Mechanism. (Fig. 65).—Combustion does not follow instantaneously upon the occurrence of the spark, however, because a small time interval is always needed for the gas in the cylinder to ignite. Consequently, unless some means are provided for offsetting the lag between spark and combustion, the explosion of the gas could not always be made to take place at exactly the correct moment under varying conditions of engine speed.
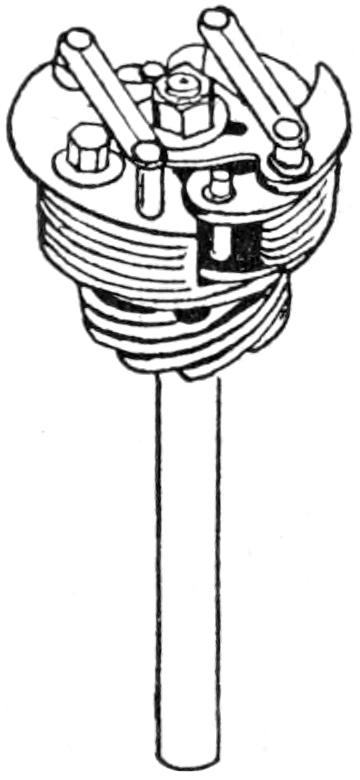
Fig. 65. Automatic Spark Advance Mechanism—North East
To compensate for this lag, therefore, there is incorporated in the distributor a centrifugally actuated mechanism, which is capable of automatically advancing or retarding the time of the spark in exact accordance with the rate of speed at which the engine is running.
The operating characteristics of the automatic advance are accurately proportioned to conform throughout the entire speed range with the requirements of the engine; and in order to insure the permanence of this relationship the device is so constructed as to be practically nonadjustable.
Manual Spark Control.—Besides this automatic advance there is also the usual manual control mechanism for changing the time of the spark independently of the centrifugal device.[122] This manual control is for use principally for retarding the spark when starting or idling the engine or for facilitating carburetor adjustments. During normal operation of the engine, the spark lever on the steering wheel quadrant should be advanced as far as permissible without causing the engine to knock, and the actual regulation of the spark position be left entirely to the automatic advance mechanism. The arrangement of the manual control is such, provided the breaker cam is properly set, that when the spark lever is in the position of full retard, and the engine is running very slowly, the spark will occur in each cylinder at 5 engine degrees after the piston has passed the upper dead center of its compression stroke. With the spark lever advanced to the limit of its travel on the quadrant, the spark will occur 15 degrees before the upper dead center position has been reached by the piston on its compression stroke.
Timing the Distributor.—Whenever it becomes necessary to disconnect the distributor shaft from the engine pump shaft the exact relative positions of the two halves of the coupling joining these two shafts, as well as the location of the distributor rotor, should be carefully noted and marked. This is necessary in order to make possible the reëstablishment of the correct relations between the distributor shaft and the pump shaft when original conditions are being restored. Moreover, care must be taken to avoid turning the engine while the distributor is disconnected, because the proper timing relations can only be retained by keeping the position of the pump shaft unchanged during this time.
Should it ever happen, however, that the distributor has been taken off without the proper precautions having been observed, or that the timing arrangement has been disturbed in any other fashion, it will thereupon become necessary to make a complete readjustment of the timing relations of the distributor and the engine. This is to be done always after the distributor has been reconnected to the engine, the first step being to ascertain definitely the relative position of the engine pistons and valves. With this done, the positions of[123] the breaker cam and the distributor rotor are then to be reset as directed below.
Since all the parts of the engine follow a regular sequence of operation, only the position of the piston and valves in the No. 1 cylinder need be considered in this process, and the three remaining cylinders may be practically disregarded. There are numerous methods, varying in their degree of accuracy, for locating the position of the engine pistons, but the most dependable one is that of removing the cylinder head so as to expose the pistons and valves to full view. With the head thus removed, the engine should be cranked slowly by hand until the No. 1 piston has risen to the top of its compression stroke and has just started to descend on its combustion stroke. At this moment the spark, when fully retarded, should normally occur in No. 1 cylinder.
Under circumstances where it is not convenient or desirable to remove the cylinder head the following approximate method for determining the location of No. 1 piston may be employed with a fair degree of success. Open the cocks of the priming cups on all the cylinders, and crank the engine slowly by hand until the No. 1 piston has just reached the top of its compression stroke. This can be ascertained by holding the thumb over the No. 1 priming cup and noting carefully the moment when the compression ceases to increase. After locating the dead center position of No. 1 piston in this way, turn the crank shaft a very slight distance further until the No. 4 exhaust valve is just at the point of closing. Under these conditions, provided the No. 4 exhaust valve lifter is in correct adjustment, the No. 1 piston should be approximately in the desired position of 5 engine degrees beyond dead center.
With the No. 1 piston thus carefully set in accordance with one of the above methods, preferably the former, bring the distributor into the position of full retard. To do this, disconnect the manual control attachment and turn the break-box as far as it will go in the direction in which the vertical shaft rotates. Then after making sure that the ignition switch is turned off, remove the distributor-head and the distributor[124] rotor and the breaker box, and with a broad bladed screw driver back off the breaker cam nut until the cam is free to turn on its shaft. Next, replace the rotor temporarily, and turn the cam slowly until the breaker contacts just begin to open when the rotor occupies the position where it normally makes contact with the No. 1 distributor terminal. This adjustment can be made to the best advantage by turning the cam forward to separate the contacts then back again slowly until the contacts just come together, at which point the cam should be allowed to remain.
After the proper setting has thus been obtained, remove the rotor again and lock the cam securely in position by tightening the slotted nut that holds it. Finally, replacing the rotor, rock the vertical shaft backward and forward as far as the slack in the gears will permit, and note carefully the action of the break contacts. The setting of the cam must be so accurate that when the gears are rocked forward to take up the slack, the contacts will be just held apart and yet when the gears are rocked backward as far as the slack permits, the contacts will be actually closed.
A convenient method of verifying this adjustment is to turn on the ignition current and connect an ordinary 14 or 16 volt 2. c. p. lamp across the two binding posts of the breaker box. The lamp thus attached, will serve as a sensitive indicator for representing the action of the contact-points when the vertical shaft is rocked forward and backward to take up the slack in the gears. The moment the contacts begin to be separated, the lamp will light; but as soon as they are allowed to come together the lamp will at once go out again.
Should the test prove the first setting to be inaccurate, the cam must be readjusted, and the test repeated several times if necessary until the correct setting is finally obtained. Too much care cannot be employed in making this adjustment, because even a very slight inaccuracy in the setting of the cam will produce a considerably magnified effect upon the operation of the engine. This is due to the fact that the engine speed is twice as great as that of the vertical shaft.
[125]
General Care.—Under normal operating conditions the ignition system requires very little care aside from the usual precautions against moisture and dirt. There are, in fact, but three points of importance that need attention during service:
1. Lubrication.
2. Cleaning and adjustment of the breaker contacts.
3. Inspection of the wiring and the spark plugs.
[126]
Atwater Kent ignition systems have been adopted of late by many prominent automobile manufacturers as a means of distributing or conveying electrical spark to the cylinders at the proper firing time.
This type of quick break distributing system has proved very efficient and dependable, and will usually outlast the life of the motor as there are very few moving parts, which eliminates troubles caused by worn parts getting out of adjustment.
This type of ignition system operates in much the same manner as the high tension magneto, and differs only in that the parts have been taken from the compact magneto case and distributed in other locations in separate units. As this type takes its current from the lighting and starting battery, it does not contain an armature or field magnets to manufacture the electrical force.
Fig. 66 illustrates the principles of operation of the type CC Atwater Kent closed circuit system, which consists of the unisparker containing the contact maker and distributor. The only moving parts are located in this unit. The coil consists of a soft iron core, with a primary and secondary winding sealed in an insulated tube or container. A resistance unit is located in the top and regulates the current automatically. The system is controlled by a switch located on the dash. The contact breaker shown in Fig. 67 consists of an exceedingly light steel contact arm. One end rests on a hardened steel cam which rotates one-half as fast as the crank shaft.[127] This cam has as many sides as the engine has cylinders. When the contact points are opened by the movement of the cam the primary circuit is broken and produces a discharge of secondary high tension current at one of the spark plug gaps.
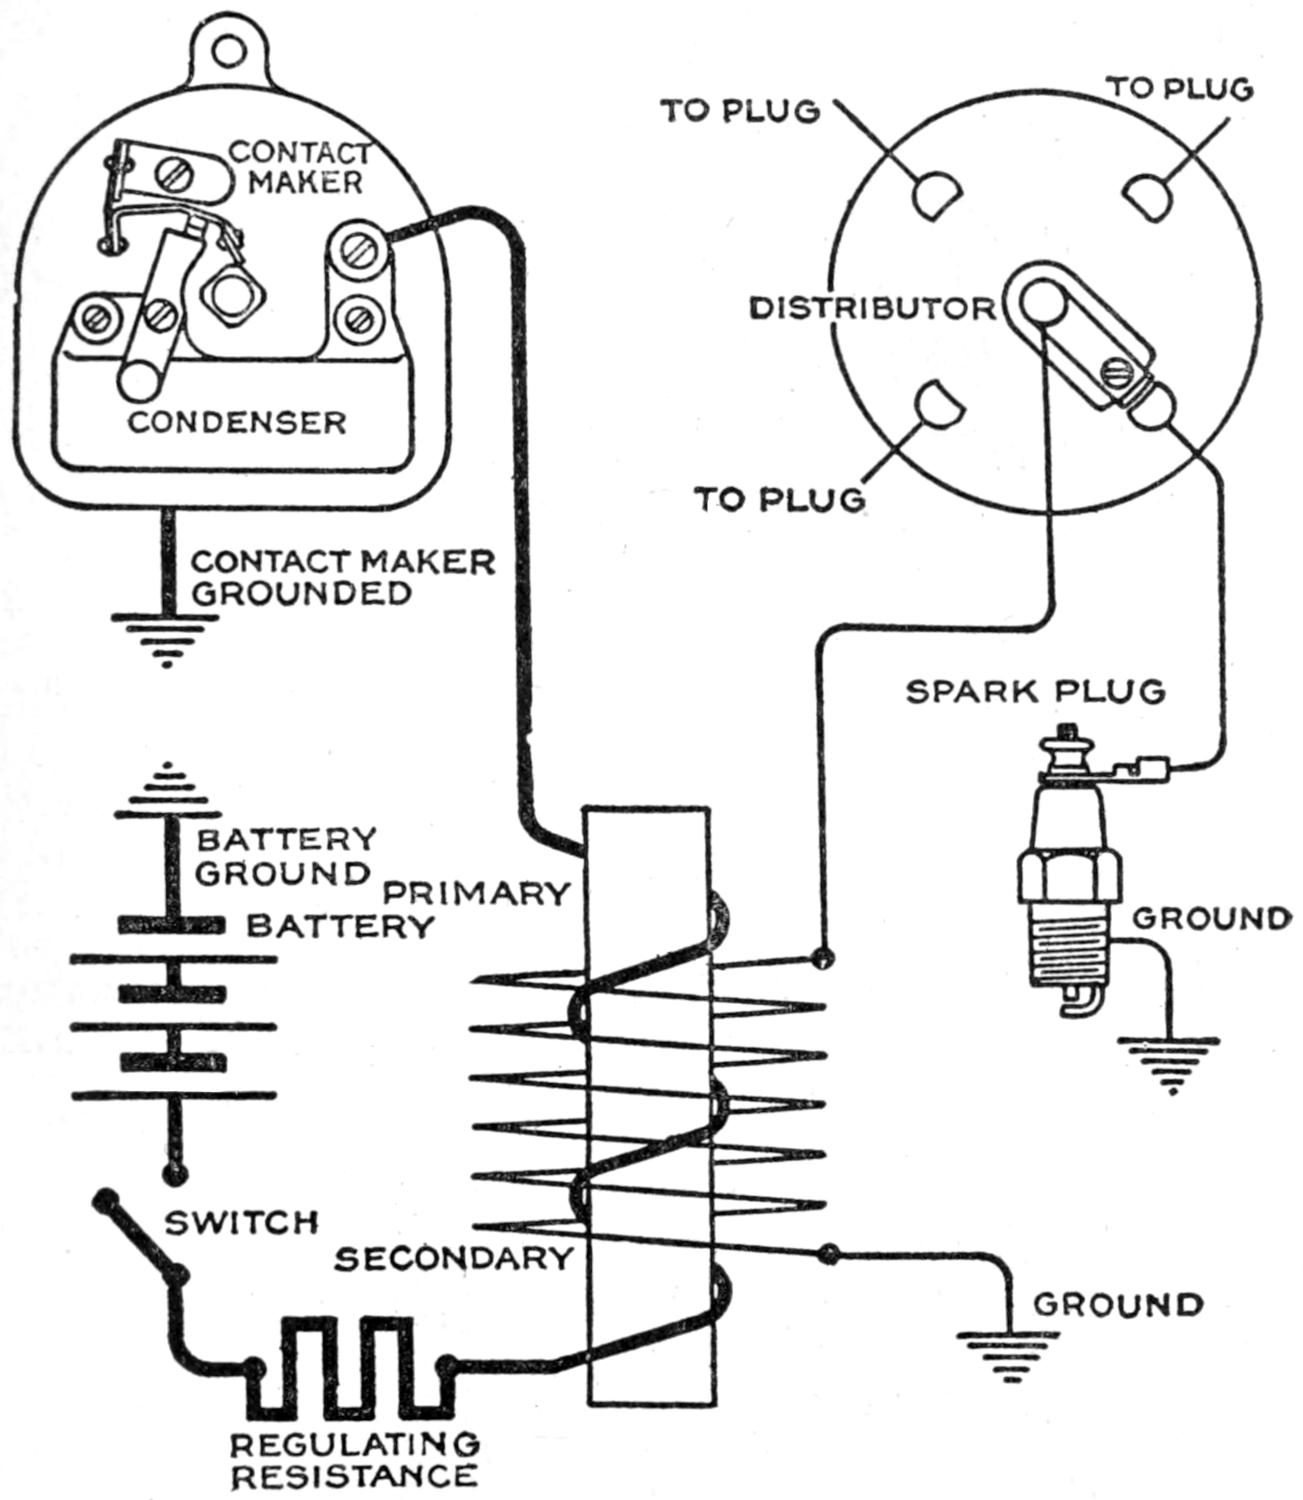
| CONTACT MAKER |
TO PLUG TO PLUG |
| DISTRIBUTOR | |
| CONDENSER | |
| TO PLUG | |
| CONTACT MAKER GROUNDED |
|
| SPARK PLUG | |
| BATTERY GROUND |
|
| PRIMARY | |
| BATTERY | GROUND |
| SWITCH | |
| SECONDARY | |
| GROUND | |
| REGULATING RESISTANCE |
Fig. 66. Atwater Kent Circuit Diagram—Type CC
Fig. 68 shows the simple Atwater Kent contactless distributor. The high tension distributor of the Atwater-Kent system forms the top of the contact maker. Each spark plug wire terminates in an electrode, which passes through the distributor cap. A rotating distributor block takes the high[128] tension current from the central terminal and distributes it to the spark plugs in proper firing order. The distributor block or arm does not make direct contact with the distributor posts. The current jumps the small gap between the distributor block and the terminal electrodes and does away with frictional wear resulting from actual contact.
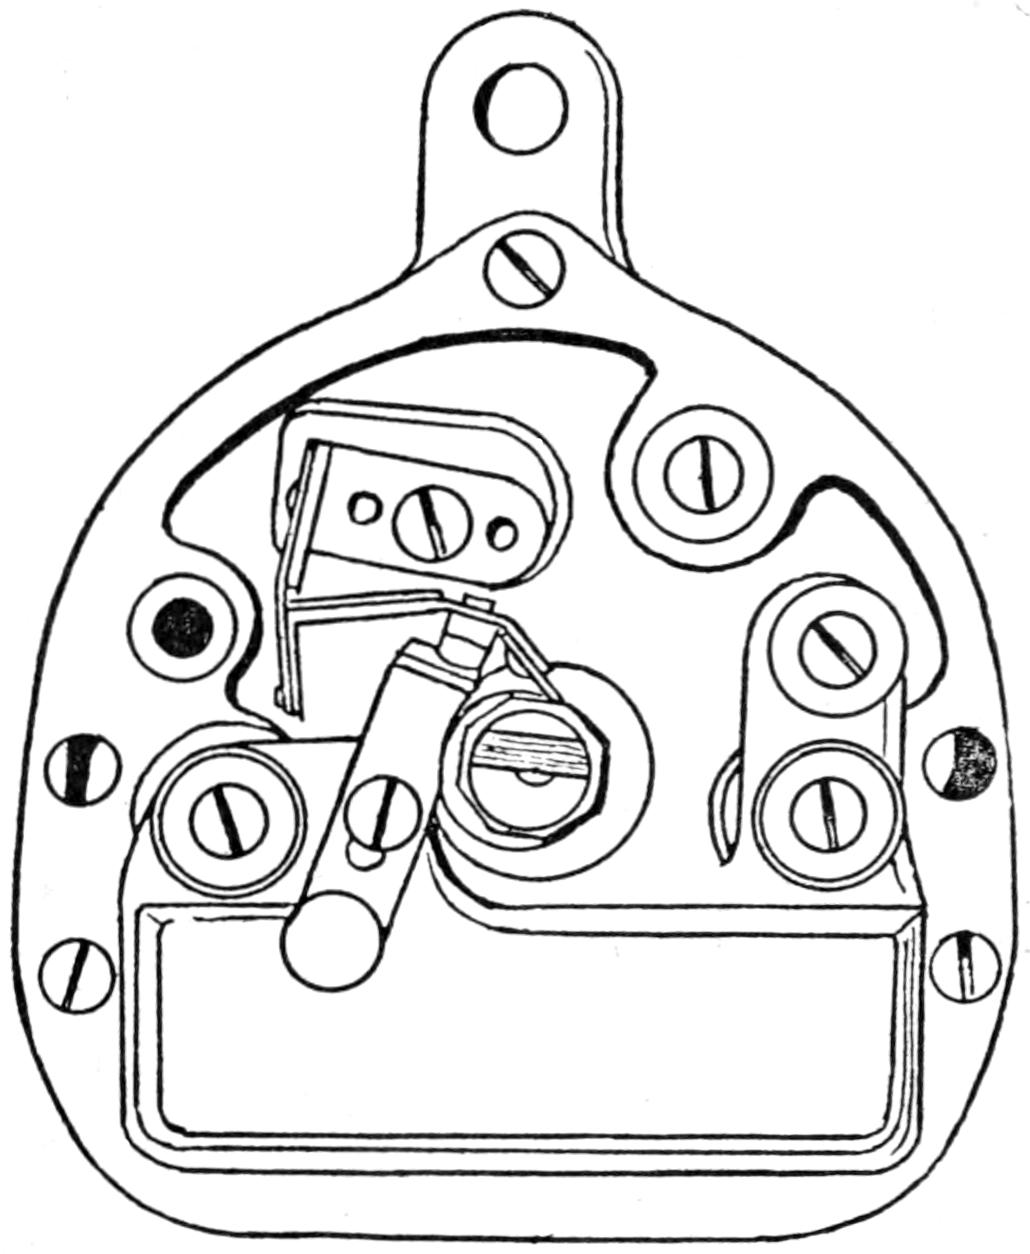
Fig. 67. Atwater Kent Contact Breaker—Type CC
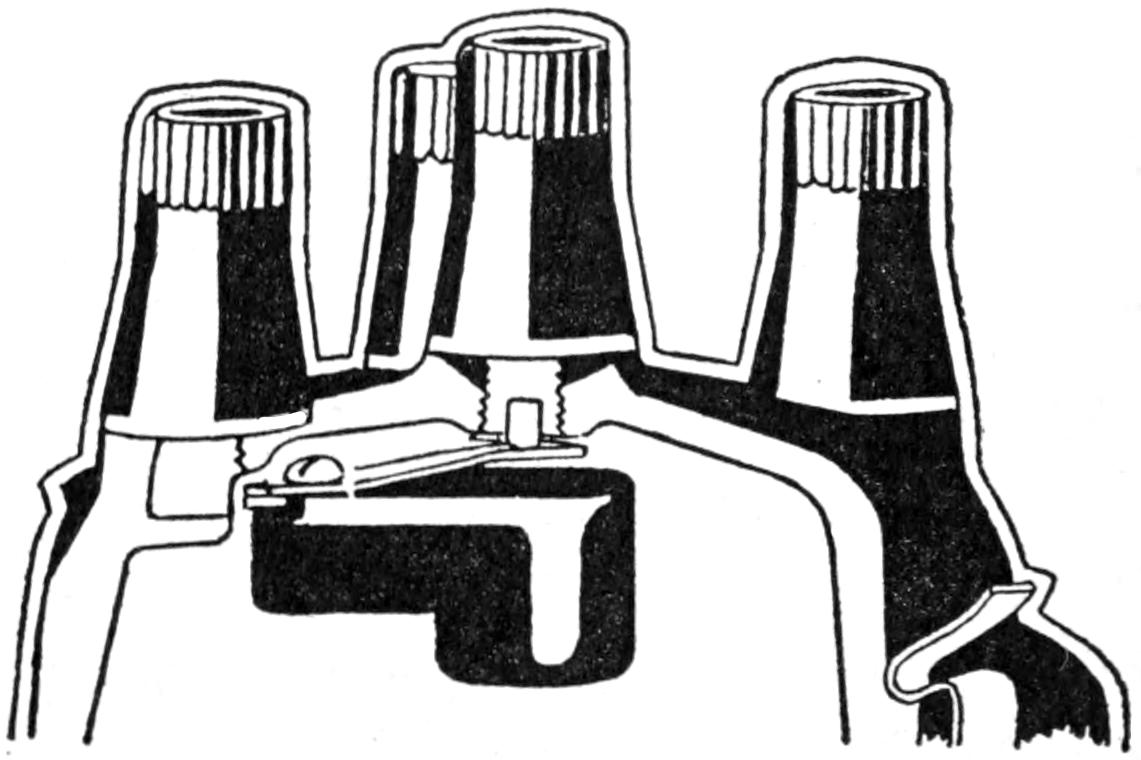
Fig. 68. Atwater Kent Distributor and Contactless Block
[129]
Fig. 69 shows the method of connecting the high tension wires to the distributor; the insulation is removed, or the wire bared in a space 11⁄4″ long. The removable terminal cover is pushed up on the wire as shown at A, the bared end of the wire is then passed through the hole in the secondary terminal as shown at B. The end of this wire is then twisted back on itself, for two complete turns as shown at C, so that the end will not project beyond the diameter of the insulation. The wire will then be tightly held when the terminal covers are screwed down as shown in Fig. D. Never use pliers to tighten these covers and do not solder the wires to the terminal posts.
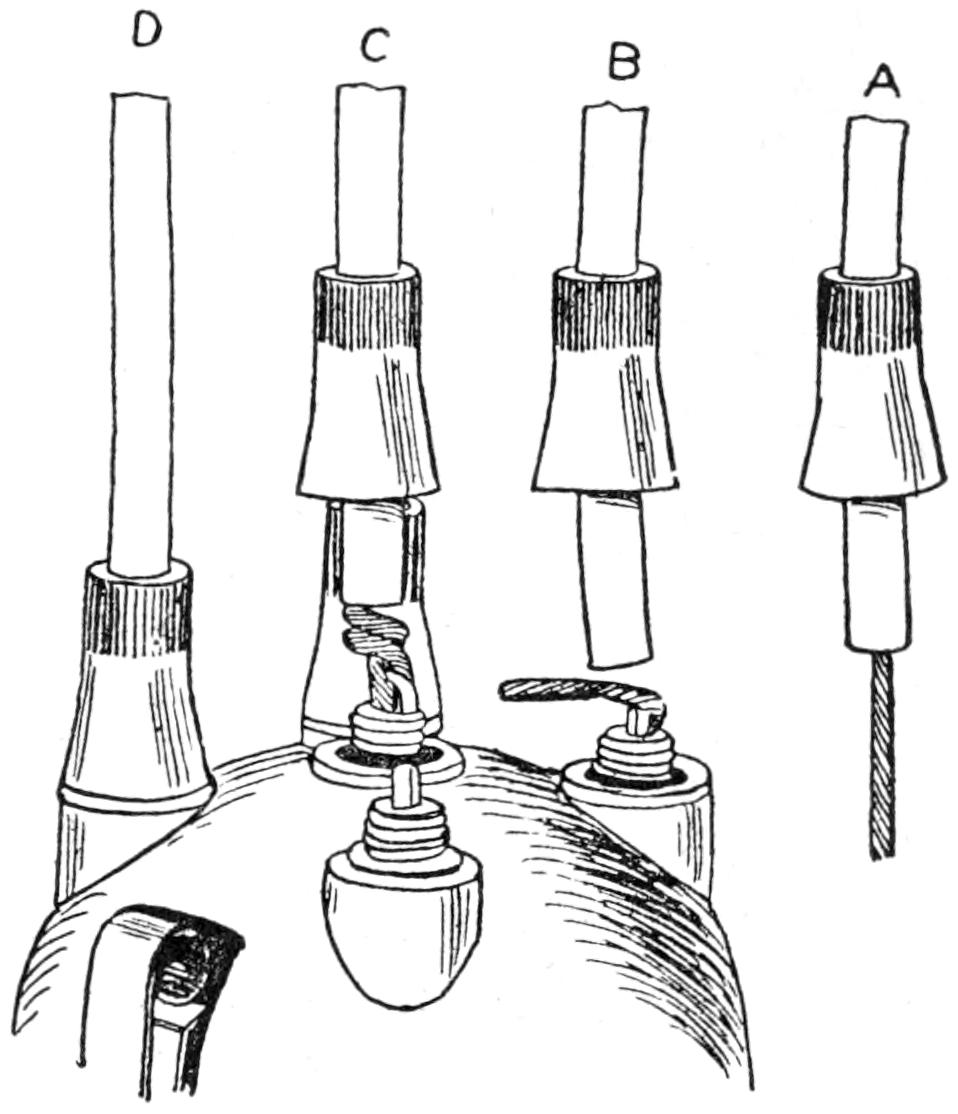
Fig. 69. Distributor Wire Connections to Distributor
Adjustment.—The only parts of this system that are adjustable are the contact points. These need to be adjusted only for natural wear. Do not adjust the points unless you are convinced, by trying everything else, that it is the points that need attention.
In making adjustments, note the following directions. The normal gap between the points should not be less than .005″, or more than .008″, the standard setting is .006″, which is[130] about the thickness of two ordinary sheets of writing paper.
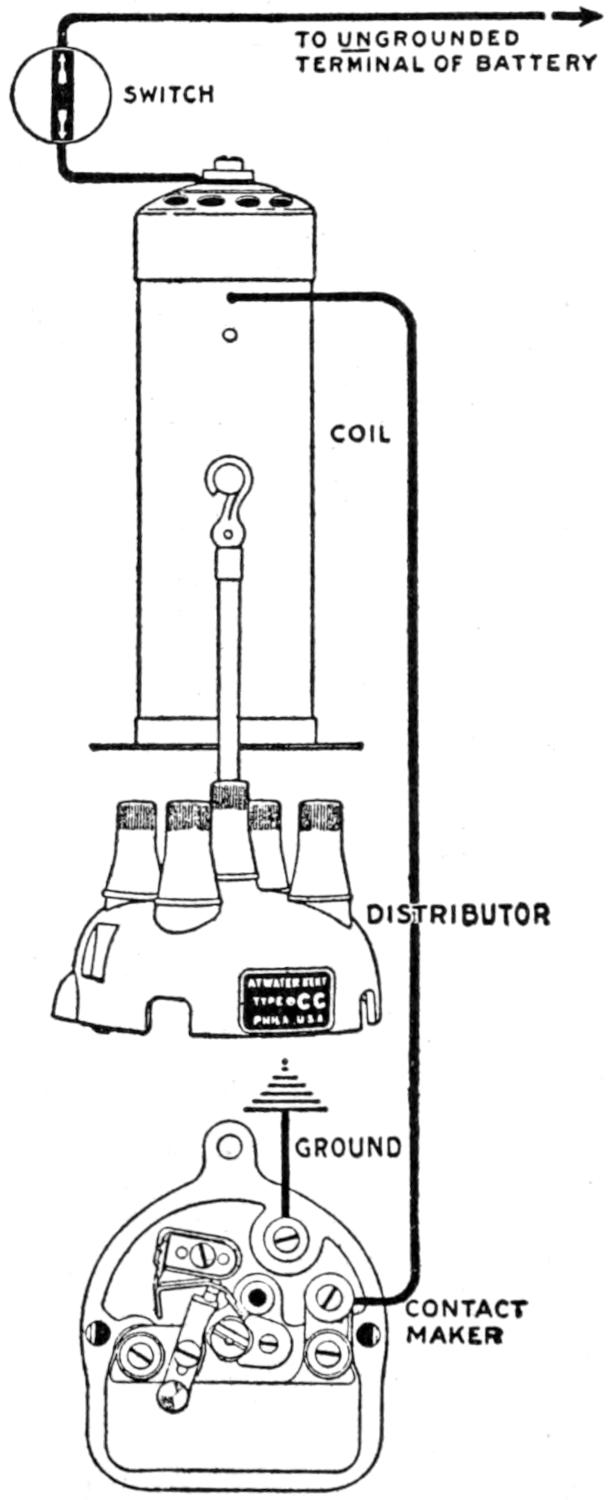
TO UNGROUNDED
TERMINAL OF BATTERY
SWITCH
COIL
DISTRIBUTOR
GROUND
CONTACT
MAKER
Fig. 70. Atwater Kent Type CC Wiring Diagram
The contact points are made of tungsten steel, the hardest known metal. When contact points are working properly small particles of tungsten steel will be carried from one point to the other, which sometimes causes a roughness and a dark gray coloring of the surfaces. This roughness does not in any way effect the proper working of the points, owing to the fact that the rough surfaces fit into each other perfectly.
[131]
It should not be necessary to file or redress the points unless they become burned, due to some abnormal condition or accident. The dark gray appearance is the natural color of the tungsten steel.
Oilings.—A very small amount of ordinary vaseline or grease applied to the cam and a drop or two of oil applied to the cups every few weeks, is all the lubrication necessary. Do not get oil on the contact points, and wipe off any free oil or grease on the contact maker.
The springs in this system are set at exactly the right tension. Do not try to bend or tamper with them.
The wiring of the type CC ignition system is very simple, as shown in Fig. 70, and is known as the one wire with ground return method. Well insulated primary wire is used for the primary circuit between the coil and the ignition switch. The best quality of five-sixteenth inch secondary wire is used to conduct the high tension current from the coil to the distributor, and from the distributor to the spark plug.
Setting or Timing the Type CC System.—The piston in number one cylinder should be raised to high dead center, between the compression and firing strokes, the clamp which holds the unisparker should be loosened and the unisparker turned backward, or opposite the rotating direction of the timer shaft until the contact points commence to open. The spark occurs at the exact instant of the opening of the point.
After completing the electrical connection the current can be turned on, and the unisparker timed exactly from the spark at the plugs. For this purpose the plugs should be removed from the engine and laid on top of the cylinders.
[132]
The operating principle of the Atwater Kent ignition system type K-2, differs from type CC system in that it operates on the open circuit plan, whereas the type CC system explained in the preceding chapter, operates on the closed circuit plan.
A-K ignition system type K-2 consists of three parts:
No. 1. The unisparker combining the special contact maker, a condenser, and a high tension distributor.
No. 2. The coil, consisting of a simple primary and secondary winding, and a condenser. These parts are all imbedded in a special insulating compound. The coil has no vibrator or other moving parts.
No. 3. The ignition switch. This switch controls the system by opening and closing the primary current.
The Principle of the Atwater Kent System.—The function of this system is to produce a single hot spark for each power impulse of the motor. It differs from other types of battery ignition systems in that the contact points do not touch except during the brief instant of the spark. The ignition circuit is, therefore, normally open, whence the name “open circuit” results. The contact maker consists of a pair of contact points, normally open, which are connected in series with a battery, and the primary circuit of the non-vibrating induction coil. The mechanism for operating the contacts consists of a notched shaft having one notch for each cylinder, rotating at one-half the engine speed, a lifter which is pulled forward by the rotation of the shaft, and a coil spring which pulls the lifter back to its original position after it has been drawn forward and released by the[133] notched shaft; hardened steel latch, against which the lifter strikes on its recoil and which in turn operates the contact points.
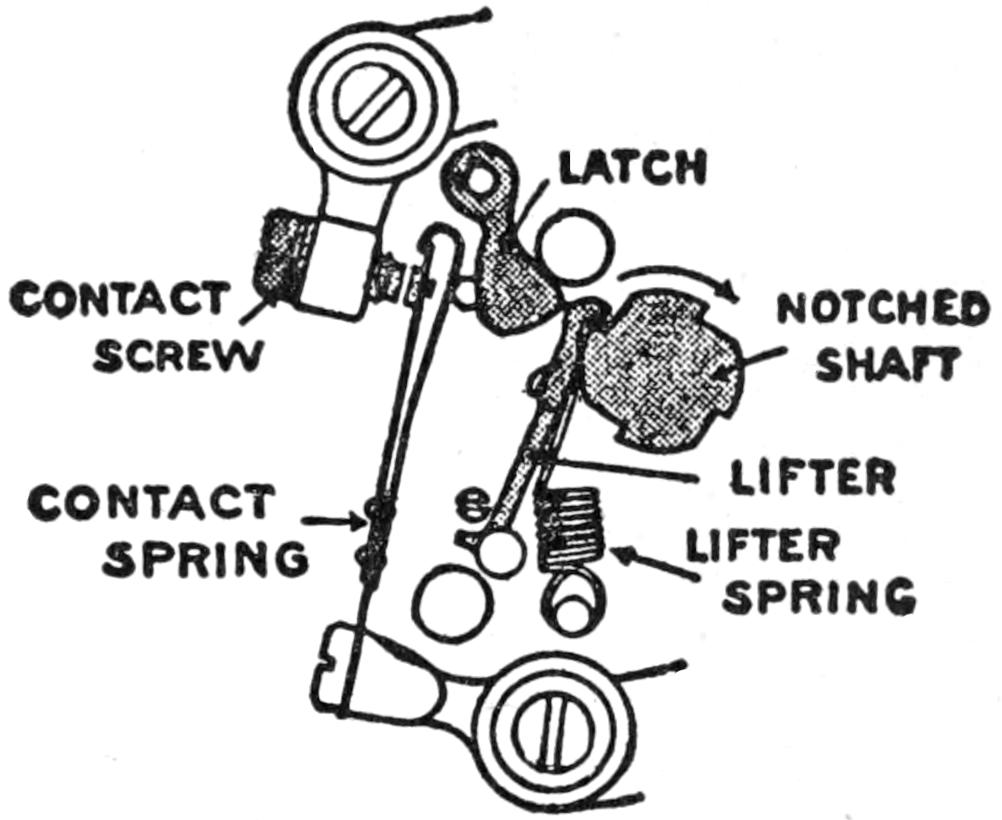
| LATCH | ||
| CONTACT SCREW |
NOTCHED SHAFT |
|
| LIFTER | ||
| CONTACT SPRING |
LIFTER SPRING |
|
Fig. 71. Atwater Kent Contact Breaker—Diagram of Action—Type K-2 System.
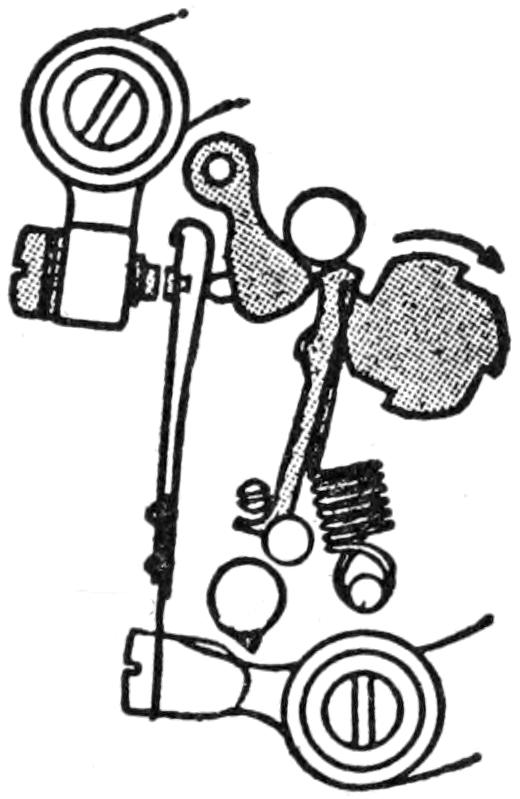
Fig. 72. Atwater Kent Contact Breaker—Diagram of Action—Type K-2 System
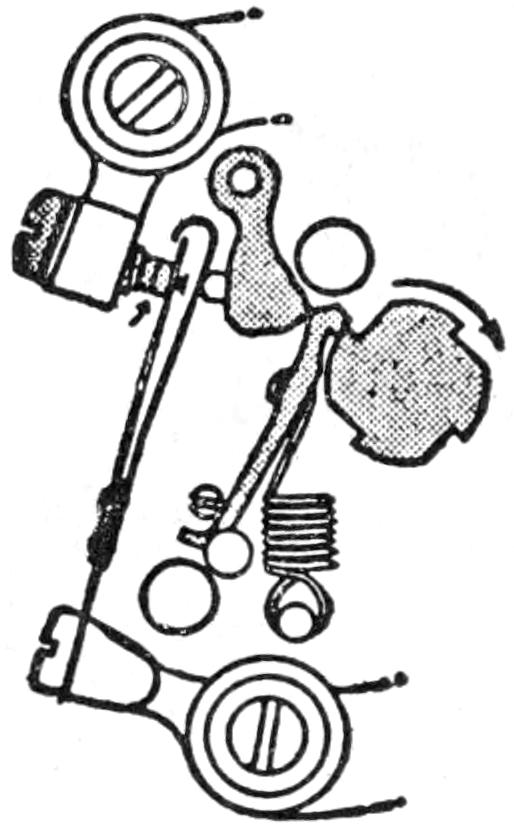
Fig. 73. Atwater Kent Contact Breaker—Diagram of Action—Type K-2 System
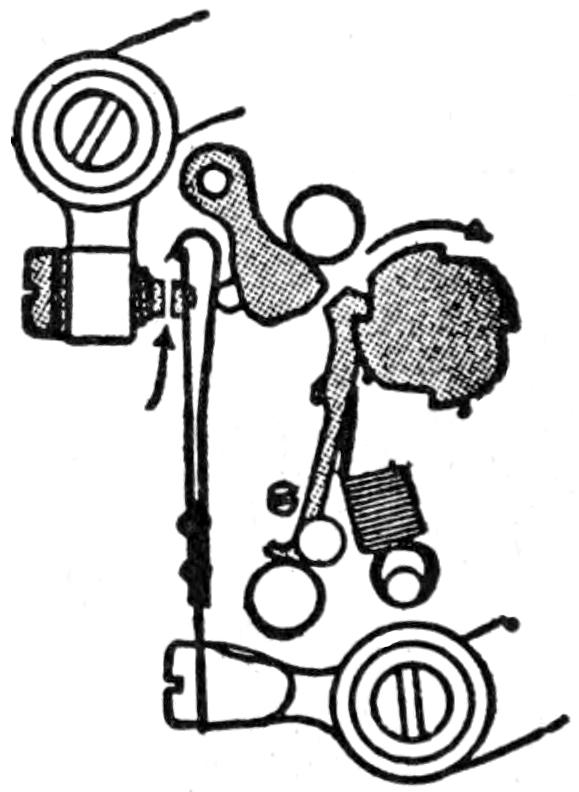
Fig. 74. Atwater Kent Contact Breaker—Diagram of Action—Type K-2 System
Operation of the Contact Maker.—It will be noted in Fig. 71 that the lifter is being pulled forward by the notched shaft. When pulled forward as far as the shaft will carry it (Fig. 72), the lifter is suddenly pulled back by the lifter spring. In returning, it strikes against the latch, throwing this against the contact spring and closes the contact for a[134] brief instant. This movement is far too quick for the naked eye to follow (Fig. 73).
Fig. 74 shows the lifter ready to be pulled forward by the next notch.
Note that the circuit is closed only during the brief instant of the spark. No current can flow at any other time, not even if the switch is left on when the motor is not running. No matter how slow or how fast the notched shaft is turning, the lifter spring will always pull the lifter back at exactly the same speed, so that the operation of the contact, and therefore[135] the spark, will always be the same no matter how fast or how slow the engine is running. The brief instant that the contact points touch, results in very little current consumption. The high tension current from the coil is conveyed to the rotating distributor block, which seats on the end of the unisparker shaft to each of the spark plug terminals in the order of firing.
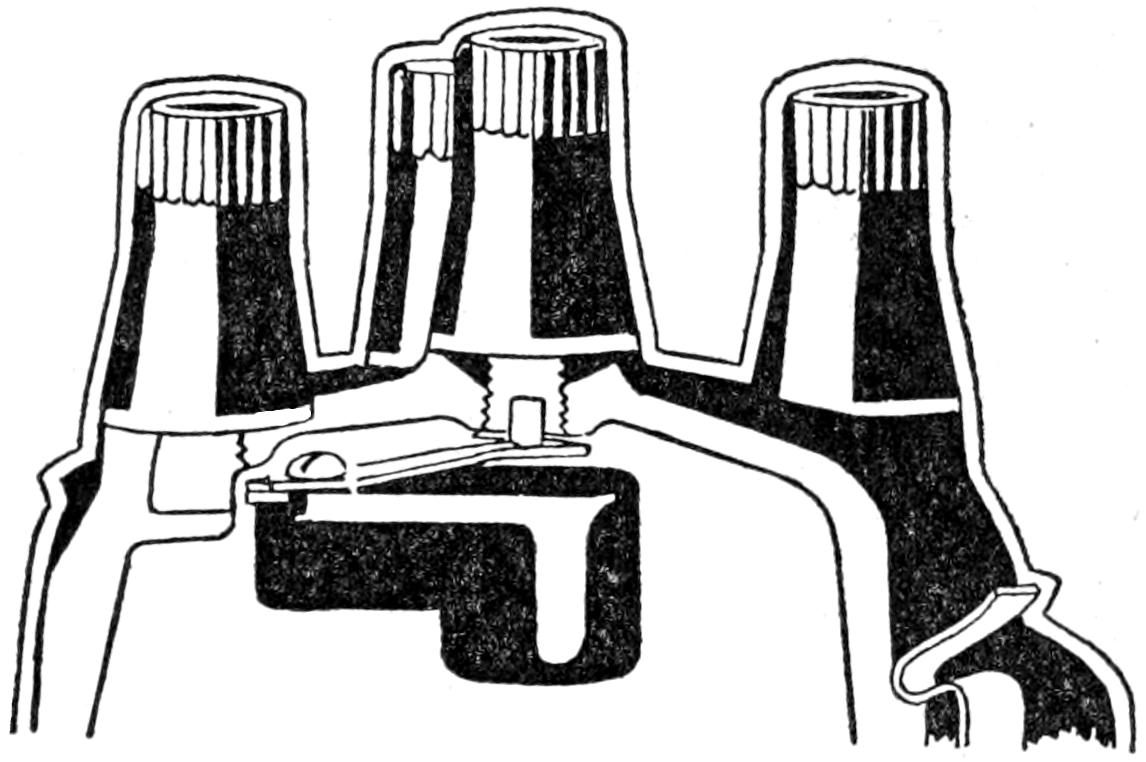
Fig. 75. Atwater Kent Distributor and Contactless Block
The important advantage which the distributor possesses is the fact that there are no sliding contacts or carbon brushes. The distributor blade is so arranged that it passes close to the spark plug terminals without quite touching (as shown in Fig. 75), thus permitting the spark to jump the slight gap without any loss of current pressure. This also eliminates all wear and trouble caused by sliding or rubbing contacts.
Fig. 76 shows the wire connections and direction of current flowage. The distributor blade is about to make contact with the terminal leading to the spark plug in No. 2 cylinder. At the instant that contact is made the breaker points in the contact maker shown in the lower part of the diagram close, thus allowing a primary or low tension current to flow between the contact maker, coil, and battery. The sudden breaking of this current occurs when the points open again, thereby creating a current of high tension voltage in the secondary coil which is conducted to the center terminal of the distributor where it is distributed to the spark plug[136] terminals through the rotation of the distributor blade. The high tension cables leading from the distributor are heavily insulated, thus the current in seeking ground return chooses the easiest path, by jumping the slight gap at the spark plugs.
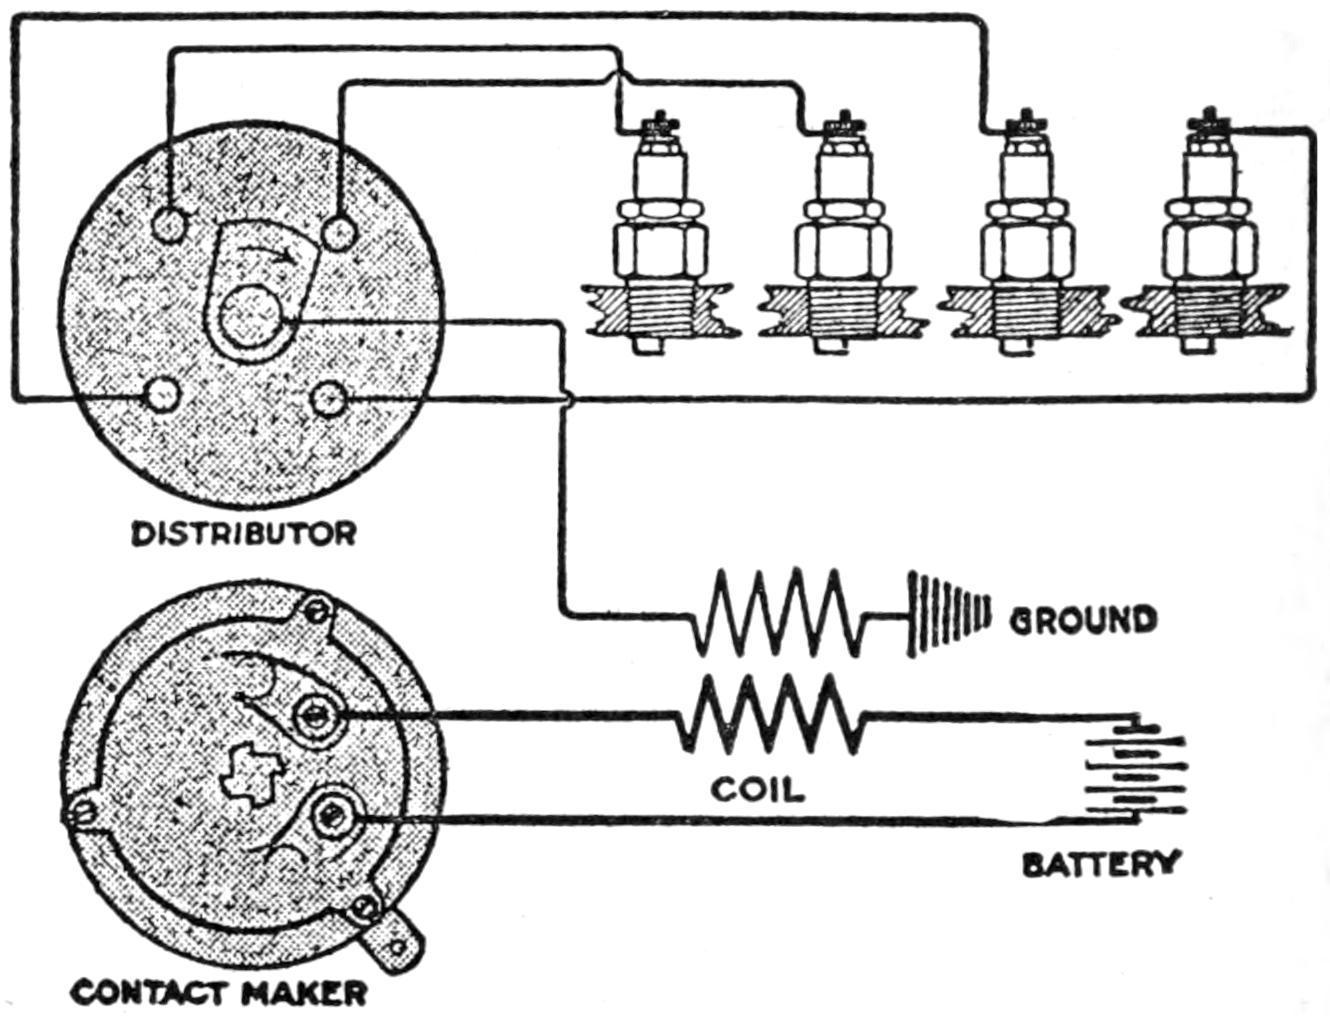
DISTRIBUTOR
GROUND
COIL
BATTERY
CONTACT MAKER
Fig. 76. Atwater Kent Wiring Diagram Type K-2
Setting and Timing the Unisparker.—The type K-2 unisparker is installed, so as to allow a small amount of angular movement or, in other words, the socket into which the unisparker fits is provided with a clamp which will permit it to be turned or locked in any given position.
Timing.—The piston in No. 1 cylinder is raised to high dead center between the compression and power stroke. Then loosen the clamp which holds the unisparker and turn the unisparker backward, or contrary to the direction of rotation until a click is heard. This click happens at the exact instant of the spark. Clamp the unisparker tight at this point being careful not to change its position. Note that current for this system is usually supplied by the starting and lighting battery. When changing batteries be sure that the voltage of the battery is the same as that marked on the coil.
[137]
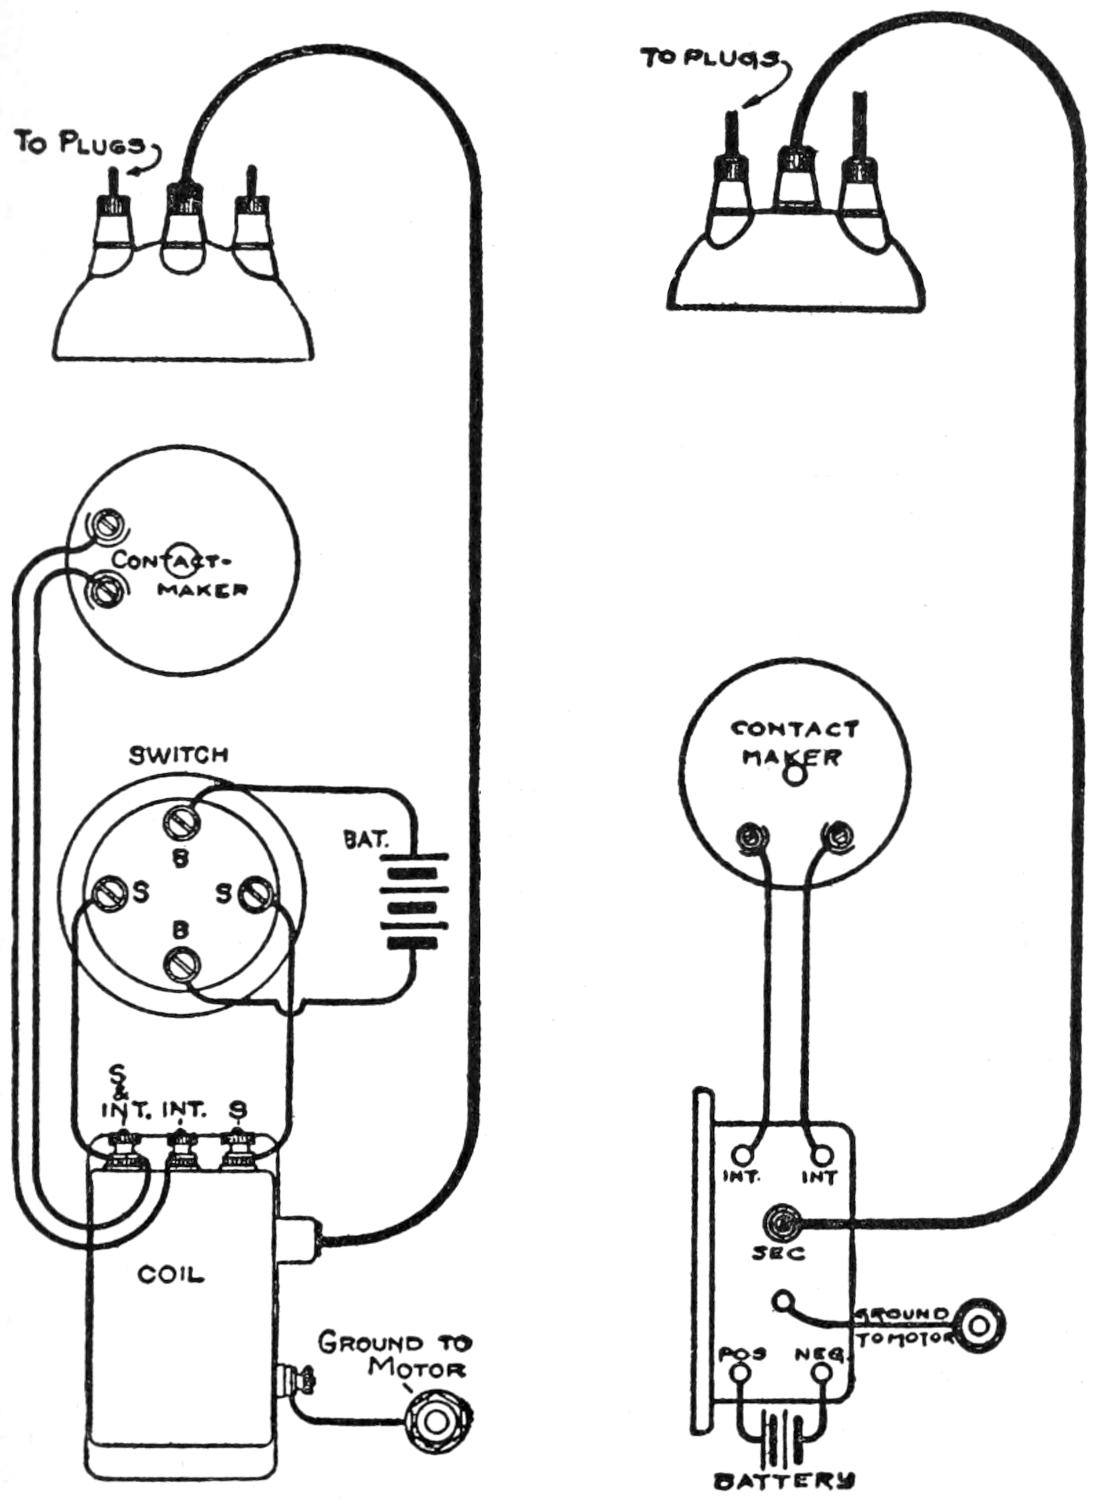
| To Plugs | |
| To Plugs | |
| Contact- maker |
|
| Switch | Contact Maker |
| BAT. | |
| S & INT. INT. S. | INT. INT. |
| COIL | SEC |
| Ground To Motor | |
| Ground to Motor | POS NEG |
| BATTERY |
Fig. 77. Atwater Kent K-2 Wiring—Cut 1, Under Hood Coil; Cut 2, Kick Switch Coil
The external wiring of the A-K type K-2 is very simple, as shown in the diagrams, Figs. 77 and 77A. Fig. 77 shows the wire connections, when the reversing switch and under-hood coil is used. Fig. 77A shows the connections, when using plate or kick switch coil. A well insulated braided primary wire is used for the primary or battery circuit. See that this wire is well protected against rubbing or abrasion wherever it[138] comes into contact with metal parts of the car. When the starting and lighting battery is used to furnish the ignition current, two wires should run directly to the battery terminals.
The two types of Atwater Kent systems described are provided with automatic spark advance mechanism. Provisions are also made for manual lever control, by simply connecting the unisparker to the throttle lever at the base of the steering gear.
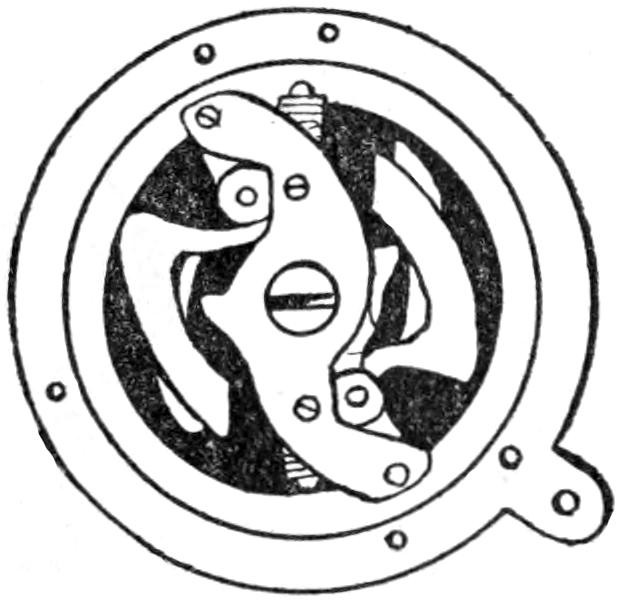
Fig. 78. Atwater Kent Automatic Spark Advance Mechanism—A K Type K-2
Fig. 78 shows the automatic spark advance mechanism. It is located on the underside of the contact maker base plate, and consists of a set of weights which swing out from the center against spring tension, and advances the unisparker on the shaft, according to the amount of centrifugal action or speed of the shaft. When the shaft is not in motion the springs draw the weights toward center, which automatically shifts the unisparker on the shaft until the spark is in a fully retarded position.
Contact Point Adjustment.—The only adjustment aside from the initial timing is in the contact points. They are adjustable only for natural wear, and one adjustment should last at least six months. The contact screw is provided with a number of shim washers against which it is set up tight. When the points eventually become worn, they should be dressed flat and smooth. A sufficient number of the washers[139] should be removed so that when the contact screw is set up tightly it will maintain the proper gap between the points. The distance between the contact points should be about the distance of a thin visiting card. They should never touch when at rest.
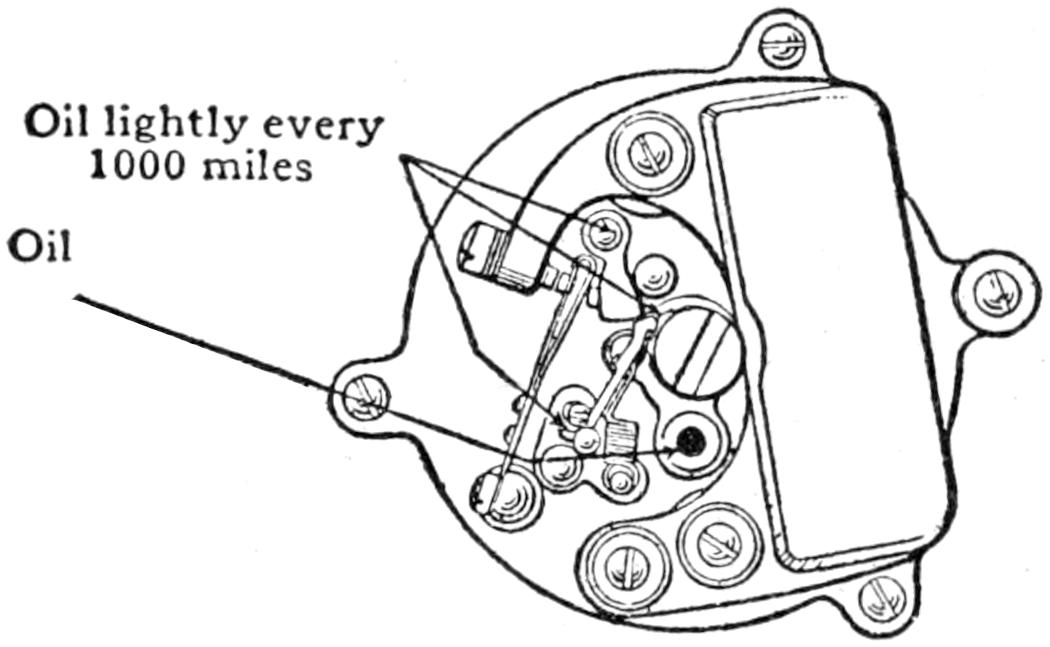
Oil lightly every
1000 miles
Oil
Fig. 79. Atwater Kent Contact Breaker—Oiling Diagram—A-K Type K-2
Fig. 79 shows an oiling diagram of the contact maker. The latch, lifter, and lifter spring are not adjustable or subject to wear. They should be well cleaned and oiled every five hundred miles. Use a light oil and avoid getting it on the contact points.
The Condenser.—The condenser of this system acts somewhat like a shock absorber to the contact points. It absorbs the spark or arc and makes the break in the primary current, clean and abrupt. The condenser is very accessible, but should never be tampered with, as it does not require any attention.
Testing for Ignition Trouble.—If the engine misses without regard to speed, test each cylinder separately by short circuiting the plug with a screw driver, allowing a spark to jump. If all cylinders produce a good regular spark the trouble is not with the ignition system.
If any cylinder sparks regularly this will indicate that the ignition system is in working order so far as the unisparker and coil are concerned. The trouble is probably in the high tension wiring between the distributor and plug, or in the plugs themselves. Examine the plugs and wiring carefully.[140] Leaky secondary wiring is frequently the cause of missing and backfiring.
Frequently, when high tension wires are run from the distributor to the spark plugs through a metal tube, trouble is experienced with missing and backfiring, which is due to induction between the various wires in the tube. This is especially likely to happen if the main secondary wire from the distributor to the coil runs through this tube with the spark plug wires.
Whenever possible the distributor wires should be separated by at least one-half inch of space. They should be supported by bracket insulators, rather than run through a tube. In no case should the main distributor wire run through a conduit with other wires.
If irregular sparking is noted at the spark plugs, examine the battery and connections.
If the trouble commences suddenly, it is probably due to a loose connection in the wiring, if gradually, the battery may be weakening or the contact points may require attention.
[141]
The Philbrin ignition system consists of a specially designed contact maker and interrupter, a distributor mounted on the same shaft, a nonvibrating heat and moisture proof coil, an armored heat, moisture, and puncture proof condenser, and a special Duplex switch.
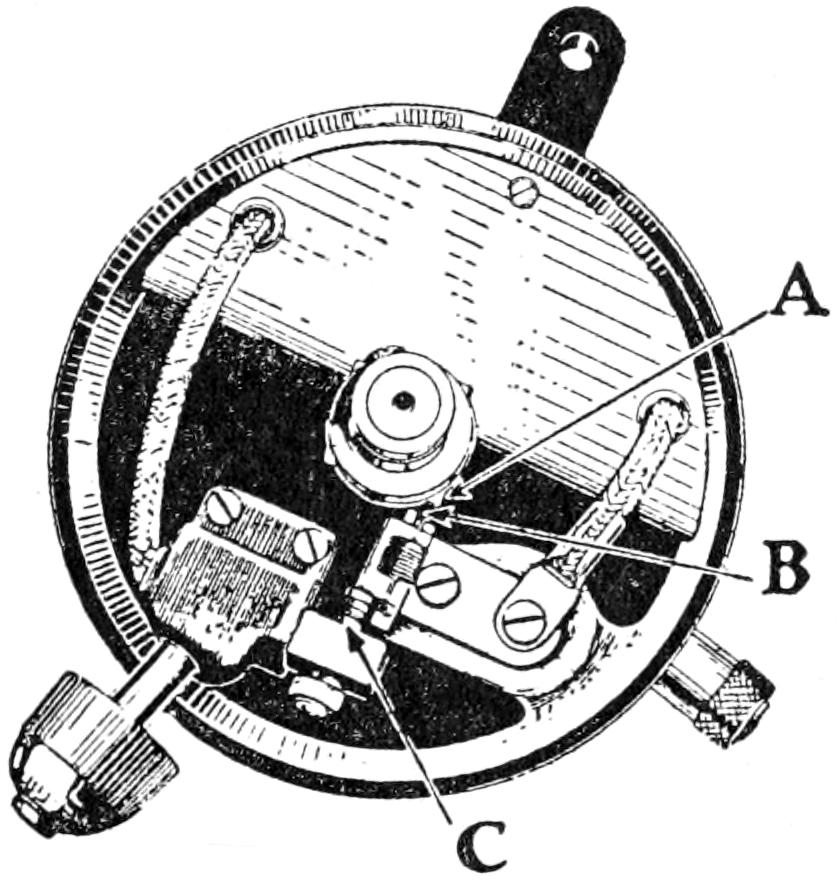
Fig. 80. Philbrin Contact Maker—Point Adjustment
Fig. 80 shows an illustration of the Philbrin contact maker which operates in this manner. The cam A strikes against the end of the plunger B and forces the points together at C, and holds the contact for approximately three and one-half degrees of the revolution of the cam. The spark occurs simultaneously with the separation of the contact points. The contact maker has but one adjustment; that of the adjustable contact screw, which is in direct line with the contact[142] plunger. The contact points are brought together gradually by the surface formation of the cam. When the point of ample saturation of the coil is reached, the breaking of the contacts is instantaneous. The duration of the spark is in proportion to the speed of the engine, but breaking of the points is always instantaneous and entirely independent of the engine’s speed thereby producing the required spark at all speeds without any spark lag.
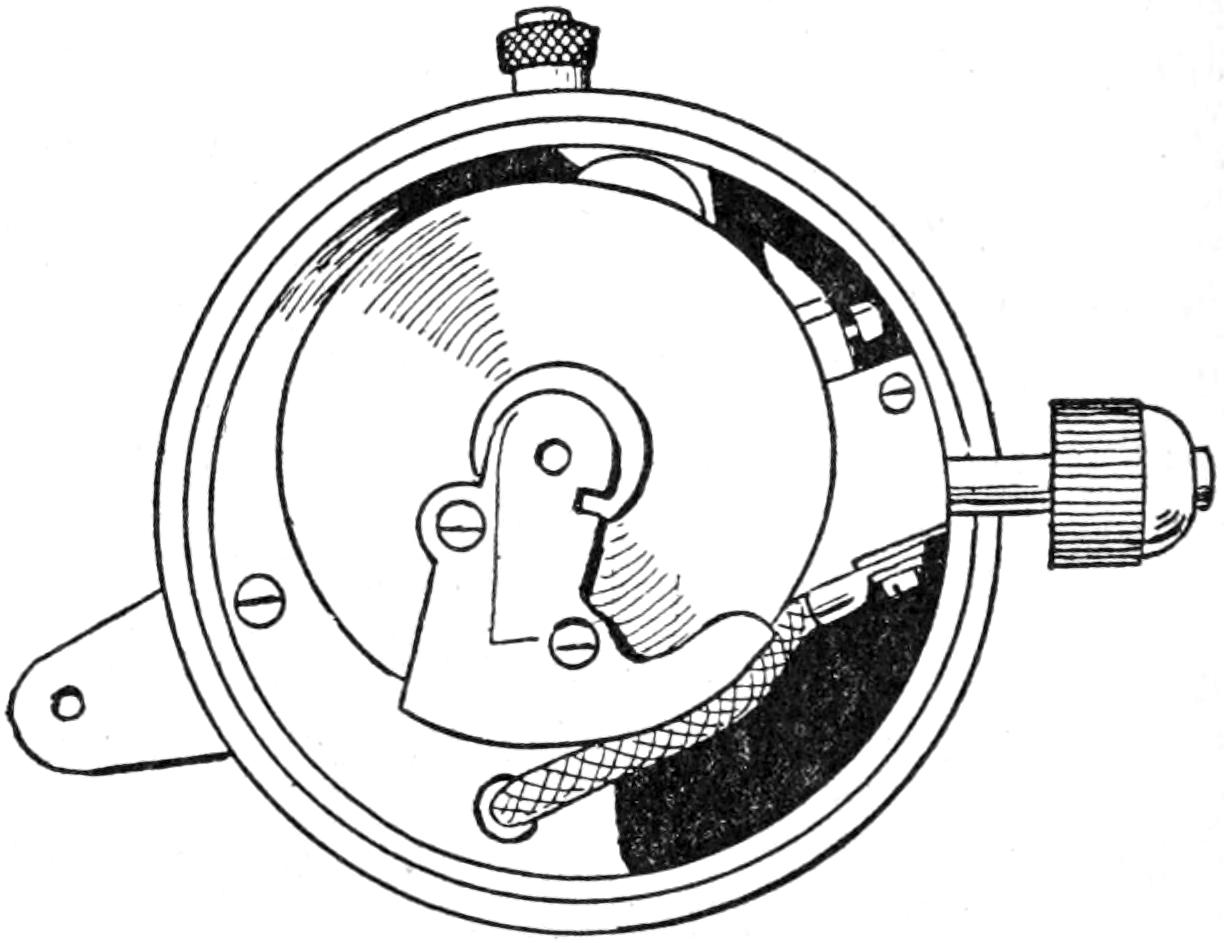
Fig. 81. Philbrin Contact Maker and Distributor Blade
Fig. 81 shows the distributor blade mounted over the contact maker. The distributor blade is so arranged that it clears the spark plug lead terminals in the cover by a slight margin, and does not make actual contact, thereby eliminating all friction due to such contacts.
Operation.—Turning on the switch sets up a low tension current in the coil and primary wire coil when the contact points close. The sudden breaking of this current causes demagnetism of the core and the primary coil to set up a high tension current in the secondary coil. This current is led to the distributor blade and passes to the spark plug terminals as the blade comes in contact range.
The Philbrin high frequency system uses the same coil and distributor as the single spark system. But as the circuits[143] of the two systems are entirely distinct and separate, they do not conflict with each other. The high frequency system has its own condenser and interrupter located in the switch case, and supplies a continuous flow of sparks.
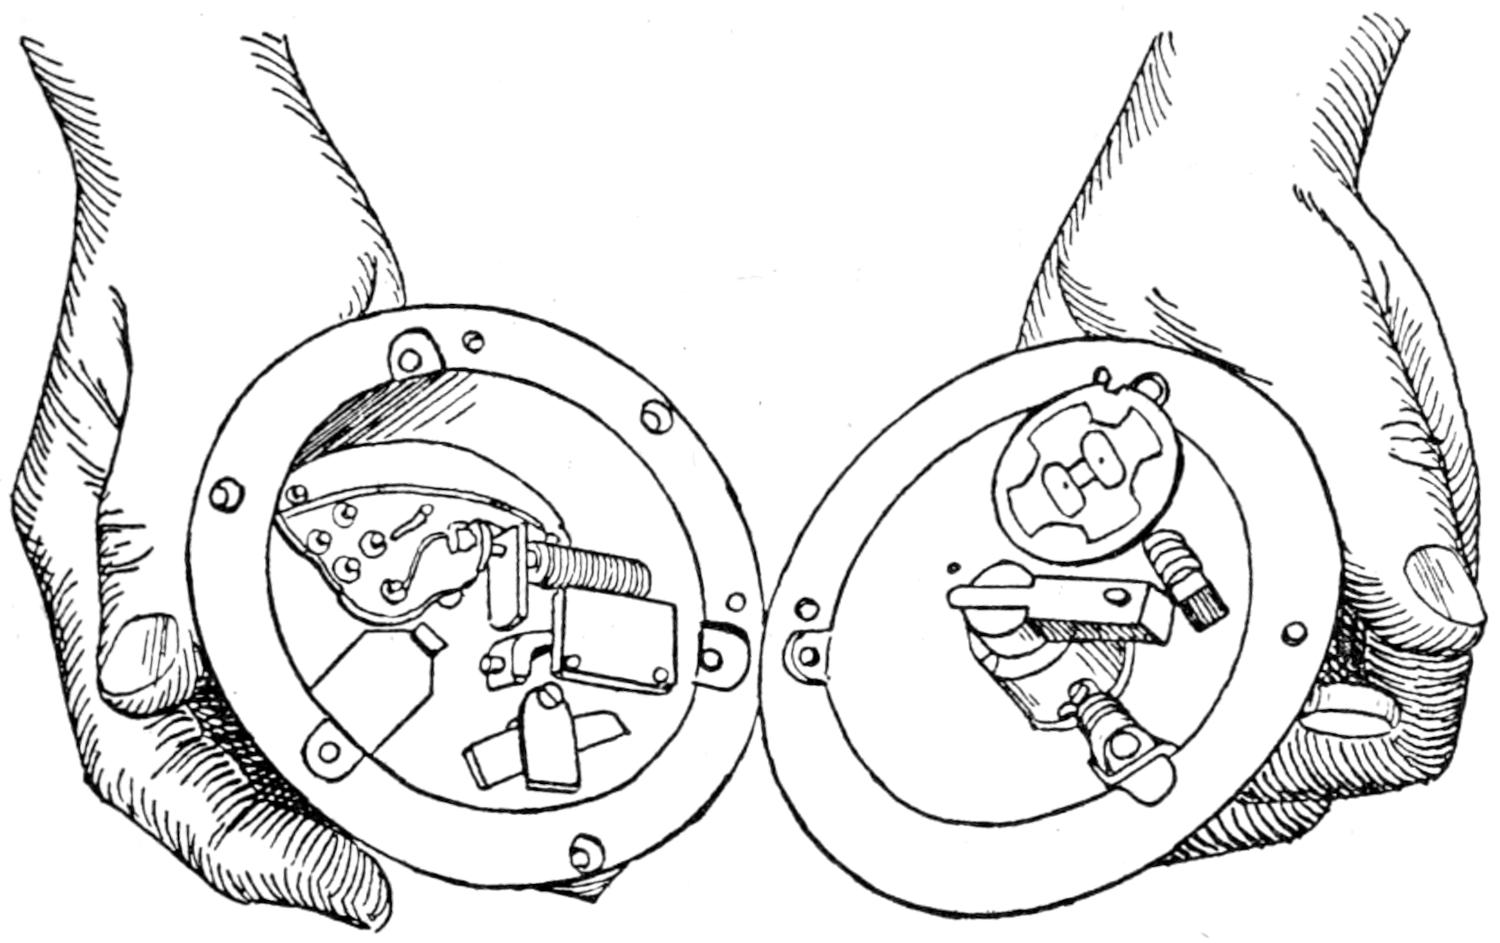
Fig. 82. Switch Case
Fig. 82 shows the interior of the switch case. This part of the mechanism controls the interruption of the battery current. The current is supplied to the interruptor through a polarity reverser, which reverses the direction of the current each time the switch button is turned. This equalizes the wear on the contact points.
Attention is again called to the distributor blade shown in Fig. 82, which is used for both systems. Because of the shape of this blade, there is a continuous flow of sparks after the explosive spark has been delivered to one cylinder until the forward edge of the distributor blade is within range of the distributing point of the next terminal. By this action the first spark delivered to the cylinder is an efficient one, and the follow up continues at intervals of approximately one-thousandth of a second. These sparks are all perfectly synchronous.
The operation of the high frequency system does not differ[144] in function action from the single spark system explained on the foregoing page. Either system may be had singly, or in duplex formation. Consequently either the single or the double system may be encountered. When the duplex system is used the driver has his choice and can use either the high frequency or single spark system, by turning the rubber roll switch on the distributor to the system indicated.
This follow-up feature has been found particularly advantageous for starting in cold weather, or where a poor grade of gasoline is encountered, and in case of a poor carburetor adjustment or foul spark plugs. The high frequency system also has the unique feature of keeping the spark plugs clean without disintegrating the electroids, as is often the case with the high tension magneto.
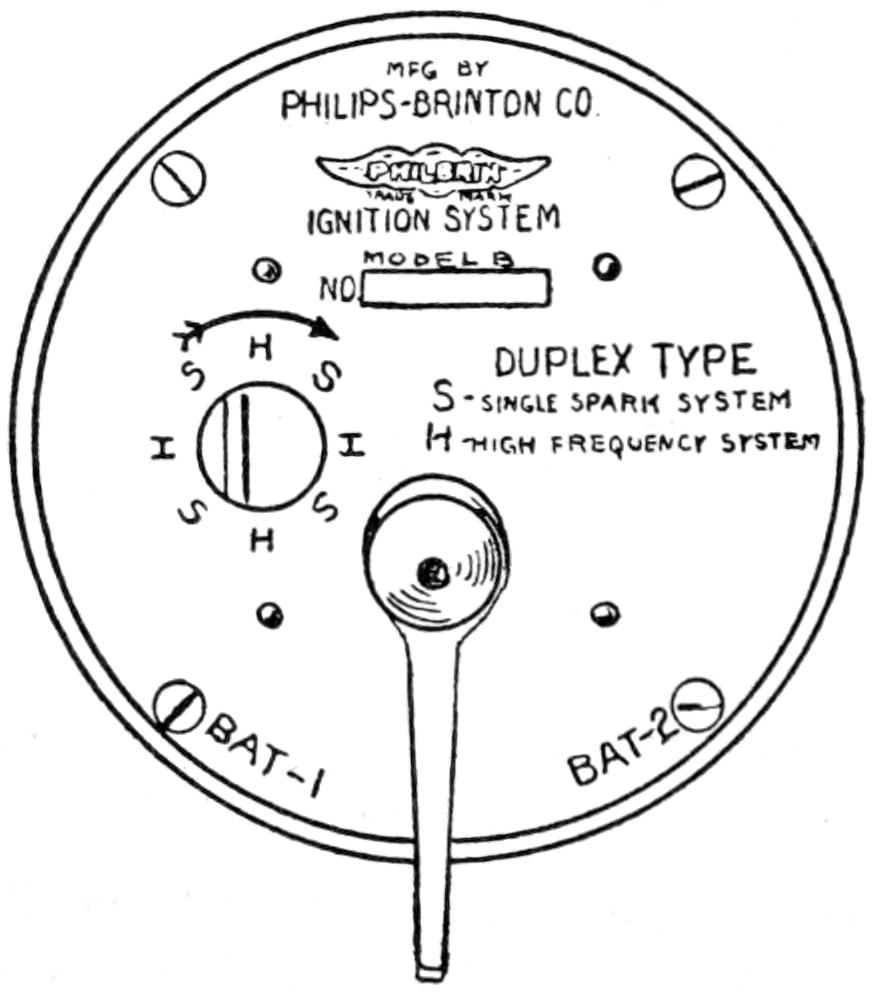
Fig. 83. Duplex High Frequency Switch
Fig. 83 shows the Duplex switch. Ordinarily a storage battery is used for one source of current, and a set of dry cells for the other. This is so arranged that either source of current can be used with either the single spark system or the high frequency system at will. One source of current only can be used if so desired, that is, the storage battery only or the dry cells alone. Where the source of current is[145] dry cells only, the single spark system is used as it is more economical in current consumption. All of the switch contacts are of the pressure plunger type, thereby eliminating the uncertainty of brush contacts. Each switch is provided with a lock operating through the hub of the lever. When the switch is locked in the off position it is impossible to remove the cover without breaking it as the cover of the switch locks to the back.
Ratchet buttons select which one of the systems is to be used, by a movement of 45°. This button operates only in a clock-wise direction.
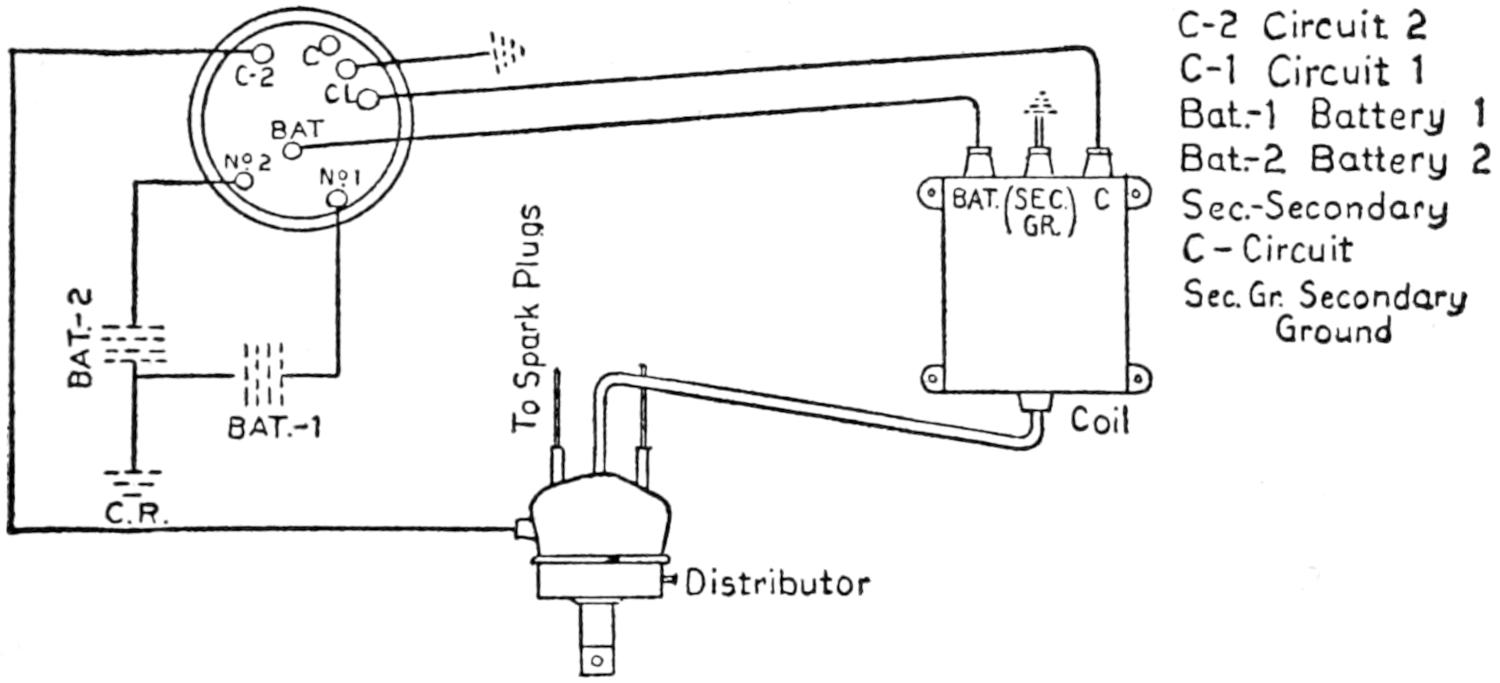
| C-2 Circuit 2 C-1 Circuit 1 Bat.-1 Battery 1 Bat-2 Battery 2 Sec-Secondary C-Circuit Sec. Gr. Secondary Ground |
||||||
| To Spark Plugs |
BAT. (SEC. GR.) C | |||||
| BAT.-2 | ||||||
| BAT.-1 | Coil | |||||
| C.R. | ||||||
| Distributor | ||||||
Fig. 84. Philbrin Wiring Diagram
Fig. 84 shows a wiring diagram of the Philbrin system. The wire connections come to the contact maker directly from the switch, instead of from the coil. This provides for control of the current to the contact maker in such a manner that if a short circuit occurs in either of the systems, by turning a button it is entirely cut off and the other system put into operation.
Tungsten contact points are used on the single spark system as they are not effected by the use of light oil. The contact points for the high frequency system are platinum-iridium. They are mounted inside of the switch case and need little or no attention. The contacts, due to the reversed[146] polarity, have an extremely long life and can be used without attention until they are worn down to the base metal. The duel type of system, however, may be purchased in separate units, and an owner may choose either the high frequency system or the single spark system separately if so desired.
This type of ignition system is manufactured for four, six, eight, and twelve cylindered cars.
[147]
A great many different types of mechanical, and compressed air starters were devised and tried out as equipment by the manufacturers of automobiles a few years ago. These devices were either mechanically imperfect, or required considerable attention from the owner to keep them in working order and have all but disappeared from the market, being supplanted by the electrical starter, which has been perfected to a high state of efficiency and dependability.
The general principle of all electrical starters is much alike and they usually operate in much the same manner. The electrical force or current is produced by a generator driven from the engine. This current is collected, or held in storage by chemical reproduction plates in a storage battery. The battery, in turn, is connected to a small electric motor carried at the side of the engine.
The Generator.—The operating principle of current production of the generator is practically the same as explained in the magneto, which may also be termed a generator or dynamo.
A generator consists of an iron frame, a set of magnetic field windings, a wound armature with a commutator on the end, and a brush which collects the current from the commutator.
The current is induced in the armature by rotating it in a magnetic field. The amount of voltage induced in the armature-coil depends on its rotating speed, as the faster the armature[148] turns, the greater the number of magnetic field lines cut, and the greater the amount of voltage induced in the armature coil.
The Regulator.—The generator is provided with a regulator to control the output rate of voltage when the engine is running at excess speeds. This is necessary to prevent the higher charging rate from overcoming the capacity of the storage battery. The regulating of the voltage output may be accomplished by mechanical or electrical means. The mechanical regulator usually consists of a governor which is timed to release the armature from the drive shaft when the engine reaches a certain rate of speed. The electrical regulator usually consists of a reversed series of field winding which acts against the force of the magnetic field, or of a bucking coil.
The Automatic Cut-out.—All types of generators which supply current to a storage battery are equipped with an automatic cut-out arrangement which is entirely automatic in action and requires no attention.
The function of the automatic cut-out is to prevent the current from flowing back to the generator when the current production of the generator is less than the charged strength of the storage battery. The cut-out may be located anywhere on the conductor, between the storage battery and the generator, and consists of a simple electro-magnet, which is operated by the direction of current flowage.
One Unit System.—The generator furnishes the current for ignition and starting, and is also reversible to act as a starting motor. The system is referred to as a one unit system.
Two Unit System.—When the starting motor and the generator act singly, and are contained in a separate casting, the system is referred to as a two unit system.
Three Unit System.—When the generator and starting motor are located as a separate unit, and when the ignition current is supplied by a magneto, this system is referred to as a three unit system.
[149]
The Starting Motor.—The starting motor is constructed in the same manner as the generator, and is simply a reversal of action. When cranking, the current from the storage battery flows through the motor winding and magnetizes the armature core. This acting upon the magnetism of the frame causes the turning effort.
Lubrication.—Regularly every two weeks, or every five hundred miles, two or three drops of thin neutral oil should be dropped into the oil wells supplying the armature bearings and usually located at each end of the armature shaft.
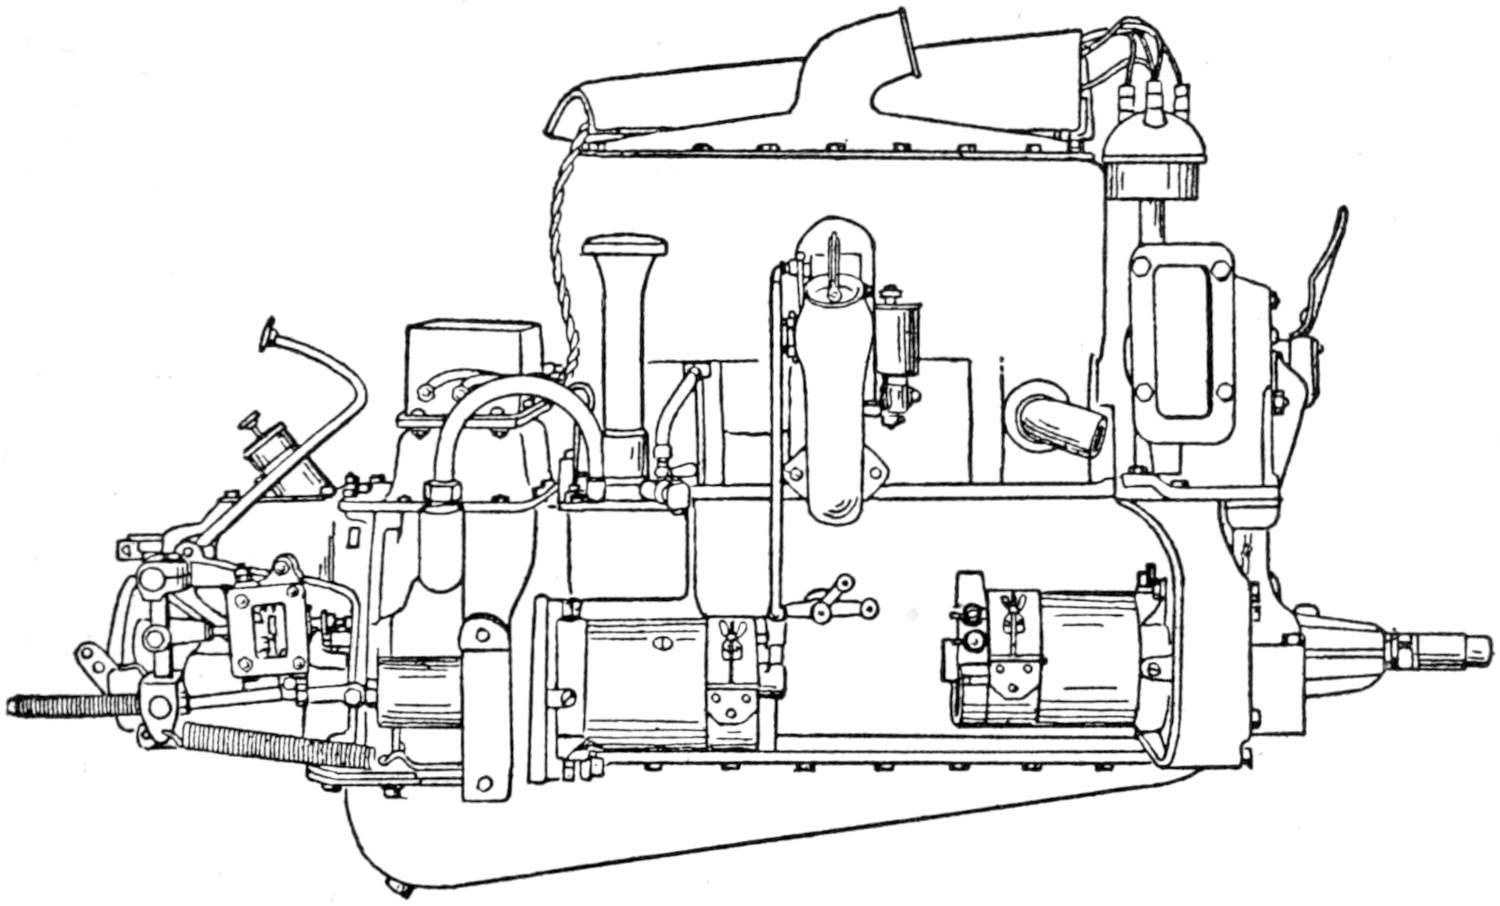
Fig. 85. Bijur 2-V System Mounted on Hupmobile Engine
Care.—Regularly every two weeks, inspect all connections as a full volume of current will not flow over a loose or corroded connection. Never allow any oil or dirt to collect on the motor or generator, as it interferes with the terminal connection and misdirects the current, and the instrument soon becomes inoperative.
Fig. 85 shows the location of the two unit Bijur electrical starting and generating system mounted on an engine. The starting motor is bolted to the flywheel housing, and is provided with a square armature shaft which carries a pinion[150] which can be moved horizontally on the shaft. This pinion meshes directly with teeth cut in the steel flywheel ring. No intermediate gears or roller clutches are used. The control lever connects through linkage to the shifting fork which shifts the pinion on the square shaft of the motor. The same foot pedal linkage operates the starting switch. Normally a spring holds the motor pinion out of mesh with the flywheel teeth and also holds the starting switch in the “off” position.
The Generator.—The generator is bolted to an extension on the crank case at the front side of the gas motor, and is driven by a silent chain from the crank shaft. After the gas motor attains a speed equivalent to a car speed of ten miles per hour on high speed, the generator begins to generate, and will generate a current which is highest at low speeds, and diminishes somewhat at higher speeds.
The machines are both self-contained as there are no regulators or automatic switches which require separate mounting.
The automatic switch for opening and closing the circuit between the generator and storage battery is mounted inside the generator. This switch is properly adjusted before the generator leaves the factory, and no further adjustments are necessary.
Two wires lead from the generator. One of these is connected at the starting motor to one of the heavy cables coming from the storage battery, while the other generator wire is grounded on the chassis, the chassis forming a part of the circuit. The generator polarity is reversible and the connections at the machine may be made haphazard and without regard to polarity. If connections are reversed at the generator, no damage will result, as the machine will automatically assume the correct polarity to charge the battery.
Fig. 86 shows the position of the Bijur starting system, and the relative neutral positions of starting pedal, motor pinion, and starting switch, when the starting equipment is not in action.
[151]
Fig. 86A shows the normal position of the various parts after the starting pedal has been depressed and just before the starting motor begins to operate. The pinion is now in full mesh with the flywheel ring and further depressing the starter pedal will close the switch.
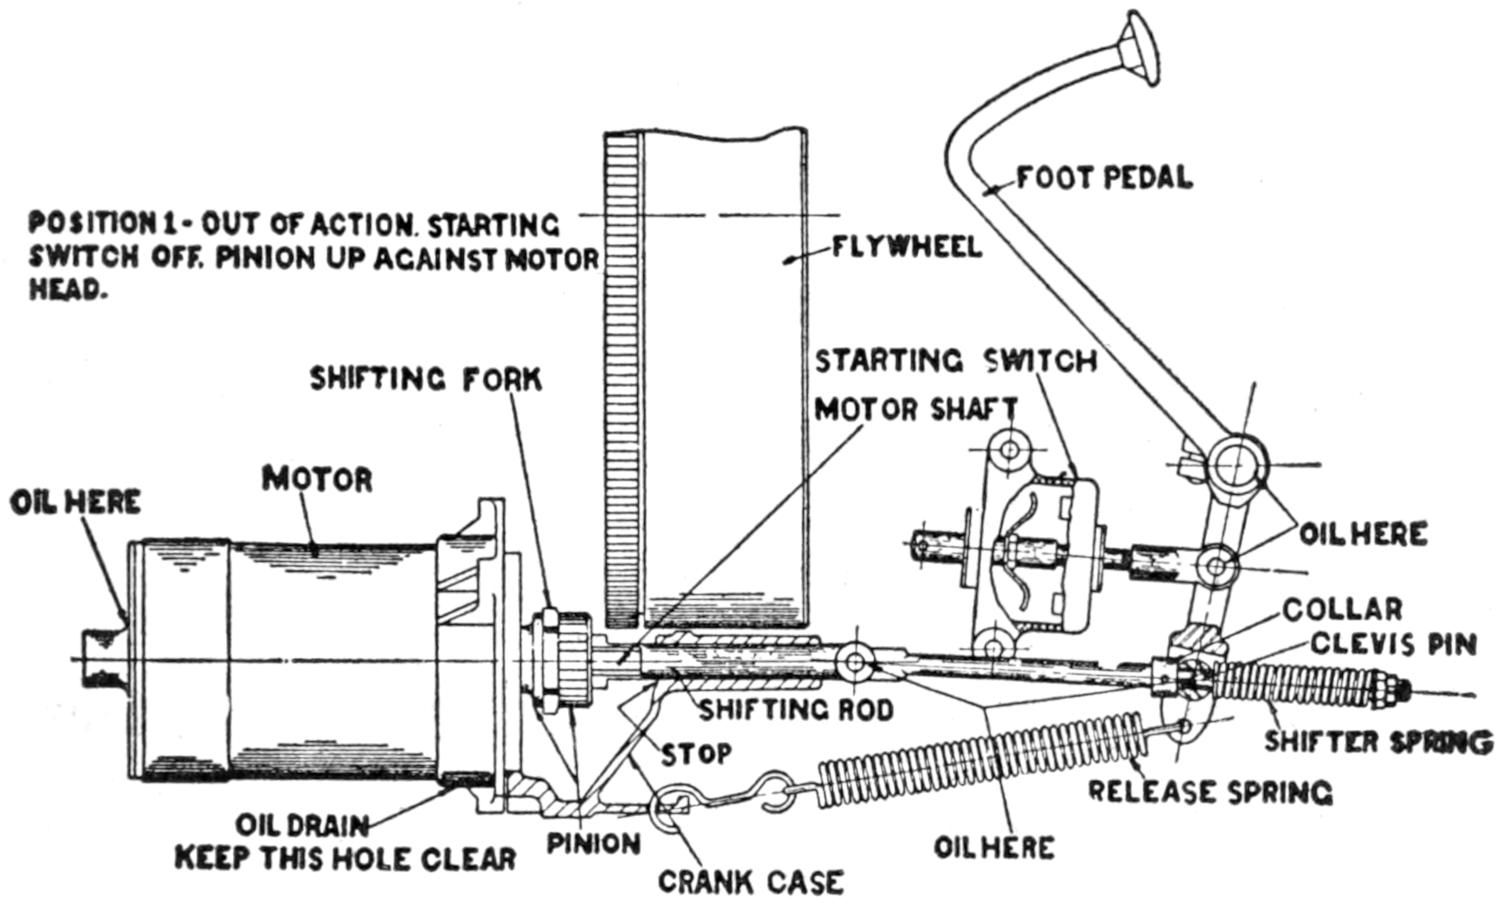
| FOOT PEDAL | |||||||||||
| POSITION 1--OUT OF ACTION. STARTING SWITCH OFF. PINION UP AGAINST MOTOR HEAD. |
FLYWHEEL | ||||||||||
| SHIFTING FORK | STARTING SWITCH MOTOR SHAFT |
||||||||||
| OIL HERE | MOTOR | OIL HERE | |||||||||
| COLLAR | |||||||||||
| CLEVIS PIN | |||||||||||
| SHIFTING ROD | |||||||||||
| STOP | SHIFTER SPRING | ||||||||||
| RELEASE SPRING | |||||||||||
| OIL DRAIN KEEP THIS HOLE CLEAR |
PINION | OIL HERE | |||||||||
| CRANK CASE | |||||||||||
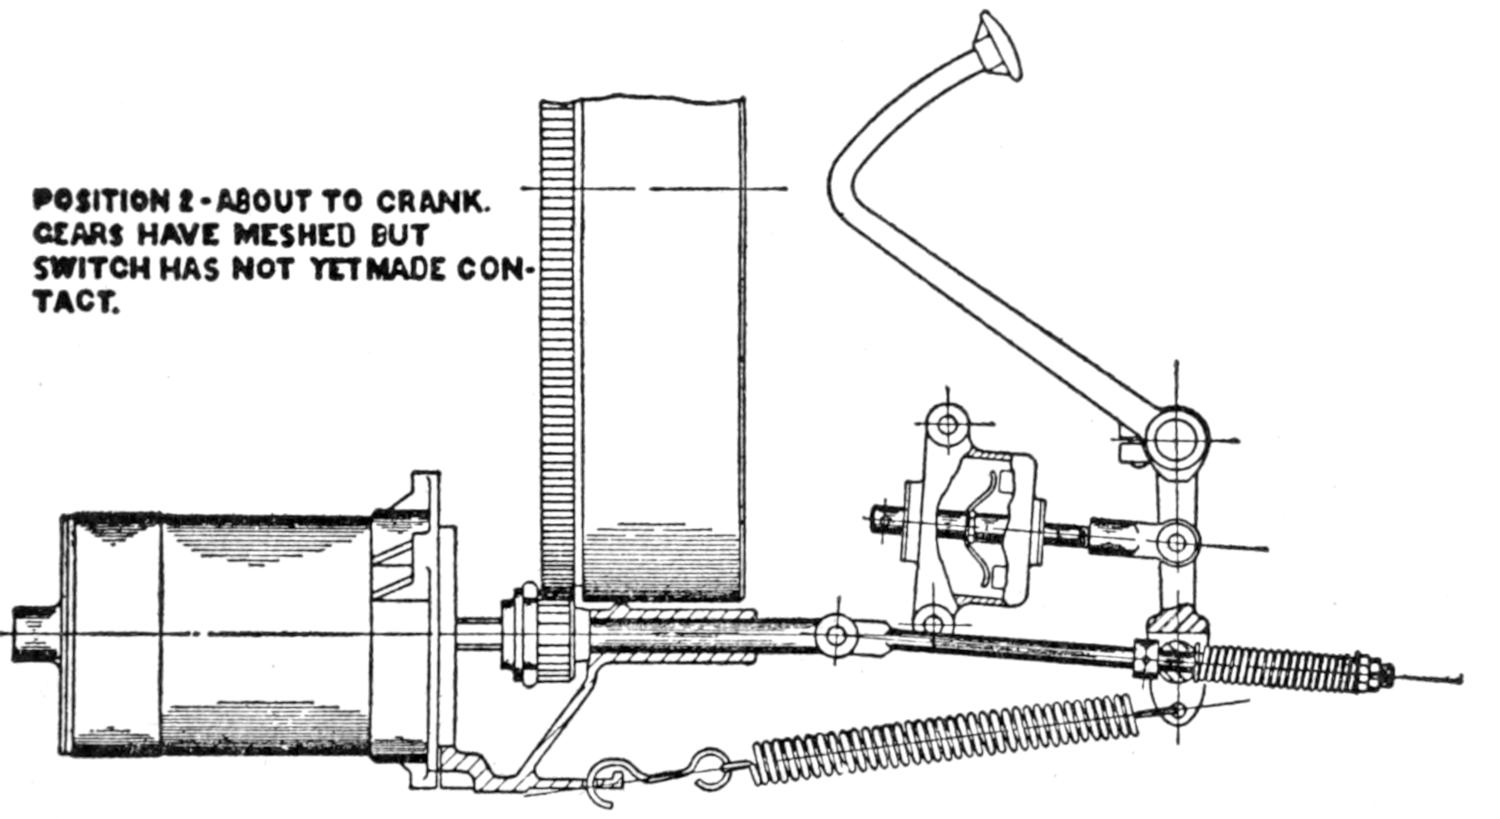
POSITION 2--ABOUT TO CRANK.
GEARS HAVE MESHED BUT
SWITCH HAS NOT YET MADE CONTACT.
Fig. 86. Bijur Starter Mechanism Showing Action
Fig. 87 shows all the parts in their positions for cranking. The small gap between the collar on the shifting rod and[152] clevis pin permits the switch rod to move and thus open the starting switch without moving the motor pinion when the starting pedal is released.
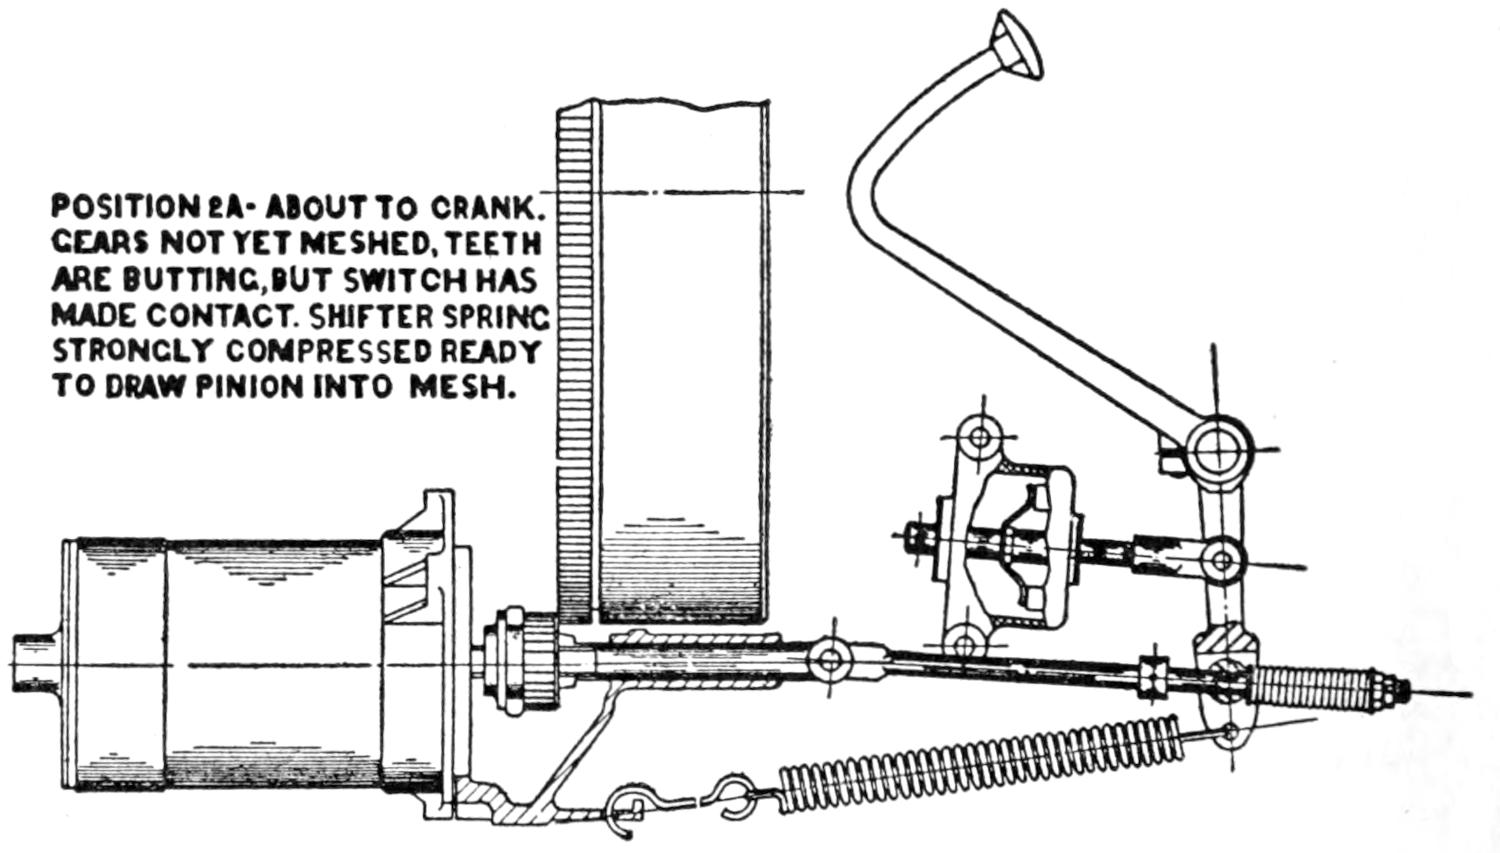
POSITION 2A—ABOUT TO CRANK.
GEARS NOT YET MESHED, TEETH
ARE BUTTING, BUT SWITCH HAS
MADE CONTACT. SHIFTER SPRING
STRONGLY COMPRESSED READY
TO DRAW PINION INTO MESH.
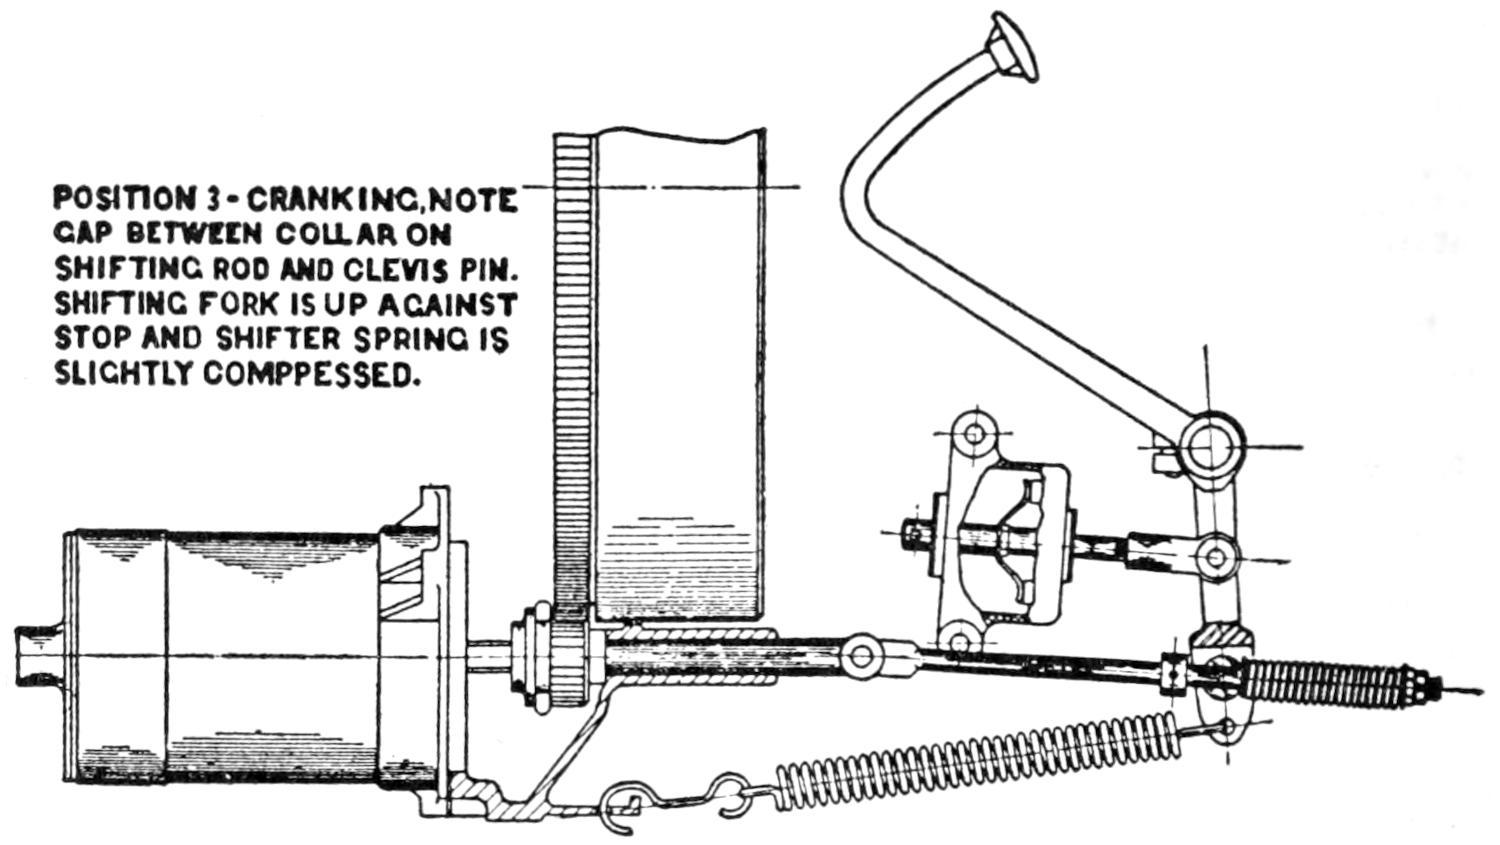
POSITION 3—CRANKING, NOTE
GAP BETWEEN COLLAR ON
SHIFTING ROD AND CLEVIS PIN.
SHIFTING FORK IS UP AGAINST
STOP AND SHIFTER SPRING IS
SLIGHTLY COMPRESSED.
Fig. 87. Bijur Starter Mechanism Showing Action
Fig. 87A shows the condition when on depressing the foot pedal, and sliding the pinion on the motor shaft towards the flywheel the pinion does not mesh with the flywheel, and the teeth butt. Depressing the foot pedal will close the starting switch strongly compressing the shifter spring. After the[153] switch is closed the motor will begin to rotate and allow the pinion to slip into mesh with the flywheel. The motor will then crank in the normal way.
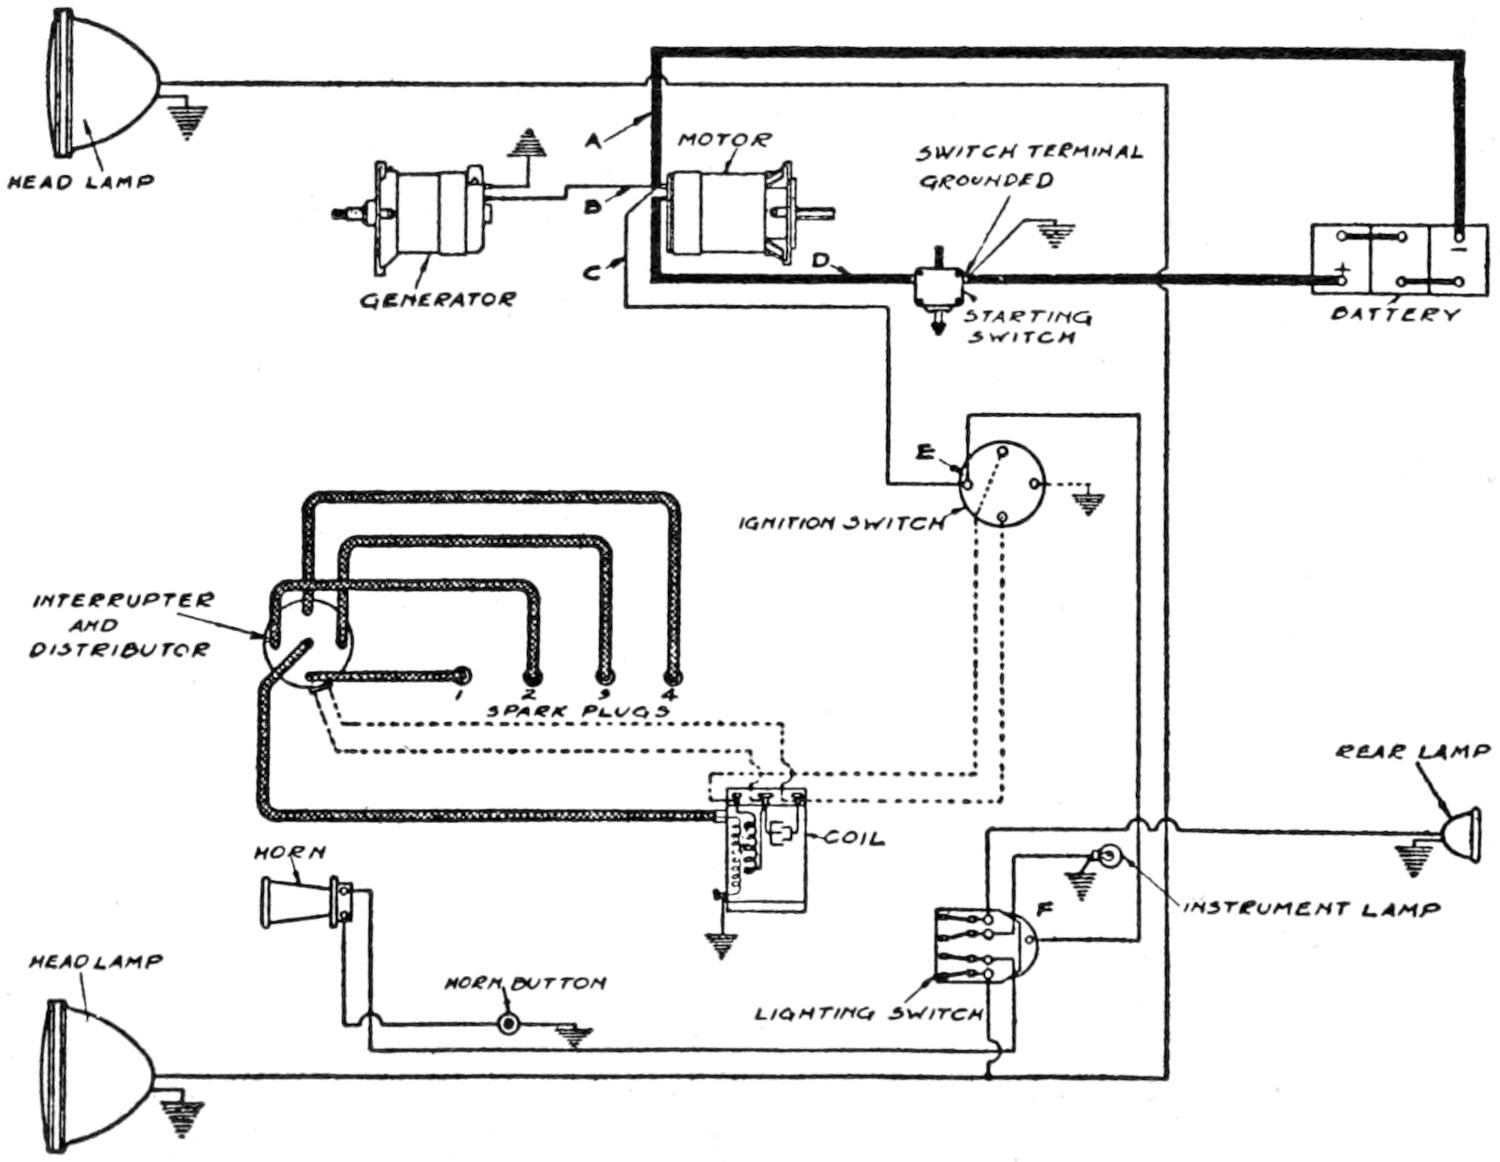
| HEAD LAMP | MOTOR | SWITCH TERMINAL GROUNDED |
||
| GENERATOR | STARTING SWITCH |
BATTERY | ||
| IGNITION SWITCH | ||||
| INTERRUPTOR AND DISTRIBUTOR |
||||
| SPARK PLUGS | ||||
| REAR LAMP | ||||
| HORN | COIL | |||
| INSTRUMENT LAMP | ||||
| HEAD LAMP | HORN BUTTON | LIGHTING SWITCH | ||
Fig. 88. Wiring Diagram Model N—Hupmobile
Fig. 88 shows a complete diagram of the Model N Hupmobile wiring system.
[154]
Fig. 89 shows a diagram of the Bijur lighting and starting system on the Jeffrey “Chesterfield-six.” The generator supplies current for the lights and charges a storage battery when the gas motor is running at speeds equivalent to ten or more miles per hour on high gear.
When the gas motor is running at speeds corresponding to less than ten miles per hour, all currents for lamps are drawn from the storage battery.
The starting motor is in operation only during the period of starting, and remains idle at all other times. The appliances shown in the diagram constituting the equipment are a six volt constant voltage generator, a six volt starting motor, starting switch, six volt hundred ampere hour battery, lamp controller, and a high tension magneto. Due to the reversible characteristics of the generator, no attention need be paid to the polarity of the wiring when it is removed and again replaced.
The starting motor pinion meshes with teeth on the flywheel when the starting switch mounted on the housing covering the motor pinion is compressed.
Operation of System Shown in Diagram.—After the gas motor reaches a speed equivalent to a car speed of approximately ten miles per hour on the third speed gear, the generator will generate and maintain a constant voltage, or electrical pressure at higher speeds and will also maintain this pressure constant at all loads.
The current output from the generator at any time will depend upon the condition of the storage battery. If a car has been left standing for some time with the lights burning, the storage battery will become more or less discharged and its voltage lowered. Under these conditions the generator voltage or pressure will be higher than that of the battery, forcing a comparatively high charging current into the battery. This current may be from 5 to 20 amperes, and the battery will rapidly approach the fully charged condition.
[155]
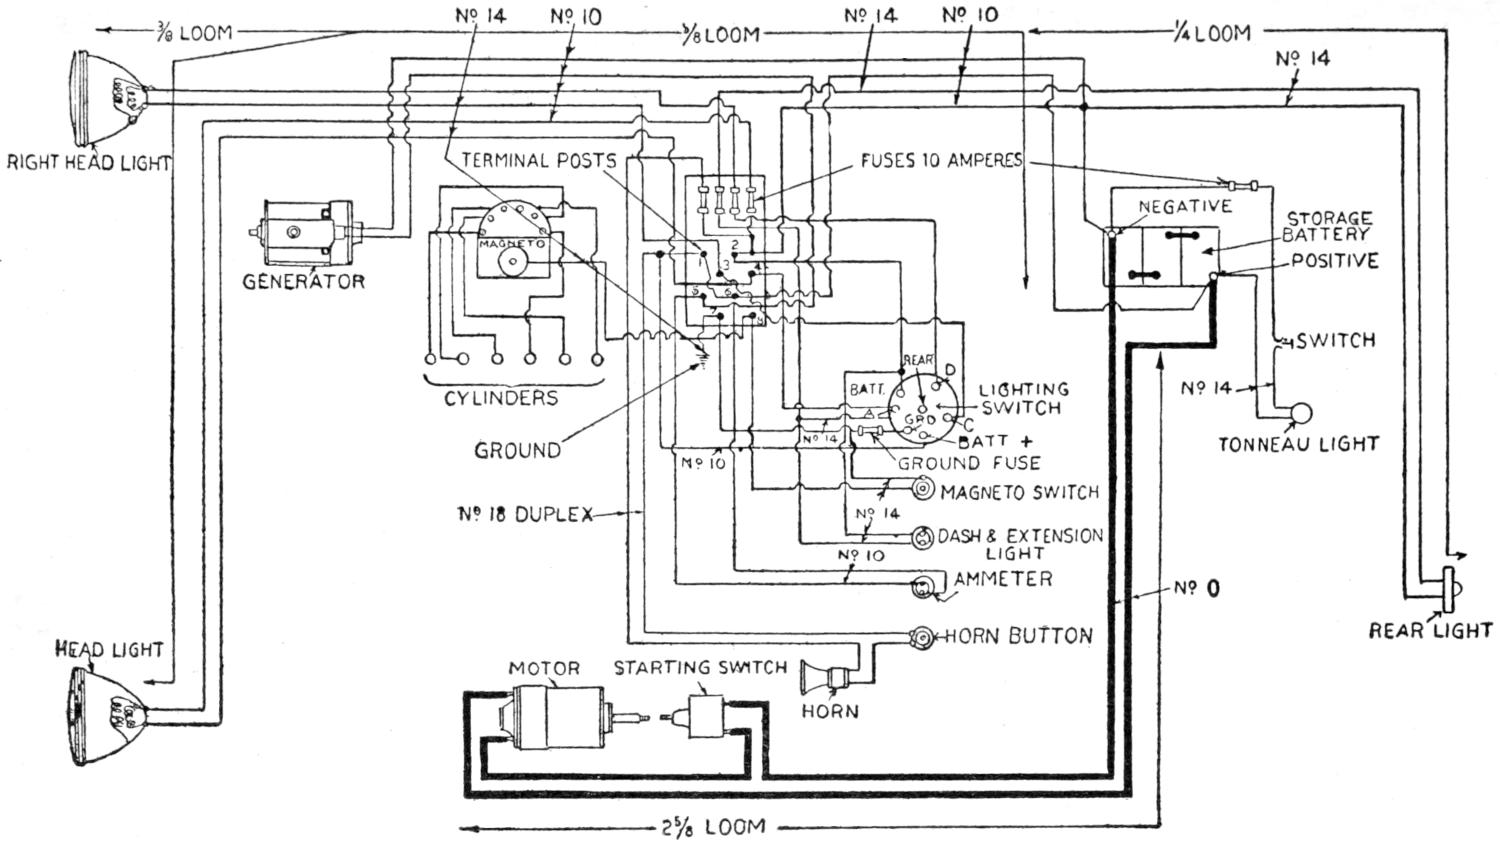
| 3⁄8 LOOM | No. 14 No. 10 | 3⁄8 LOOM | No. 14 No. 10 | 1⁄4 LOOM | ||
| No. 14 | ||||||
| RIGHT HEAD LIGHT | TERMINAL POSTS | FUSES 10 AMPERES | ||||
| NEGATIVE | ||||||
| STORAGE BATTERY |
||||||
| GENERATOR | MAGNETO | POSITIVE | ||||
| SWITCH | ||||||
| CYLINDERS | BATT -
LIGHTING SWITCH |
No. 14 | ||||
| No. 14 BATT + | TONNEAU LIGHT | |||||
| GROUND | No. 10 | GROUND FUSE | ||||
| MAGNETO SWITCH | ||||||
| No. 18 DUPLEX | No. 14 | |||||
| DASH & EXTENSION LIGHT |
||||||
| No. 10 | ||||||
| AMMETER | No. 0 | |||||
| HORN BUTTON | REAR LIGHT | |||||
| HEAD LIGHT | MOTOR | STARTING SWITCH | ||||
| HORN | ||||||
| 25⁄8 LOOM | ||||||
Fig. 89. Wiring Diagram—Jeffrey-Chesterfield Six
[156]
As a battery becomes charged its voltage increases reducing the difference in pressure between the generator and battery and decreasing the charging current to the battery.
Current from the generator passes through an ammeter and this meter shows the current being supplied to the battery and the lights, or to the battery only when no lights are in operation.
Starting Motor.—The starting motor is provided with a square shaft and carries a pinion which can be moved horizontally on this shaft. This pinion meshes directly with teeth cut on the flywheel.
The starting pedal located at the driver’s seat connects through linkage to fork which shifts the link on the square shaft of the motor. The same foot pedal linkage operates the starting switch. Normally a spring holds the motor pinion out of mesh with the flywheel teeth, and also holds the starting switch in an “off” position.
Operation of the Starter.—Depressing the starter, one pedal operates the starting switch and makes a preliminary contact which connects the starting motor to the storage battery through a resistance located inside of the starting switch. This resistance permits a small amount of current to pass through the starting motor, causing its armatures to rotate at relatively slow speed. This slow rotation insures proper meshing of the pinion and flywheel teeth when they are brought into engagement. Depressing the foot pedal also shifts the pinion on the square shaft of the motor so as to bring it into contact with the teeth on the flywheel.
[157]
When the pinion is in full mesh with the teeth on the fly, the moving contact in the starting switch has traveled to a position where the resistance is cut out of the circuit, connecting the storage battery directly to the starting motor. The starting motor will then spin the gas motor.
Starting.—First see that the necessary adjustments have been made, then depress the starting foot pedal as far as it will go and hold it firmly in place until the gas motor starts. The instant the gas motor begins firing the foot pedal should be released. The starting pedal should be pressed as far as it will go without any pausing on the downward stroke.
Fig. 90 shows diagram of operation and wiring of the Bijur electrical system used on Jeffery 4-cylinder car.
If the pinion and flywheel teeth do not mesh properly do not hold the starting pedal down, release it and after a few seconds pause, depress the pedal again.
If the gas motor does not start firing promptly after spinning it with the electric motor, do not continue to spin it, but see that the proper adjustments for starting have been made and that there is gasoline in the carburetor, and that the ignition is in working order.
Continued spinning of the gas motor by the electric motor will not damage the electrical equipment but constitutes a useless drain on the storage battery and should be avoided.
Wiring.—Fig. 90 shows the circuits for all electric appliances on the Jeffrey-4 car. The various units are wired on the two-wire system. The “out of focus” filaments in the head lamp bulbs are wired on the three-wire system, the chassis acting as a neutral wire, one side of the “out of focus” filament being grounded in the head lamps. The “in focus” filaments are on the two-wire system.
The dash lamp is on the tail lamp circuit and is so arranged that these two lamps are always in operation when any combination of head lamp filaments are in use.
Fuse Circuits.—Each head lamp is separately fused, the current for both filaments in each head lamp bulb passing through one fuse.
[158]
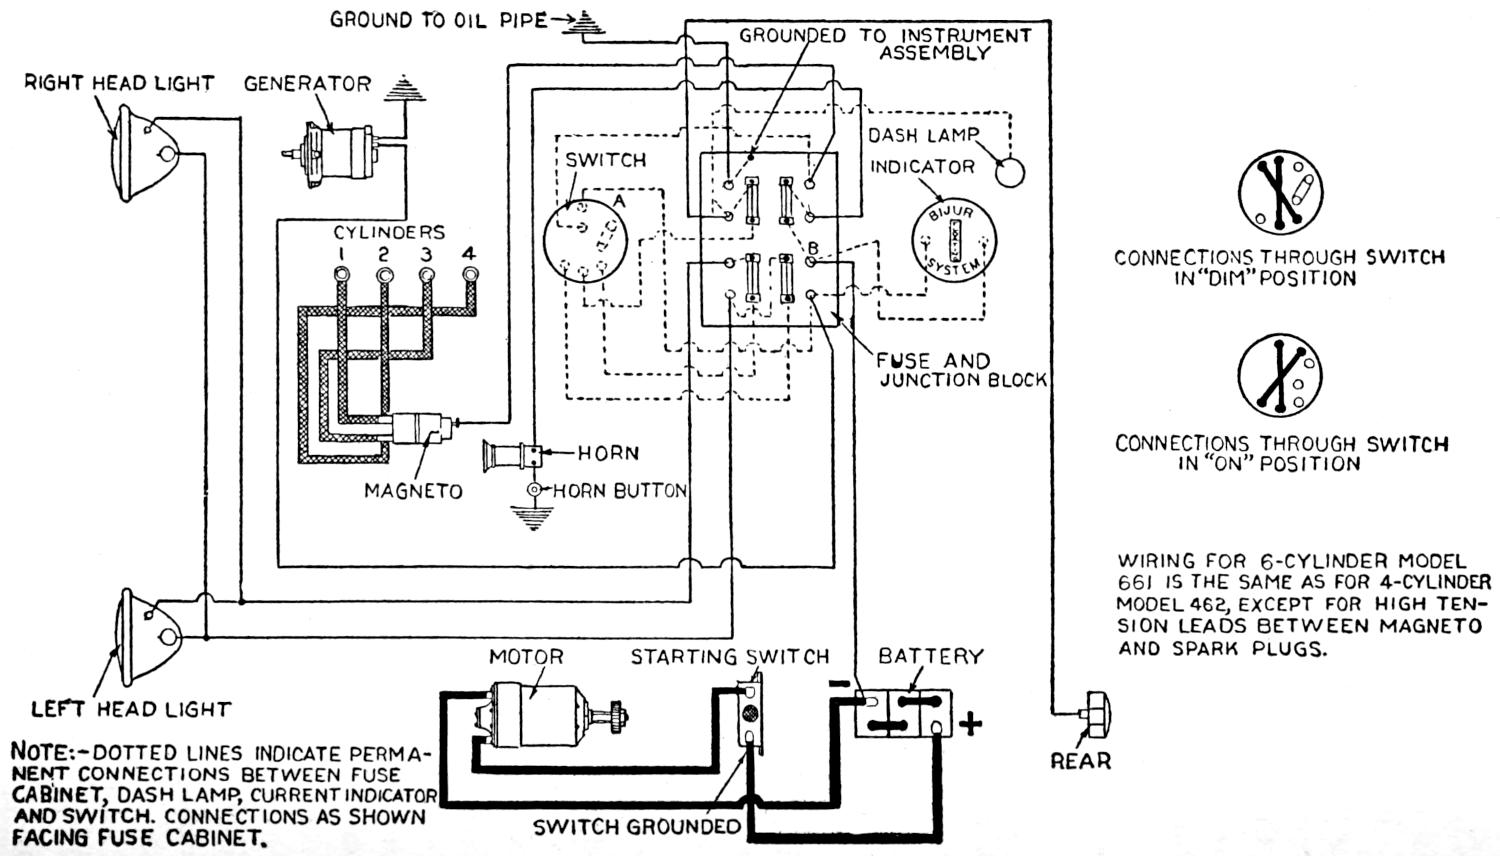
| GROUND TO OIL PIPE | ||||||
| GROUNDED TO INSTRUMENT ASSEMBLY |
||||||
| RIGHT HEAD LIGHT | GENERATOR | |||||
| DASH LAMP | ||||||
| SWITCH | INDICATOR | |||||
| CYLINDERS 1 2 3 4 |
CONNECTIONS THROUGH SWITCH IN “DIM” POSITION | |||||
| FUSE AND JUNCTION BLOCK |
||||||
| HORN | CONNECTIONS THROUGH SWITCH IN “ON” POSITION | |||||
| MAGNETO | HORN BUTTON | |||||
| MOTOR | STARTING SWITCH | BATTERY | WIRING FOR 6-CYLINDER MODEL 661 IS THE SAME AS FOR 4-CYLINDER MODEL 462, EXCEPT FOR HIGH TENSION LEADS BETWEEN MAGNETO AND SPARK PLUGS. | |||
| LEFT HEAD LIGHT | ||||||
| NOTE:—DOTTED LINES INDICATE PERMANENT CONNECTIONS BETWEEN FUSE CABINET, DASH LAMP, CURRENT INDICATOR AND SWITCH. CONNECTIONS AS SHOWN FACING FUSE CABINET. | SWITCH GROUNDED | REAR | ||||
Fig. 90. Wiring Diagram—Jeffrey-Four
[159]
Separate fuses are provided for the electric horn circuit and for the rear lamp circuit. The push button for operating the electric horn is mounted on the center of the steering post.
Ground Fuse.—A fuse is located in the ground circuit between the lamp controller and the magneto top to ground.
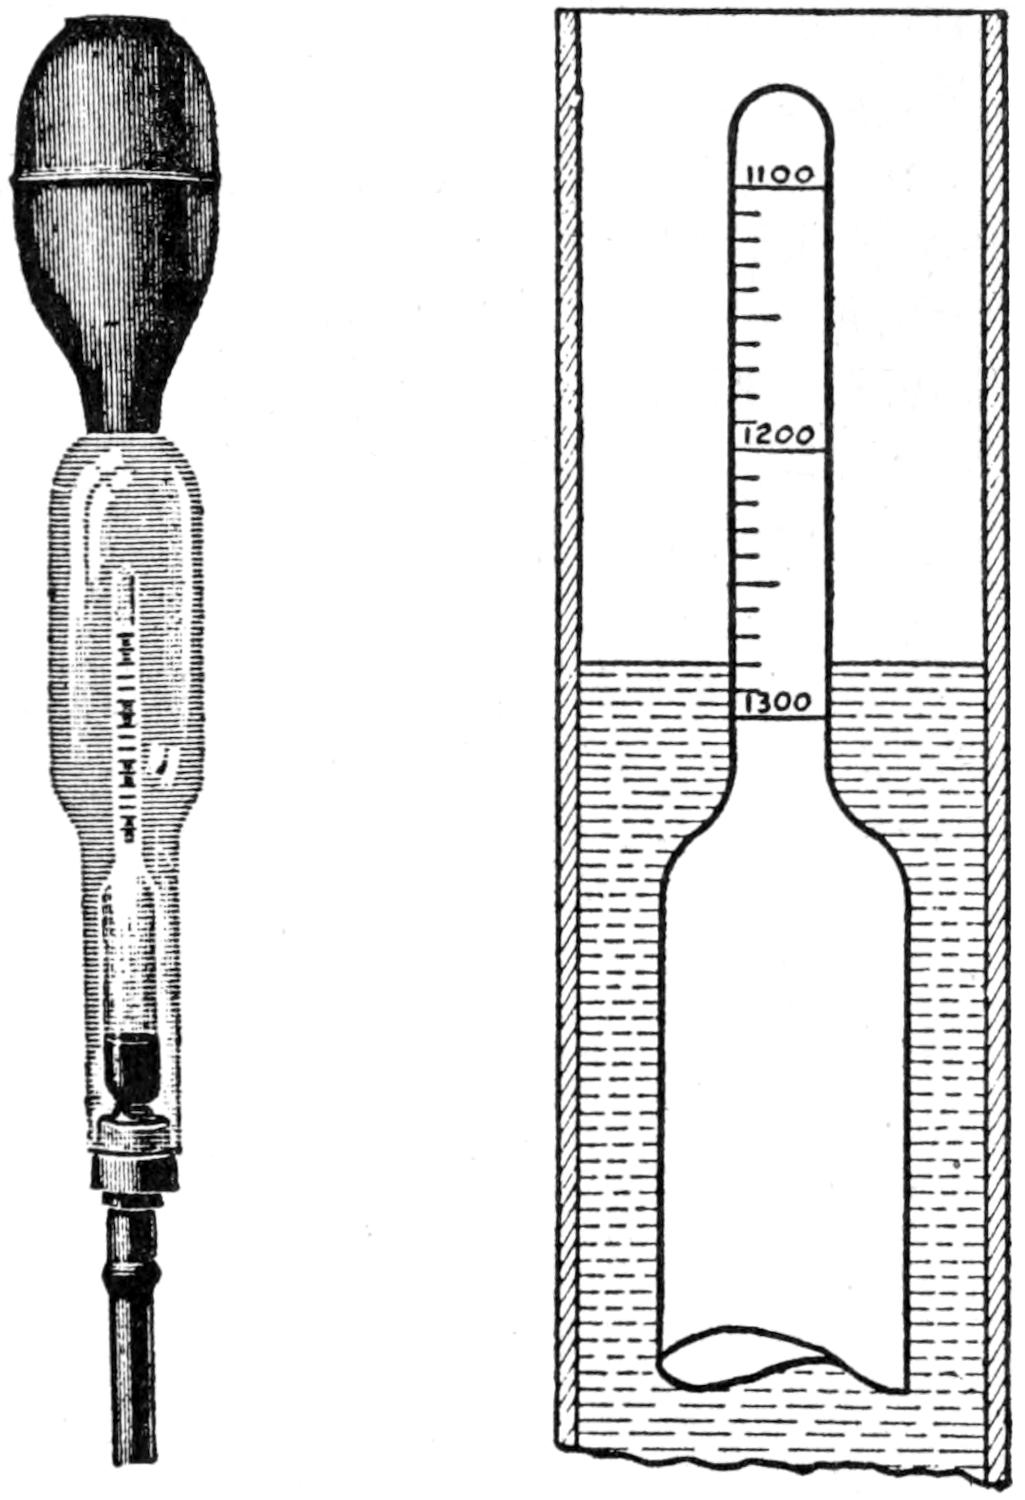
Fig. 91. Hydrometer Syringe
Lamp Controller.—A pair of wires from the terminals of the storage battery connect to the five position lamp controller. All lighting circuits connected to this controller which may be locked in any of the five positions.
Oiling should be practiced regularly every two weeks or every five hundred miles. Two or three drops of thin neutral oil should be put in each of the two oilers of the motor and in each of the two oilers of the generator. Do not flood the bearings with oil.
[160]
At the same time the starting motor shaft should be oiled. An oil hole is provided in the top of the starting motor gear case and about ten drops of cylinder oil should be used.
Fig. 91 shows a hydrometer syringe used for determining the specific gravity or density of the solutions in the battery cells.
To take specific gravity readings unscrew the filler or vent plug and insert the tube into the cell and release bulb slowly to draw the acid solution into the chamber until the hydrometer floats. The enlarged graduated stem shows a reading of 1.280 at the point where it emerges from the solution. After testing, the solution must be returned to the cell from which it was taken. Specific readings above 1200 show the battery more than half charged.
Gravity below 1.150 indicates battery completely discharged or run down.
Should the gravity fall below 1.150 the gas motor should be given a long run to restore the battery.
[161]
The North East starter system shown in Fig. 911⁄2 comprises the North East Model G starter-generator and the combined starting switch and reverse current cut-out. This equipment serves to start the engine and provide current for the lamps and other electrical accessories as well as for the ignition system. The battery as the source of current while the engine is not in operation or is running slowly; but at all engine speeds above 350 R. P. M. the starter-generator supplies current for the entire electrical system.
Wiring.—In the accompanying wiring diagrams the starting circuit is represented by the very heavy cables; the charging circuit, where it does not coincide with the starting circuit, by the cables of medium weight, and the lighting and the ignition circuits by the light cables. As will be seen from the diagrams, the starting circuit extends from the positive terminal of the battery to the starting switch, and thence, when the switch is closed, through the starter-generator armature and field coils back to the negative terminal of the battery by way of the grounded negative starter-generator terminal, the car frame, and the battery ground connections. The charging circuit is identical with the starting circuit except at the starting switch, where instead of passing from one switch terminal to the other through the switch contactor it extends through a parallel path which includes the reverse current cut-out and the charging indicator. The cable leading to the lighting and ignition switch is attached to the positive terminal of the indicator. From this switch the lighting and the ignition circuits become distinct, and each, after passing through its proper course, reaches the car frame and returns through it to the source of supply.
[162]
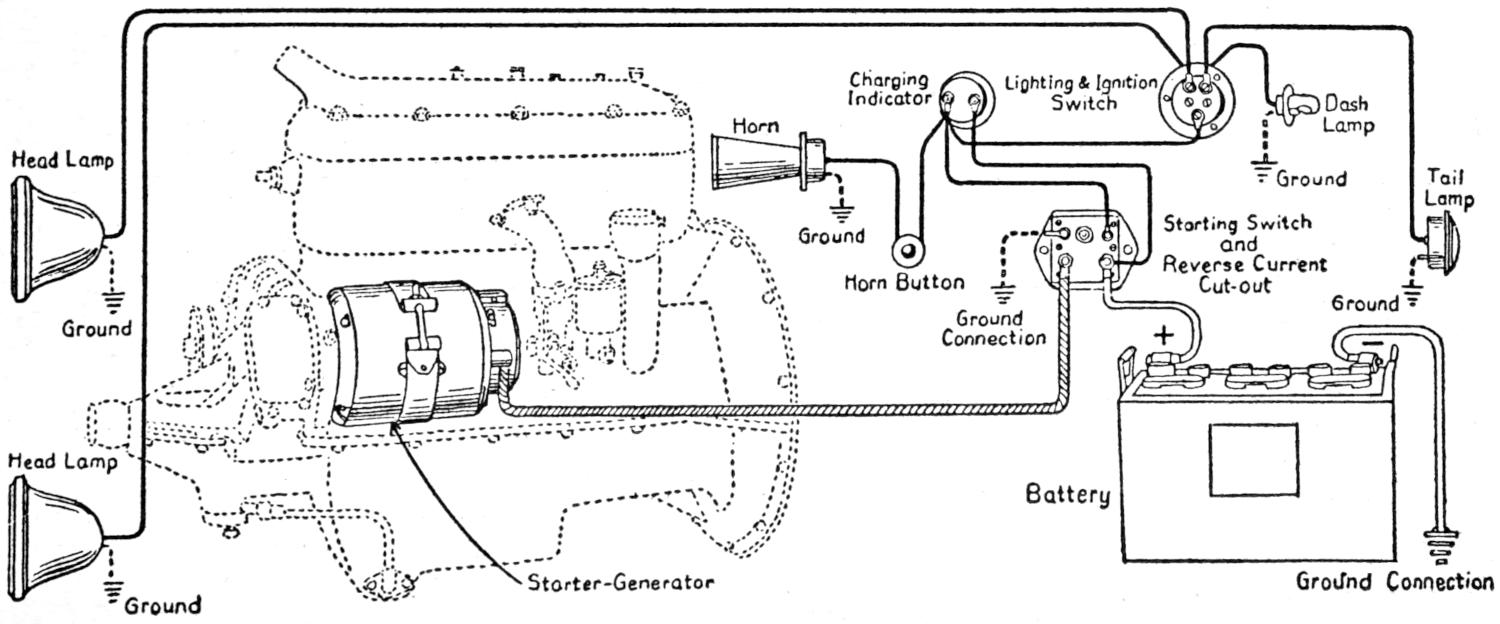
| Charging Indicator |
Lighting & Ignition Switch |
Dash Lamp |
|||||||
| Horn | |||||||||
| Head Lamp | Ground
Tail Lamp |
||||||||
| Ground | Horn Button | Starting Switch and Reverse Current Cut-out |
|||||||
| Ground | Ground Connection |
Ground | |||||||
| Head Lamp | |||||||||
| Battery | |||||||||
| Ground | Starter-Generator | Ground Connection | |||||||
Fig. 911⁄2. Dodge Wiring Diagram
[163]
Without exception all the connections of the starting and lighting system must be made as indicated in this diagram if entirely satisfactory results are to be obtained from the equipment.
Starter-Generator (Fig. 92).—The starter-generator is mounted on the left side of the engine by means of an adjustable support and a clamping strap. It runs at three times engine speed, operating directly from the crank shaft through a silent chain drive. Being a single unit machine, it employs but one armature with only one commutator, one set of field windings and one set of brushes for the performance of all of its functions both as a starter and as a generator.
While starting the engine it acts as a cumulatively compounded motor; but while serving as a generator it operates as a differentially compounded machine with its output positively controlled through the agency of a Third Brush Regulating system, supplemented by the differential influence of the series field upon the shunt field.
The machine is designed for 12 volt service and, when driven by the engine, normally begins to deliver current to the battery as soon as the car speed is brought up to approximately 10 miles per hour. From this point on, the charging rate rises rapidly with increasing speed until the standard maximum rate of 6 amperes is reached at a car speed of 16 or 17 miles per hour. From this speed to 20 or 21 miles per hour it remains practically constant, but above 21 miles per hour it decreases gradually until at the upper speed limit of the engine it may become as low as 3 amperes.
This charging rate conforms throughout with the standard recommendations of the battery manufacturers. The early maximum reached by the starter-generator output provides amply for the demands of current at ordinary driving speeds; while the tapering characteristic, which comes into effect at high speeds, serves to protect the battery from superfluous charging in instances where cars may be subjected to continuous high speed service.
[164]
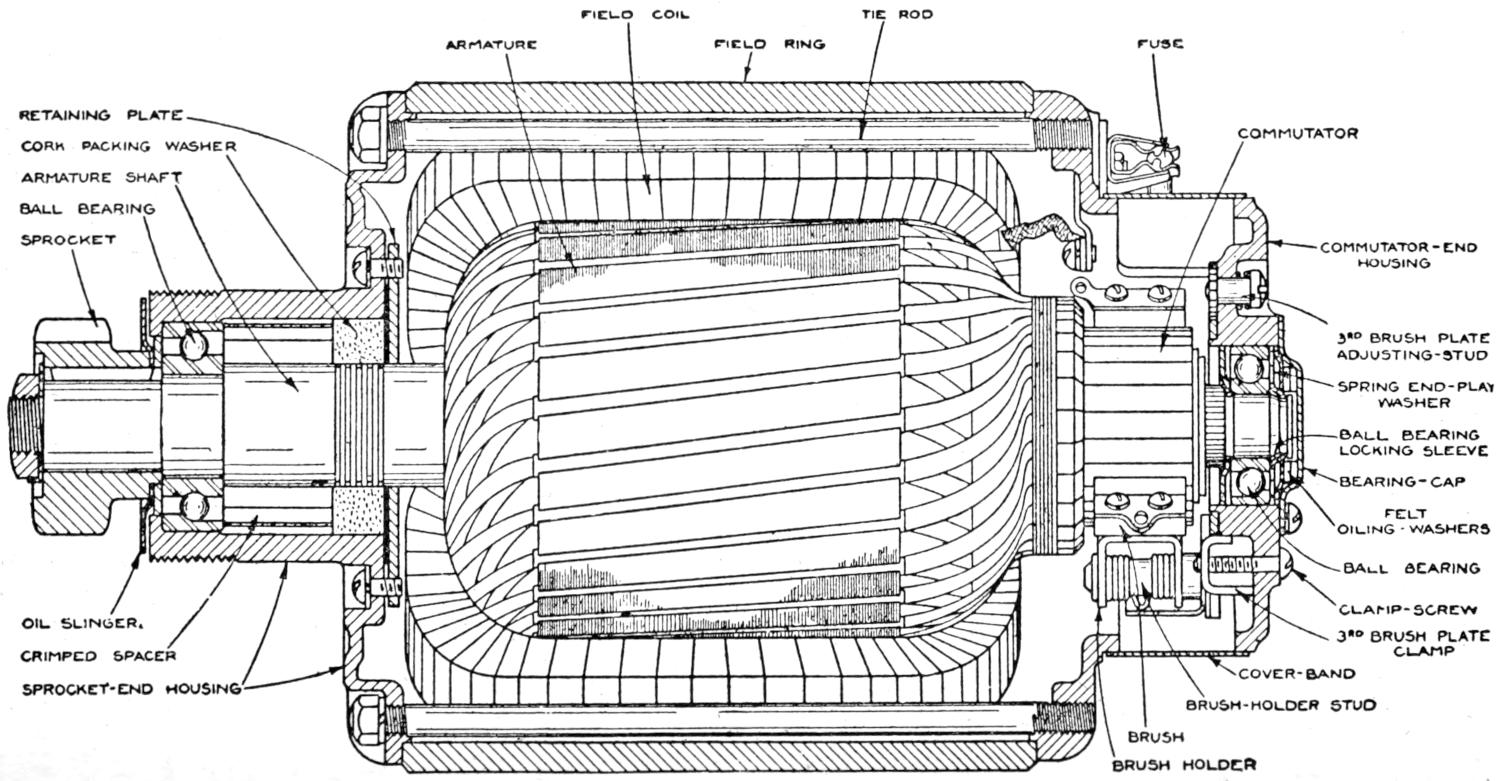
| FIELD COIL | TIE ROD | |||||
| ARMATURE | FIELD RING | FUSE | ||||
| RETAINING PLATE | ||||||
| CORK PACKING WASHER | COMMUTATOR | |||||
| ARMATURE SHAFT | ||||||
| BALL BEARING | ||||||
| SPROCKET | COMMUTATOR-END HOUSING |
|||||
| 3RD BRUSH PLATE ADJUSTING-STUD |
||||||
| SPRING END-PLAY WASHER |
||||||
| BALL BEARING LOCKING SLEEVE |
||||||
| BEARING-CAP | ||||||
| FELT OILING-WASHERS |
||||||
| BALL BEARING | ||||||
| OIL SLINGER. | CLAMP-SCREW | |||||
| 3RD BRUSH PLATE CLAMP |
||||||
| CRIMPED SPACER | COVER-BAND | |||||
| SPROCKET-END HOUSING | BRUSH-HOLDER STUD | |||||
| BRUSH | ||||||
| BRUSH HOLDER | ||||||
Fig. 92. North East Model G Starter-Generator
[165]
Adjustment of Charging Rate.—The third brush system is so constructed as to permit the charging rate to be changed when desired to a higher or to a lower value than that for which it is normally adjusted. Such adjustments should not be attempted by the car owner himself, and should never be made except in cases of actual necessity where the normal charging rate does not meet the special service conditions under which the equipment may be required to operate permanently. In every instance where there is any reason to believe that a modification of the rate would be beneficial, the car owner should refer the equipment to the North East Electric Company or its nearest branch or service station.
Fuse.—The fuse is located on the commutator end of the starter-generator. Its purpose is to protect the electrical system if possible by rendering the starter-generator inoperative whenever abnormal operating conditions may occur. Due to its protective function the fuse is always the first point in the system to be inspected in case the starter-generator ever failed to produce current. If the fuse is found to be “blown” or missing, a new one should be applied and the machine given a preliminary test before further search for trouble is made. Should the generator fail to deliver current even after a new fuse has been installed or should the new fuse “blow” when the machine is in operation, the entire electrical system should then be inspected thoroughly for possible faults such as open circuits, improper connections or abnormal grounds. Under such circumstances the difficulty should always be corrected before any further attempt is made to operate the equipment.
Precautions Necessary for the Operation Without Battery in Circuit.—The third brush regulating system requires a closed charging circuit for the successful performance of its duties. The battery, therefore, forms an indispensable link in the system and its presence in circuit is always essential to the proper operation of the starter-generator. Should the machine ever have to be operated with the battery disconnected[166] or with the charging circuit otherwise incomplete, the electrical system must be protected by rendering the machine inoperative. This is to be done by removing the fuse from its clips.
When the starter-generator thus rendered incapable of producing current, no ignition current will be available from the usual sources. Under such circumstances, therefore, the engine cannot be operated without some provisional source of ignition current. A battery of nine or ten dry cells will serve satisfactorily as a temporary substitute provided they are used for ignition only.
Starting Switch and Reverse Current Cut-out.—The reverse current cut-out is located in the same case with the starting switch. This combined switch and cut-out is mounted near the center of the toe-board where the switch push-rod button is within convenient reach from the driver’s seat.
[167]
The motor generator which is located on the right side of the engine is the principal part of the Delco System. This consists essentially of a dynamo with two field windings, and two windings on the armature with two commutators and corresponding sets of brushes, in order that the machine may work both as a starting motor, and as a generator for charging the battery and supplying the lights, horn and ignition. The ignition apparatus is incorporated in the forward end of the motor generator. This in no way affects the working of the generator, it being mounted in this manner simply as a convenient and accessible mounting. The motor generator has three distinct functions to perform which are as follows:
1.—Motoring the generator.
2.—Cranking the engine.
3.—Generating electrical energy.
Motoring the generator is accomplished when the ignition button on the switch is pulled out. This allows current to come from the storage battery through the ammeter on the combination switch, causing it to show a discharge. The first reading of the meter will be much more than the reading after the armature is turning freely. The current discharging through the ammeter during this operation is the current required to slowly revolve the armature and what is used for the ignition. The ignition current flows only when the contacts are closed, it being an intermittent current. The maximum ignition current is obtained when the circuit is first closed and the resistance unit on the front end of the coil is cold. The current at this time is approximately 6 amperes, but soon decreases to approximately 31⁄2 amperes. Then as the engine is running it further decreases until at 1000 revolutions of the engine it is approximately 1 ampere.
[168]
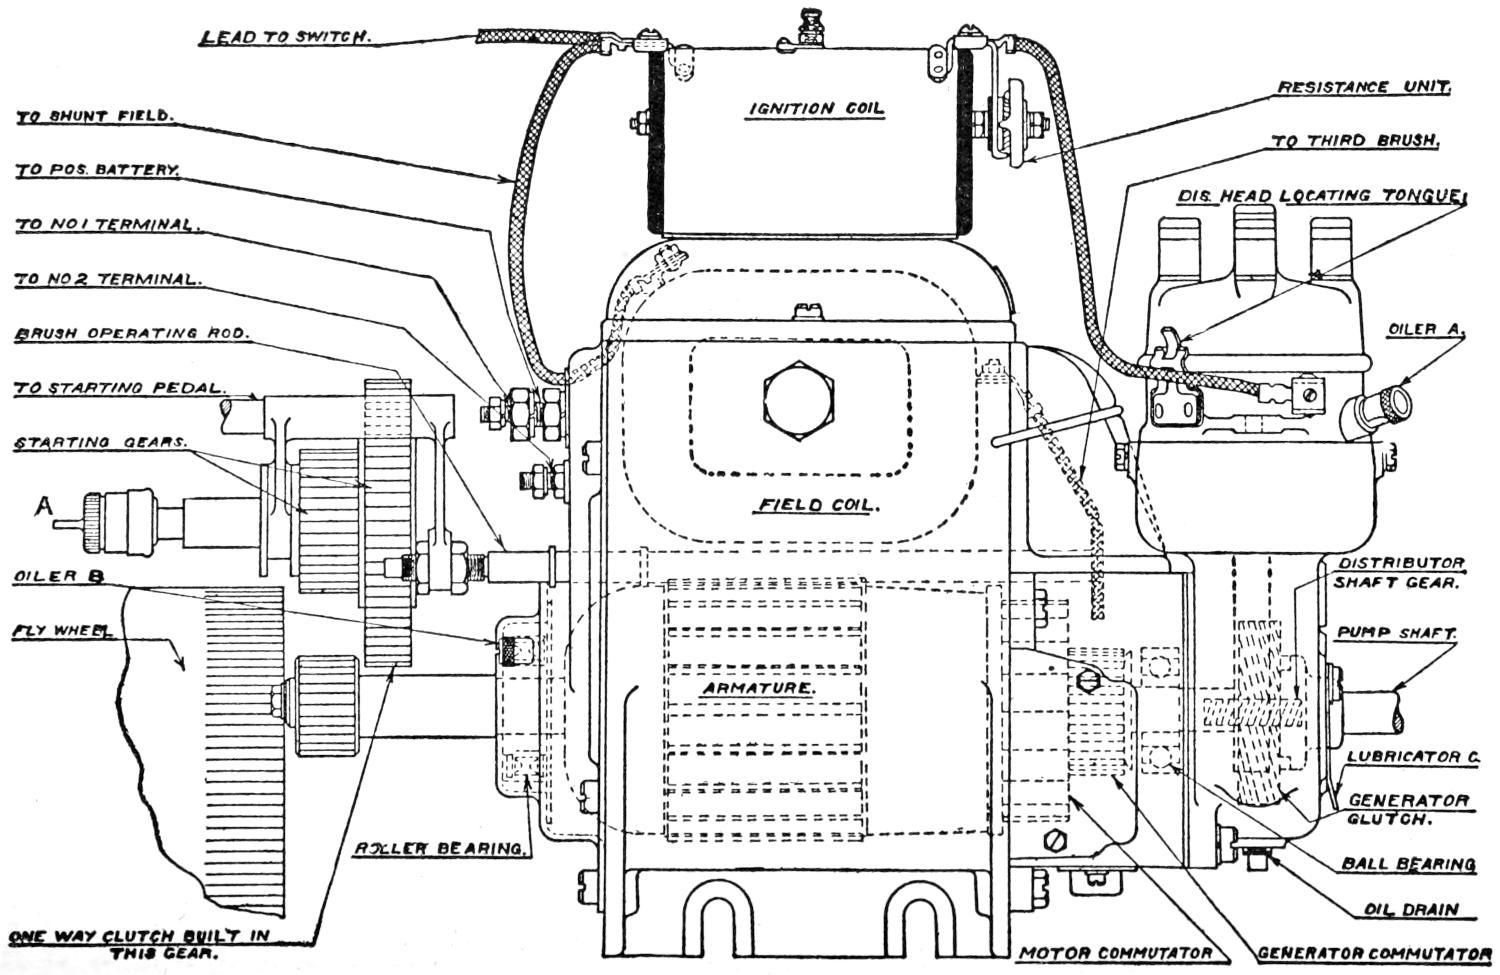
| LEAD TO SWITCH. | |||
| TO SHUNT FIELD. | IGNITION COIL. | RESISTANCE UNIT. | |
| TO THIRD BRUSH. | |||
| TO POS. BATTERY. | DIS. HEAD LOCATING TONGUE. | ||
| TO NO 1 TERMINAL. | |||
| TO NO 2 TERMINAL. | |||
| BRUSH OPERATING ROD. | OILER A. | ||
| TO STARTING PEDAL. | |||
| STARTING GEARS. | |||
| A | FIELD COIL. | ||
| OILER B. | DISTRIBUTOR SHAFT GEAR. |
||
| FLY WHEEL. | PUMP SHAFT. | ||
| ARMATURE. | |||
| LUBRICATOR C. | |||
| GENERATOR CLUTCH. |
|||
| ROLLER BEARING. | BALL BEARING. | ||
| OIL DRAIN. | |||
| ONE WAY CLUTCH BUILT IN THIS GEAR. |
MOTOR COMMUTATOR. | GENERATOR COMMUTATOR. | |
Fig. 93. Delco Motor Generator—Showing Parts
[169]
This motoring of the generator is necessary in order that the starting gears may be brought into mesh, and should trouble be experienced in meshing these gears, do not try to force them, simply allow the starting pedal to come back giving the gears time to change their relative positions.
A clicking sound will be heard during the motoring of the generator. This is caused by the overrunning of the clutch in the forward end of the generator which is shown in Fig. 93.
The purpose of the generator clutch is to allow the armature to revolve at a higher speed than the pump shaft during the cranking operation and permitting the pump shaft to drive the armature when the engine is running on its own power. A spiral gear is cut on the outer face of this clutch for driving the distributor. This portion of the clutch is connected by an Oldham coupling to the pump shaft. Therefore its relation to the pump shaft is always the same and does not throw the ignition out of time during the cranking operation.
The cranking operation takes place when the starting pedal is fully depressed. This causes the top motor brush to come in contact with the motor commutator. As this brush arm lowers, it comes in contact with the gear in the generator brush arm raising the generator brush from its commutator. At the same time the current from the storage battery flows through the heavy series field winding, motor brushes and motor winding on the armature. The switching in this circuit is accomplished by means of the top motor brush which is operated from the starting pedal. (Shown in Fig. 94).
This cranking operation requires a heavy current from the storage battery, and if the lights are on during the cranking operation, the heavy discharge from the battery causes the voltage of the battery to decrease enough to cause the lights[170] to grow dim. This is noticed especially when the battery is nearly discharged; it also will be more apparent with a stiff motor or with a loose or poor connection in the battery circuit. It is on account of this heavy discharge current that the cranking should not be continued any longer than is necessary, although a fully charged battery will crank the engine for several minutes.
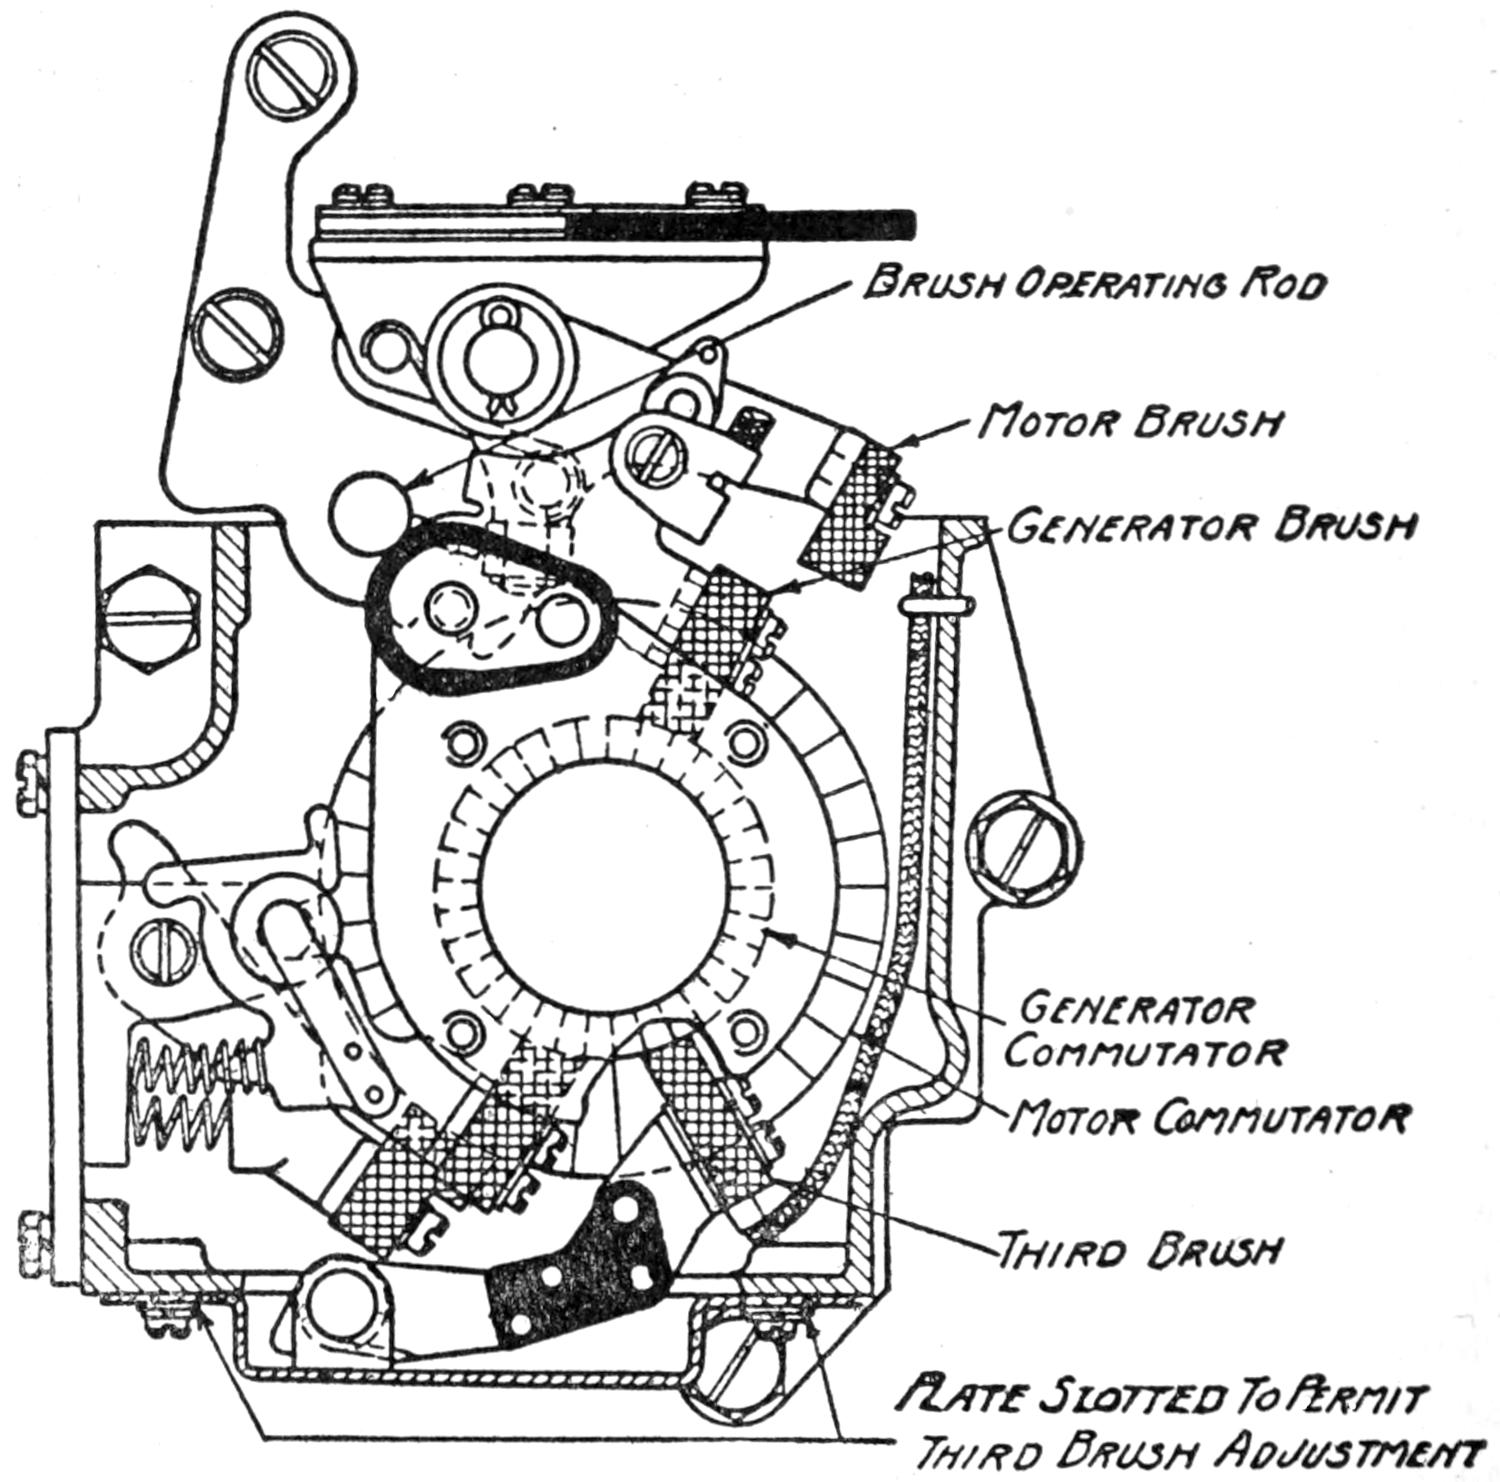
Brush Operating Rod
Motor Brush
Generator Brush
Generator
Commutator
Motor Commutator
Third Brush
Plate Slotted To Permit
Third Brush Adjustment
Fig. 94. Delco Motor Generator—Diagram of Operation
During the cranking operation the ammeter will show a discharge. This is the current that is used both in the shunt field winding and the ignition current; the ignition current, being an intermittent current of comparatively low frequency, will cause the ammeter to vibrate during the cranking operation.[171] If the lights are on the meter will show a heavier discharge.
The main cranking current is not conducted through the ammeter, as this is a very heavy current and it would be impossible to conduct this heavy current through the ammeter and still have an ammeter that is sensitive enough to indicate accurately the charging current and the current for lights and ignition.
As soon as the engine fires the starting pedal should be released immediately, as the overrunning motor clutch is operating from the time the engine fires until the starting gears are out of mesh. Since they operate at a very high speed, if they are held in mesh for any length of time, there is enough friction in this clutch to cause it to heat and burn out the lubricant. There is no necessity for holding the gears in mesh.
The motor clutch operates between the flywheel and the armature pinion for the purpose of getting a suitable gear reduction between the motor generator and the flywheel. It also prevents the armature from being driven at an excessively high speed during the short time the gears are meshed after the engine is running on its own power.
This clutch is lubricated by the grease cup A, shown in Fig. 93. This forces grease through the hollow shaft to the inside of the clutch. This cup should be given a turn or two every week.
When the cranking operation is finished the top brush is raised off the commutator when the starting pedal is released. This throws the starting motor out of action (Fig. 94). The top brush comes in contact with the generator commutator, and the armature is driven by the extension of the pump shaft.
At speeds above approximately 7 miles per hour the generator voltage is higher than the voltage of the storage battery which causes current to flow from the generator winding through the ammeter in the charge direction to the storage battery. As the speed increases up to approximately 20 miles[172] per hour this charging current increases, but at the higher speeds the charging current decreases.
Lubrication.—There are five places to lubricate the Delco System:
1. The grease clutch for lubricating the motor clutch.
2. Hole at B (Fig. 93) for supplying cup grease for lubricating the generator clutch and forward armature bearing.
3. The oiler C in the rear end cover for lubricating the bearing on the armature shaft. This should receive a few drops of oil once a week.
4. The oil hole in the distributor at A (Fig. 93) for lubricating the top bearing of the distributor shaft. This should receive oil once a week
5. This is the inside of the distributor head. This should be lubricated with a small amount of vaseline, carefully applied two or three times during the first 2000 miles running of the car, after which it will require no attention. This is to secure a burnished track for the rotor brush on the distributor head. This grease should be sparingly applied and the head wiped clean from dust and dirt.
The combination switch (Figs. 95 and 96) is for the purpose of controlling the lights, ignition, and the circuit between the generator and the storage battery. The button next to the ammeter controls both the ignition and the circuit between the generator and the storage battery, the latter circuit being shown in the heavier line as shown on the circuit diagram (Fig. 98). The button next to this controls the head lights. The next button controls the auxiliary lamps in the head lights. The button on the left controls the cowl and tail lights.
The circuit breaker is mounted on the combination switch as shown in Fig. 96. This is a protective device, which takes the place of a fuse block and fuses. It prevents the discharging[173] of the battery or damage to the switch or wiring to the lamps, in the event of any of the wires leading to these becoming grounded. As long as the lamps are using the normal amount of current the circuit breaker is not affected. But in the event of any of the wires becoming grounded an abnormally heavy current is conducted through the circuit breaker, thus producing a strong magnetism which attracts the pole piece and opens the contacts. This cuts off the flow of current which allows the contacts to close again and the operation is repeated, causing the circuit breaker to pass an intermittent current and give forth a vibrating sound.
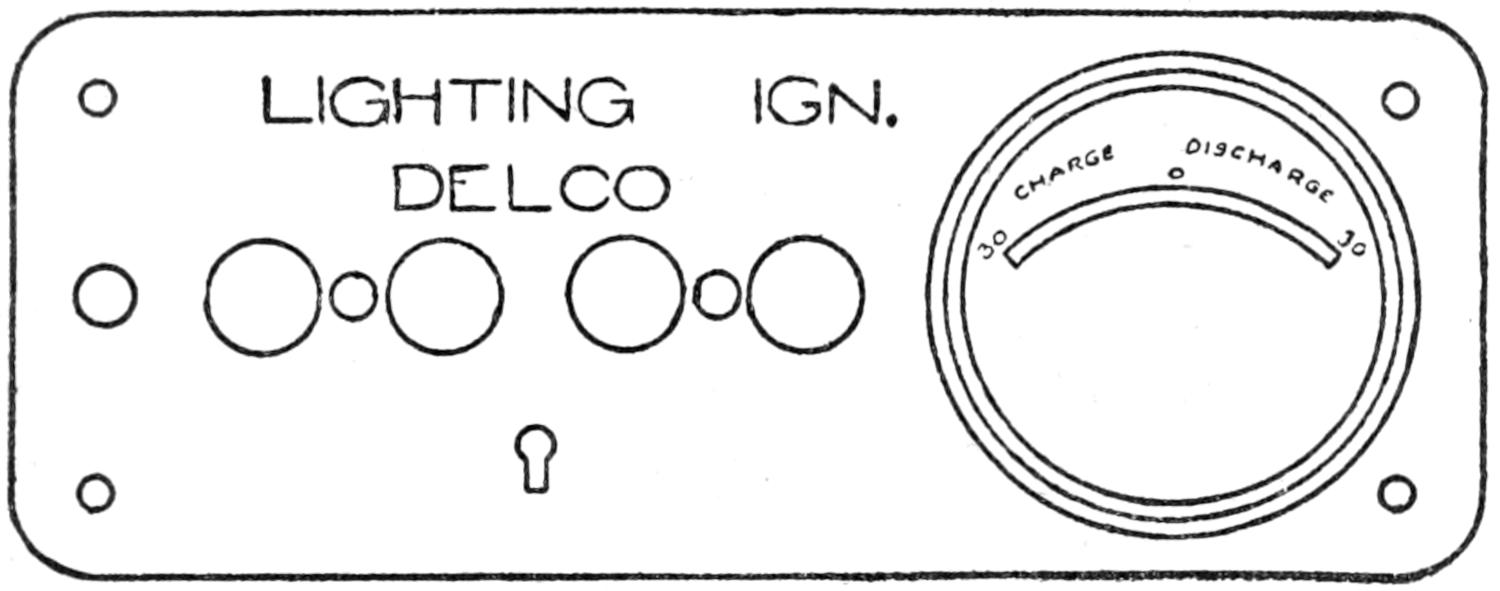
Fig. 95. Delco Ignition Switch Plate
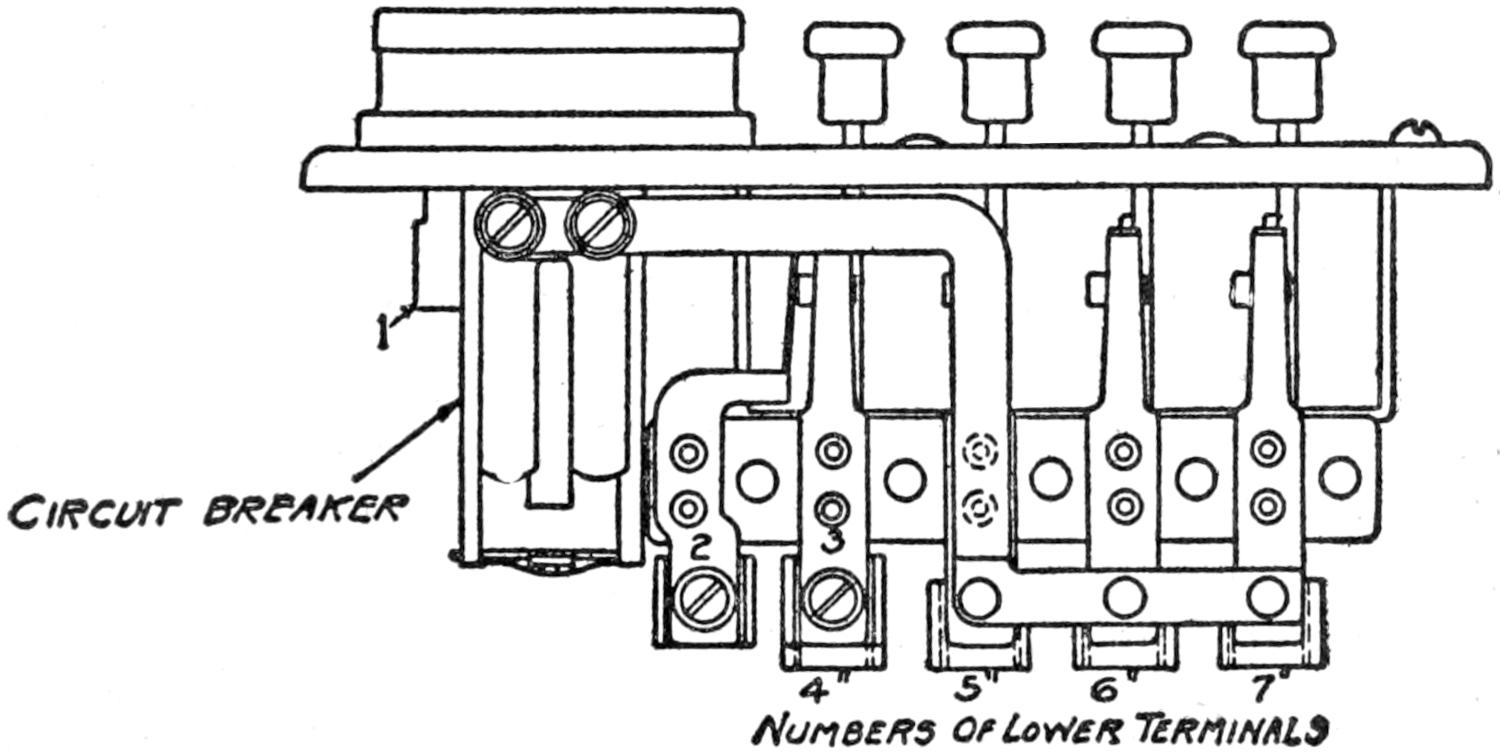
Circuit Breaker
Numbers of Lower Terminals
Fig. 96. Delco Ignition Switch Circuit Breaker—Mounted
It requires 25 amperes to start the circuit breaker vibrating,[174] but once vibrating a current of three to five amperes will cause it to continue to operate.
In case the circuit breaker vibrates repeatedly, do not attempt to increase the tension of the spring, as the vibration is an indication of a ground in the system. Remove the ground and the vibration will stop.
The ammeter on the right side of the combination switch is to indicate the current that is going to or coming from the storage battery with the exception of the cranking current. When the engine is not running and current is being used for lights, the ammeter shows the amount of current being used and the ammeter hand points to the discharge side, as the current is being discharged from the battery.
When the engine is running above generating speeds and no current is being used for lights or horn, the ammeter will show charge. This is the amount of current that is being charged into the battery. If current is being used for lights, ignition and horn, in excess of the amount that is being generated, the ammeter will show a discharge as the excess current must be discharged from the battery, but at all ordinary speeds the ammeter will read charge.
The ignition coil is mounted on top of the motor generator as shown in Fig. 94 and is what is generally known as the ignition transformer coil. In addition to being a plain transformer coil it has incorporated in it a condenser (which is necessary for all high tension ignition systems) and has included on the front end an ignition resistance unit.
The coil proper consists of a round core of a number of small iron wires. Wound around this and insulated from it is the primary winding. The circuit and arrangement of the different parts are shown in Fig. 97. The primary current is supplied through the combination switch through the primary winding and resistance through the coil, to the distributor contacts. This is very plainly shown in Fig. 98. It is the interrupting of this primary current by the timer contacts together with the action of the condenser which causes a rapid demagnetization of the iron core of the coil that induces the[175] high tension current in the secondary winding. This secondary winding consists of several thousand turns of very fine copper wire, the different layers of which are well insulated from each other and from the primary winding. One end of the secondary winding is grounded and the other end terminates at the high tension terminal about midway on top of the coil. It is from this terminal that the high tension current is conducted to the distributor where it is distributed to the proper cylinders by the rotor shown in Fig. 98.
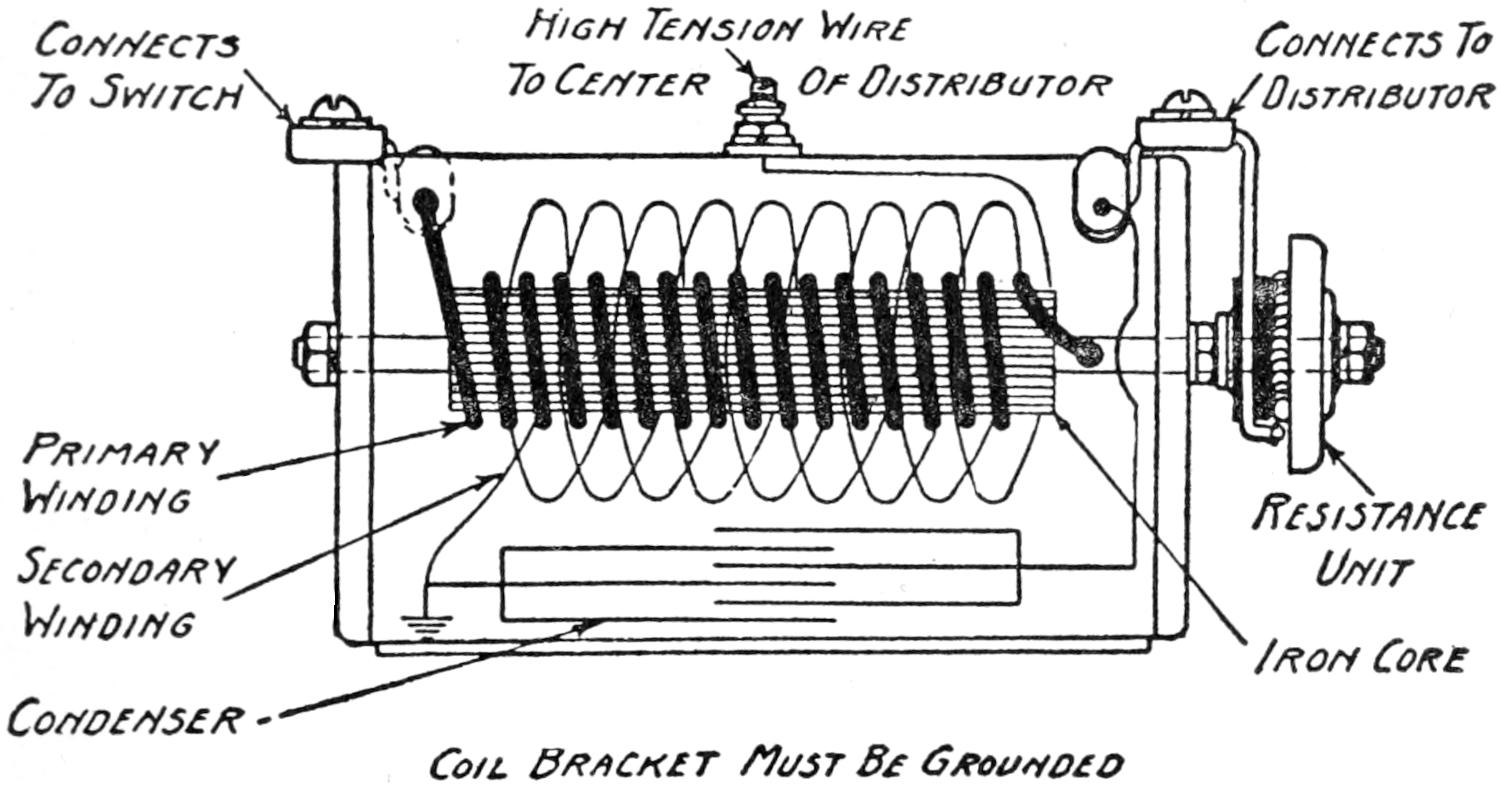
| Connects To Switch |
High Tension Wire To Center Of Distributor |
Connects To Distributor |
| Primary Winding |
Resistance Unit |
|
| Secondary Winding |
Iron Core | |
| Condenser | ||
| Coil Bracket Must Be Grounded | ||
Fig. 97. Delco Ignition Coil
The distributor and timer, together with the ignition coil, spark plugs, and wiring, constitute the ignition system.
The proper ignition of an internal combustion engine consists of igniting the mixture in each cylinder at such a time that it will be completely burned at the time the piston reaches dead center on the compression stroke. A definite period of time is required from the time the spark occurs at the spark plug until the mixture is completely expanded. It is therefore apparent, that, as the speed of the engine increases, the time the spark occurs must be advanced with respect to the crank shaft, and it is for this reason that the Delco ignition systems are fitted with an automatic spark control.
[176]
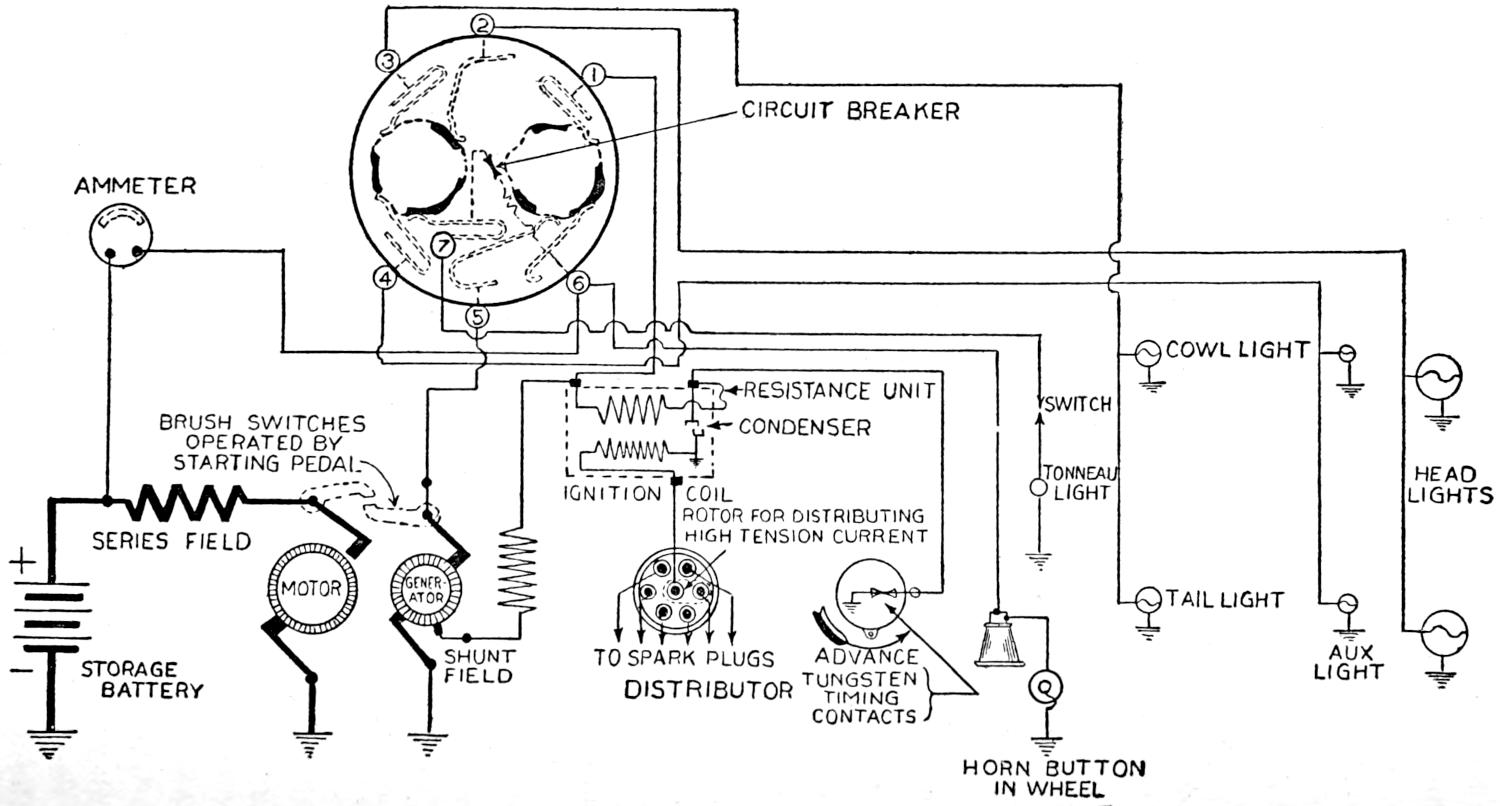
| CIRCUIT BREAKER | |||||||
| AMMETER | |||||||
| COWL LIGHT | |||||||
| RESISTANCE UNIT | SWITCH | ||||||
| BRUSH SWITCHES OPERATED BY STARTING PEDAL |
CONDENSER | ||||||
| IGNITION COIL | TONNEAU LIGHT |
HEAD LIGHTS |
|||||
| SERIES FIELD | ROTOR FOR DISTRIBUTING HIGH TENSION CURRENT |
||||||
| MOTOR | GENERATOR | TAIL LIGHT | |||||
| STORAGE BATTERY |
SHUNT FIELD |
TO SPARK PLUGS DISTRIBUTOR |
ADVANCE TUNGSTEN TIMING CONTACTS |
AUX LIGHT |
|||
| HORN BUTTON IN WHEEL |
|||||||
Fig. 98. Delco Wiring Diagram—Buick Cars
[177]
The quality of the mixture and the amount of compression are also factors in the time required for the burning to be complete. Thus a rich mixture burns quicker than a lean one. For this reason the engine will stand more advance with a half open throttle than with a wide open throttle, and in order to secure the proper timing of the ignition due to these variations and to retard the spark for starting, idling and carburetor adjusting, the Delco distributor also has a manual control.
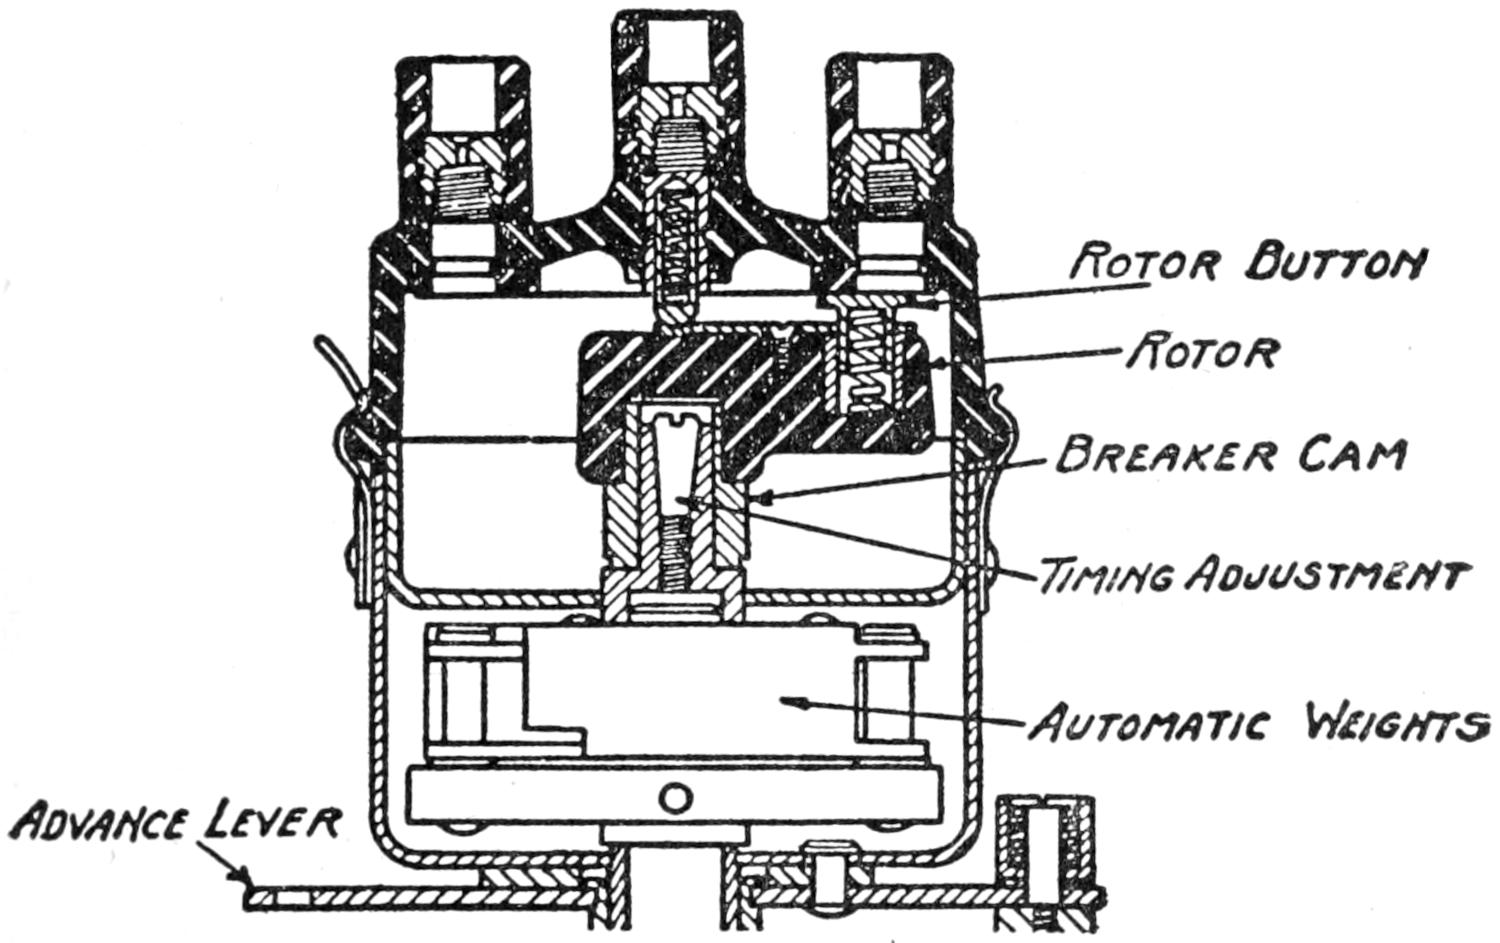
Rotor Button
Rotor
Breaker Cam
Timing Adjustment
Automatic Weights
Advance Lever
Fig. 99. Delco Ignition Distributor
The automatic feature of this distributor is shown in Figs. 99 and 100. With the spark lever set at the running position on the steering wheel (which is nearly all the way down on the quadrant), the automatic feature gives the proper spark for all speeds excepting a wide open throttle at low speeds, at which time the spark lever should be slightly retarded. When the ignition is too far advanced it causes loss of power and a knocking sound within the engine. With too late a spark there is a loss of power which is usually not noticed except by an experienced driver or one very familiar with the car and heating of the engine and excessive consumption of fuel is the result.
[178]
The timer contacts shown at D and C (Fig. 100) are two of the most important points of an automobile. Very little attention will keep these in perfect condition. These are tungsten metal, which is extremely hard and requires a very high temperature to melt. Under normal conditions they wear or burn very slightly and will very seldom require attention; but in the event of abnormal voltage, such as would be obtained by running with the battery removed, or with the ignition resistance unit shorted out, or with a defective condenser, these contacts burn very rapidly and in a short time will cause serious ignition trouble. The car should never be operated with the battery removed.
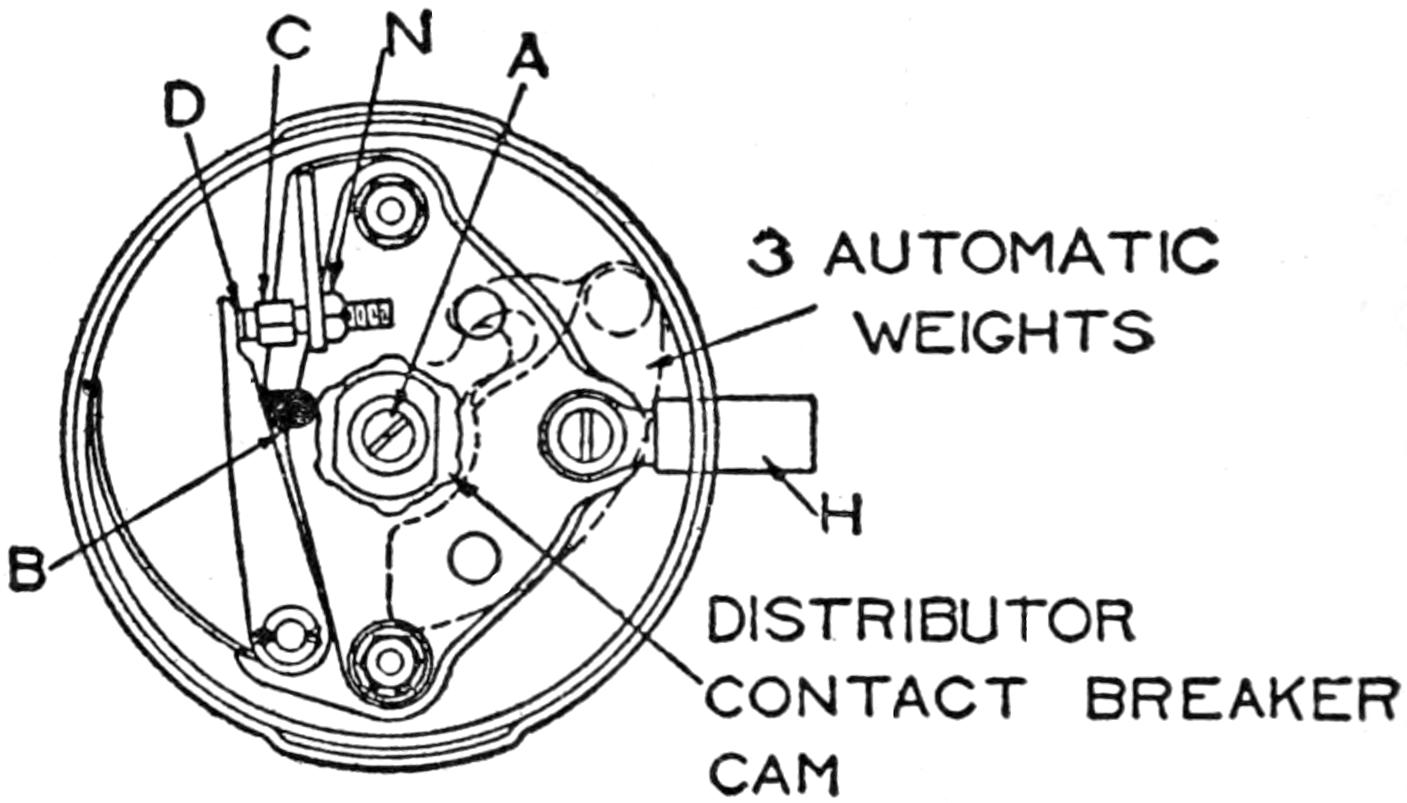
3 AUTOMATIC
WEIGHTS
DISTRIBUTOR
CONTACT BREAKER
CAM
Fig. 100. Delco Ignition Contact Breaker and Timer
It is a very easy matter to check the resistance unit by observing its heating when the ignition button is out and the contacts in the distributor are closed. If it is shorted out it will not heat up, and will cause missing at low speeds.
A defective condenser such as will cause contact trouble will cause serious missing of the ignition. Therefore, any of these troubles are comparatively easy to locate and should be immediately remedied.
These contacts should be so adjusted that when the fiber block B is on top of one of the lobes of the cam, the contacts are opened the thickness of the gauge on the distributor wrench. Adjust contacts by turning contact screw C, and[179] lock nut N. The contacts should be dressed with fine emery cloth so that they meet squarely across the entire face.
The rotor distributes the high tension current from the center of the distributor to the proper cylinder. Care must be taken to see that the distributor head is properly located, otherwise the rotor brush will not be in contact with the terminal at the time the spark occurs.
The distributor head and rotor should be lubricated as described under the heading “Lubrication.” The amount of ignition current required for different speeds is described under the heading “Motoring the Generator.”
[180]
The modern storage battery does not produce or generate electrical force. It was designed to carry an extra supply of current in storage to operate lighting and starting systems, and in most cases the current required for ignition is drawn from this supply.
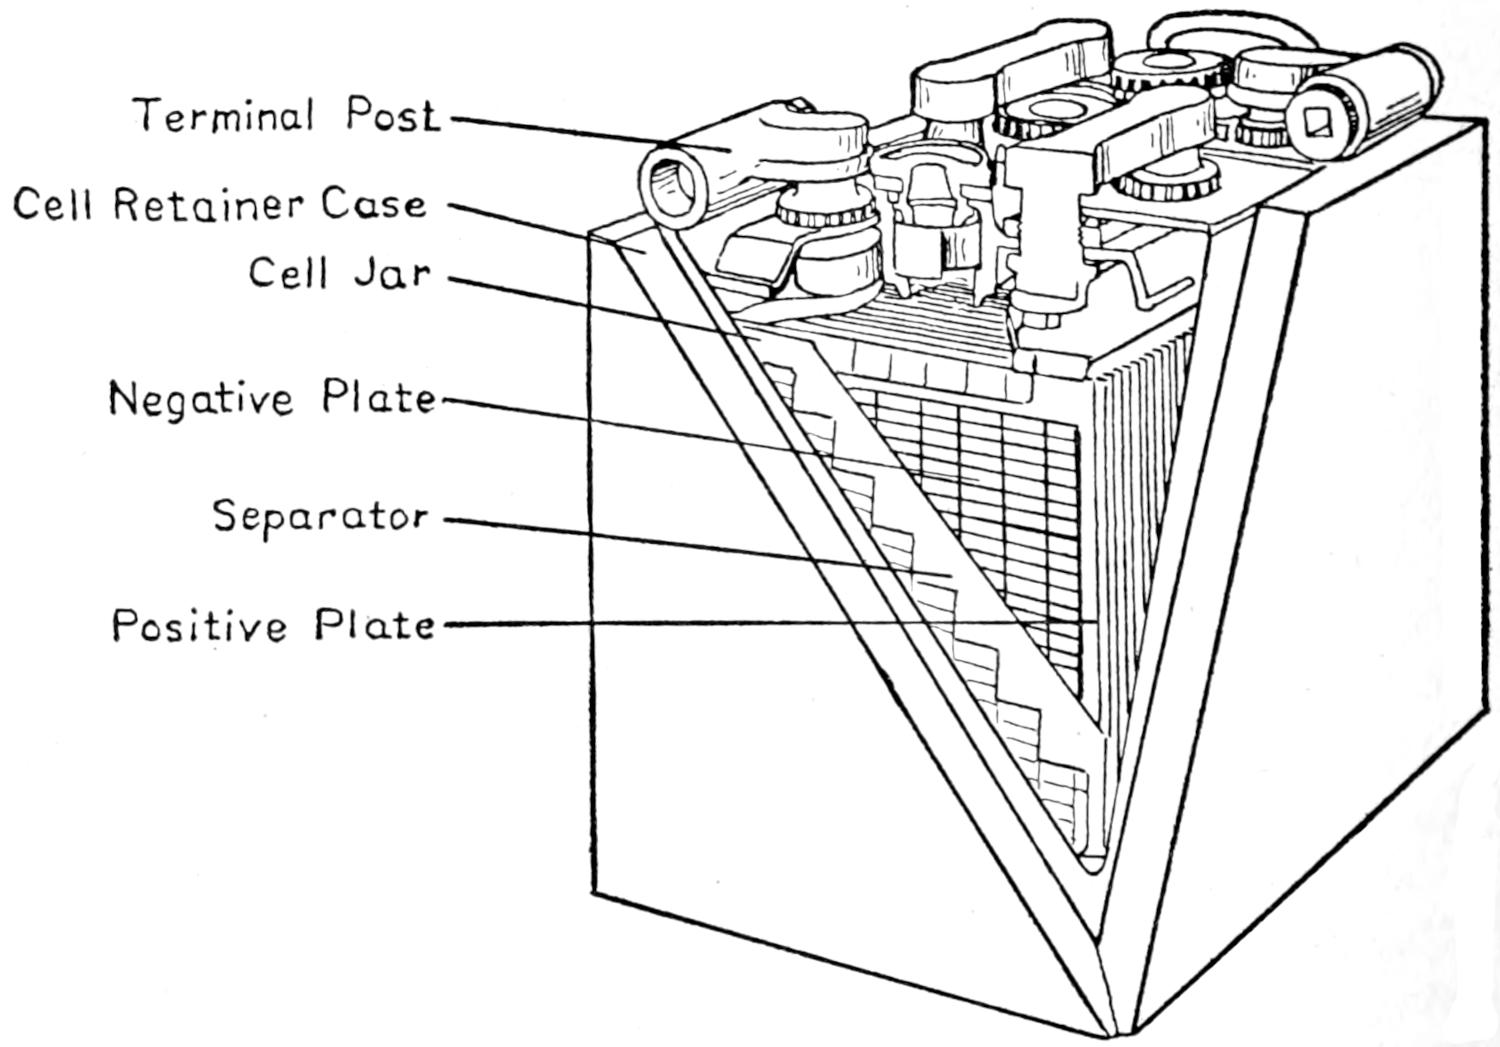
Terminal Post
Cell Retainer Case
Cell Jar
Negative Plate
Separator
Positive Plate
Fig. 101. Storage Battery, Sectional View
A storage battery is also called an accumulator, as it accumulates and retains a charge of electrical current for future use.
Fig. 101 illustrates a storage battery with a section of the[181] cell retainer case removed to show the location of the cells, their respective order, terminal posts and connections. A section of the cell jar, has also been removed to show the core, which consists of a set of positive and negative plates. The positive plates are inserted between the negative plates and are held in this position through their respective connections to the positive and negative terminal posts. The cell retainer-jars are made of zinc or rubber, and contain an acid and water solution called electrolyte into which the core is entirely immersed.
The Positive and Negative Plates.—The plates are held from direct contact with each other by a wood or rubber separator. These plates are formed with small sectional compartments called grids, into which a lead compound in paste form is pressed. The positive plates are made of lead oxide (zinc), and are dark gray in color, while the negative plates are made of pure lead, and are light gray in color.
Cells.—The cells are connected up in series, that is, the positive terminal post of one cell is connected to the negative terminal post of the next cell, forming a direct path through the cell arrangement. Each cell will retain a two-volt pressure until fully discharged. The voltage of a battery is determined by adding the number of two-volt cells that it contains.
Amperage.—The standard type of storage battery shown in Fig. 102 is composed of three two-volt cells which form a six-volt unit of sixty ampere hours, which means that a fully charged battery will deliver one ampere per hour for sixty hours. This, also, is about the rate of amperage consumed by the modern battery ignition system.
Electrolyte Solution.—The electrolyte solution is composed of a mixture of one part of sulphuric acid added to four to six parts of water. This solution is poured into the cell through the filler cap, until the plates are covered from one-fourth to one-half inch in depth as shown in Fig. 102.
Care should always be exercised to keep the air vent in the filler cap free from grease and dirt in order that the gases formed through evaporation may escape.
[182]
Battery Charging.—The cells are charged by passing a direct current through them, which causes a chemical action to take place as the current flows in, changing the nature of the positive and negative plates, thereby retaining a current force equal to the difference of the changed nature of the plates. The battery is entirely discharged when the plates become alike in nature.
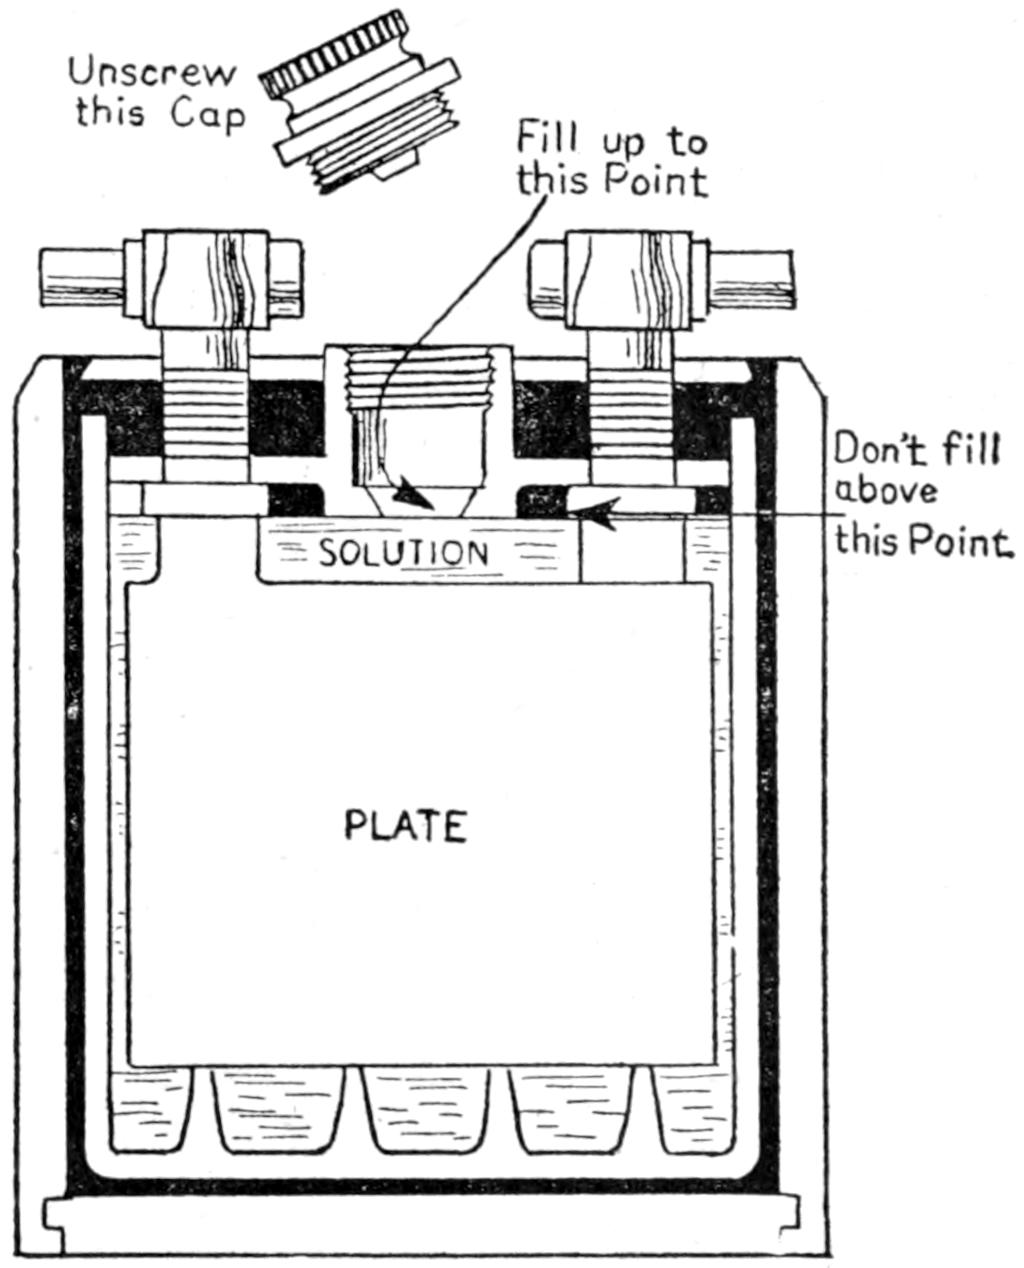
| Unscrew this Cap |
|||
| Fill up to this Point |
|||
| SOLUTION | Don’t fill above this Point |
||
| PLATE | |||
Fig. 102. Storage Battery, Sectional View
Storage Battery Care and Maintenance.—Regularly once every week during the summer, and every two weeks during the winter, add water to each of the three cells of the battery, until the tops of the plates are covered. Use water only; never add acid of any kind. Water for battery purposes should be distilled fresh rain or melted ice, and must be free from alkali, iron, or other impurities. The battery should be kept clean and free from dirt. Use only clean non-metallic vessels for handling and storing water for battery purposes.
The state of charge of a battery is indicated by the specific[183] gravity or density of the solution. Fig. 103 shows a hydrometer syringe used for taking specific gravity readings. The filler or vent plug in the top of the cell is removed and the rubber tube of the hydrometer syringe inserted into the cell so that the end of the tube is below the solution. Then squeeze the rubber bulb slowly, drawing the solution into the acid chamber until the hydrometer floats.
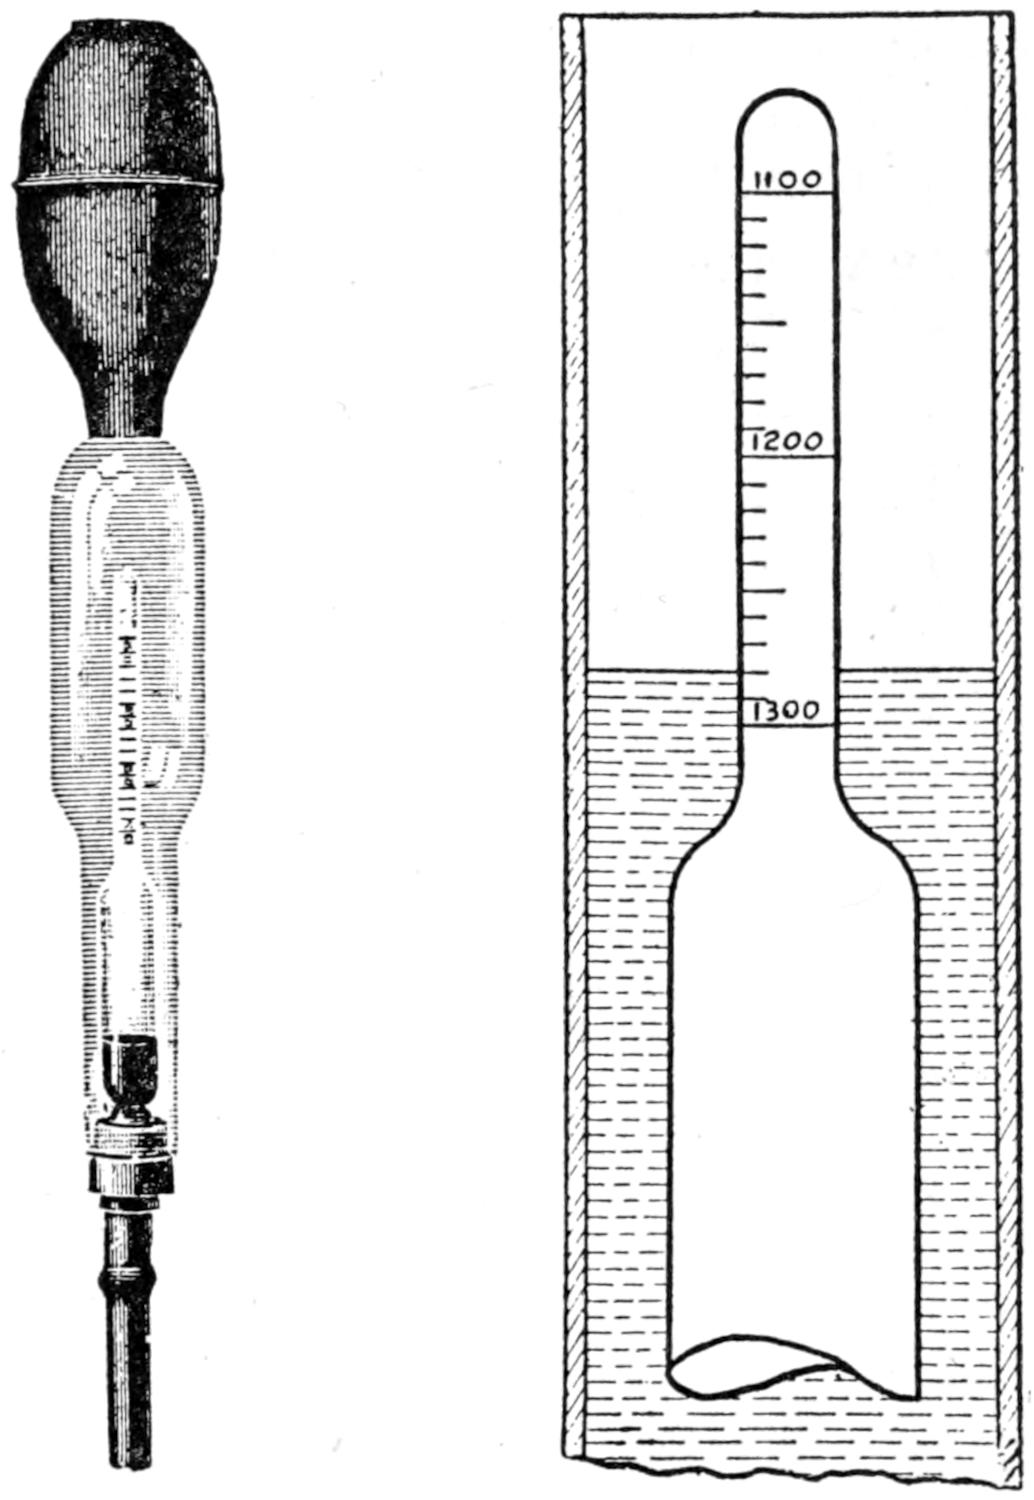
Fig. 103. Hydrometer Syringe
The reading on the graduator stem at the point where it emerges from the solution is the specific gravity or density of the solution.
Fig. 103 shows an enlarged section of the hydrometer floating so that the reading of the graduated scale is 1.280 at the point where it emerges from the solution. This is the specific gravity or density of the solution.
[184]
After testing, the solution must be returned to the cell from which it was taken.
Never take specific gravity readings immediately after adding water to the cells.
The specific gravity readings are expressed in “points,” thus the difference between 1.275 and 1.300 is 25 points.
When all the cells are in good condition the specific gravity will be approximately the same in all cells and the difference should not be greater than 25 to 30 points.
With a fully charged battery the specific gravity of the solution will be from 1.280 to 1.300.
Specific gravity readings above 1.200 indicates that the battery is more than half charged.
Specific gravity readings below 1.200, but above 1.150 indicates battery less than half charged.
Gravity below 1.150 indicates battery discharged or run down.
Should the gravity fall below 1.150 the gas motor should be given a long run with all lights turned off, to restore the battery.
This condition may result from leaving a car standing for prolonged periods with all lights in use and insufficient running of the gas motor in between these periods to replace the current taken to supply the lights.
When the specific gravity shows the battery to be half discharged, the lights should be used sparingly until the gravity rises to approximately 1.275.
If the specific gravity in one cell is much lower than that of the others, and if successive readings show the difference to be increasing, this indicates that the cell is not in good order.
If one cell regularly requires more water than the others (continually lowering the specific gravity), a leaky jar is indicated. Leaky jars should be replaced immediately.
If there is no leak and the specific gravity falls 50 to 75 points below that of the other cells in the battery, an internal short circuit is indicated and should be remedied.
[185]
Battery to Remain Idle.—Where a battery is to remain out of active service for a long period, it may be kept in good condition by giving it a freshening charge at least once a month, by running the gas motor idle.
When a battery has been out of service for some time it should be given a thorough charge before it is placed in service again.
If the gas motor cannot be run to give a freshening charge, the battery should be taken from the car and placed at a garage, which makes a business of charging storage batteries. It can be charged at least once a month. This charge should be 4 and 3⁄4 to 5 amperes for twenty-four hours.
Battery Freezing.—In order to avoid freezing, a battery should be kept in a fully charged condition, as a fully charged battery will not freeze except at extreme temperatures. As a battery discharges the specific gravity of the solution decreases, and the specific gravity of a fully discharged battery will be approximately 1.120. Batteries of this low gravity will freeze at 20° F. above zero, whereas, the density of the solution in a battery approximately three-quarters charged will be 1.260, and a solution of this density will not freeze until 60° F. below zero.
See Accumulator. Chapter 14, Electrical Dictionary—Function and Chemical Action.
[186]
Some definite knowledge of spark plug construction quality, and care, will be found very useful to the average motorist in purchasing new plugs, and keeping those in present use, in good condition. A good plug properly constructed should outlast the life of the motor. When purchasing new plugs, first examine the old plug and get one of the same length. This is very important as spark plugs are made in as many different lengths as required by high and low compression motors. High compression motors have a small low walled combustion chamber, while low compression motors usually have a spacious high wall chamber and require a longer plug, whereas if the long plug is used in the high compression motor it may be put out of commission by the ascending piston. Next determine the size of the plug and the gauge of the thread. The majority of motors use the 3⁄4 inch plug, with the S. A. E. thread, while a few still use the A. L. A. M. thread which is much finer gauged. Another point to be remembered is that it is an unwise expenditure to purchase cheap plugs because the intense heat and pressure that they are subjected to and required to stand, demands that they be made of the highest quality of material and workmanship.
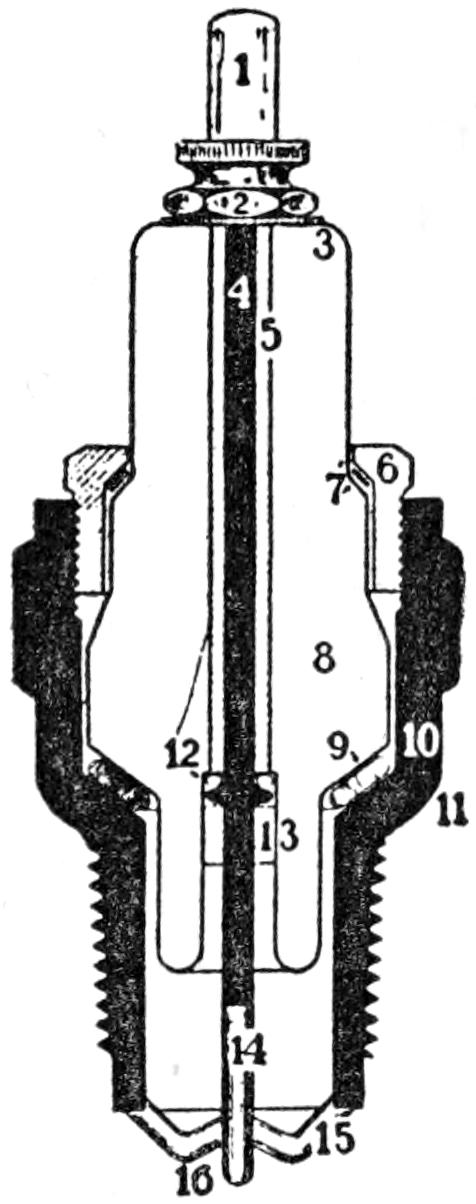
Fig. 104. Spark Plug
Fig. 104 shows the sectional construction of a spark plug costing from one dollar to one dollar and fifty cents. No. 1, the terminal, is designed to fit all connections. No. 2 nut which holds electroids firmly in place. No. 3 represents round edged shoulders which prevent the plug from short circuiting on the outside. No. 4 is a heavy electroid which will not break or burn. No. 5 is an extra heavy insulator which insures a good spark in case the outer porcelain insulator[187] becomes broken or cracked. No. 6 is a bushing which holds the insulator firmly in place from the top. No. 7 is a high compression washer which allows for upward expansion and makes an even seat for the bushing which holds the insulator in position. No. 8 is a massive porcelain insulator designed to withstand a high temperature without cracking. No. 9 is a copper asbestos washer that allows for the downward expansion of the insulator. No. 10 is the shell casting which holds and protects the insulator. No. 11 are rounded corners which will allow the plug to be screwed down flush without coming into contact with the curved walls of the cup containers. No. 12 is a high compression washer which prevents all leakage. No. 13 shows elastic cement which strengthens the lower construction of the insulator and prevents the compression from escaping through the center of the insulator. No. 14 is a hardened polished steel tipped electroid. No. 15 is a bent polished steel electroid dipped on each side of the spark in order to prevent oil from running down from the shell casting and closing the spark gap. No.[188] 16 represents an extended center electroid which prevents any oil that may have lodged on it from stopping at the spark gap.
Spark Plug Cleaning.—To insure a smooth running motor and a good spark, the spark plugs should be cleaned at thirty day intervals. It is not always necessary to disassemble them at this time as the carbon usually collects and bakes on the metal casting shell and can be removed by running a thin knife blade or finger nail file around the inner surface. However, when the insulator becomes pitted or carbon burnt the plug should be disassembled and the insulator wiped clean with a cloth dampened in kerosene. Never immerse the insulator in kerosene, as this will loosen the cement around the center electroid and cause the plug to leak compression. The shell may be immersed. It is then wiped dry and the inside surfaces scraped or rubbed with a piece of sand or emery paper to dislodge the carbon pits. After all parts have been thoroughly dried the plug is reassembled, using new washers.
[189]
The clutch used in automobile construction of the present day becomes a necessary part of the equipment upon the adoption by manufacturers of the progressive and selective types of sliding gear transmissions.
When the engine is started the clutch is “in,” that is, in contact with the flywheel, and all parts of the clutch revolve with it at the same speed. The shaft on which the clutch is mounted extends into the transmission gear case, but as the transmission gears are in a neutral position, the movement of the car is not affected.
When the car is to be started the clutch foot pedal (usually on the left side of the steering column) is pressed down. This throws the part attached to the drive shaft out of contact with the part attached to the flywheel, and in its backward movement it comes into contact with the clutch brake, as shown in Fig. 105, which stops it from revolving. The hand gear control lever is shifted into the first speed slot or position. The pressure on the foot pedal is then gradually released and the clutch is carried in by spring tension, and the car moves off at first speed.
Second Speed.—The clutch is thrown “out” after a brief lapse of three to five seconds has been allowed for the brake to slow up rotation in order that the gears to be meshed will be rotating at the same speed. The hand control lever is now shifted into the second speed slot, and the clutch pedals released.
High Speed or Direct Drive.—The clutch is thrown out and a few seconds allowed for it to slow up. The hand control lever is shifted into the high speed slot, which connects the[190] drive or propeller shaft directly to the clutch shaft and the car is driven at crank shaft speed when the clutch is let in.
Reverse.—The clutch is employed in the same manner. However, the motion of the car, the clutch and all gears must be at a stand still before the gear control lever is shifted to the reverse speed slot, as the gears in the transmission operate in the opposite direction.
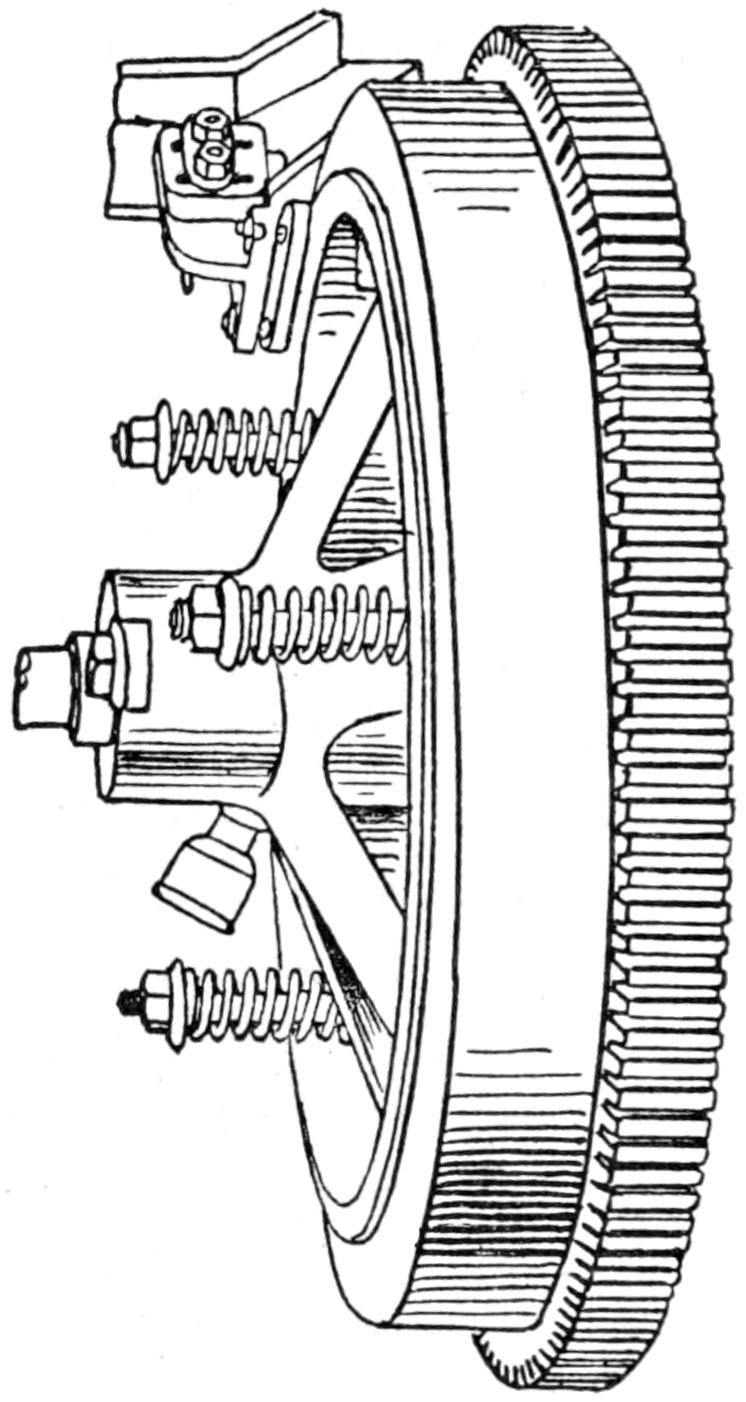
Fig. 105. Cone Clutch and Brake
A clutch always consists of two parts, one part which is attached to the flywheel, and another part which operates on or against the part formed by the flywheel.
While there are five to seven different types of clutches, but two types are used by the majority of automobile manufacturers. The single or multiple disc clutch is used almost exclusively[191] in unit power plant construction, while the cone type is used when the transmission is carried in a separate unit.
Fig. 105 shows the cone clutch with its three adjusting springs and clutch brake. The cone is shown in a lighter color than the flywheel. It has a funnel-shaped surface with a slant or angle of from thirty to thirty-eight degrees. The slanted surface is faced with leather and fits into the rim of the flywheel which has been ground to the same slant. The cone clutch is not attached to the flywheel but forms a part and revolves with it when the faces are in contact. The cone is carried on a separate short shaft which extends into the transmission case. This shaft carries a steel plate or disc at the front end to which the cone which slides on the shaft is anchored by studs extending from the plate through the cone. The studs usually number three or four and carry a two to three inch spring on the outer end back of the cone. The cone is backed out of contact with the flywheel face, against the tension of these springs, in a toggle leverage connected to the foot pedal. The clutch brake shown in Fig. 105 is adjustable and makes contact with the rim of the cone retarding the rotation when the cone is drawn out of contact with the flywheel.
Cone Clutch Care.—The leather face of the cone should receive 5 to 7 drops of Neat’s foot oil every thirty days. A grease cup will be found on the cone which provides lubrication for the shaft on which the cone slides. This should be given a half turn every second day.
Cone Clutch Adjustment.—The three studs extending through the cone, have a lock nut adjustment on the outer end, and the cone may be adjusted up to make a stronger face contact by loosening the lock nut and turning the inner nut to the right. This strengthens the spring tension and causes the contact faces to set more firmly. This adjustment, however, should take place only when clutch slipping is noted. Only a little movement of the nuts is necessary, and all three or four nuts should be taken up a like amount in order to[192] prevent the cone from running out of line or making uneven contact.
Fig. 106 shows the multiple disc clutch used almost exclusively in connection with the unit power plant. This type of clutch consists of a set of plates attached and driven by the flywheel, and another set of plates or thin discs attached to the drive shaft. The drive shaft plates operate between the flywheel plates. The contact is frictional and the plates are held together by spring tension.
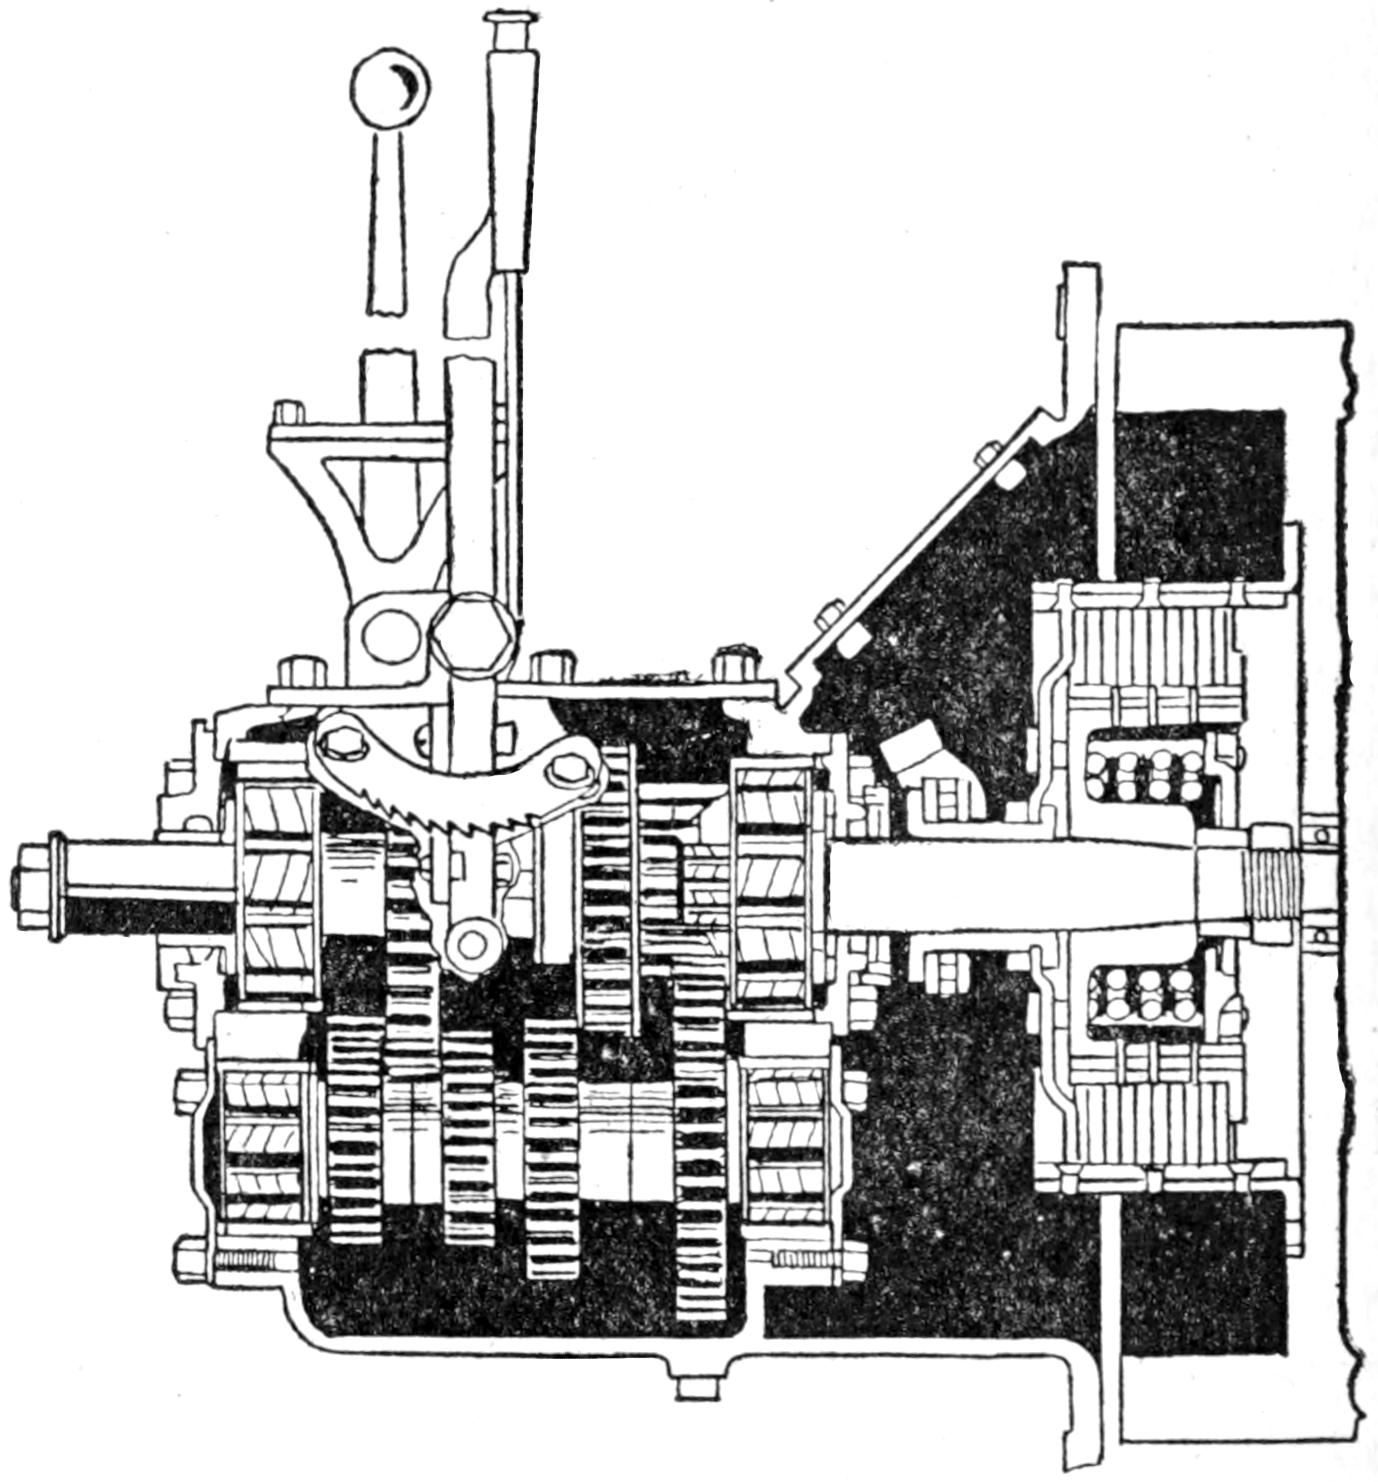
Fig. 106. Multi-Disc Unit Power Plant, Clutch and Transmission
The new Borg and Beck Clutch is provided with a thrust bearing at the inner end of the clutch sleeve, which does away with the friction between the parts, and eliminates the need of a clutch brake.
[193]
The clutch is mounted in the customary way in a housing which contains both the flywheel and the clutch.
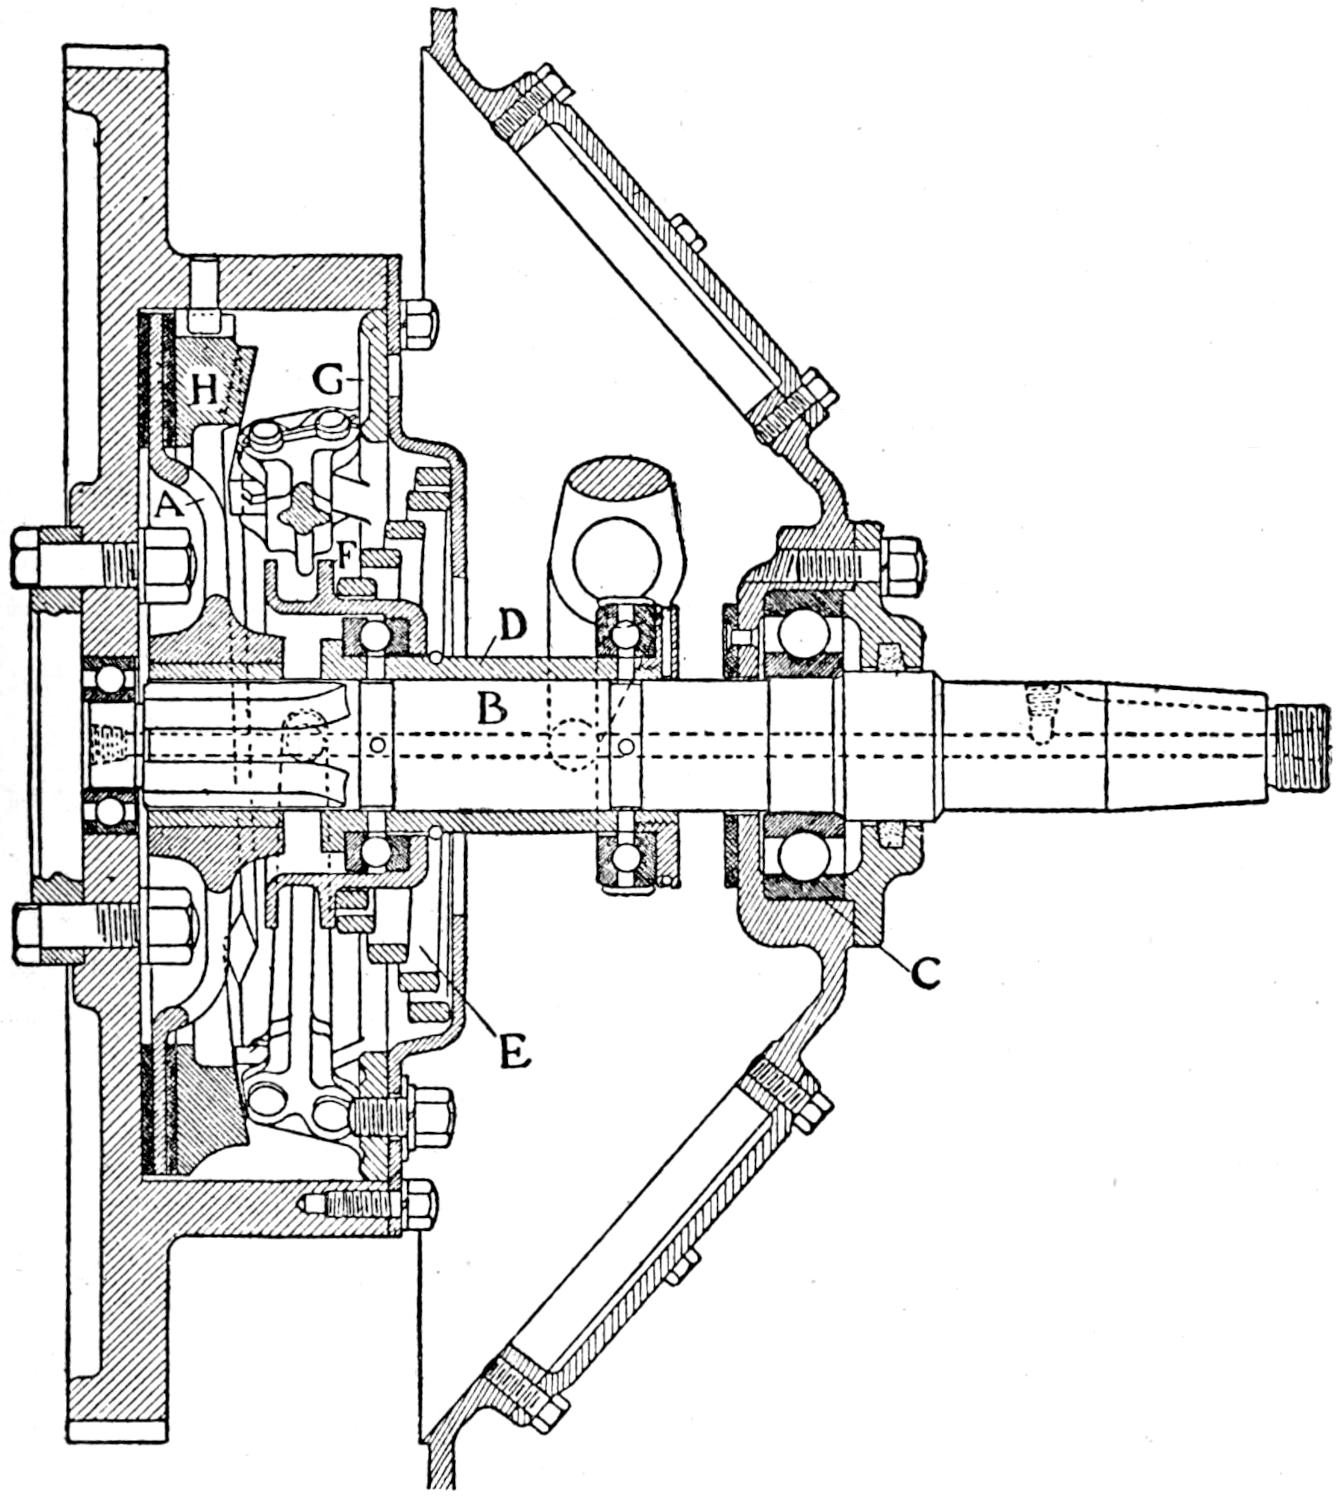
Fig. 107. Borg and Beck Clutch
Referring to the sectional view, Fig. 107, the action of the clutch is clear if it is kept in mind that among the rotatable parts only the driven group, comprising of the disk A and the shaft B, can stand still when the flywheel is running. All the other rotatable parts are anchored to the flywheel, and must revolve and drive with the latter. The clutch brake was formerly mounted at the inner end of the clutch shaft, and has been replaced by the thrust bearing shown at C.
[194]
When the clutch is disengaged there is no friction between the shaft B, and the throw out sleeve D. The thrust bearing takes the rotating drag of the clutch shaft, thereby eliminating the necessity for a brake to check the spinning action. The friction and power action is readily understood as, when the clutch is thrown in, all the rotating parts are friction locked into a single combination and revolve as one with the flywheel.
The power of the release clutch spring E, acting through the throwout-collar F, and the bell crank pivot G, drives the thrust shoes outwardly with a lever wedge toggle combination of powers against the overhanging, inward beveled face to the thrust ring H, since the parts on which they are mounted are backed against the cover wall or rigid end of the clutch casing. It therefore follows that the full part shafting effect of the thrust is communicated to the thrust ring H, and the latter, in being driven hard toward the flywheel, sets up between itself and the inner casing wall a friction grip sufficiently powerful to stop the slippage of the asbestos rings upon the polished faces of the discs, thus giving the drive to the car.
When the pedal is depressed to release the clutch, the retracing parts telescope the coil of the spring E, until it occupies nearly a single plane. The withdrawing parts also release the clutch shoes a sufficient distance from the face of the thrust ring H to permit the latter, together with its companion friction ring, to back away from the disc, thus breaking the friction grip and permitting it to come to a stop, while the flywheel and the parts of the clutch anchored to it are left free to revolve idly.
The release disc A is so light that its spinning does not continue except for a very short time and does not offer any clashing action on the gears. The full thrust of the spring transmitted through the powerful lever toggle action to the friction grip parts is always sufficient to lock the driving flywheel parts, and the driven disc, into a fixed nonslipping relation for a full driving action; but it is still always within control of the driver, through the foot lever, to let the clutch[195] into engagement by degrees, and thus by a gradual increase of the friction grip, gradually overcome the starting slippage.
Adjustments.—Taking up adjustments are provided by means of bolts acting through adjustment slots in the cover. When the bolts are loosened and shifted in their cover slots, they control and shift with them an adjustment ring which brings all the shoes to new seats against the nonslipping thrust ring and these seats being farther up the inclines of the tapered ring, the ring is necessarily thrust much farther toward the other friction parts, thus compensating the wear.
The adjustment for throw-out can be controlled by taking up the friction grip adjustment, the latter being identical with the take up adjustment just described, as these too are taken care of by the same mechanical means to make the adjustment on the clutch.
Disc Clutch Cleaning; Dry Plate.—Dry plate clutches do not require any oil, except that the grease cups (which provide lubrication for the sleeve shaft and bearings) be filled weekly and given a half turn every second day. The housing and plates should be cleaned whenever slipping becomes noticeable. To do this remove the cover from the housing, and the drain plug from the bottom, hold the clutch out, and squirt kerosene over the plates with a dope gun. This will remove the grease from the plates, and also any dirt or grit that may have lodged in the bottom of the housing.
Disc Clutch Cleaning; Wet Plate.—The wet plate clutch is cleaned in the same manner as the dry plate, except that the plug is first removed from the bottom of the housing and the oil drained off before using the kerosene. After the plates and housing have been cleaned, replace the drain plug and fill the housing up to the clutch shaft with a heavy cylinder oil.
Cone clutches are always in perfect condition when leaving the factory and should not require any further attention during the first season or for eight to ten thousand miles of service.
[196]
After that it is usually necessary to replace the leather, or reline the cone, which makes it as good and as serviceable as when it was new.
New Clutch Leathers.—New clutch leathers may be obtained from the manufacturer, or from the service station, by giving the number and model of the car. New clutch leathers obtained in this way are cut, shaped, and have the ends cemented, and are ready to be slipped on or off, over the cone and riveted into place. However, the leather must first be soaked in water or Neat’s foot oil to make it soft and pliable. This allows it to be driven or stretched over the cone. The rivets must be counter-sunk to prevent the heads from extending above the top surface of the leather, which would cause the clutch to “grab” or jerk upon being engaged.

Fig. 108. Cone Clutch Leathers—Pattern—Cutting
Measuring and Cutting Clutch Leathers.—Whenever possible it is advisable to purchase clutch leathers cut and cemented, ready to put on. But in case of emergency or when the proper size cannot be obtained, a new leather may be cut from a piece of leather three-sixteenth of an inch in thickness using the old leather as a pattern. But in case the old leather is not available to serve as a pattern, proceed in the following manner which is illustrated in Fig. 108, which shows how to make an exact pattern out of paper without going into technicalities. Take a piece of heavy wrapping paper, forty or fifty inches long and twenty inches wide, lay the cone on the left hand edge about one inch from the bottom of the sheet, roll the cone keeping the paper flat on the face until[197] the starting edge meets the sheet, hold the wrapped cone and draw a line around the inside of the paper, letting the pencil rest against the edge of the large diameter of the cone; repeat at the small end of the cone, then draw a line parallel to the starting edge where it meets the sheet. This will give you a pattern similar to that shown with the dotted lines in Fig. 108.
Now secure a piece of unstretchable leather (belting is preferable). This belting or leather should be slightly longer than the pattern you have just completed and sufficiently wide to embrace the curve; about twelve to fifteen inches wide for the average clutch will be sufficient, and about three-sixteenths of an inch thick.
Cut out the paper pattern and lay it on the leather belting as shown in Fig. 108, and cut out with a sharp knife, leaving one-half inch over at each end as a safety measure and for mitering the joints. Fit this leather to the cone and cut the ends the exact size, miter the ends and cement with a good leather cement. Be sure that you have the rough or flesh side of the new facing on the outside; rivet it firmly in place and smooth down the rough spots with a piece of coarse sand paper, clean off all dirt, grease, and grit, especially the grit from the sand paper, as this will grind and score the smooth surface of the flywheel and cause clutch slipping. Paint the leather with Neat’s foot oil and the clutch is ready to be assembled and adjusted.
Cone Clutch Cleaning.—Cone clutches usually do not require any special care or cleaning unless oil or grease, other than (Neat’s foot or castor) are applied accidentally or by mistake to the leather face. If this happens the grease must be thoroughly cleaned off of the leather face with kerosene or gasoline otherwise the clutch will not hold. After the clutch leather has been washed allow it to dry for twenty minutes and apply a thin coat of Neat’s foot oil evenly on the leather face before reassembling the clutch.
[198]
Transmission came into use with the application or adoption of the internal combustion engine as a factor in motor car propulsion.
As this type of engine develops its power by a rapid succession of explosions in the combustion chambers, each explosion delivers an impulse or power stroke to the piston, which in turn sets the crank shaft and flywheel to revolving. The momentum gathered by the crank shaft and flywheel may therefore be termed the power for duty, or in other words, unless there is momentum or carrying motion at this point, there will be little or no power for duty.
This brings us up to a point where it is easy to see that a rapid series of explosions are necessary to gain carrying momentum or power to move a dead weight load. As this motional power could not be applied to the load without serious damage to the gears and bearings, it was necessary to invent a device to gradually transmit or apply the power to the movable load by graduating the leverage. This resulted in the development of the automobile transmission. The natural way of doing this at first seemed to be by applying the power to the load by frictional slippage. Many ingenious devices of this sort were tried out without much success until the driving and driven disc type made its appearance.
Fig. 109 shows the driving and driven disc type of friction transmission. This type of transmission is not being used by any of the present day manufacturers of automobiles, but may still be found on some of the three and four-year-old models still in operation.
A, the drive shaft, is squared and slides backward a distance[199] of three inches through a squared sleeve extending from the hub of the flywheel. The action of this shaft is controlled by a leverage arrangement to a foot pedal. B, the steel plate driving disc, is attached to the end of shaft A, and drives C, when held back against it by pressure on the foot pedal. Disc C can be slid in any position on the jack or cross shaft D, and is controlled by a leverage arrangement connected to a hand lever. The various speeds are obtained by sliding disc C into different positions and contacts on the left side of disc B. Reverse speeds are obtained by sliding disc C over center where it forms contact on the right side of B and is driven in an opposite direction.
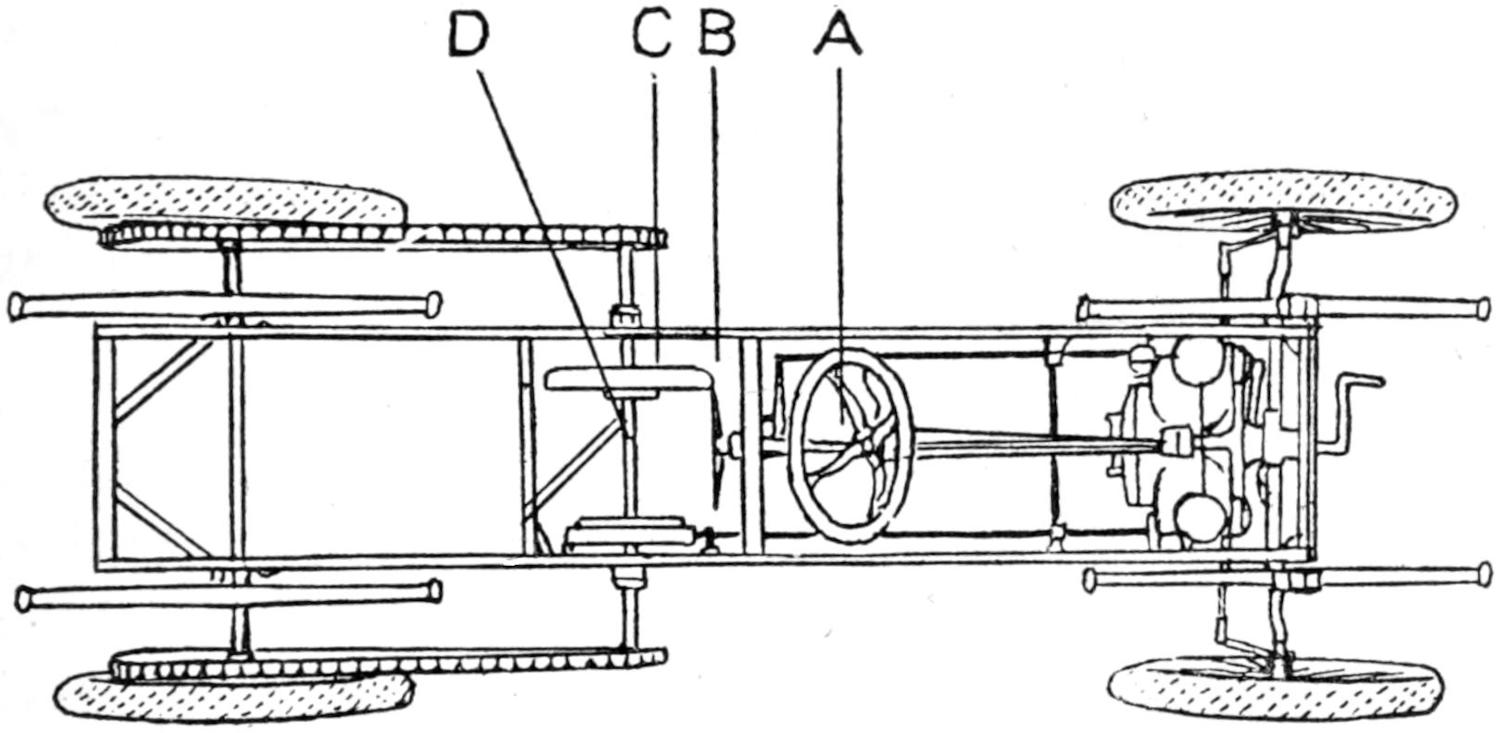
Fig. 109. Friction Transmission
The Planetary Type of Transmission.—The planetary type of transmission made its appearance along about the same time as the friction type. The power is transmitted to the load through a set of reduction gears arranged in a drum. A king gear on the engine shaft operates a set of small gears in the drum. These small gears reduce the leverage speed and transmit the power to the drive shaft, a band similar to that used on brakes is fitted to the face of the drum. When this drum containing the reduction gears is not in use it turns at crank shaft speed. The speed is used by pressing a foot pedal which tightens the brake band and holds the drum stationary, thereby forcing the smaller gears into action.
[200]
Planetary transmissions are shown and fully explained in a later chapter. (See Model T Ford Supplement.)
The Sliding Gear Transmission.—This type of transmission has proved very successful, and is used by 98 per cent of the present day automobile manufacturers. This type of transmission made its first appearance with a progressive gear shift, that is, it was necessary to proceed through one speed or set of gears to engage the next. This arrangement caused considerable confusion at times, as it was necessary to reshift the gears back through these speeds to attain neutral, when the car was brought to a stand still.
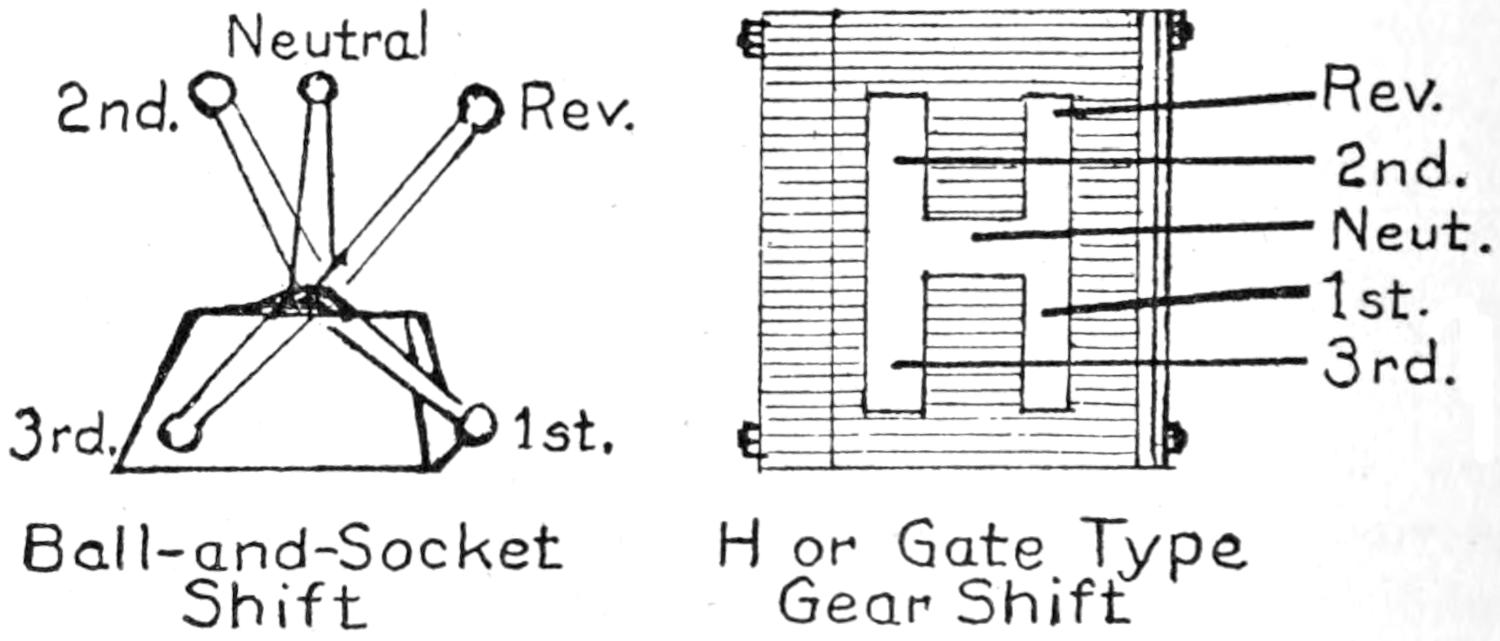
| Neutral | ||||
| 2nd. | Rev. | Rev. | ||
| 2nd. | ||||
| Neut. | ||||
| 1st. | ||||
| 3rd. | ||||
| 3rd. | 1st. | |||
| Ball-and-Socket Shift |
H or Gate Type Gear Shift |
|||
Fig. 110. Selective Type of Gear Shifts
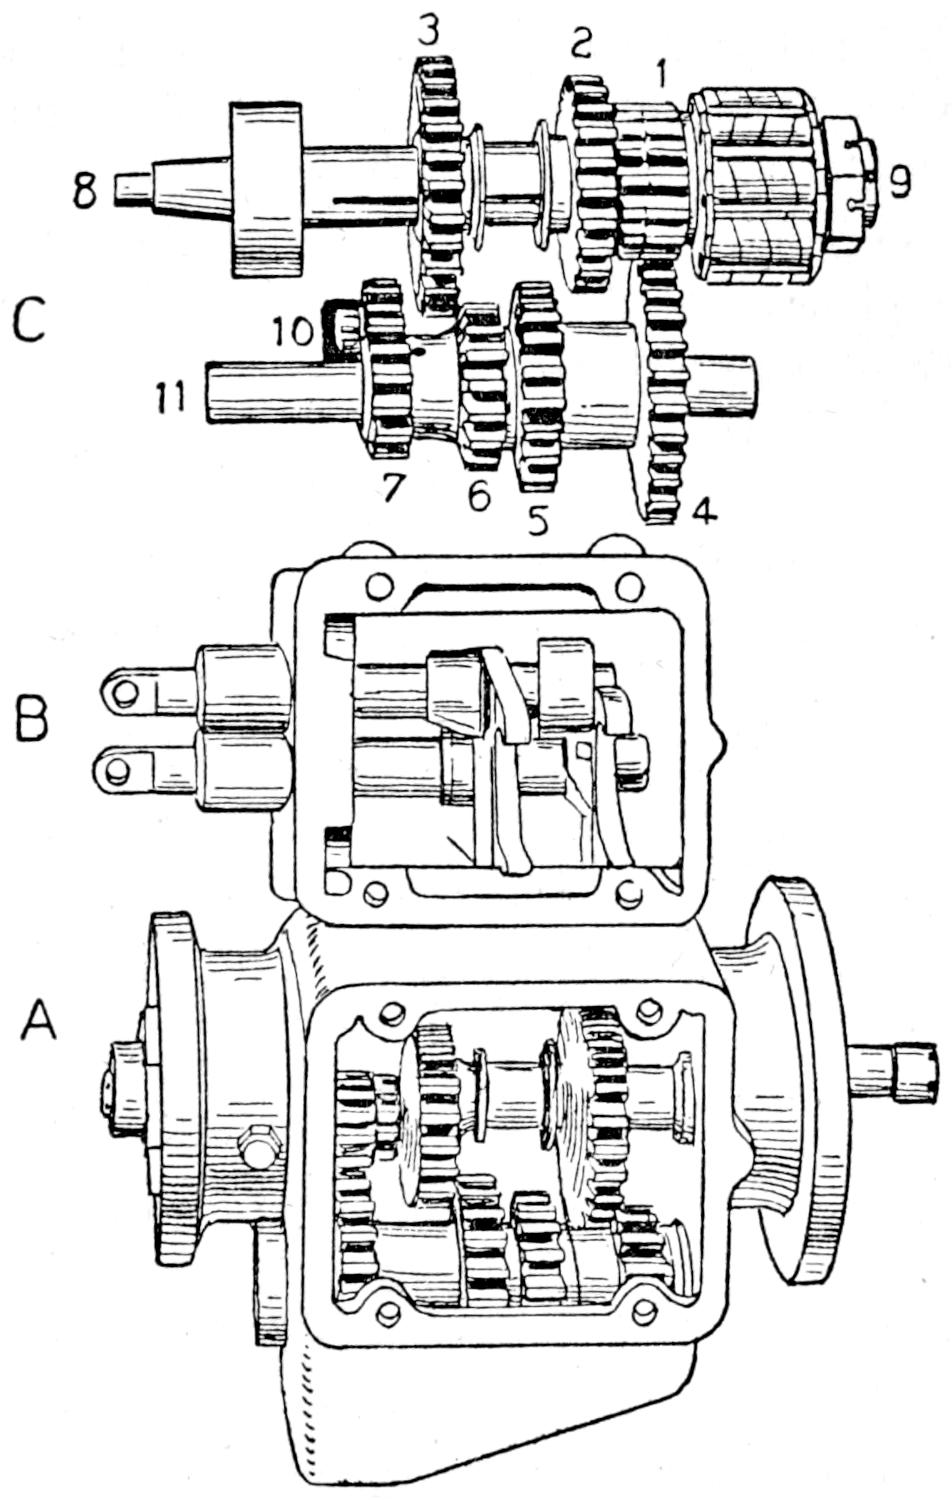
Fig. 111. Sliding Gear Transmission—Sectional View
The control lever operated on a straight forward and backward direction on a quadrant, having a notch for each speed change. This gear shifting arrangement has also been abandoned by manufacturers in favor of the selective gear shift which is arranged so that the driver may choose any speed at will. Fig. 110 shows the control lever which operates in a frame resembling the block letter H and the ball and socket shift which operates in the same manner. Fig. 111 shows the complete assembly of the selective sliding gear transmission. The sliding gears are arranged on a separate core and are operated by an individual throw fork, which seats in a groove on the shoulder of the gear. Low and reverse are always opposite each other on the same core. High and intermediate are located on another core, and are controlled by another individual[201] shifting fork. The gear box arrangement (Fig. A) shows the cast gear box which contains the gears, shafts, and bearings, and a roomy compartment below the gears in which grease is carried, as the gears in this type of transmission always operate in an oil bath which prevents excessive wear and causes them to operate noiselessly. Fig. B, the gear case cover, contains the slotted sliding shafts, to which the gear in shifting forks are attached. Fig. C shows the arrangement of the gears in the case and explains their operation. Gear No. 1 is attached to the extreme end of the engine shaft, and is continually engaged with gear No. 4, which causes the[202] counter shaft No. 11, containing the stationery gears, to revolve whenever the engine shaft No. 9 is in operation. The drive shaft No. 8 does not run straight through and connect with No. 9, the engine shaft, but ends and takes its bearing in the core of gear No. 1. Consequently, when the gears on the drive shaft are slid into mesh with the gears on the counter shaft, variable speeds are attained. Low speed is obtained by sliding gear No. 3 into mesh with gear No. 6; second or intermediate is obtained by meshing gears No. 2 and gear No. 5.
High, or engine speed, is obtained by sliding gear No. 2 which is cored and shouldered over the end of gear No. 1, making a direct connection of the drive shaft No. 8, and the engine shaft No. 9, at this point. Reverse is obtained by meshing gear No. 3 on the drive shaft with gear No. 10, which is an extra or idle gear mounted on a stub shaft on the rear of the gear case. Idle gear No. 10 is always in mesh with gear No. 7, on the counter shaft.
Functional operation engine shafts always turn to the right or clockwise, which causes the counter shaft to turn to the left or anti-clockwise. This causes the drive shaft to turn to the right when low or intermediate speed gears are engaged, driving the car forward. Reverse, is obtained by the use of an extra gear in this way. Counter shaft turning to the left turns idle gear to the right, and this gear turning to the right, turns gear on the drive shaft to the left, and causes the car to be driven in a backward direction. In the unit power plant shown in Fig. 112, the operation and gear shifting are identical with that of the separate gear case. The crank case of the motor is either extended or another case attached to the motor which has a compartment arranged to contain the clutch and transmission gears. This arrangement results in compactness, and does away with the supports required to carry the transmission separately.
Transmission Care.—The transmission should be thoroughly cleaned and refilled with fresh grease or heavy oil once in every thousand miles that the car is driven to prevent excessive wear and much noise. To clean, remove the plug at the bottom[203] of the case, and the cover from the top. After the old oil has drained out, replace the plug, fill the case half full of kerosene, replace the cover, and let the motor run for a few minutes with the gears in neutral. Drain the kerosene off, and wash the case and gears off with a paint brush which has been dipped into fresh kerosene. Then examine the gears for blunt burrs and the bearings for looseness. If the gears are burred or chipped, file, or grind them down to level. If the bearings are loose they will have to be replaced, as the bearings used to carry both the counter and drive shaft are seldom provided with means of adjusting. These bearings, however, will not show wear for years if properly cared for. Next, see that the gear case is free from grit and filings, replace the drain plug, and fill the gear case to within one half inch from the drive or propeller shaft with a light graphite grease or heavy oil, and replace the cover using a new gasket.
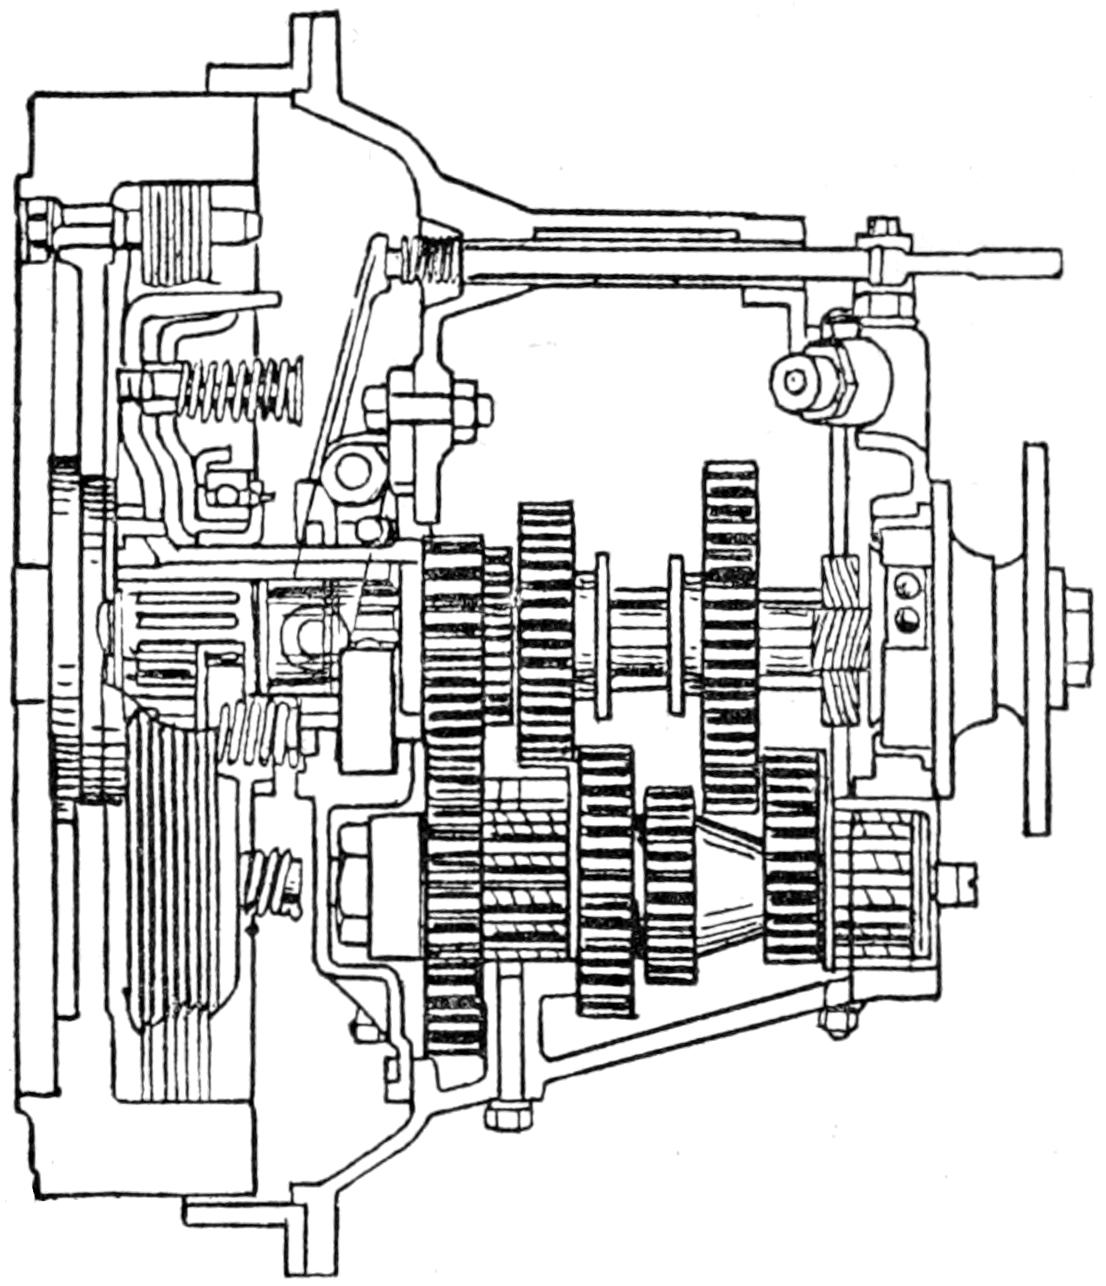
Fig. 112. Clutch and Transmission Assembly—Unit Power Plant
[204]
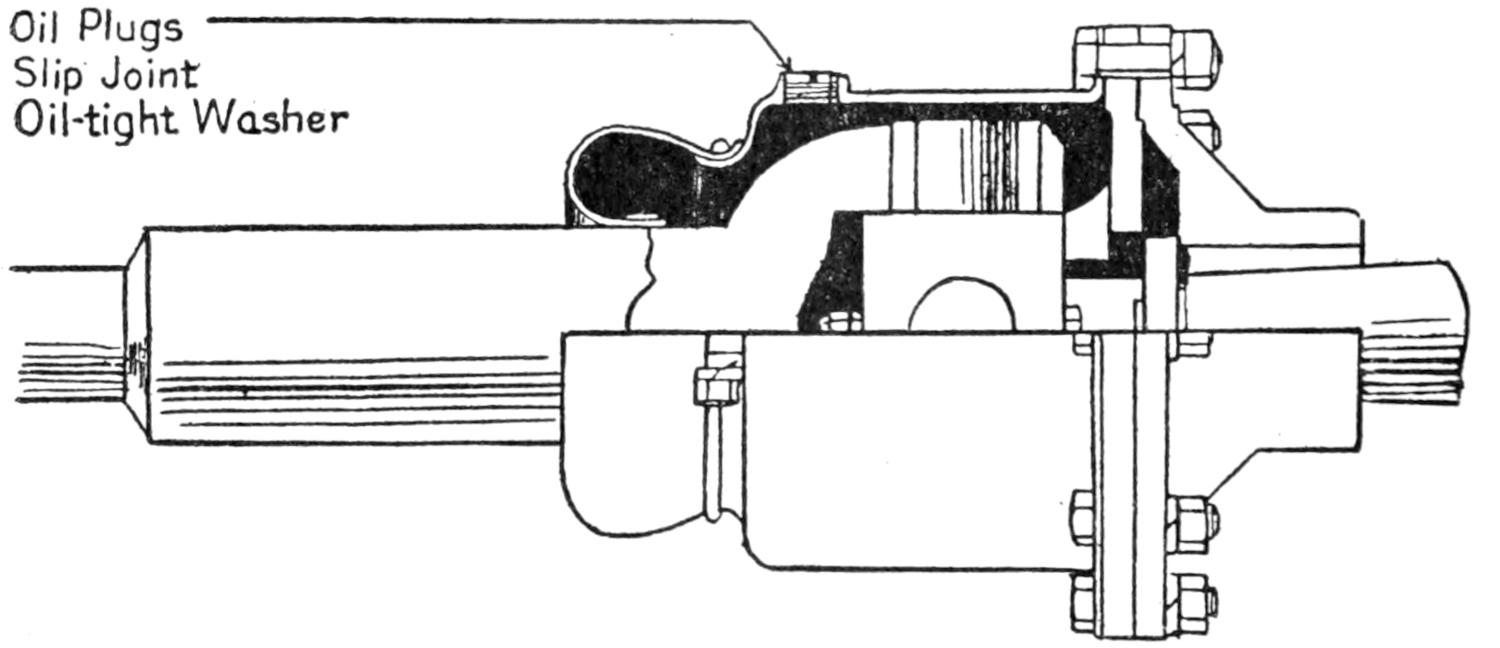
Oil Plugs
Slip Joint
Oil-tight Washer
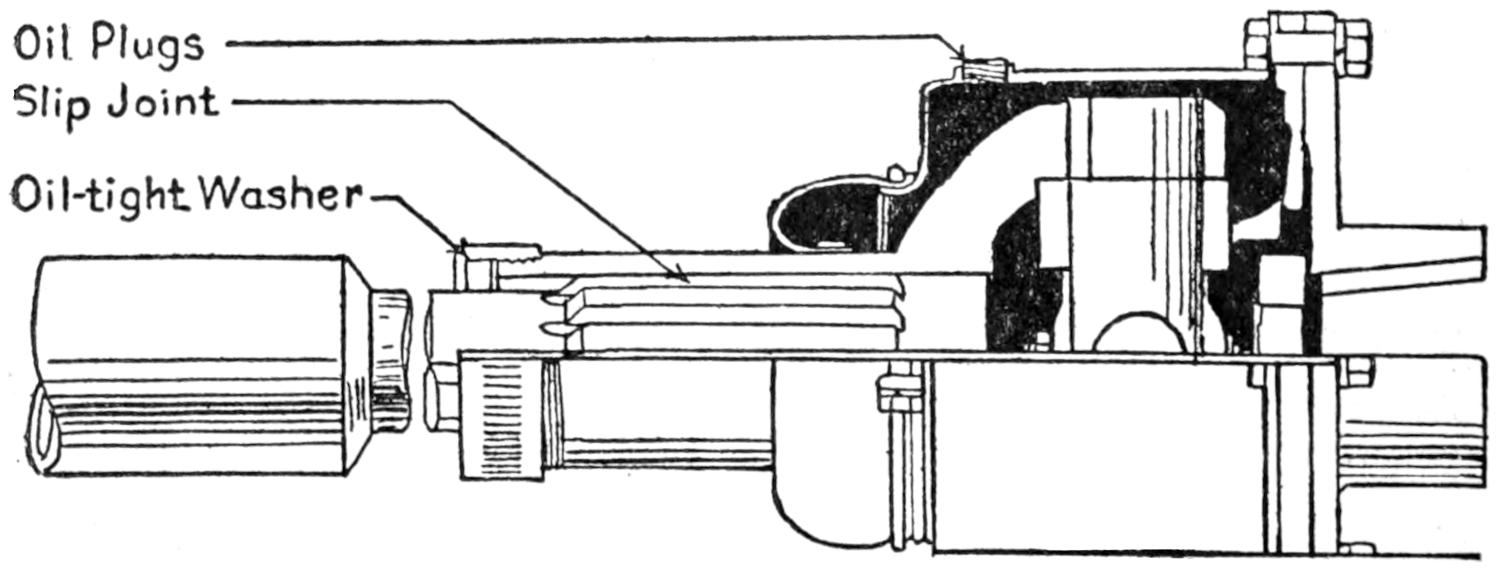
Oil Plugs
Slip Joint
Oil-tight Washer
Fig. 113. Slip Joint and Universal
Universal joints were designed to transmit power from one shaft to another at constantly changing angles. An automobile engine cannot be hung at the low level required to allow straight line drive, as it would have to be carried from six to eight inches lower than it is in present construction, and this would allow very little road clearance if any. And as the rear axle receives the power transmitted to it at a constantly changing level due to torque and spring action, it is necessary[205] to have a flexible coupling on the propeller shaft between the engine and the rear axle to prevent the gears and bearings from being damaged from distortion.
Universal joints are made of the best steel or bronze, do not require any adjusting, and will outlast the life of a car, providing they are not driven at too great an angle, and are kept well lubricated. A metal shell or leather boot is fitted to the joint to carry and provide constant lubrication. This boot or container should be kept well-packed with a heavy oil, (600-W steam oil, Whitemore’s compound or a light graphite grease).
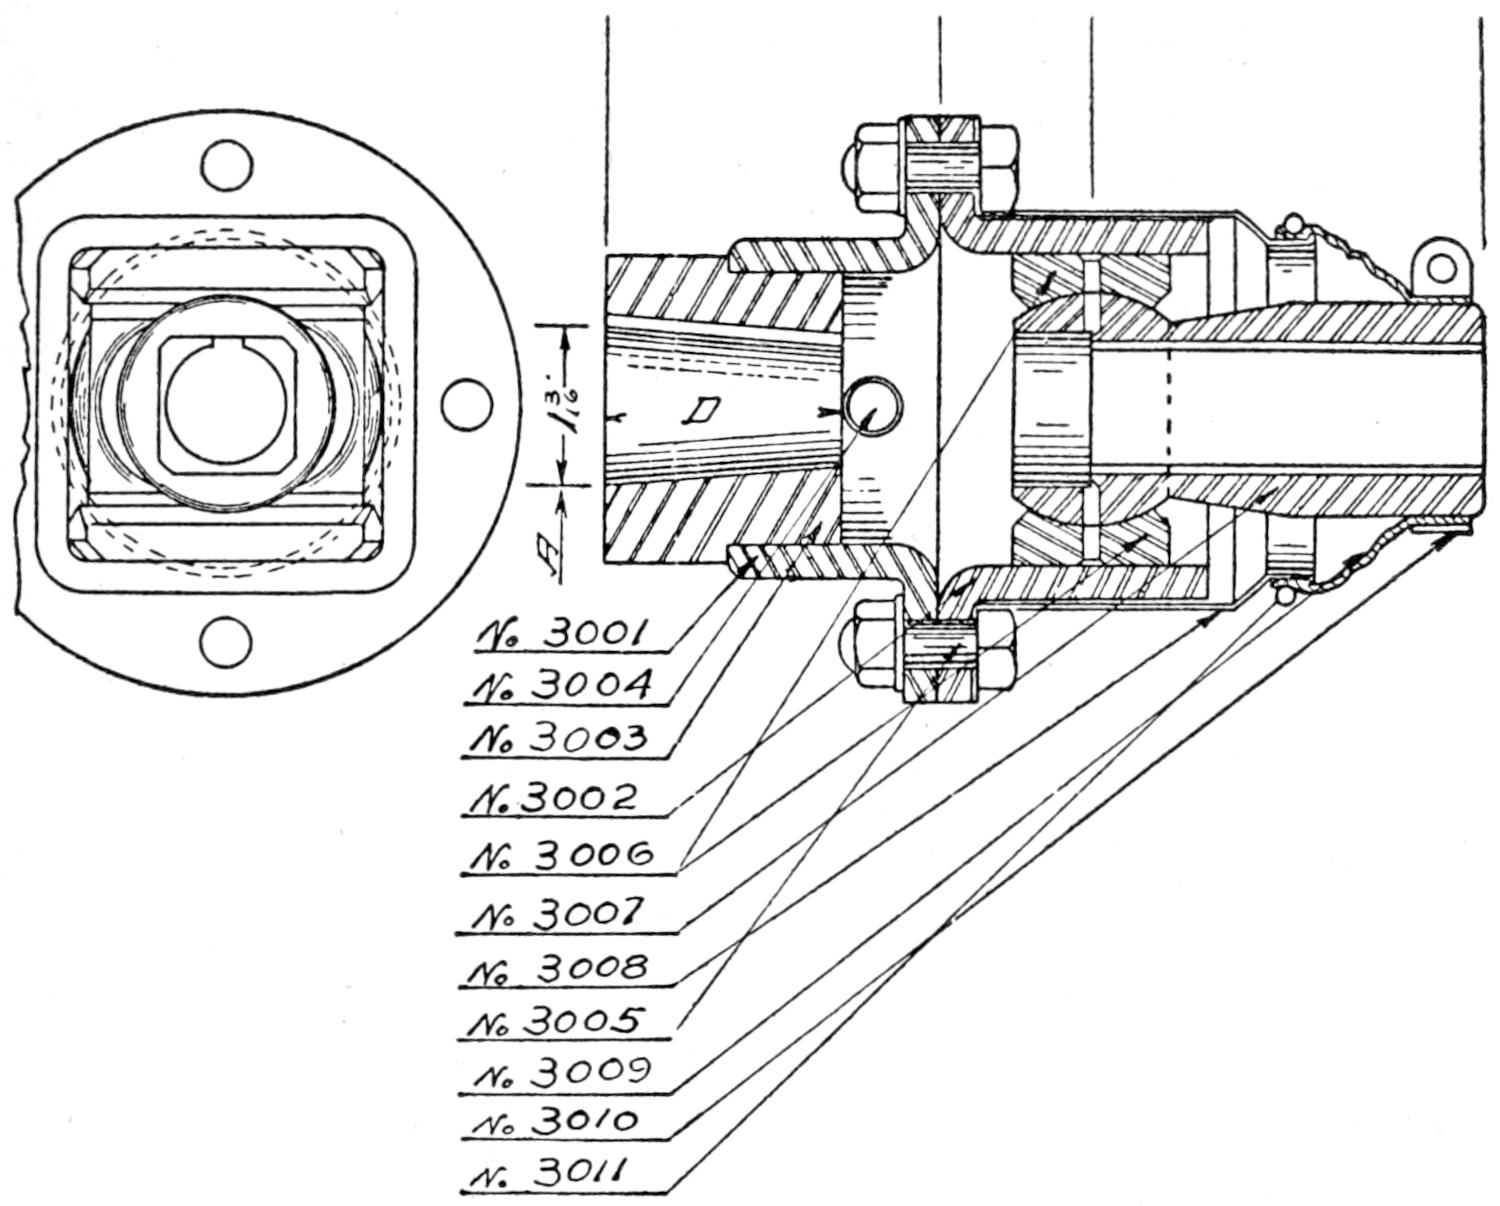
No 3001
No 3004
No 3003
No 3002
No 3006
No 3007
No 3008
No 3005
No 3009
No 3010
No 3011
Fig. 114. Universal-Joint Construction Diagram
Remove the oil plug every thirty days and pack the housing. Use a dope or oil gun to force in the lubricant. The housing should be subjected to regular inspections quite frequently as the lubricant often escapes from the end boot due to distortion and wear.
[206]
Fig. 113 shows the rigid construction of a heavy duty universal joint and slip joint. The ends of the shafts are yoked and fitted to a swivel cross block; the leather boot follows the angle of the shaft and makes the housing oil tight.
Fig. 114 shows a sectional view of the “Standard” universal joint, manufactured by the Universal Machine Co., of Bowling Green, Ohio. The left-hand cut shows the forward section and tapered shaft seat. This joint gives a combined universal action and slip on a two inch square. All points are concentric and always in balance. The bearings are provided with grooves and holes for lubrication. A metal and leather boot is also provided for protection, and as a grease retainer. And owing to the flange type there are but four bolts to remove in order to disassemble this joint.
The names of the various parts are given according to corresponding numbers.
[207]
Differential gears were designed to allow for equalization of the power strain transmitted to the rear axles.
The rotary movement is transmitted to the axles joining the wheels by a bevel gear, which if simple would drive both wheels at the same speed. This is satisfactory on the “straight ahead” drive, but it is clear that in turning a corner the car is describing a portion of a circle, and the inner wheel having a smaller circumference to traverse, must go at less speed than the outer. The differential gear was devised to allow for this difference in power stresses.
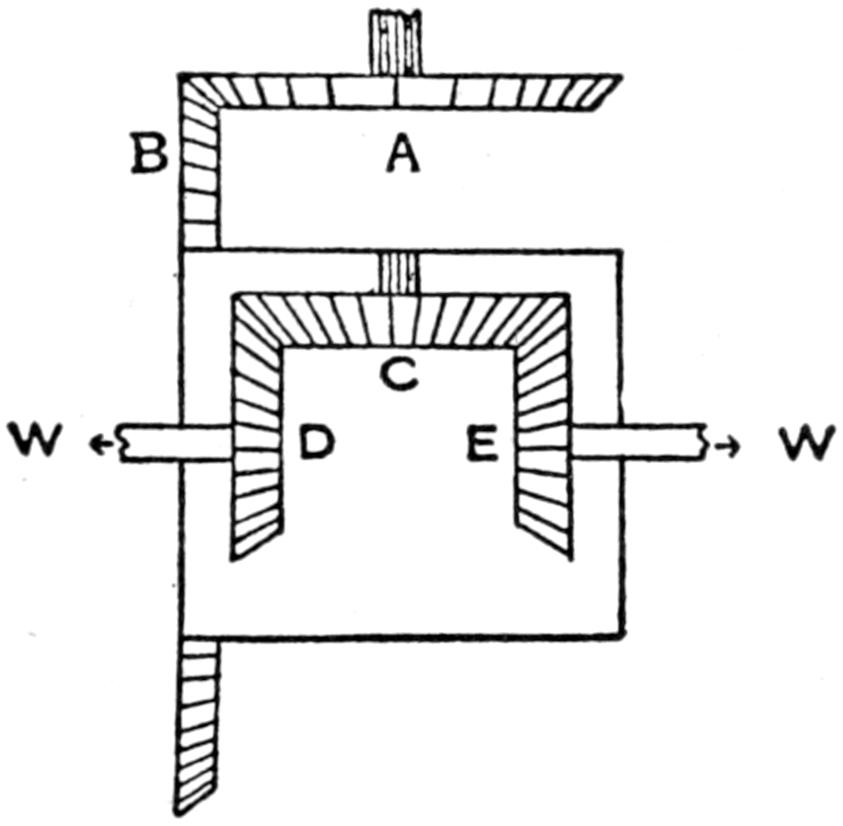
Fig. 115. Differential Action Diagram
It is perhaps the functional action more than the simple mechanism that one finds the most confusion about. The diagram given in Fig. 115 shows how the functional action is mechanically carried out.
In the first place, each wheel, W, is fixed firmly to an independent axle turned by pinions, D and E. These pinions[208] are connected by another, C. Now if D turns, E will rotate in the opposite direction due to the action of C. If D and E are rotating in the same direction at the same speed, C will merely lock with them and not rotate. If now, D accelerates slightly, C will turn, slowly retarding E, while if E accelerates, C will turn slowly in the opposite direction retarding D. This is precisely what is required in turning a corner. Now fix these in a box, driven as a whole by the bevel or ring gear B driven by the driving pinion gear A. When the car is on the straight ahead drive D, C, E are locked. C does not rotate and the three act as a single axle. As the car turns, C turns slowly, acted upon by the outer wheel, and gives the differential action.
The Worm Gear Drive.—The worm gear drive differential action is practically the same as the bevel gear action, the only difference being that there is a worm gear on the end of[209] the drive shaft which engages with a helical toothed gear, which takes the place of the bevel gear B.
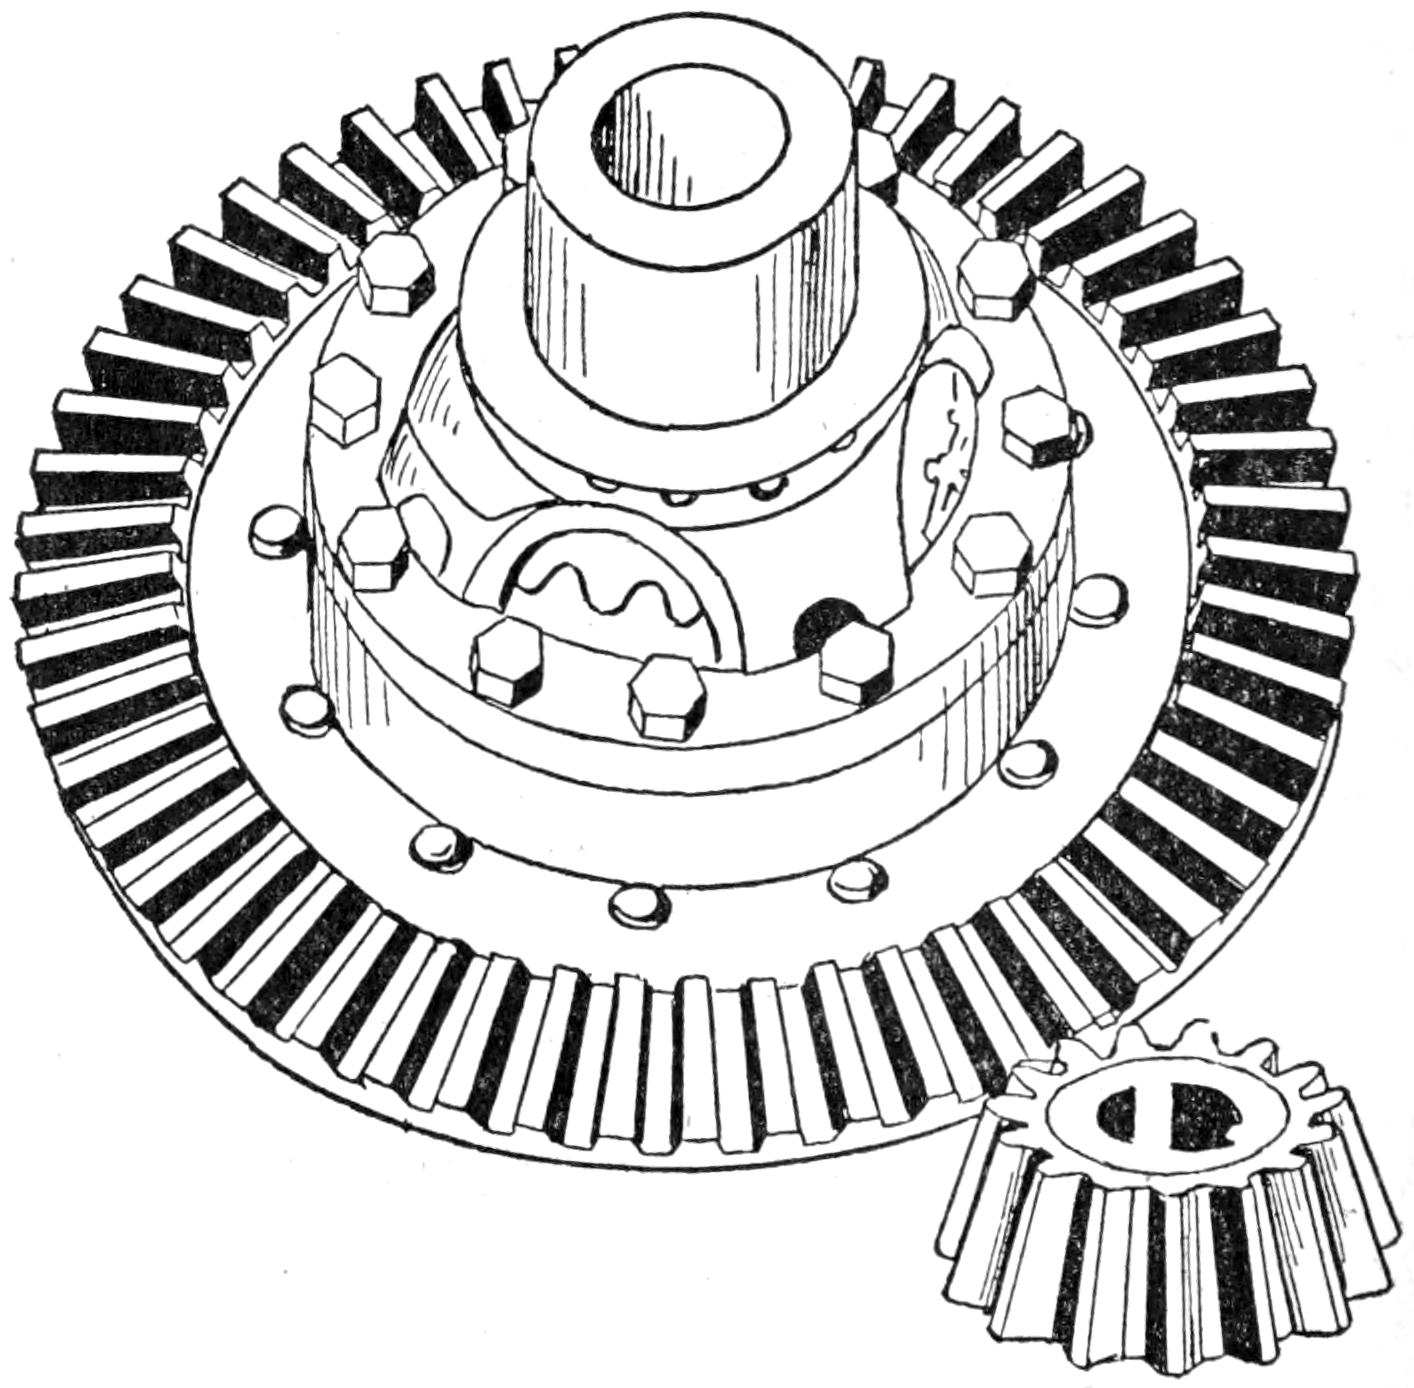
Fig. 116. Differential Assembly
Fig. 116 shows the differential gear assembly which is carried by a set of bearings. These bearings are held in place by a set of shoulders, or retainers which are built into the housing on each side of the differential assembly. These bearings may be of either the radial, roller, or ball type. However, when the ball or roller bearing is used for carrying the differential, an end thrust bearing must be used in conjunction to take the end thrust and for adjusting purposes. The differential assembly shown is known as the bevel gear and pinion drive. The pinion gear is keyed to the tapered end of the drive shaft and usually does not carry an adjustment. The bevel gear mesh adjustment is made by setting the bearing supporting the differential assembly backward or forward. This adjustment, however, applies mostly to the full floating axle, as the axle shaft in this case usually has a square end which slides into the small bevel gear of the differential. The shaft used in this type of axle may be drawn out through the wheel and replaced without disassembling the axle or removing the weight from the wheels.
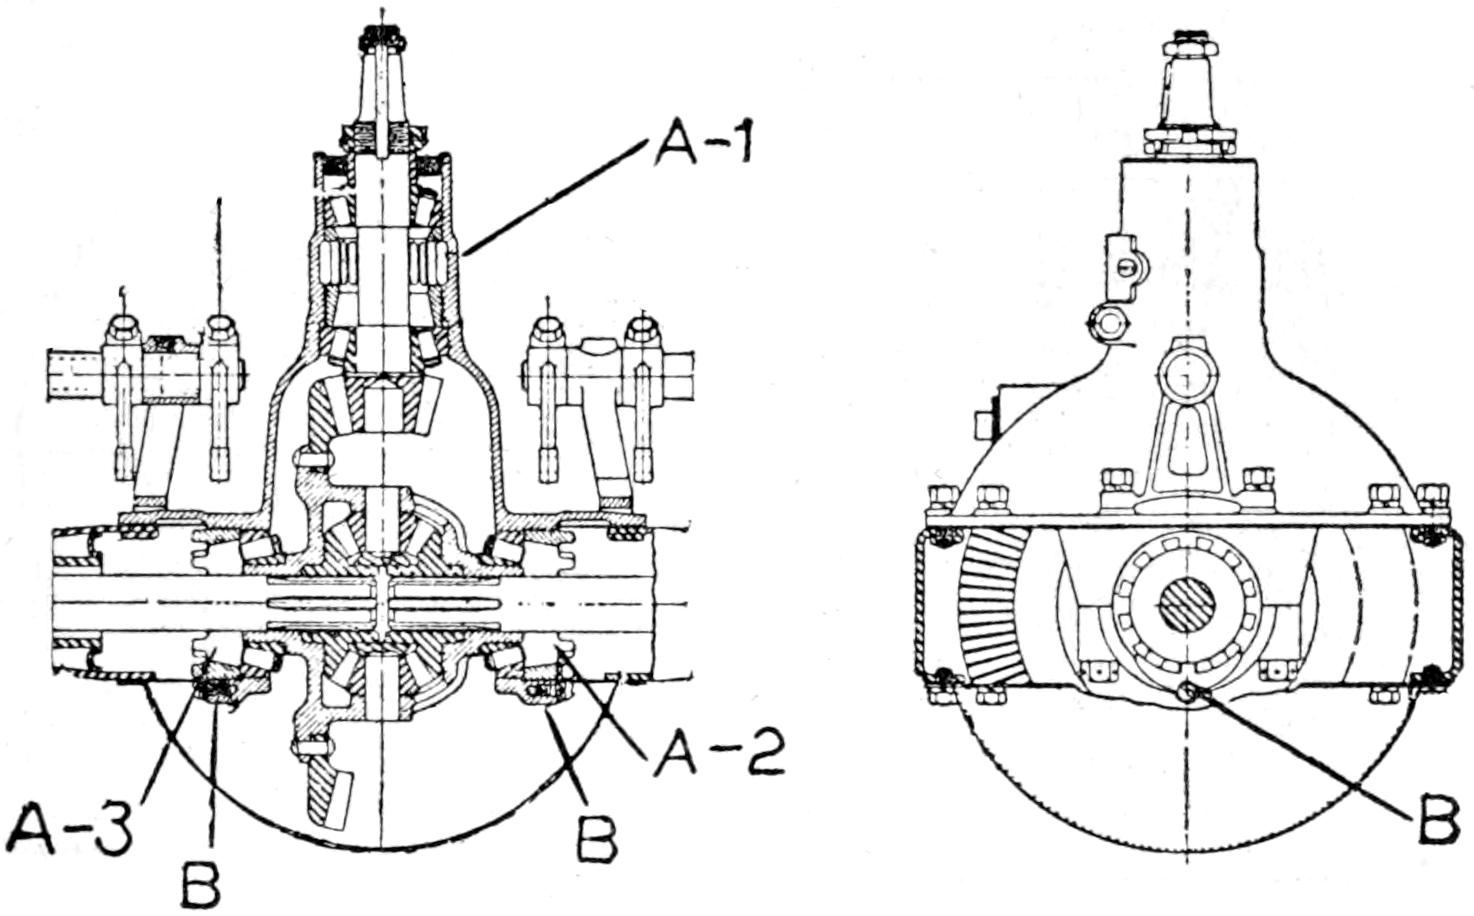
Fig 117. Differential Adjusting Points
When the Hotchkiss drive is employed in combination with the semi-floating or three-quarters floating axle, three adjusting[210] points will be found. Fig. 117 shows the three points at which adjustments are made. The short drive shaft carries the pinion gear at the rear end, and a universal joint at the front end is supported by a set of radial bearings inside of the front and rear ends of the housing.
The adjustment on this shaft is made by turning the notched cone A1 to the right, which pushes the bearings farther upon the bearing cones and reduces the looseness. After the short shaft has been properly adjusted, remove the lugs B, which fit into the notches of the adjustment nuts, A2 and A3, and turn A2 to the left to loosen, now turn A3 to the right until the bevel gear is meshing properly with pinion gear, then replace the lugs, B, to hold the adjustment. It is only necessary to make this adjustment when play occurs from natural wear, which will happen probably once in every five to seven thousand miles.
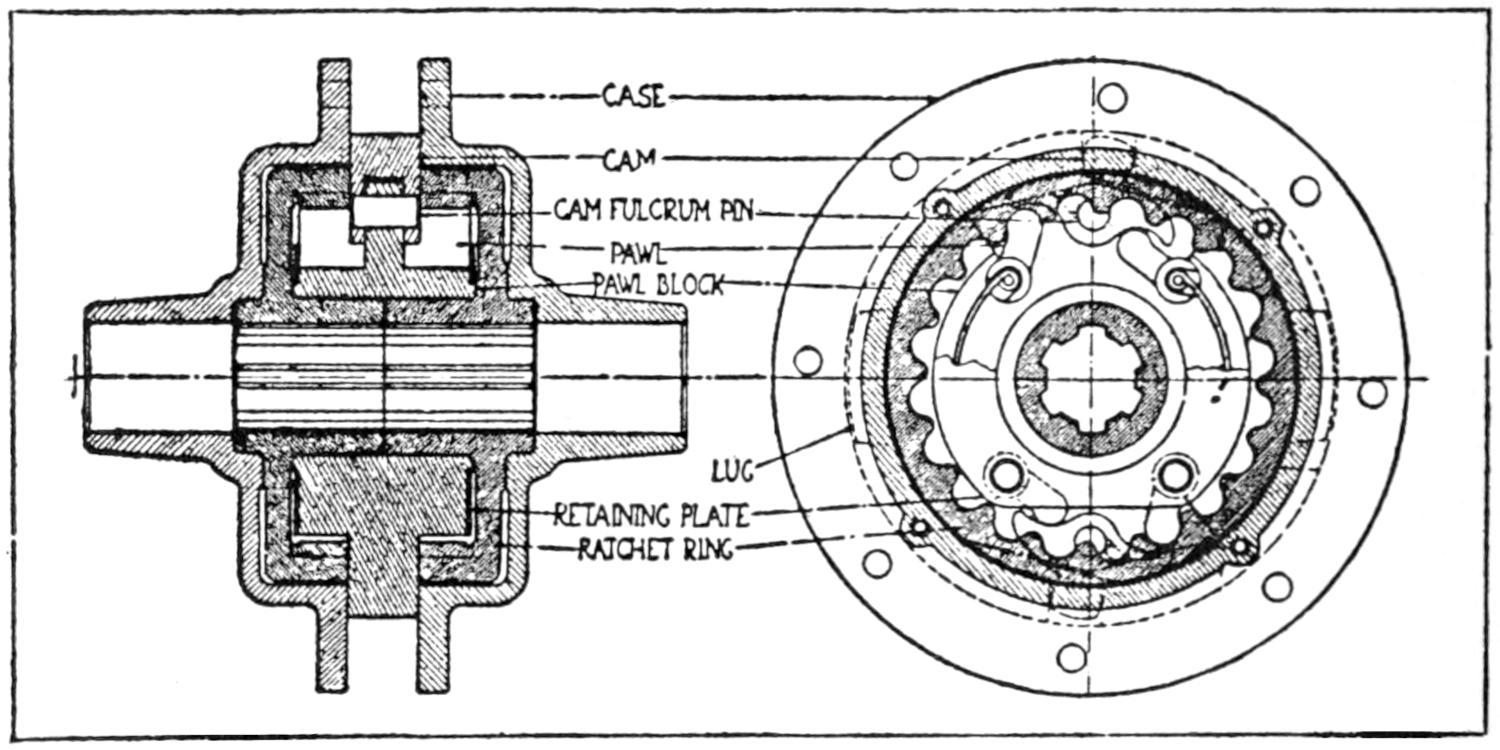
CASE
CAM
CAM FULCRUM PIN
PAWL
PAWL BLOCK
LUG
RETAINING PLATE
RATCHET RING
Fig. 118. Allen Gearless Differential
Fig. 118 shows a cross-section of the Allen gearless differential. The main gearing is bolted to the casing. The wheel shafts are splined to ratchet rings. The two lugs of the pawl block are secured in slots in the casing so that the block turns with it. Eight pawls on the pawl block drive, the ratchet rings two on each side operate for forward, and two on each side for reverse. The pawls permit either ratchet ring to overrun[211] them and move freely in the direction of motion, so long as it is moving faster than the pawl block. The lugs of the pawl block have a little motion, about 3⁄16″, in the slots, so that the casing moves this distance before engaging them for forward or reverse motion. This operates the rocking cams by their heads inserted in slots in right angles to the lugs, having the effect of pressing on and disengaging the forward or reverse pawls according to the direction of the motion.
When the car is running by its momentum with the clutch out, the action is reversed and the ratchet rings drive the casing and driving gear through the pawl block.
The adjustment given above also applies to the setting of the Allen differential.
Lubrication.—See Chapter on Axles.
[212]
Two types of rear axles are being used by the manufacturers of automobiles—the live axle, and the dead axle. The live axle which carries the weight of the load and transmits the power of rotation to the wheels, is built in two distinct designs called the semi-floating axle, and the full-floating axle. The semi-floating design is used extensively in manufacturing cars of light weight, while the full-floating design is favored more by the manufacturers of cars of medium and heavy weight. Both designs give equally satisfactory results.
The dead axle carries the weight of the car and load in much the same manner as a horse drawn vehicle. The power is conveyed to the loose wheels on the axle, by means of a chain which operates on a sprocket attached to the hub of the wheel, or by an internal gear drive arranged and housed in the brake drums.
The Semi-floating Axle.—In the semi-floating design of axle, the axle shaft carries the weight and transmits the rotation power to the wheel, which is keyed and locked to the outer end. The axle shaft is provided with a bearing at each end which operates on the inside of a closely fitted housing. The inside end of each axle shaft is bolted directly to the differential. The housing is split or divided into two halves, and bolts together in the center over the differential. This design of axle gives excellent service, but has one disadvantage in that it is somewhat difficult to disassemble, as the rear system must be disconnected from the car to take the housing apart. Fig. 119 shows a part sectional view of a semi-floating axle used by the Detroit Taxicab Co. The wide series of S. K. F.[213] ball bearings used on this axle are self aligning, which prevents any binding action from shaft deflection.

Fig. 119. Semi-Floating Rear Axle
The Full-floating Axle.—The full-floating design of axle serves the same functional purpose as the semi-floating design, but is constructed differently and operates on a widely different plan. In the full-floating design of axle, the axle shaft does not support any of the weight of the car or load, but serves simply as a member to transmit the power rotation to the wheels. The wheels are mounted on separate bearings, which operate on the outside of the outer end of the housing. The inner ends of the axle shafts are squared, or splined and slide into slots or seats in the differential gears. The differential assembly is in a separate unit, and is floated on bearings held by retainers extending from the forward end of the large ball-shaped center of the housing. The outer end of the axle shaft extends through the hub of the wheel, and has an umbrella-shaped plate on the end which bolts to the outside face of the wheel, as shown in Fig. 120, thus transmitting the power directly to the outside of the wheel, without the axle shaft taking any bearing. The axle shaft may be drawn out through the wheel, by removing the nuts which secure the umbrella plate, without removing the weight of the car from the wheels. The differential unit can also be removed without disassembling the housing, by removing a large cover plate from the center of the housing. Fig. 121 shows a typical full-floating axle, with a spiral bevel gear drive. The wheels in this case are mounted on a set of double series radial and[214] thrust ball-bearings. The Hotchkiss type of short shaft final drive is carried in the forward extended part of the housing.
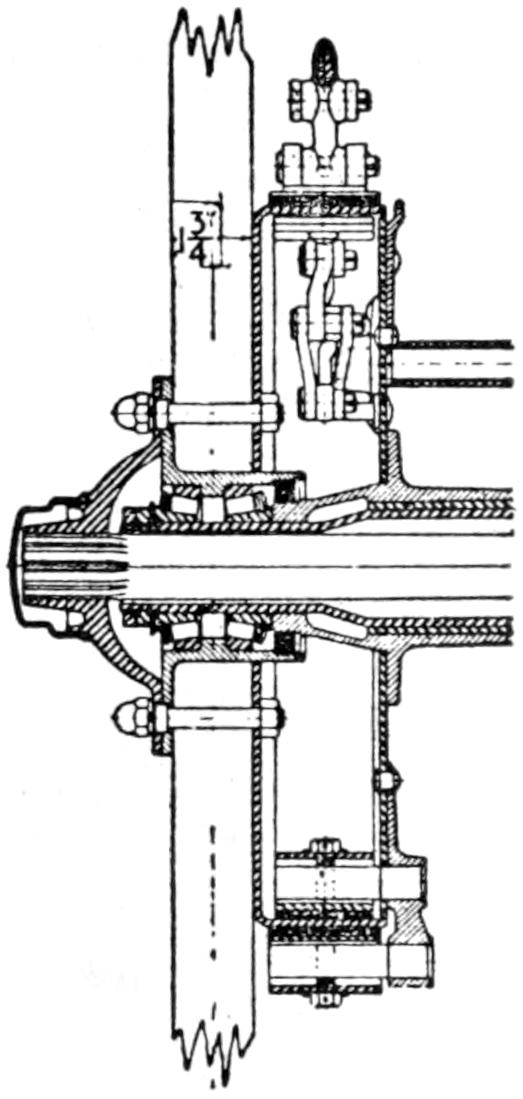
Fig. 120. Full-Floating Axle—Wheel-End Arrangement

Fig. 121. Full-Floating Axle
Two types of front axles are used by the manufacturers of automobiles. The I-beam type, which is a one piece drop forging, and the tubular or hollow type, which is round and has the yoke fitted into the ends. Both types operate on the same principle and plan, the only distinction between the types is that one type has the I-beam cross member and the other type has a pipe or tubular cross member.
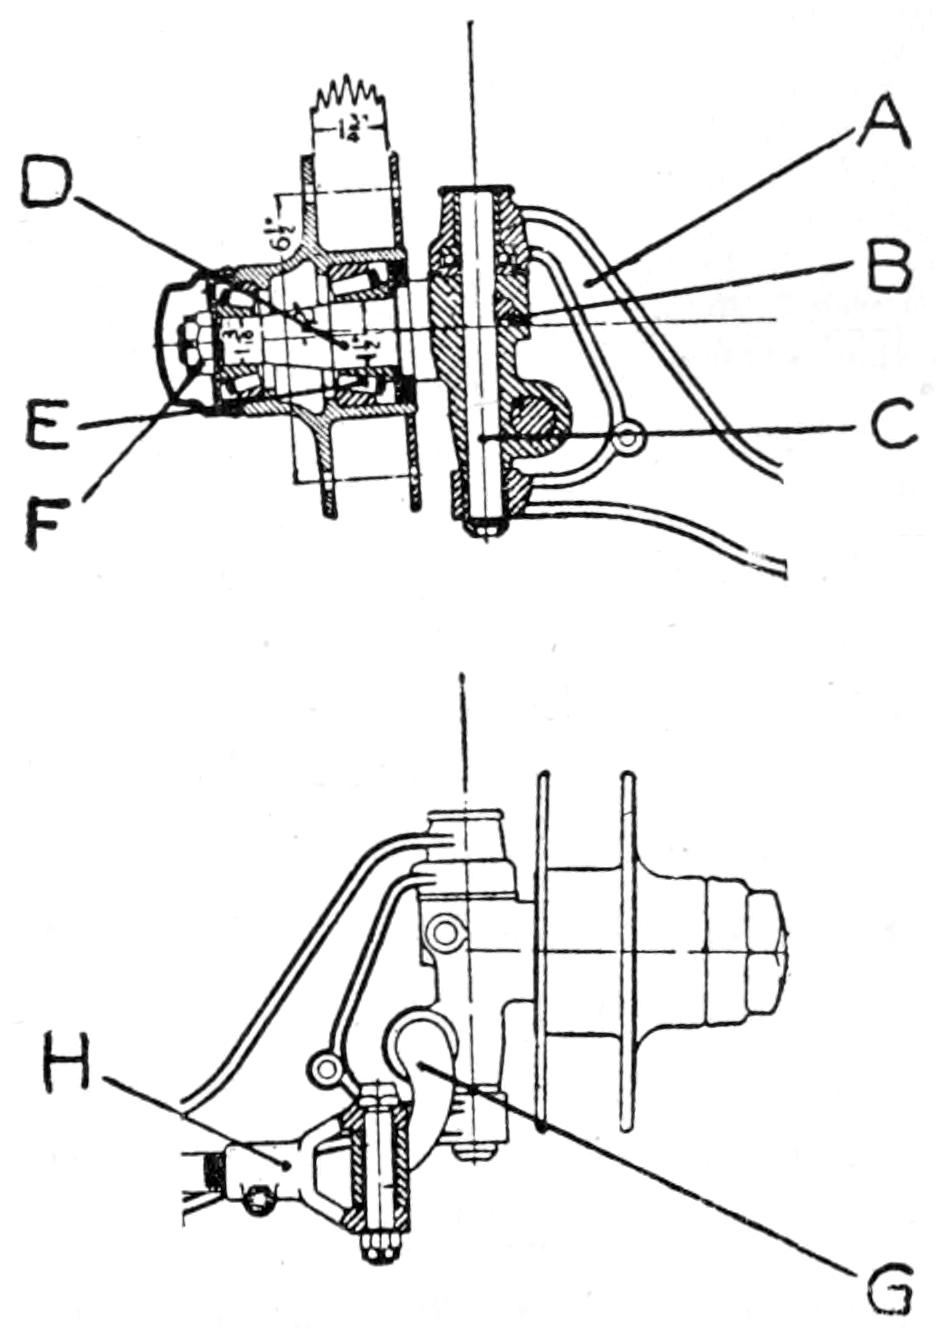
Fig. 122. Steering Knuckle and Front Axle Parts
The front axle consists of an I-beam or tubular cross member, which is yoked at each end as shown at A, in Fig. 122. A[215] steering knuckle B is held between the ends of the yoke by C, a king pin, which allows the knuckle to swing in a half circle. D, the spindle or short axle, is provided with a set of radial thrust bearings. The wheel is adjusted snugly to the bearings E by a castillated nut F. The adjustment is held by a cotter pin which extends through the spindle and head of the nut F. A short arm extends backward from each steering knuckle, shown at G, in Fig. 122, and are connected together by an adjustable tie or spread rod shown at H. A half circle ball arm extends from the knuckle and circles over the axle. A rod or drag link forms the connection between the ball arm and the steering arm of the steering gear. Fig. 123 shows the location of the parts assembled on a typical drop forged I-beam front axle. A section of the hub has been removed to show the location of the double row radial end thrust ball bearings.[216] This type of bearing is becoming very popular for automobile uses.
Adjustments of the Semi-floating Type of Axle.—The short shaft carried in the forward part of the housing has a center nut adjustment between the universal joint and the pinion gear; moving this notched nut to the right facing the rear axle draws the shaft backward and meshes the teeth of the pinion gear deeper with the teeth of the ring gear. After this adjustment is made, examine the teeth for even mesh; it may be necessary to shift the differential unit to secure an even bearing. (See chapter on differential gears for detailed instructions in regard to differential adjusting.)

Fig. 123. I-Beam Front Axle
Adjustments on the Full-floating Axle.—The adjustments on the full-floating axle are usually made by shifting the differential unit, although a pinion gear adjustment is usually provided as described above.
Care.—The housing of both the semi-floating and the full-floating axle should receive a fresh supply of medium fiber or graphite grease every thousand miles. To grease, remove the plug on the large part of the housing and force in grease with a dope gun until it begins to bulge out of the hole.
Wash out the housing every five thousand miles, and replace the lubricant, as small metallic particles are worn off the gear teeth and this grit, which is destructive to the gears and bearings, mixes with the grease making it necessary to remove it that often.
A grease cup will be found located at the outer end of each half of the axle housing, which supplies the lubricant for the outer bearing. This grease cup should be filled weekly with a medium cup grease and given a half turn each day.
[217]
Care of Front Axle.—Pack the space between the bearings in the hub of the wheel every thousand miles. Use a heavy cup grease. The king bolts which hold the steering knuckles between the ends of the yokes are hollow and carry a grease cup on the head, which forces the grease out through finely perforated holes, and lubricates the bushings on which the pins take their bearing. This cup should be filled weekly and given a half turn each day.
[218]
An automobile is always equipped with two sets of brakes, as they are required by law. The functional action of the brakes is to check the motion of the car when the driver wishes to stop or reduce the rolling speed. The service brake usually operates on the external surface, or on the outside of the drum flange, and is connected to the right foot pedal through a set of linkage. The emergency brake operates on the internal surface of the drum, and connects through linkage to a hand lever operating on a notched quadrant. The service brake is used in ordinary driving to check the rolling motion and to stop the car. The emergency brake is used to assist the service brake and to hold the car, in case the driver wishes to allow it to stand on a grade.
Fig. 124 shows a set of brakes assembled on the axle ready to receive the horizontal flange of the brake drum. The brake drum is attached to the wheel; consequently when a wheel has been removed and is about to be replaced, the first operation consists of starting the drum flange into the space between the lining of the external and internal bands; care should always be exercised in making this adjustment, in order not to burr the outer edge of the lining, as a brake with an uneven frictional contact surface is of little value in checking the motion of the car.
In Fig. 124, A shows the position of the band on the inside of the drum; B shows the contracting tension coil spring which holds the bearing surfaces of the band in contact with the flat surface of the cam when the brake is not in use; C shows the cam shaft, and the flat surfaces of the double action cam, which expands the band and brings it into even contact with[219] the inner horizontal surface of drum flange, thereby checking the motion of the wheel by frictionally grasping the drum.
The service brake shown in Fig. 124 is of the external contracting type, which operates on, or frictionally grasps the outside horizontal surface of the drum. D shows the lined band, which is held in a stationary position from the rear; E shows the leverage arrangement with its expanding coil spring, which holds the band free from the drum, when the brake is not in use; F is the lever to which the pull rod is connected; G is the lever on the internal brake cam shaft to which the hand lever is connected by the pull rod.
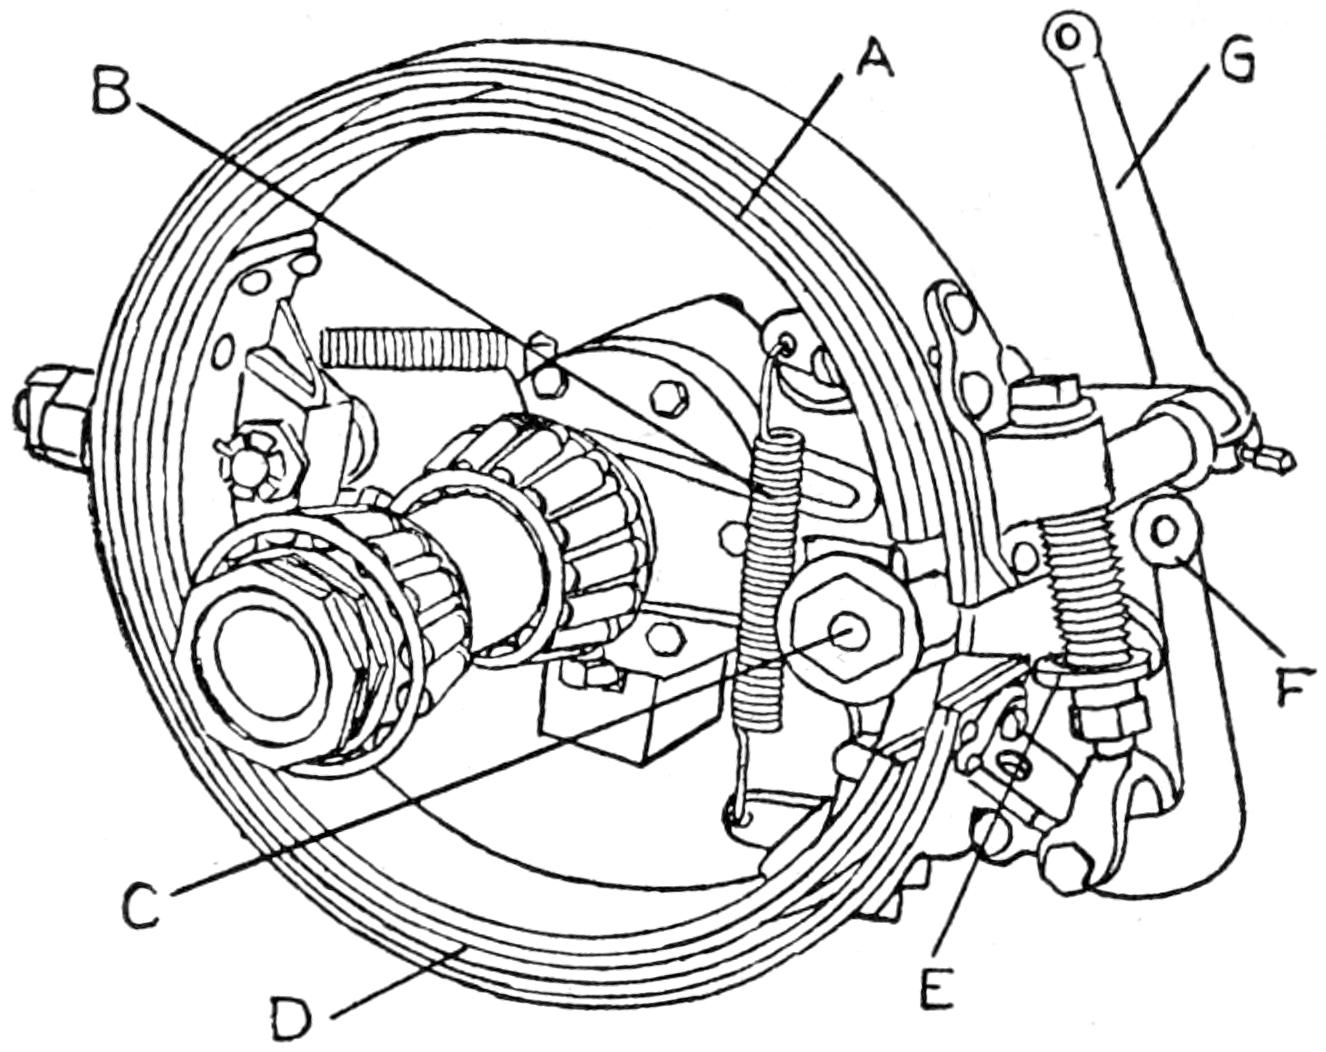
Fig. 124. Brake—Types and Adjustment
Fig. 125 shows a new type of internal expanding brake, which is being used on many of the late models. The brake band in this case is supported at three points and has an adjustment at the rear main point of support. The cam has been done away with, and the band is expanded by a leverage toggle arrangement which operates through a much larger area, and is more dependable as there is no danger of its “sticking” or turning over, as was often the case with the cam.
Fig. 126 shows another type of service brake which may be encountered on a few of the former models. This type of[220] brake is usually located on the propeller shaft at the rear end of the transmission case. This type of brake operates in the same manner as the service brake at the end of the axle.
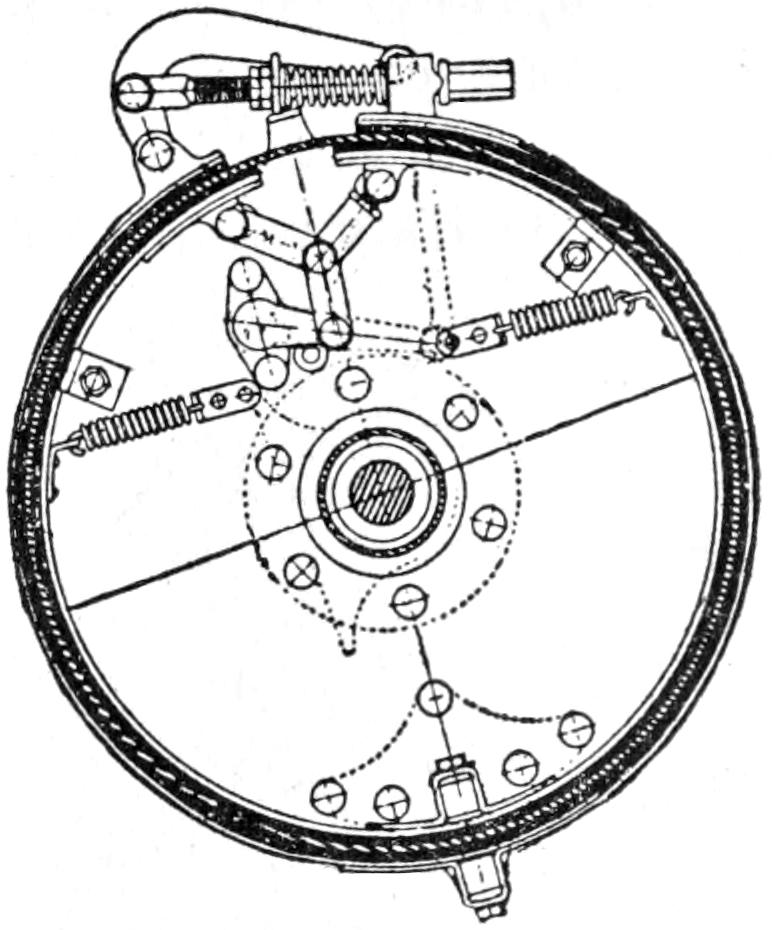
Fig. 125. Brake—Showing Toggle Arrangement
Fig. 126 shows an equalizer which allows for any difference that may occur in making adjustments.
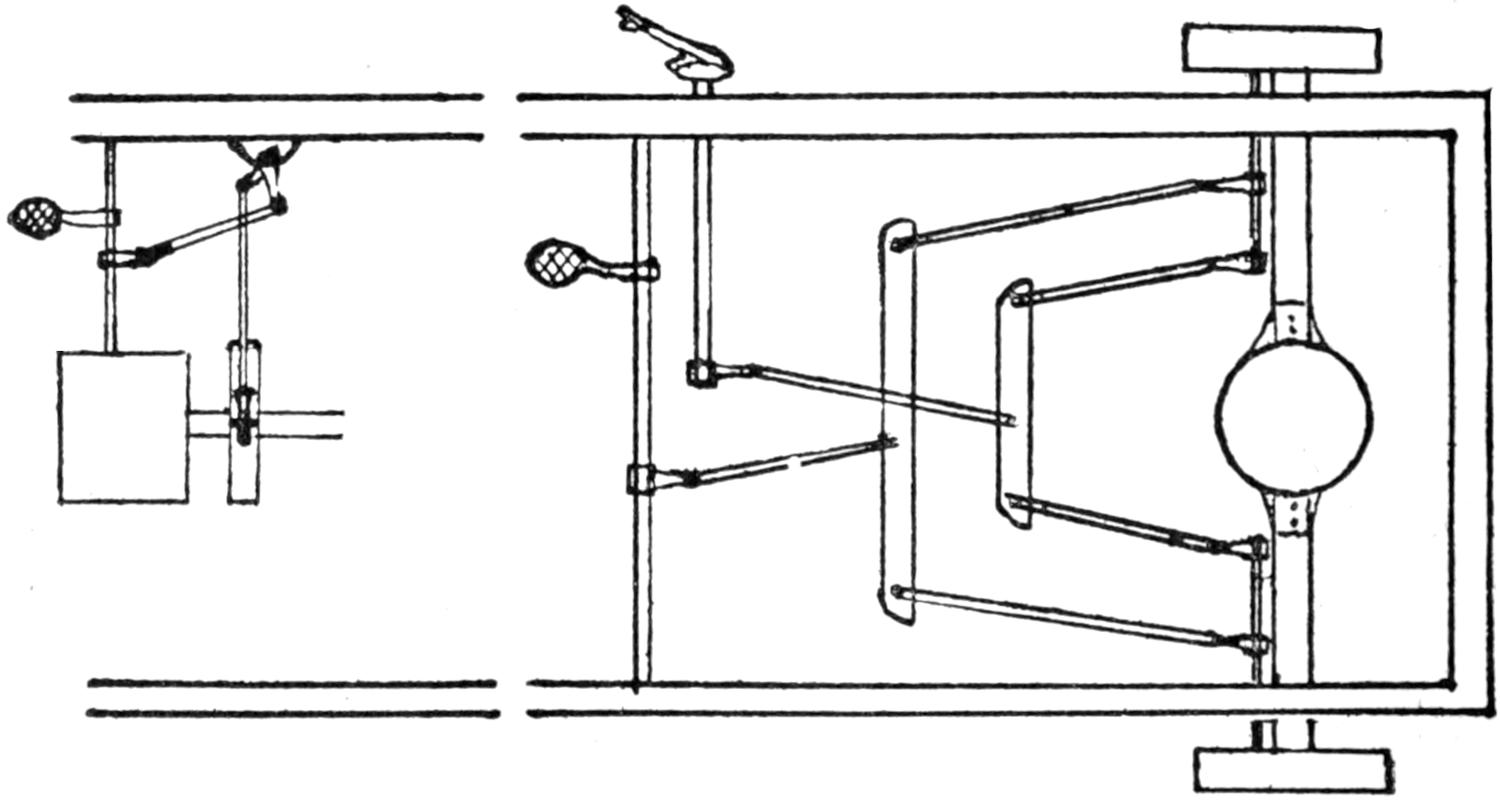
Fig. 126. Transmission Brake—Equalizer
Fig. 127 shows the complete brake assembly, and the points of adjustment on late Buick cars.
Brake Adjustment.—All types of brakes are adjustable.[221] The service brake usually has two adjusting points, one at the drum, which is made by turning the nut on the leverage pull pin, and another on the pull rods. A long neck clevis, or a long butted turn buckle will always be found on the pull rods, or on the rod leading to the equalizer. The adjustment is made by turning either to the right to shorten, or take up, and to the left to lengthen. The clevis is always threaded to the right, while the turn buckle has a right and left thread which carries each end of the rod into the butt when it is turned to the right. The lock nuts must always be turned up tight to the butts after the adjustment is made in order to hold it.
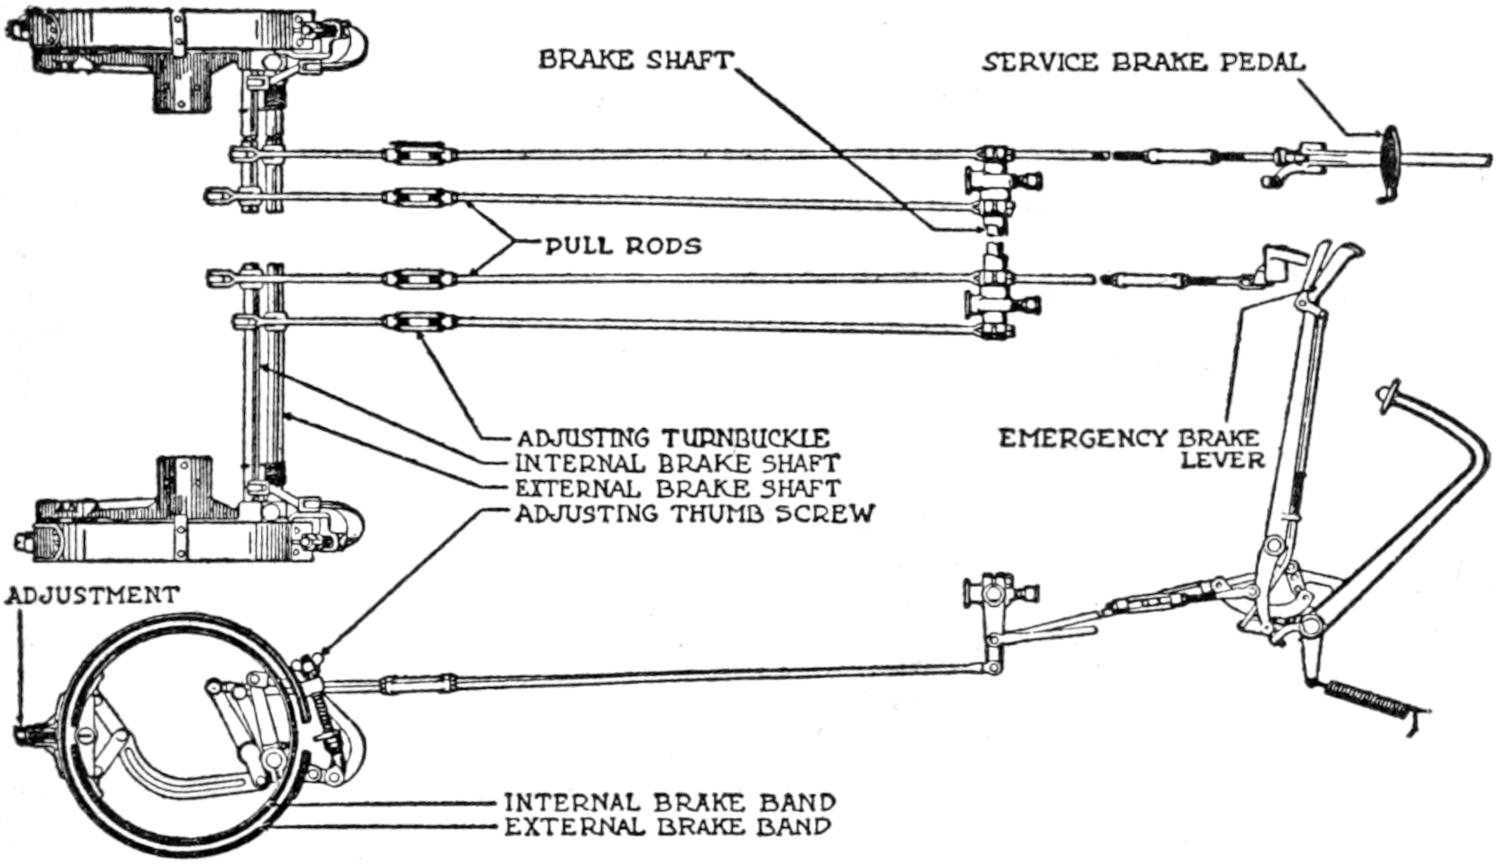
| BRAKE SHAFT | SERVICE BRAKE PEDAL | |
| PULL RODS | ||
| ADJUSTING TURNBUCKLE | EMERGENCY BRAKE LEVER |
|
| INTERNAL BRAKE SHAFT | ||
| EXTERNAL BRAKE SHAFT | ||
| ADJUSTING THUMB SCREW | ||
| ADJUSTMENT | ||
| INTERNAL BRAKE BAND | ||
| EXTERNAL BRAKE BAND |
Fig. 127. Brake—Arrangement and Adjustment—“Buick”
Brake Care.—A great deal depends upon the proper operation of the brakes. They should be regularly inspected at least once a month for loose adjustments and uncleanliness. The need of adjustment usually occurs from natural wear, while an unclean frictional surface is usually the result of oil or grease seepage through the outer axle bearing. A felt washer is provided to prevent this from taking place, but as these washers are subjected to considerable pressure, they often become caked and hardened and lose their absorbing effectiveness. These washers can be purchased at any accessory store for a few cents apiece, and applied with very little trouble.
[222]
Cleaning the Surface of the Brake Bands.—This is accomplished by removing the wheel and washing the friction contact surface with gasoline, after the surfaces have become thoroughly dry. Drop three or four drops of castor or Neat’s foot oil on the contact surfaces of the drum, and replace the wheel and spin it a few times before releasing the jack.
Caution.—After you have set the gears for starting, and before you release the clutch pedal, always reach and make sure that the emergency brake lever is in the neutral position. New drivers invariably forget to do this, which results in severe strain on the bearings, and causes them to get loose; the average brake band will not stand more than fifteen to twenty minutes of continuous contact before it burns or wears beyond the point of usefulness.
[223]
Information recently gathered from observation and interviews shows that the average owner who operates and cares for his car, invariably overlooks the springs and their connections while giving the car the bi-monthly or monthly tightening-up and greasing, while the balance of the car usually receives the required attention.
This fact seems to be due mostly to an oversight, for the springs are usually inspected while the car is motionless and at this time they do not show defects readily, and have the appearance of being rigid, inactive, and compact.
Weekly Spring Care.—Weekly spring care should consist of filling the grease cups (with a medium hard oil cup grease) and turning them down until the grease makes its appearance at the outer edge of the spring eye. This, under ordinary driving conditions, will be sufficient lubrication for one week. But in cases where the car receives more than ordinary use the grease cups should be given one-half turn every second day. The shackle connections should then be wiped dry to prevent dust and grit clinging and working into the bearing, which causes much wear on even a sufficiently lubricated bearing surface.
Bi-monthly Spring Care.—Special attention should be given at this time to the U-shaped clips which connect the spring to the axle. A loose clip means a broken spring at the first severe jolt, caused by the rebound taking place between the clips. Therefore, tightly adjusted clips will prevent action from taking place at the point between the clips where the leaves are bolted together and will entirely eliminate spring[224] breakage. Tighten up the nut on the leave guide clip bolt to prevent rattling. The shackles should be inspected for side play. To determine whether there is side play, jack up the frame until the weight is off the spring, then grasp it near the shackle and shake with an in and out motion. If there is play a rattle thump will be heard. To take out play, remove cotter pin and turn up castillated nut snugly on the shackle pin. If the nut cannot be turned up a full notch, place a thin washer over the end of the pin. The nut, however, should not be turned up too tight as a certain amount of action is necessary.
Lubrication of the Spring Leaves.—Lubrication of the spring leaves should take place once every month. This point must be kept in mind and adhered to, as a spring cannot produce the marked degree of action necessary for smooth and easy riding, when the sliding surface is dry and rusty. The leaves slide on each other when the spring opens and closes, and if the sliding surface is not well lubricated the movement will be greatly checked by the dry friction; these dry surfaces also gather dampness which soon forms into dry-rust, which, in time entirely retards action and results in a very hard riding car.
It is not necessary to disassemble the spring at the monthly greasing period, unless the spring has been neglected and rust has formed on the sliding surfaces. In this case the sliding surface of each blade must be cleaned with a piece of sand or emery paper.
When the springs receive regular attention, it is only necessary to jack up the frame until the wheels and axles are suspended, the weight of which will usually open the leaves sufficiently to insert a film of graphite grease with a thin case knife. In some cases where the leaves are highly curved, it may be found necessary to drive a small screwdriver in between them. However, great care should be exercised in doing this, as the blades are highly tempered and spring out of position very easily.
Wrapping Springs.—Car owners in some parts of the country[225] grease their springs and wrap them with heavy cord or adhesive tape. While this serves to keep the grease in and the dust and dirt out, it also binds the leaves and prevents free action. If the car is to be driven for any length of time on sandy or muddy roads, wrapping may be found very beneficial. But use only a water-proof material (heavy oil paper or canvas) to wrap with. Cut the material into one and one-fourth inch strips, and wrap from the center toward the outer end to prevent binding.
The following shows the results of a spring care test conducted by the writer. The cars were chosen at random and only those accepted which had seen six months or more service.
Eighteen owners were interviewed. Six of this number gave their springs a thorough greasing and tightening up every two weeks, and not one of this group made a complaint of any nature regarding breakage, stiffness, or noise.
Five of the remaining twelve, gave their springs occasional attention. Their reports were not entirely unsatisfactory, but had a tendency toward such troubles as rattles, squeaks, and stiffness in action.
The remaining seven did not give their springs any attention whatever, and all made unsatisfactory reports ranging from broken leaves, to side play, jingles, squeaks and hard riding.
Therefore the results of careful and regular attention may readily be seen by the reports of the first six owners. All nuts and connections were tightened, and the sliding surfaces of the leaves greased on an average of once every two weeks. The springs gave satisfactory results, and the cars retained that easy, soft, springy action, so noticeable in a new car.
The reports of the five who gave their springs occasional attention would probably have been the same as the first six, had they given the proper attention more frequently. But they usually waited until the trouble became annoying, which caused wear on the spring eye, shackle strap, and pin, on each occurrence making a good adjustment impossible. The[226] stiffness in action and squeaks were caused by dry fractional surfaces between the leaves which prevented free action.
Types.—There are five standard types of springs, and two or three types of special design. The riding qualities of all types of springs depend on their length and resiliency, which is taken into consideration by the engineer and designer. Consequently there is not much choice between the different types.

Fig. 128. 1⁄2-Elliptical Front Spring
Fig. 128 shows the semi-elliptical type of spring used principally for front suspension. The front end of this spring is bolted rigidly to the downward end slope of the frame while the rear end carries a movable shackle arrangement.
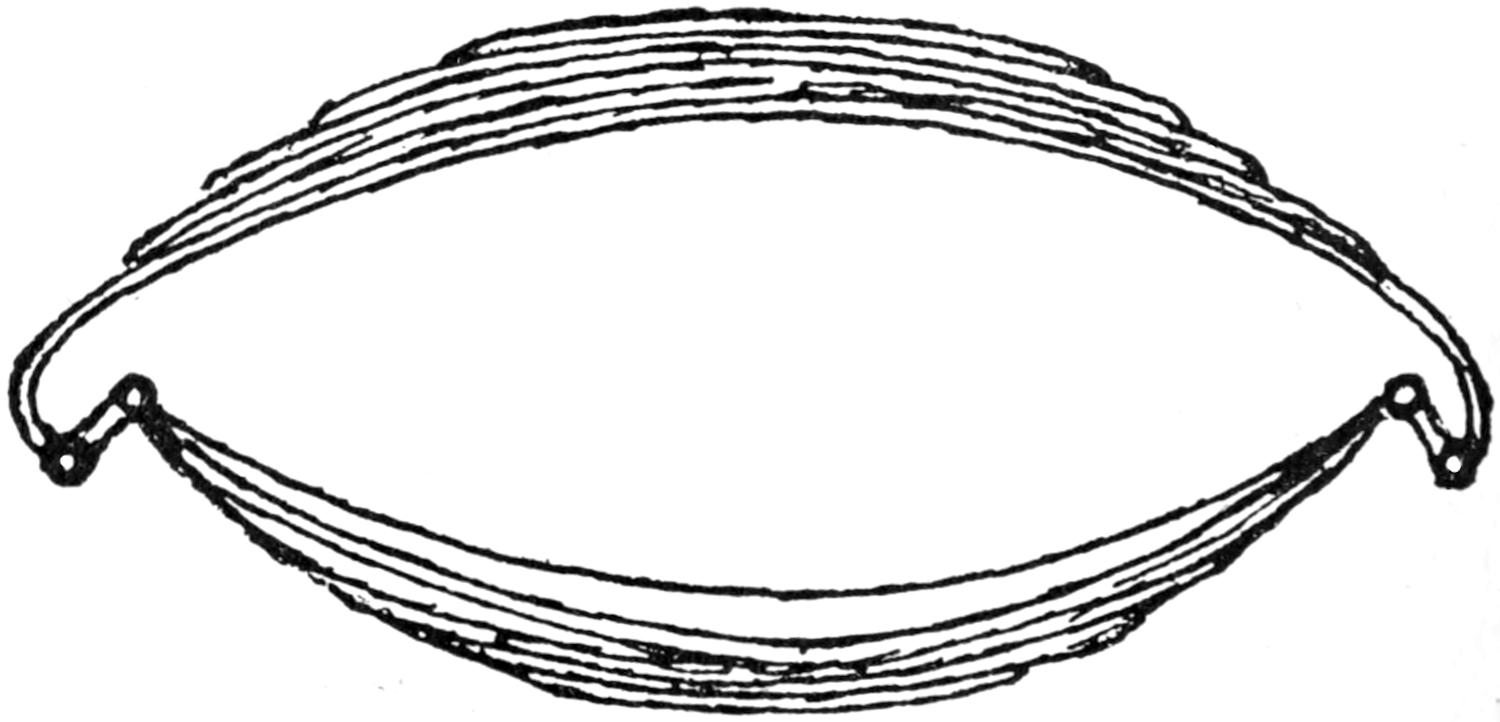
Fig. 129. Full-Elliptic Spring
Fig. 129 shows the full elliptical type of spring which may be used for either front or rear suspension. The ends may be fastened together solidly with a yoke and eye arrangement, or shackled as shown in the above cut.
[227]
Fig. 130 shows a spring of the three-quarters elliptical type used in rear suspension only. This type of spring carries a shackle arrangement at the front and rear end which allows backward and forward motion to take place very freely, consequently it is very necessary to use a very substantial set of torque rods to keep the proper alignment.

Fig. 130. 3⁄4-Elliptical Rear Spring
Fig. 131 shows the three link or commonly termed platform type of spring used only in rear suspension on the heavier models.
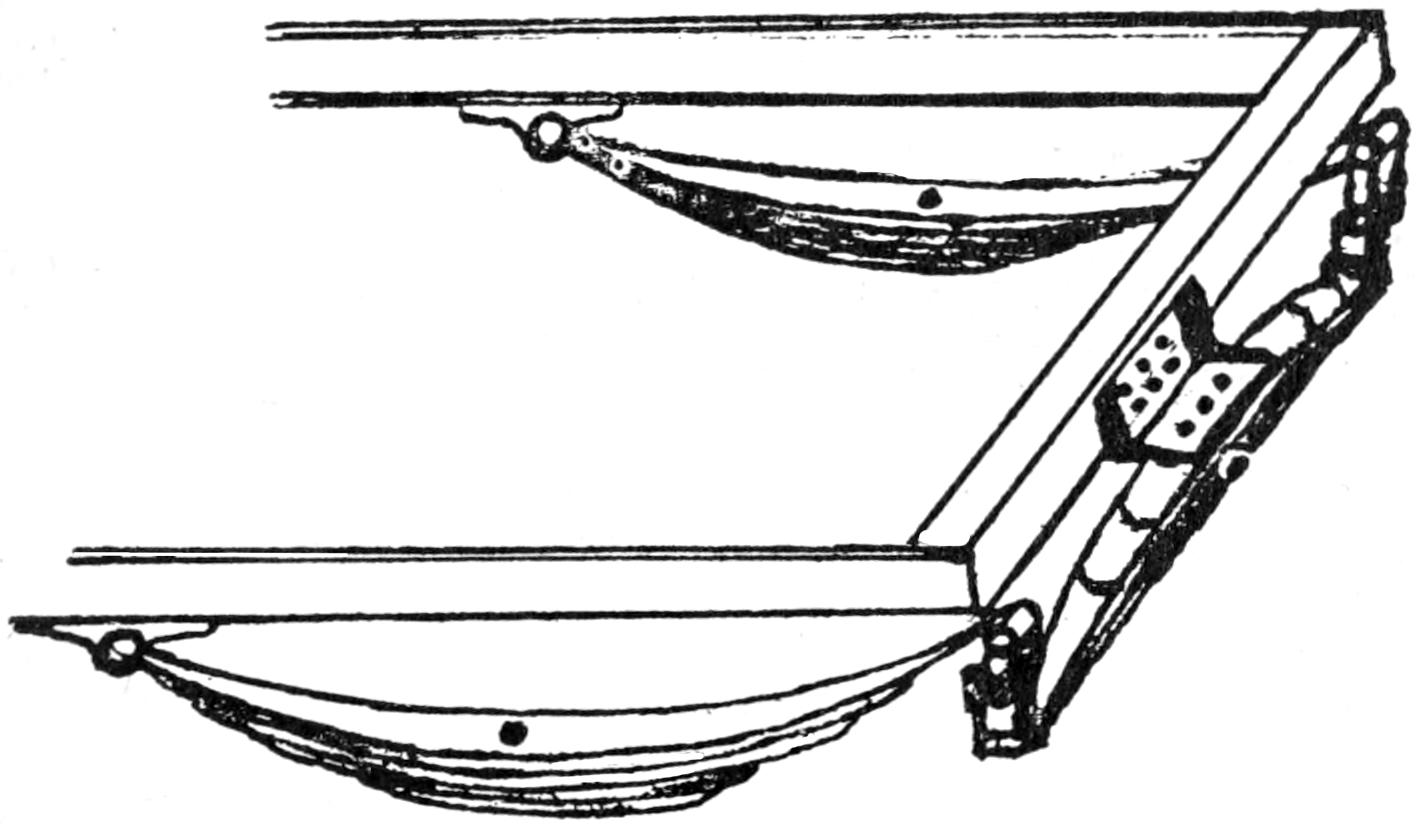
Fig. 131. Platform Spring
Fig. 132 shows the front type of cantilever spring. The front end of this type of spring is bolted to a seat on the front axle, while the rear end may be fastened directly to the under side of the frame or attached to a specially arranged[228] casting seat at the side of the frame. This type of spring is sometimes employed in multiple formation.

Fig. 132. Cantilever Spring, Front
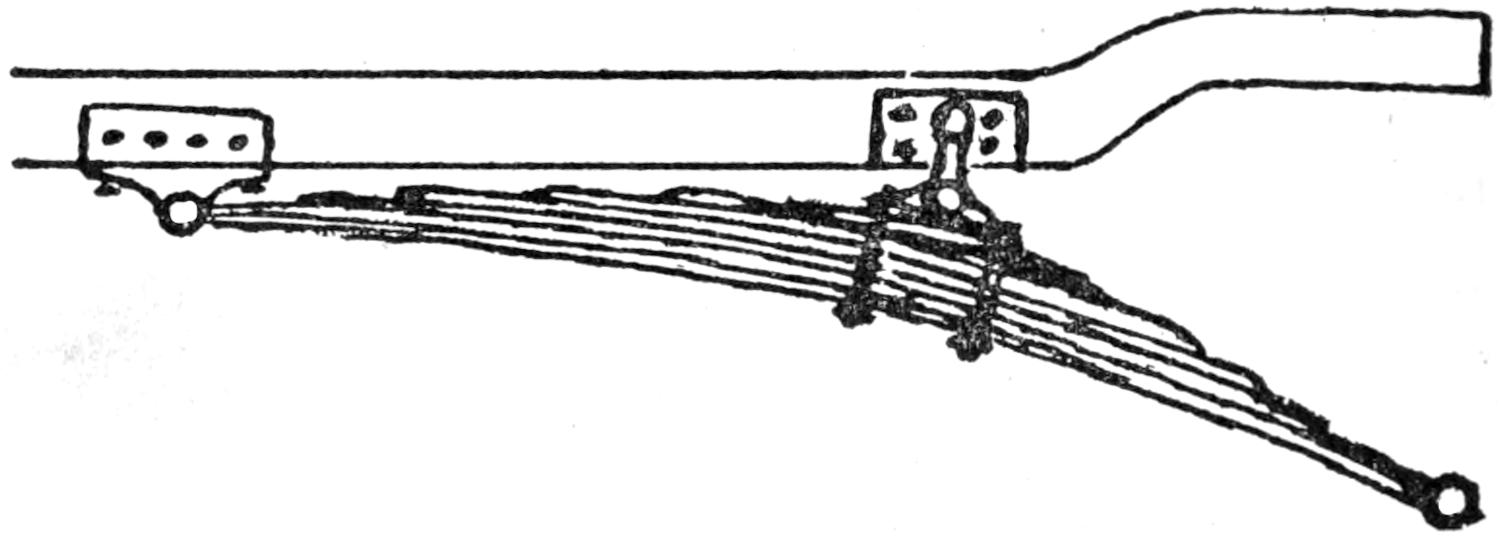
Fig. 133. Cantilever Spring, Rear
Fig. 133 shows the rear type of cantilever spring, which may employ a shackle arrangement on one or both sides, while a hinged seat is usually employed near the center or slightly over-center toward the front end.
[229]
Attention should be given quite frequently to wheel alignment, as the life and service of tires depends almost entirely upon wheel alignment.
When either of the front wheels become out of line, through a bent spindle, worn spindle pin, loose or worn bearing the tire on this wheel is subject to cross traction. That is, when the car moves forward, the tire on the out of line wheel is forced to move forward by the other three points of traction, and as it is not in line with the forward movement the tire must push or drag crosswise at the traction point. This results in the tread being worn or filed off in a very short time, exposing the layers of fabric to dampness and wear which results in a “blow-out” and ruined tire, which would probably have given several thousand miles of service had proper attention been given to wheel alignment.
Alignment Test.—To test the alignment, first look at the lower side of the springs where they rest on the axle seats. If one of the springs has slipped on the seat through a loose clamp, the direction and distance of the slip may be noted by the rust mark left by the movement. Drive the axle back, leave the clamp loose, measure the distance between the centers of the front and rear hub caps on the unaffected side with a tape or string, move the tape to the affected side and make the center distances the same, tighten the nuts on all clamps using new spring or lock washers.
Lengthwise Wheel Alignment.—Before lining up the wheels lengthwise, jack each wheel separately and shake it to detect a loose bearing or worn spindle pin which is usually the seat of the trouble. After the defective part has been readjusted or[230] replaced, test the alignment as follows: Using a string or straight edge, which should be placed or drawn across the front and rear tire, making four contacts as near center as possible without interference from the hubs. The string or straight edge is then moved to the other side of the car and three contacts are made, one on the rear center of the front tire, and two across the center of the rear tire. The spread rod should then be adjusted to allow the front contact point to converge or lean from the line toward the other front wheel.
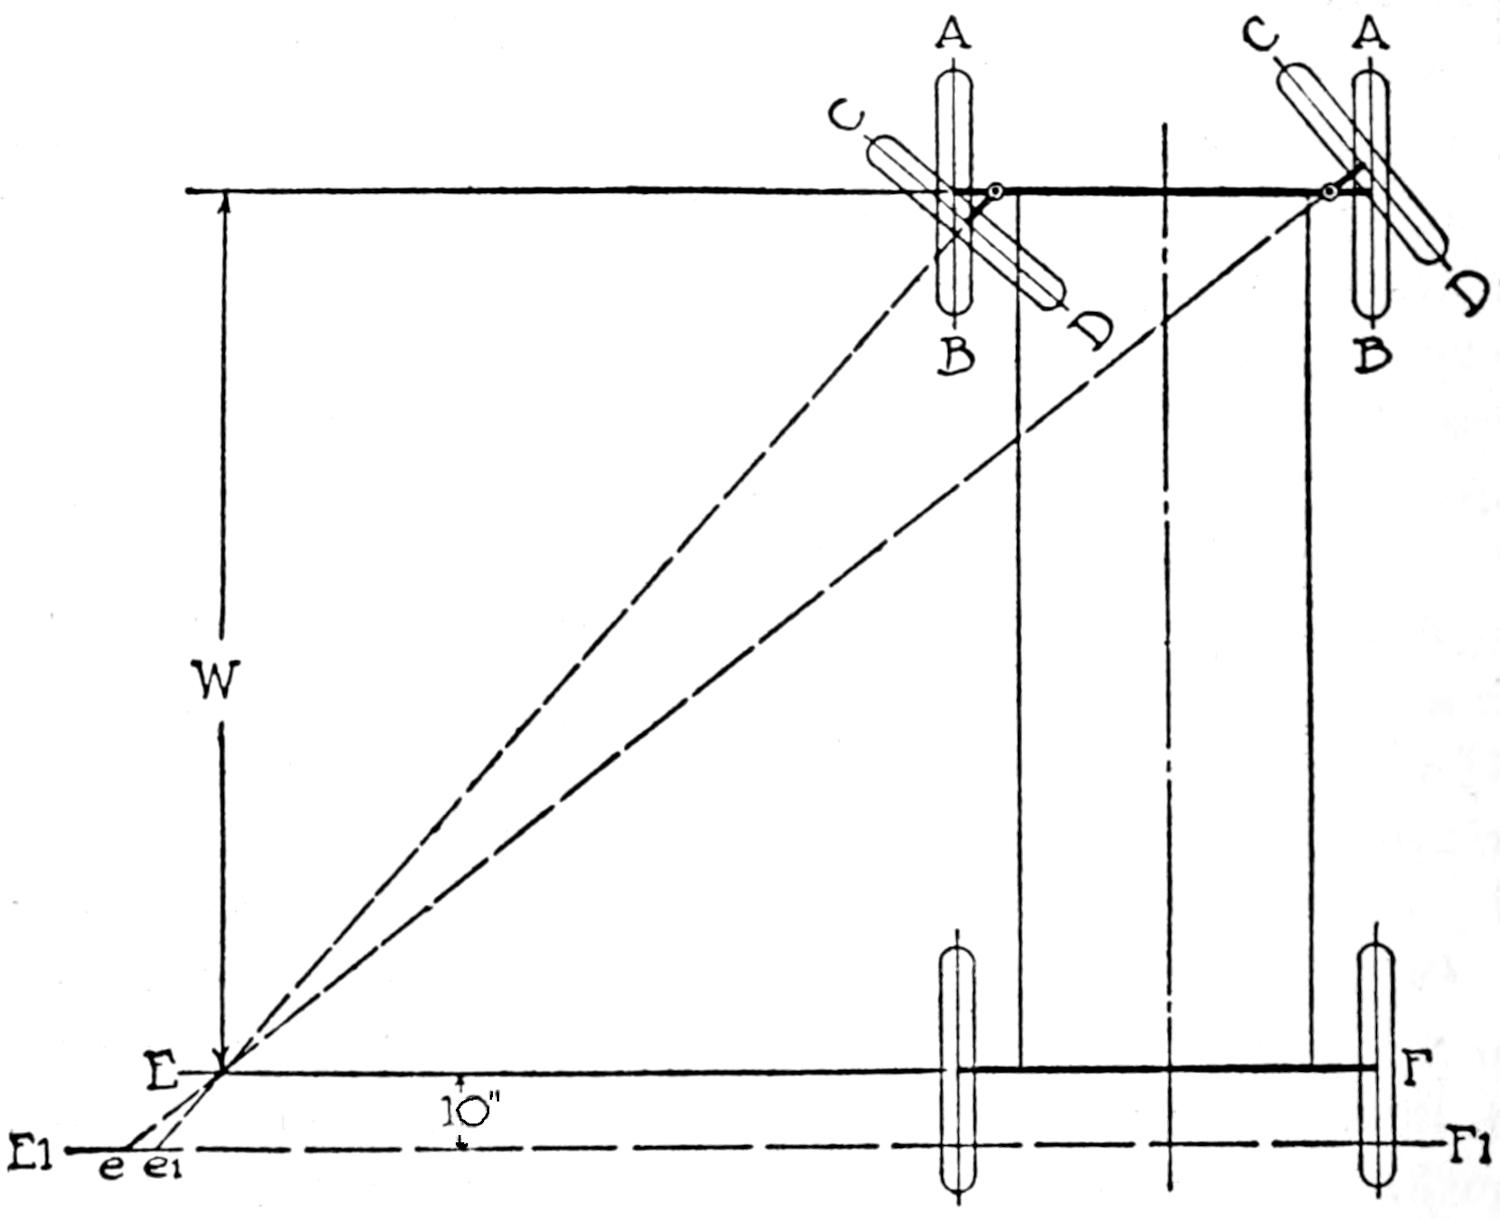
Fig. 134. Wheel-Alignment Diagram
Mechanical Alignment.—When a motor vehicle turns the inside wheel has to describe a curve of smaller radius than the outside wheel. A line drawn lengthwise through the steering arms, extending from the spindles or knuckles, should meet at a point in the center of the rear axle to determine the correct wheel base, otherwise the car will turn in two angles, which causes the tire on the outside to slide crosswise at the[231] traction point. Fig. 134 shows the position of the wheels and the direction they travel in describing two distinct curves in turning to the left. The correct mechanical alignment and wheel base will be seen in the diagram, A B. The front wheels have been turned to a 45 per cent angle, e-e1 lines drawn through the spindles will meet at E, a line drawn through the rear axle. E1 in this diagram shows the effect on the steering of lengthening the wheel base of the car. In this case the wheel base has been lengthened 10″ and the lines e and e1 meet at different angles at a point on E1. The car tries to turn about two distinct centers, as this is an impossibility, sliding of the tire occurs.
[232]
Operation and Care
The steering mechanism used in automobile construction is arranged to operate independent of the axle, or in other words the wheels turn on a pivot, or knuckle, held between the yoked ends of the axle. A spindle or axle extends outward from each steering knuckle to accommodate the wheels. A set of short arms extend to rear of the steering knuckles; an adjustable spacer bar, commonly called a tie or spread rod, serves as the connection between the arms. The arms incline slightly toward each other; which causes the inside wheel to turn on a shorter angle than the outside wheel when turning a corner. Another steering arm carrying a ball at the outer end, describes a half circle over the axle, and is attached to either the spread rod arm or the steering knuckle. An adjustable rod, or drag-link, carrying a ball socket at each end serves as the connection between the steering arm extending from steering gear and the half circle arm of the knuckle. To adjust wheels see chapter on “Wheels and Axle Alignment.”
Steering Gear Types.—Three types of steering gears are commonly used by automobile manufacturers. They are namely, the worm and sector, worm and nut, and rack and pinion types.
Fig. 135 shows the construction and operation of the worm and sector type. The lower end of the steering shaft carries a worm gear which meshes with the sector gear supported by a separate shaft. The sector has a ball arm extending downward,[233] which moves in a forward and backward direction when the steering shaft is turned.
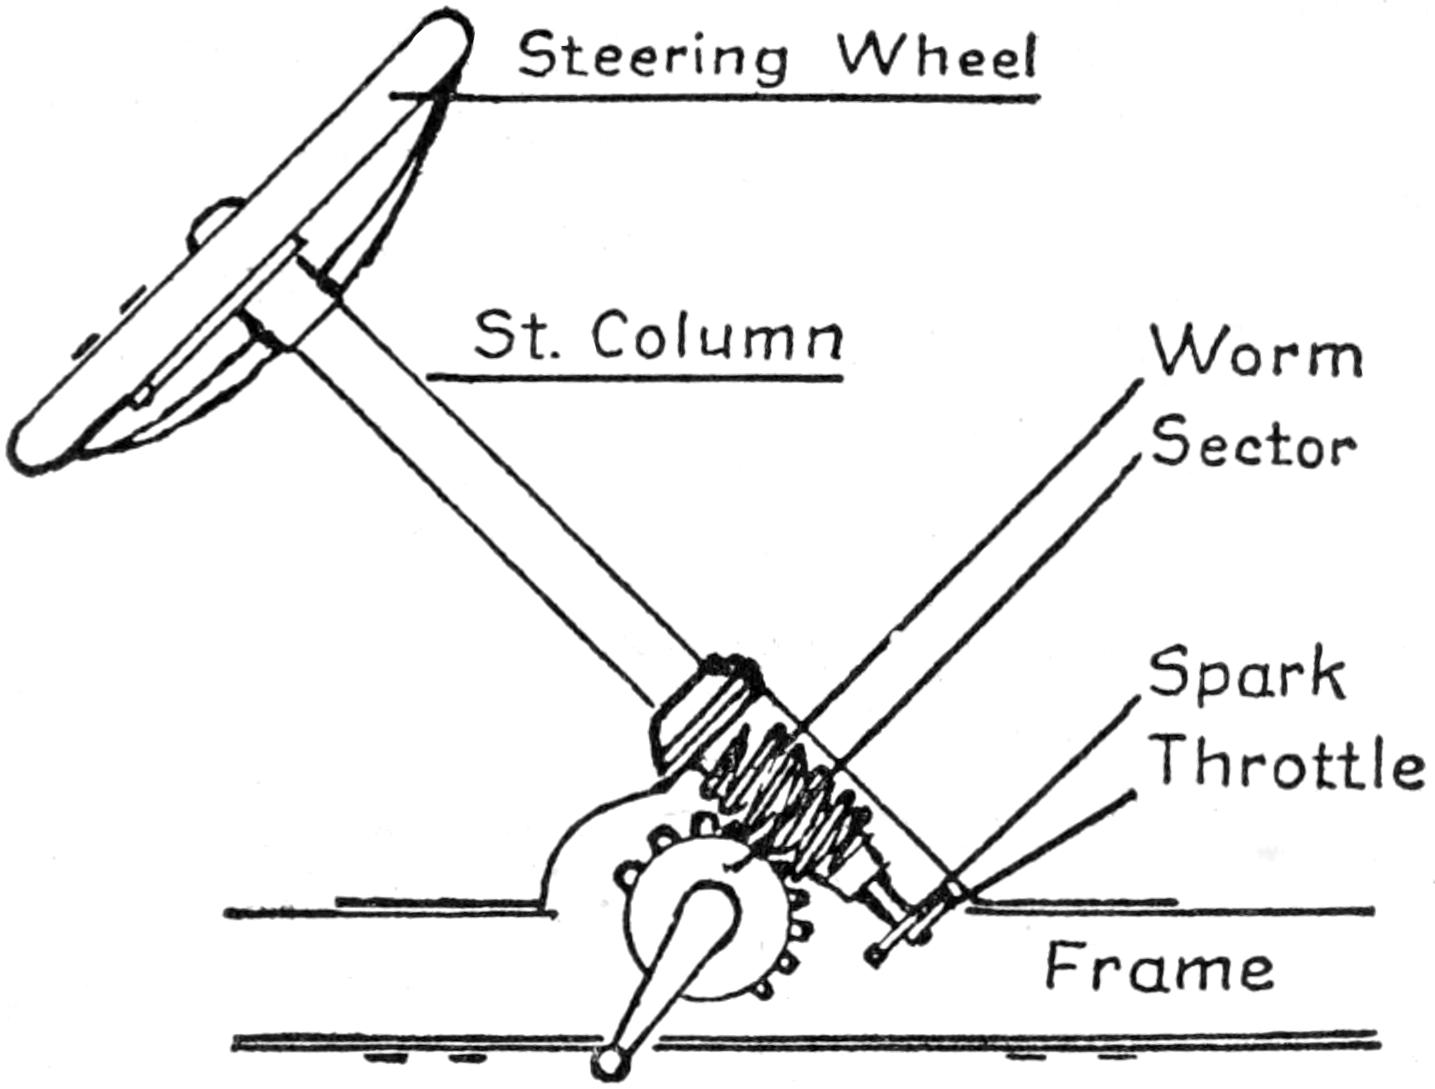
Steering Wheel
St. Column Worm
Sector
Spark
Throttle
Frame
Fig. 135. Worm and Sector Steering Gear
Adjusting the Worm and Sector Type of Steering Gear.—An eccentric bushing is provided to take up play between the worm and sector. This adjustment is made by driving the notched cone to the right to take out play, and to the left to slack up or take out stiffness.
Fig. 136 shows the worm and nut type of steering gear. This type of steering gear as well as the worm and sector, is called the irreversible steering gear, which means that no reverse action takes place, or is present at the steering wheel, should one of the front wheels encounter a stone in the road, or drop into a deep rut. The worm and nut type consists of a double armed and pivoted steering arm. Each arm carries a ball. The drag link socket is attached to the ball on the lower arm while the ball on the upper and shorter arm fits in a socket in the nut through which the worm on the steering shaft passes. This nut is threaded to fit the worm which passes through it and moves up and down on the worm according to the direction which the steering wheel is turned.[234] The housing of this type of steering must be well packed with a light cup or graphic grease to prevent the screw or worm from binding, which will make steering difficult and tiresome.
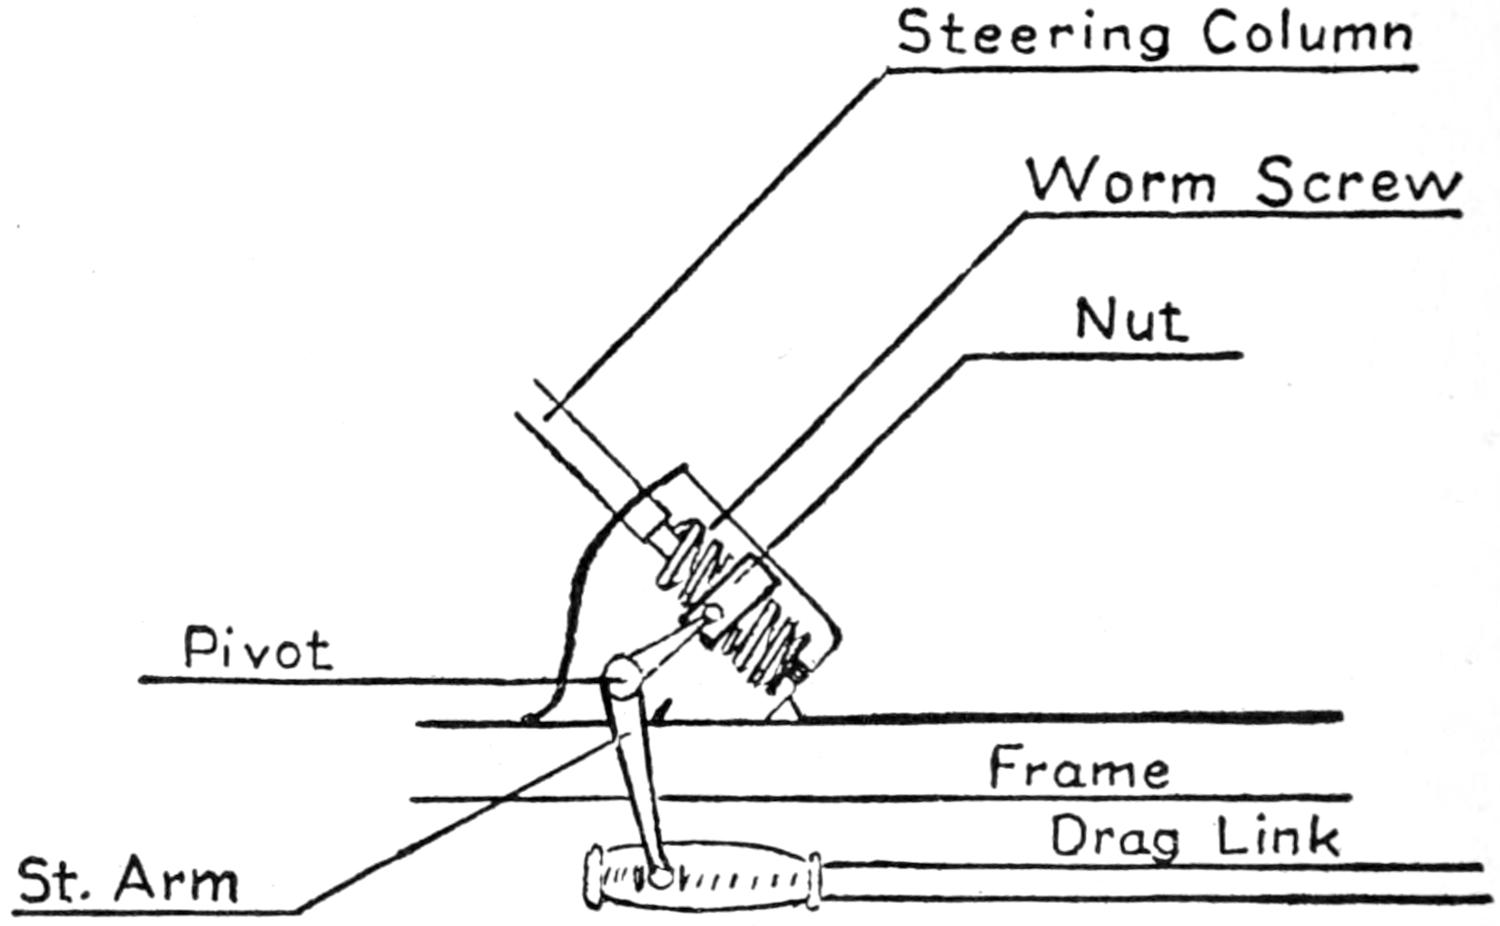
| Steering Column | |
| Worm Screw | |
| Nut | |
| Pivot | |
| Frame | |
| Drag Link | |
| St. Arm |
Fig. 136. Worm and Nut Type Steering Gear
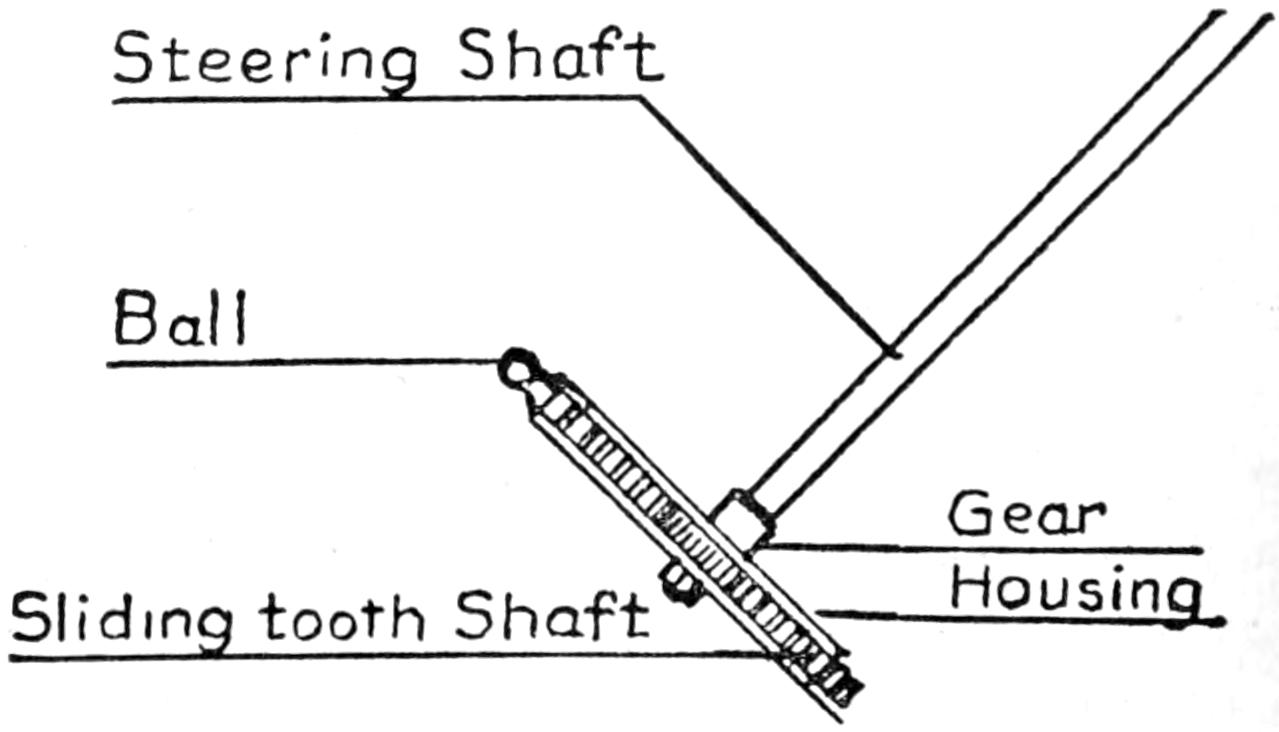
Steering Shaft
Ball
Gear
Housing
Sliding tooth Shaft
Fig. 137. Rack and Pinion Type Steering Gear
Fig. 137 shows the rack and pinion type of steering gear. This type of steering gear is used on a few of the lighter weight cars and is not as dependable owing to a reverse action through the steering mechanism when an obstruction is encountered by one of the front wheels. This type of steering device consists of a solid shaft with the steering wheel keyed to the upper end.
[235]
A small spur gear is keyed and locked to the lower end, and meshes with a horizontal toothed shaft which slides inside of a housing. The connection between the steering gear and the steering knuckles is made by a short rod or drag link carrying a split ball seat on each end. One end of the drag link socket is fitted to a ball on the end of the horizontal toothed shaft, while the socket on the other end is fitted to a ball on the upper end of the bolt which connects the tie rod and knuckle.
Steering Gear Care.—Steering gears should be closely adjusted. The housing should be packed with a medium hard oil or graphite grease at least once in every thousand miles that the car is driven. All bolts and nuts connecting the different parts of the steering gear should be regularly inspected and kept in a perfectly tight condition.
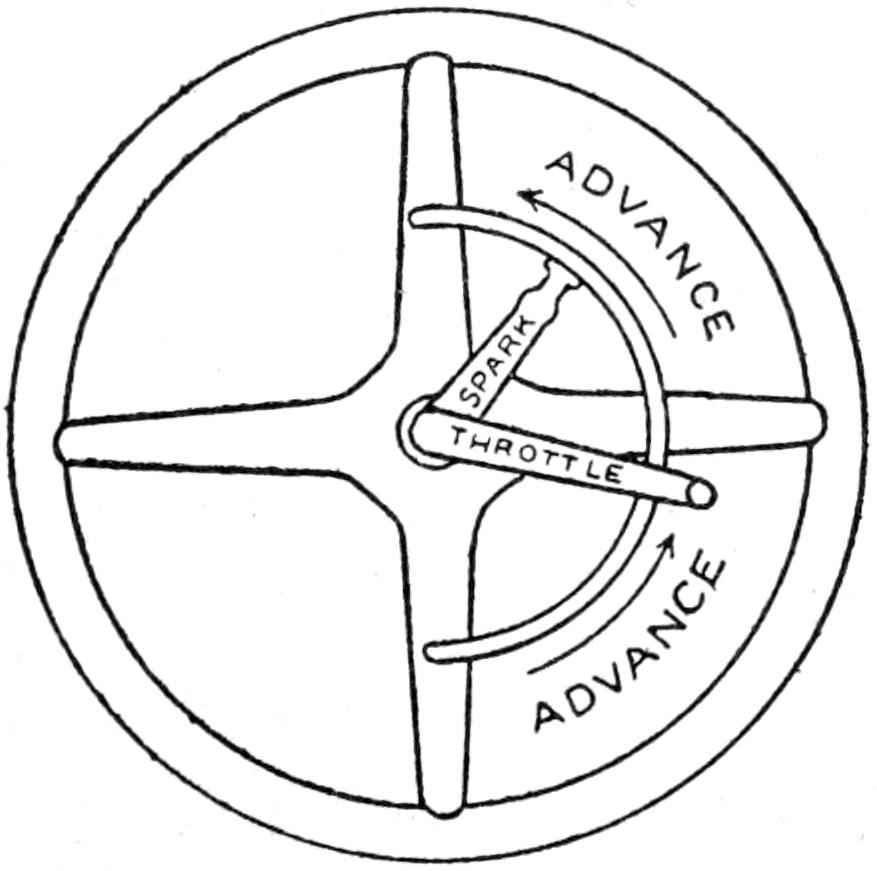
Fig. 138. Steering Wheel
Fig. 138 shows the location of the spark and gas control levers which usually operate on a quadrant on the upper side of the steering wheel. The short lever always controls the spark, which may be advanced or retarded by moving it. The long lever is attached to the carburetor, and controls the speed of the motor by regulating the volume of gas vapor supplied to the motor.
[236]
Three types of bearings are being used by the manufacturers of automobiles and gasoline engines. They are, namely, the plain bearing or bushing, the solid and flexible roller-bearing, and the double and single row of self-aligning ball bearings.
Bearings were designed to prevent wear and friction between parts, which operate on, or against each other.
Fig. 139 shows three types of plain bearings. A, the split type of plain bearing, is used widely by the manufacturers of engines as main bearings to support the crank shaft and at the large end of the connecting rod. B is a cylindrical type of plain end bushing, used to support light shafts in end walls. C is a center or sleeve type of plain bushing.

Fig. 139. Plain Bearings or Bushings
All three types of plain bearings described above will stand unusually hard use, but must be kept well lubricated or run in an oil bath to prevent frictional heating and excessive wear. Fig. 140 shows two types of shims used between the retainer jaw of a split bearing, which allows the wear to be taken up when the bearing gets loose and begins to pound. The shims may be either solid or loose leafed, and are of different thickness. The loose leafed shim has an outer casing,[237] which contains seven to ten metal sheets of paper-like thinness, which may be removed to the exact thickness required for an accurately fitted bearing.
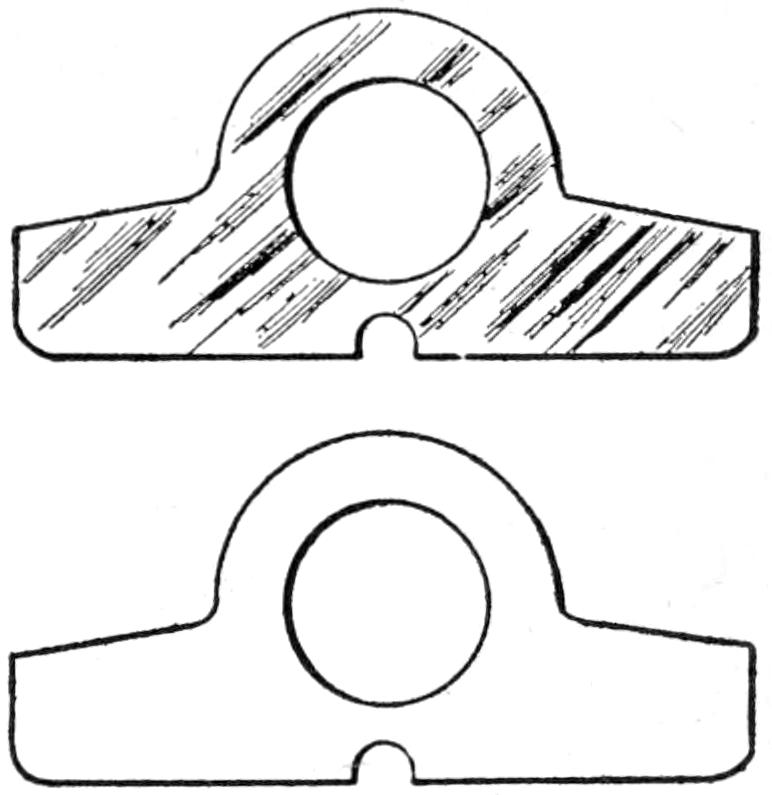
Fig. 140. Shims
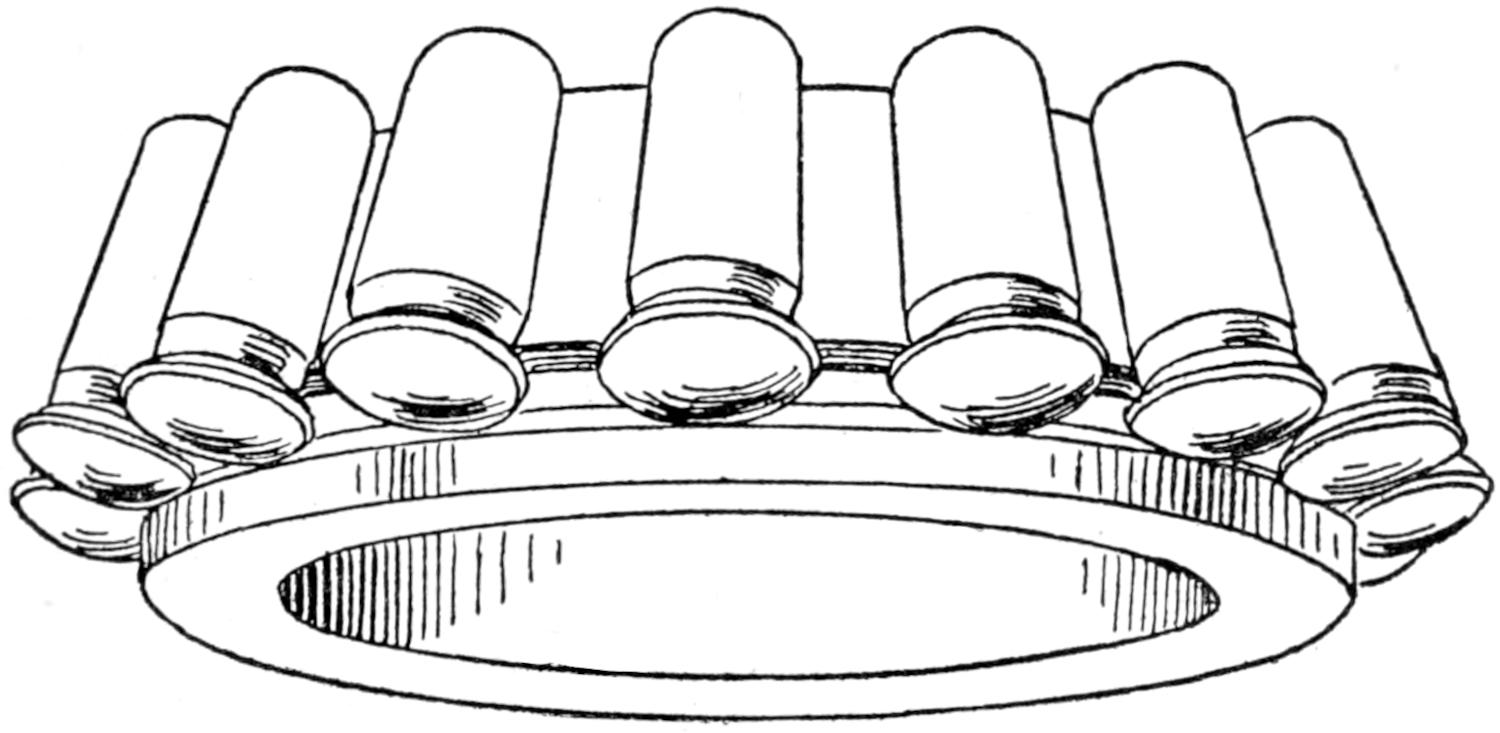
Fig. 141. Bock Roller Bearing
Fig. 141 shows the Bock type of radial and end thrust roller bearing. The end of each roller is provided with a section of a perfect sphere which rolls in unison with the tapered rollers and makes the end contact practically frictionless. The advantage claimed for this type of bearing is that it embodies both the ball and roller bearing strength and reduces the friction on the roller and thrust end to a minimum. This type of bearing is used in the hub of the wheel, which must be cleaned and well packed with a medium grease every thousand[238] miles. The bearing is best cleaned by dropping it into a container of kerosene and scrubbing it with a stiff paint brush. Do not run the car with the hub cap off.
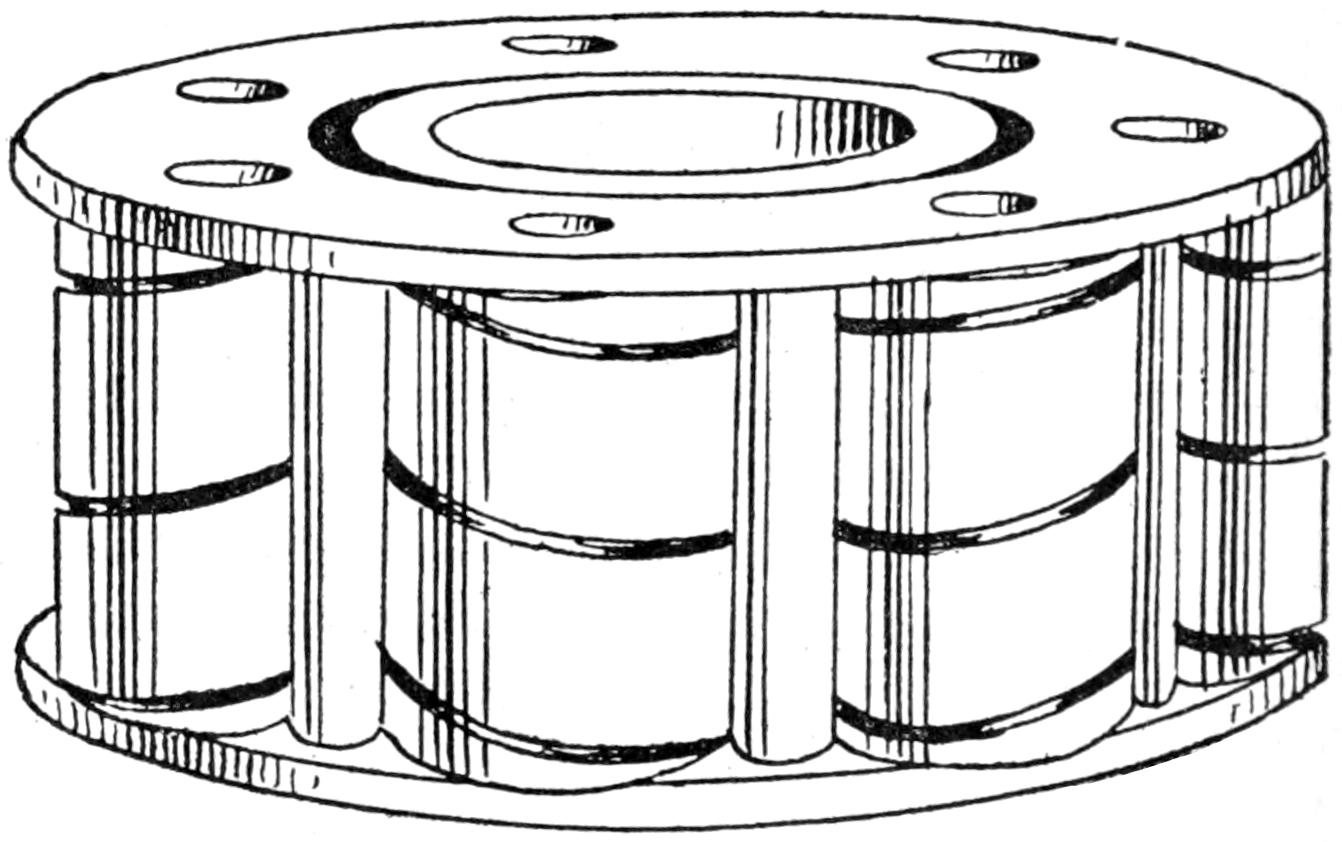
Fig. 142. Hyatt Roller Bearing
Fig. 142 shows the Hyatt flexible type of roller bearing. This type consists of an inner and outer race and a cage which holds the flexible rolls. The flexible rolls are spirally wound from a high grade sheet alloy steel. The rolls are placed in the cage in alternative positions. This arrangement of rollers has a tendency to work the grease back and forth on the surfaces of the races. Another advantage claimed for this type of bearing, is that the weight is more evenly distributed at the point of contact, due to the fact that the wound rolls allow a certain amount of resiliency, and accepts road shocks easily, which reduces the amount of frictional wear to a minimum. This type of bearing requires the same attention as the Bock, described above.

Fig. 143. Double Row Radial Ball Bearing
Fig. 143 shows a type of double row ball bearings. Ball bearings are being used more extensively each year by the manufacturers of light and heavy duty motor vehicles. The efficient reliability and ease of action has proven to be the main factor in the development of this type of bearing. One of the big features in considering ball bearings is that a ball rolls equally well in any direction, and the slightest effort[239] will start it to rolling. It is a proven fact, that a ball is started more easily than any other type of supportive element. This explains why ball bearings of all types come nearest to being frictionless. Once upon a time people believed that the ball in ball bearings carried the load by point of contact, which is not true, as ball bearings carry the load on a definite area. And in bearing construction, such as shown in Fig. 143, where the inner and outer race curves around the[240] balls and increases the contact area, the contact capacity is greatly increased. Thus a one-fourth inch S. K. F. ball showed a crushing resistance of nine thousand and seven hundred pounds, while the one-half inch ball showed a crushing strength of twenty-five thousand pounds. The sectional view of a radial bearing, shown in Fig. 142, consists essentially of four elements, which are the following: (a) The outer ball race, (b) the two rows of balls, (c) the ball retainer, and (d) the inner ball race.
The inner surface of the outer race is spherically ground in the form of a section of a sphere whose center is the center of the axis of rotation. This provides that both rows of balls shall carry the load at all times. This reduces the load carried by each ball to the least amount.
The ball retainer is made of a single piece, which provides for proper spacing of the balls, and positively circulates the lubricant. The retainer is open at the sides, which permits free access of lubricant, and makes inspection easy.
The inner ball race contains two grooves to accommodate the two rows of balls, and the curvature of the outer race is slightly larger than that of the balls. The fact that both inner and outer races are curved gives an ample surface contact between the balls and the races.
Fig. 144 shows a double thrust bearing. This type of bearing was designed to take end thrust in both directions. It is used to stabilize the shaft against lateral motion and to accept reversing thrust loads. It is also automatically self-aligning.
The assembly of balls and races forms a section of a sphere within a steel casing. The inside of this casing is ground spherically to the same radius as the spherical seats, thus permitting the assembled bearing parts to adjust themselves to any shaft deflection.
This type of double thrust bearing is so designed that the central rotating disc, two rows of balls, and the aligning seats are combined in a single unit within the casting.
The unit construction of this type of bearing insures ease[241] in mounting, and eliminates much costly machine work usually encountered in setting double thrust bearings, and renders the bearing practically dirt, dust and fool-proof. If it becomes necessary to disassemble the machine upon which these bearings are mounted, the user has every assurance that the shafts can be relocated precisely in its original position, with the minimum of time, labor and expense. This type of bearing is also entirely free from adjustment, loose parts, costly machine work, and the possible abuse at the hands of inexperienced workman are entirely done away with.
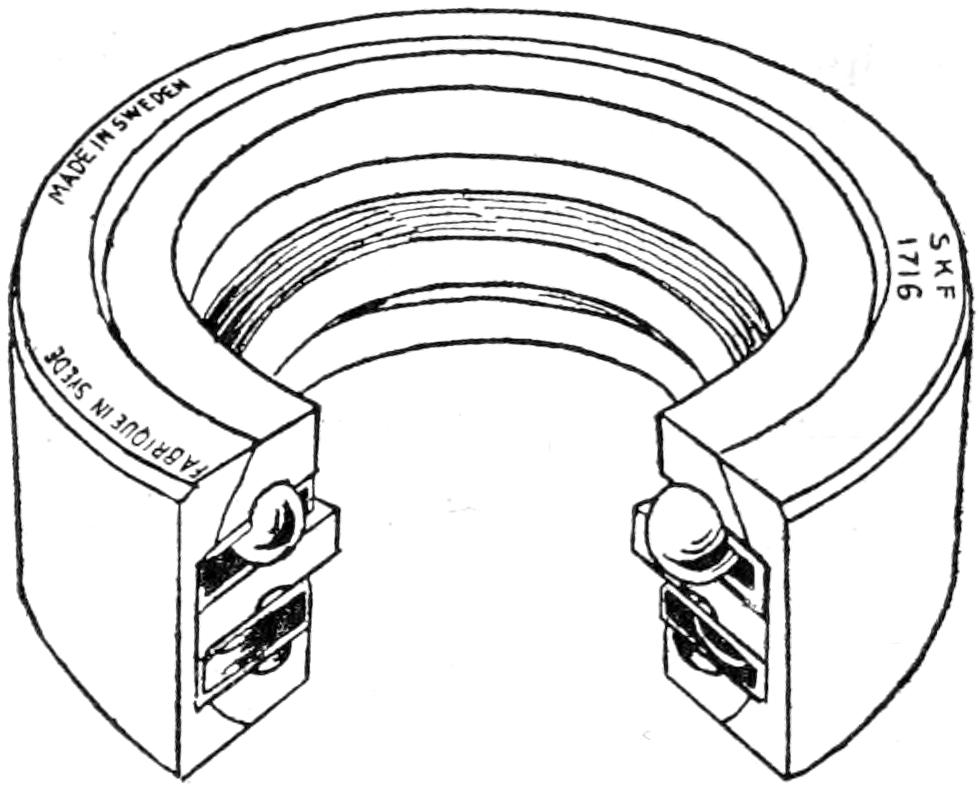
Fig. 144. Double Row Thrust Bearing
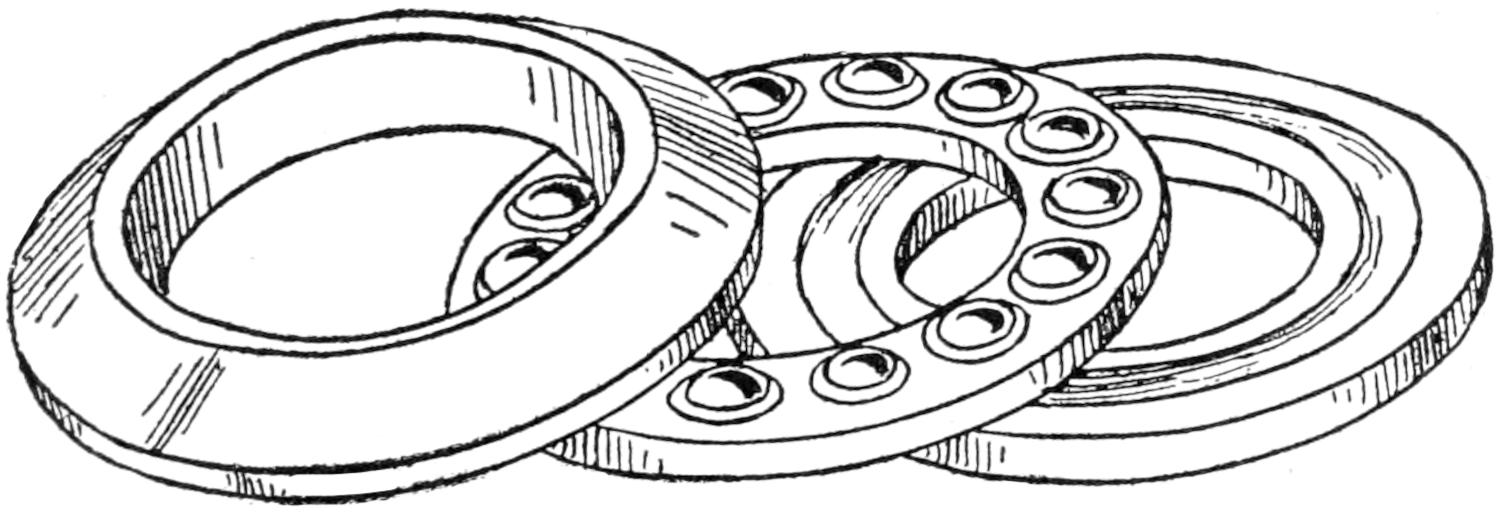
Fig. 145. End Thrust Bearing
Fig. 145 shows a thrust bearing designed to carry the load in one direction, along the shaft, and consists of two hardened steel discs provided with grooved ball-races, and a single row of balls held in position between the races by means of a suitable retainer.
Cleaning Bearings.—To clean bearings, use gasoline, kerosene,[242] or a weak solution of baking soda and soft water. Place the cleaning fluid in a shallow receptacle, take a piece of wire and bend a hook on the end, place the hook through the center of the bearing and rinse up and down in the fluid, spinning it with the hand occasionally. If some of the grease has dried or baked on the roll or roller guide or retainer and refuses to be dislodged by this method, lay the bearing flat and scrub with a brush which has been dipped into the cleaning fluid.
[243]
1. Oil cup on shackle bolt or loop pin. Fill every week with medium cup grease giving one half turn every second day.
2. Right front spring. Loosen the small clips No. 47, clean off all dirt and grease with a brush dipped in kerosene, and jack up the frame, which will open the leaves. Force graphite between the leaves, let the frame down and wipe off all the grease that is forced out, in order to avoid the gathering of dust and grit (see chapter on Spring Care).
3. Front lamp. Keep brackets and vibration rod well tightened. Wipe lens with a damp cloth (inside and outside), and polish with tissue paper. Adjust or focus both lamps so that the center rays will strike side by side 45 feet ahead of the car. Push the light bulbs well into the sockets, otherwise a dark spot will appear in the center. Test the wire connection plugs occasionally for weak springs or sticking contact pins.
4. Radiator (see chapter on Cooling Systems).
5. Radiator Cap. Grease or oil thread occasionally.
6. Radiator connecting hose (see chapter on Cooling Systems).
7. The fan. It usually operates on a ball and cone bearing, which must be kept well adjusted and greased to prevent a clattering or rumbling noise.
8. The fan belt. This should be well tightened to prevent slipping, which will cause over-heating. Apply belt dressing occasionally to prevent dry-rot and cracking.
9. Adjust the starter chain from time to time by setting down the idler gear.
10. Metal tube for carrying the high tension leads to the[244] spark plugs. Remove the wires from the tube when overhauling and tape worn insulation.
11. Spark plugs (see chapter on Spark Plug Care).
12. The horn. Keep connection tight, clean gum and old grease off the armature and adjust the brushes when it fails to work.
13. Priming cups. Cover the threads with graphite or white lead and screw them into the cylinder head tightly to prevent compression leaks.
14. Horn bracket. Keep well tightened, to prevent vibration.
15. Clutch pedal. It can usually be lengthened or shortened to accommodate leg stretch, oil and grease bearings, and connecting joint each week.
16. Primer or choker, which operates the air valve on the carburetor.
17. Steering column.
18. Steering wheel (see chapter on Steering Gears).
19. Horn shorting push button.
20. Spark control lever.
21. Gas throttle control.
22. Transmission (see chapter on Transmission).
23. Brake rods (see chapter on Brakes).
24. Universal joint (see chapter on Universal Joints).
25. The frame.
26. Emergency brake leverage connection.
27. Service brake leverage connection.
28. Threaded clevis for lengthening or shortening brake rods.
29. Crown fender.
30. India rubber bumper.
31. Brake band guide.
32. Gasoline or fuel tank.
33. Filler spout and cap.
34. Spring shackle hinge.
35. Tire carrier.
36. Spare tire and demountable rim.
[245]
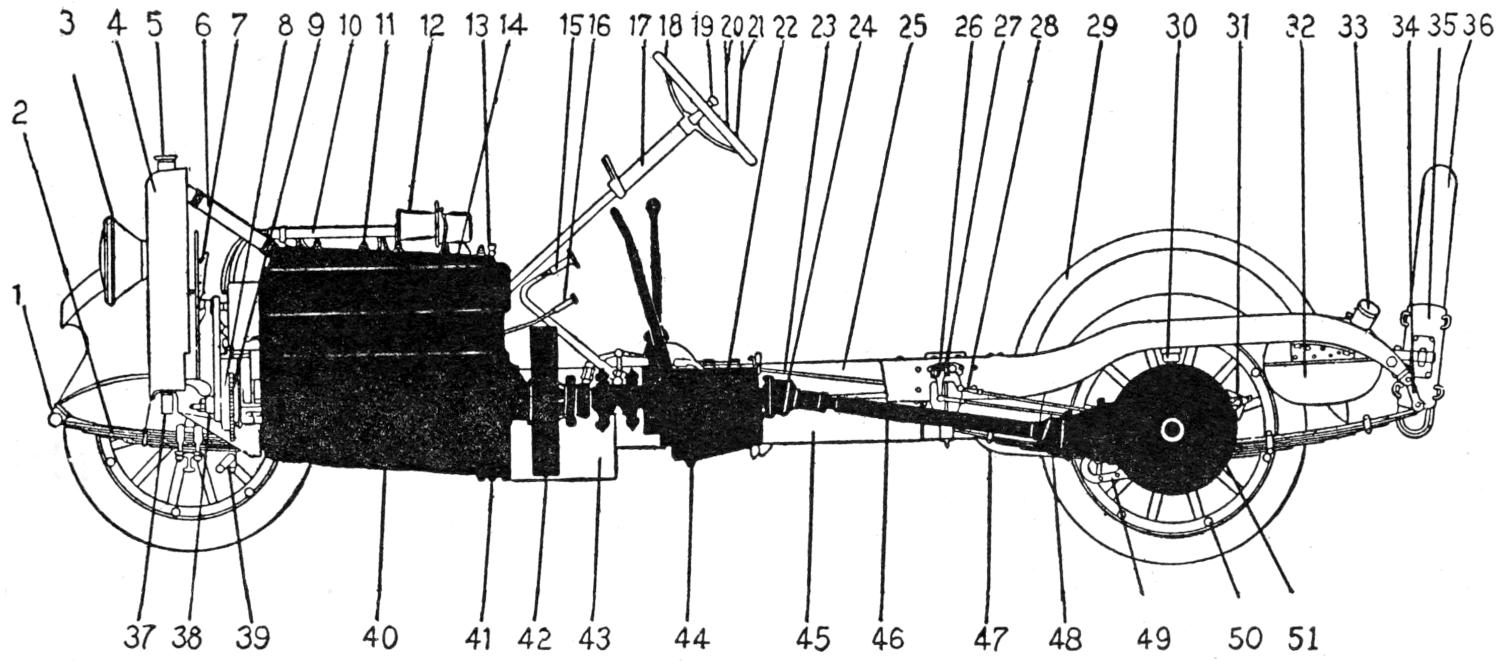
Fig. 146. Car Arrangement
[246]
37. Radiator fastening stud.
38. Starting crank ratchet.
39. Spread rod with left and right threaded clevis at each end.
40. The crank case.
41. Crank case drainage plug.
42. The flywheel and clutch.
43. Box for carrying storage battery.
44. Transmission drain plug.
45. The muffler (see chapter on Muffler Care).
46. Main drive shaft.
47. Spring blade alignment clamp.
48. Rear universal joint.
49. Service brake lever.
50. Demountable rim clamp bolt.
51. Differential housing on rear axle.
[247]
Before starting to dismantle the car for overhauling, see that all the necessary tools are at hand and in good condition. Place them out separately on a bench or board near the car. Then secure a number of boxes to hold the parts of each unit in order that they may not become intermixed.
When overhauling is to take place, start at the front of the car and work back. First, disconnect and remove the radiator and inspect the tubes for dents or jams. If any of any consequence are found, pry the fins up and down on the tubes clearing the affected part, which is removed and replaced with a new piece of tubing and soldered in place. Then turn a stream of water into the radiator and let it run for fully an hour, or until it is fully flushed out. Next, inspect the hose connections, as the rubber lining often becomes cracked and breaks away from the fabric which retards the circulation, by filling the passage with hanging shreds of rubber. Then plug up the lower entrance to the water jackets and fill the jackets with a solution of 2 gal. of water to 1⁄2 lb. of washing soda. Let this solution stand in the jackets for one-half hour; then flush out with clean water. The carburetor and manifolds should be removed and cleaned. The float, if cork, should be allowed to dry. It is then given a coat of shellac and allowed to dry before reassembling the carburetor.
The engine should then be turned over slowly to test the compression on each cylinder. If it is found to be strong on each cylinder, the piston rings and cylinder wall may be passed as being in good condition. In case you find one cylinder is not as strong as the others, the trouble may be ascertained by inspection. It may be caused by a scored cylinder[248] wall, worn piston rings, leaky gasket, or pitted valve seats. Next remove the head of the motor and remove the carbon with a scraper and wash with kerosene. If the motor is not of the detachable head type, remove the valve cup and use a round wire brush to loosen the carbon. It is best in this case to burn out the carbon with oxyacetylene flame.
Next remove the valves and test the springs for shrinkage or weakness. If any are found that do not conform in length, replace them with new springs. Grind the valves (see previous Chapter on Valve Grinding).
Next examine the water pump and pack the boxing with a wick or hemp cylinder packing.
Cleaning the Lubricating System.—Remove the plug in the bottom of the crank case and drain out the oil. Replace the plug and pour 1 gal. of kerosene into the crank case through the breather pipe and spin the motor. Then remove the drain plug and allow the kerosene to drain out. After it has quit running, turn the motor over a few times and allow it to drain one-half hour. Replace the plug and fill the crank case to the required level with fresh cylinder oil. Next, remove the plate from the timing gear case and inspect the gears for wear and play. If they are packed in grease, remove the old grease and wash out the case with kerosene. If they receive their oil supply from the crank case it will only be necessary to inspect them for wear. Then replace the motor head, timing gear case plate and manifolds, using new gaskets and new lock washers. Next clean the spark plugs and ignition systems (see chapter on Spark Plugs and Ignition System).
Then we proceed to the different types of clutches. The cone clutch usually does not require cleaning, but in cases where it has been exposed to grease or lubricating oil the leather face may be cleaned with a cloth dampened in kerosene, after which a thin coating of Neat’s foot oil is applied to the leather facing. The cone is then replaced and the springs adjusted until it runs true. This is determined by holding it out and spinning it.
The wet and dry plate clutches are treated in much the same[249] manner. First drain out all the oil or grease and wash out the housing with kerosene. Examine all parts for wear and adjust or replace loose parts. Fill the housing up to the slip shaft with fresh oil or grease, that is, providing it is a wet plate clutch. The dry plate clutch need only be washed with kerosene to remove any grease or dirt that has lodged on the plates.
Cleaning the Transmission.—First drain off the oil and wash the gear with a brush dipped in kerosene. Then inspect the bearings for looseness. If you find one badly worn, replace the bearing at each end of the shaft. Next, examine the gears. If they are blunt, burred or chipped, smooth them off on an emery wheel or with a coarse file. Wash out the case with kerosene and fill with a thick transmission oil or grease until the fartherest up meshing point is covered to the depth of from 1 to 11⁄2 inches. Examine the slots or notches on the horizontal sliding shafts in the cover of the case which holds the gears in or out of mesh. If the slots are badly worn it will be necessary to replace sliding shafts or it may be necessary to replace the springs which hold the ball or pin to the shaft and slots.
The universal joints are cleaned and freed of all grease and dirt. The bushings and trunion head are inspected for looseness. If any exists a new set of bushings will usually remedy the trouble. The housing should then be packed with a medium or fairly heavy cup grease.
Next we come to the differential which is treated in the same manner as the transmission, except that the housing is packed with a much heavier grease, and new felt washers are placed at the outer end of the housing where the axle extends to the wheels.
The rear system is then jacked up until both wheels clear the ground. The brakes are then tested and adjusted (see chapter on Brakes), and the rear wheels tested for looseness. If the axle is of the full floating type looseness may be taken up by withdrawing the axle and loosening the lock nut back of the cone and driving the notched cone ring to the[250] right (facing it) until the play is taken up. When looseness is found in the semi-floating or three quarters floating axle it is necessary to replace the outer bearing which is located inside of the outer end of the housing tube.
Next examine the springs (see chapter on Springs and Spring Tests).
This brings us to the steering gear, which should be inspected, tightened up, and freed from all play at the various joints and connections, after which it should be well packed with grease.
The front wheels should be jacked up and tested for loose or worn bearings and spindle pins. The bearings can usually be adjusted while the loose spindle pin or bushing should be replaced. After the bearings have been adjusted or replaced, pack the space in the hubs between the bearings with a medium hard oil or cup grease, which will sufficiently lubricate the bearings for 2000 miles of service.
The wheels and axles are then lined up (See chapter on Alignment).
Next, take a piece of sharp wire and remove all the dirt, gum, and hard grease from oil holes supplying clevis joints and plain bearings. Take up all play which is liable to produce noise and rattles with new bolts, pins and washers. Clean and fill all grease cups boring out the stem heads with a piece of wire.
(See chapter on Washing, Painting, and Top and Body Care.)
[251]
The necessary repair equipment should be divided into two sets, one to be carried with the car, which we will call road repair necessities, such as 25 ft. of 5⁄8″ manilla hemp rope, which will probably come in very handy and save the original cost many times in one year. Even with good roads and the general tendency toward improvements, there still remains a great many miles of bad road that becomes very troublesome with their customary chuck holes and slippery brims, which often lead a motorist to bring up in a ditch after a short rain storm. The advantages of this rope are explained in this way; should you slide into the ditch or get into a deep rut, the wheels will usually spin and you are helplessly stuck. A pull from a passing motorist, or farmer, will help you out of your difficulty. Should any part of your car break, or give out, any passing motorist or farmer will give you a tow to the nearest garage and thereby avoid delays.
Therefore, we will head our list of road repairs with: 25 ft. of 5⁄8″ manilla hemp rope, 2 inner tubes, 1 blowout patch, 1 outer shoe, 1 set of chains, 1 jack, 1 pump, 1 tire gauge, 1 tube repair outfit and patches, an extra spark plug, several cores and terminals, a few feet of primary and secondary wire, 1 box of assorted bolts, nuts, washers and cotter pins, 1 qt. can of lubricating oil, 1 complete set of good tools neatly packed in a small box and secured to the floor of the car under the rear seat by fastening both ends of a strap to the floor and placing a buckle in the center which will hold the box securely and avoid all noise.
Garage repair equipment should consist of the following: 1 set of tire jacks, 1 small vulcanizing set and supplies, 1 can[252] of medium cup grease, 1 can or tank of lubricating oil, 1 small vise, 1 box of felt washers, 1 box of assorted cotter pins, 1 box of assorted nuts, 1 box of assorted lock washers, 1 box assorted cap screws and bolts, 1 set of assorted files, 1 hack saw, 1 Stilson wrench, 1 dope gun, 1 air pressure oil can, 1 valve lifter, several valve and assorted springs, 1 box of auto soap, 1 sponge and a good chamois skin.
This outfit should all be purchased at the same time and each supply and tool packed or placed in respective places, so that it will not be necessary to look far and wide when you wish to use some particular tool. With this equipment, and some knowledge and patience, the average man should be able to keep his car in excellent condition by doing his own adjusting and repairing.
[253]
Body.—The body is the carrying part of the car and usually consists of an oak or ash frame covered with a thin sheet steel. It is bolted to the frame of the car, and aside from washing and cleaning and keeping the bolts tight to prevent squeaks, it requires no further care.
Body Washing.—When about to wash the body, soak the dirt off with a gentle open stream of cold water. That is, remove the nozzle from the hose, and do not rub. Remove mud before it gets dry and hard whenever possible. Grease can be removed with soap suds and a soft sponge. Use a neutral auto soap, and rub as little as possible. Rinse thoroughly with a gentle stream of cold water, and dry and polish with a clean piece of chamois skin. If the body has a dull appearance after washing, due to sun exposure or too frequent washing, apply a good body polish lightly and polish until thoroughly dry with a clean piece of gauze or cheese cloth.
Running Gear Washing.—Scrape the caked grease and dirt off from the brake drums and axles, and scrub lightly with a soft brush dipped in soap suds. Rinse thoroughly with a gentle stream of cold water. Dry with a piece of cloth or a chamois. Old pieces of chamois skin which are too dirty to use on the body can be used to dry the running gear. If the running gear takes on a dirty appearance after becoming dry, go over it with a cloth dampened with body polish. Tighten up all bolts and make all adjustments while the car is clean.
Engine Cleaning.—Clean the engine with a paint brush dipped in kerosene. Then go over it with a cloth dampened with kerosene.
[254]
Top Cleaning.—The top should never be folded until it is thoroughly cleaned and dried. Dust on the outside can be removed by washing it with clear cold water and castile soap. Be sure to rinse it thoroughly with clear water. The inside should be dusted out with a whisk broom. Be careful when folding it and see that the cloth is not pinched between the sockets and bows, and always put on the slip cover when it is folded to keep out the dust and dirt.
Curtain Cleaning.—Wash the curtains with castile soap. After they are dry go over them with a cloth dampened in body polish. Always roll the curtains; never fold them.
Cleaning Upholstering.—If the car is upholstered with leather or imitation leather, it should be washed with warm water and castile soap, then wiped off thoroughly with a clean cloth dampened in clear warm water. If the upholstering is with cloth it should be brushed thoroughly with a stiff whisk broom, then gone over lightly with a cloth dampened in water to which a few drops of washing ammonia has been added.
Rug Cleaning.—Clean the rugs with a vacuum cleaner, or stiff whisk broom.
Windshield Cleaning.—Add a few drops of ammonia or kerosene to a pint of warm water; and wash the wind shield with this solution and polish with a soft cloth or tissue paper.
Sedan or Closed Body Cleaning.—Follow directions given for cleaning upholstering and windshields.
Tire Rim Cleaning.—Remove the tires twice each season. Drive the dents out of the rims, rub off all rust with sand paper, and file off all sharp edges and paint the rims with a metal filler. Allow the paint to dry thoroughly before replacing the tire. Rust on the rims causes rapid tire and tube deterioration.
Tire Cleaning.—Rinse the mud and dirt off the tires, and wash them with soap suds and a coarse sponge. Rinse with clear water.
Lens Cleaning.—To clean the light lens follow the instructions given above for cleaning windshields.
Cover the car at night to prevent garage dust from settling[255] into the pores of the paint. This type of dust causes the varnish to check and take on a dull dirty appearance, and is very hard to remove without the use of soap. Use a neutral soap and rinse thoroughly with clear cold water.
A good serviceable throw-cover can be made from any kind of cheap light goods, or by sewing several old sheets together.
Caution.—Do not dust the car immediately after driving it in the sun and never use a feather duster as this only pads the dust into the varnish, and scratches it.
A good dusting cloth is made by dampening a soft cloth with an oil polish. The cloth should be left to dry in the sun for several hours after being dampened with oil.
Rinsing the body off with clear cold water and drying it with a chamois skin is always preferable as it produces a clean appearance and freshens the paint.
[256]
Building a tire is like building a house or laying a cement sidewalk; the foundation must be right or the job will not stand up.
The foundation of a tire as every motorist knows consists of alternative layers of rubber, fabric, or cord, covered with a tread and breaker strip of rubber. The tread and breaker strip, however, are not worth the space they occupy if they are placed over a poorly constructed foundation of cheaply made fabric. Therefore, great care should be exercised in choosing a tire of standard make which has been tested, inspected, and guaranteed to be in perfect condition, and gives a mileage guarantee.
The cheaper grades of tires may be very deceiving in looks, but the point remains, that beneath the tread and breaker strip there must be something that is cheaper in quality than the material used in building a standard tire or it could not be sold for less, as tire building material sells at a market price obtainable to all; and the standard tire is usually produced in large quantities at a small profit, which may be seen by comparing the production records and the dividends paid on capitalization.
This point alone shows the wise economy in purchasing tires of standard build and avoiding all so-called low priced tires as they usually cost the motorist considerable more before the average mileage of a good tire is obtained.
Tires given close attention will usually give from one to two thousand more miles of service than those that do not receive prompt attention. Therefore, close inspection should be made frequently for cuts, rents, stone bruises, or a break in[257] the tread which exposes the underlying fabric to wear and dampness.
When a break is discovered in either the tread or breaker strip, it should be slightly enlarged and well cleaned. A coat of raw rubber cement is applied and allowed to dry. Another coat of cement is applied, and when this coat is fairly dry, fill the indenture with raw rubber gum and cook for thirty minutes with a small vulcanizer. The cement, rubber, and vulcanizer may be purchased at any accessory store for a couple of dollars.
Tire Care.—Always keep the garage floor clean and free from oil, grease and gasoline, in order that the tires may not come in contact with it or stand in it. All three are deadly enemies to rubber. This is easily accomplished by spreading a thin layer of sawdust or bran on the floor and dampening it. This not only makes floor cleaning easy but also keeps the air moist and causes the dust to settle quickly.
When a tire comes in contact with either grease, oil, or gasoline, it should immediately be washed with warm water and castile soap.
Mud must not be allowed to dry and bake on the tires as it causes the rubber to loose its springy elastic qualities, and dry-rot or rubber scurvy takes place immediately, and the tread begins to crack and crumble.
Tire Chains.—Use tire chains only when they are absolutely necessary to overcome road conditions, as the use of chains under the most ideal conditions results in a certain amount of damage to the tires, and also causes destruction to improved roads. Chains are easily put on by stretching them out at the rear of the car and rolling the car on them. The clamps should be placed forward in order that the contact with the road may serve to keep them closed.
Adjust the chains to the tire loosely in order that the cross chains may work around and distribute the wear evenly.
Cross Chains.—Inspect the cross chains occasionally for wear and sharp edges.
Do not use springs across the front of the wheel to hold[258] the chains, as they prevent the cross chains from working around on the tire and the opposite side chain is often drawn onto the tread, and as these chains are not continuous, the link connections wear and cut the tread exposing the underlying layers of fabric to dampness and wear.
Tube Care.—When an extra tube is carried with the car shake some tire talc or soap stone on it and wrap with tissue paper. It can then be carried in a small box with the tools without being damaged from vibration.
Tube Repairing.—A tube should always be vulcanized to make the repair permanent; but in case you must make a road repair and have not a vulcanizer with you, an emergency repair can be made by sticking on a patch. The surface of the tube and the patch is cleaned and roughened with a fine file or piece of emery paper. A coat of cement is applied next and allowed to dry. Another coat of cement is applied and allowed to dry until it becomes tacky. The patch is then pressed on the tube and held under pressure fifteen or twenty minutes until the cement is dry. This repair will serve for a short time but should be made permanent at the first opportunity.
Tire Storage.—When the car is to be stored for the winter, the tires should be left on the wheels and deflated to thirty pounds pressure (that is, after they have been relieved of the weight of the car), except in cases where the garage is cold and very damp and subjected to weather changes. In this case remove the tires and hang them up in a cool dry place (store room or cellar).
Always remove the old valve cores from the valve stems and replace them with new ones before putting the tires back into service, as the rubber plungers deteriorate very rapidly when inactive. Valve cores can be purchased at any service station in a small tin container for thirty-five to fifty cents per dozen.
[259]
The average car owner usually fights shy of the electrical system. This deserves attention when overhauling the car, as well as any other part of the car, and a few simple precautions will go a long way toward eliminating electrical troubles.
The entire electrical system should be gone over. One of the most important things demanding inspection is the wiring. It often happens that the insulation becomes chafed or worn, through contact with other parts of the car. It is, therefore, important to look over the wiring very carefully. Where there is any doubt as to the insulation being insufficient, new wires should be used. This eliminates the possibility of there being an accidental ground, or short circuit, rendering a part or the entire system inoperative.
All terminals should be gone over to determine whether they are clean and tight. This is especially true of the terminals on the storage battery, and at the point where the battery is grounded to the frame of the car if it is a single wire system.
The connections between the storage battery and the starting motor should be clean and free from corrosion. If these connections are not tight and clean, improper performance of the starting motor is the result.
Apply a small amount of vaseline to the battery terminals for protection of the metal from the action of the acid fumes and prevention of corrosion. It is well to have the battery inspected by a battery specialist and any necessary repairs taken care of.
[260]
Distributor and relay points should be examined to see if they are pitted or burned. If they are, they should be smoothed down with a fine platinum file and adjusted to the proper gap. It is essential that the contact points meet squarely. If this is not done burning and pitting will result.
The generator and starting motor commutator should be examined for undue wear and high mica. It may be necessary in order to insure good performance that the commutator be turned down in a lathe and the mica undercut.
The brushes should be properly seated by careful sanding. This is especially necessary when the commutator is turned down. It is desirable to have three-quarters of the brush face bearing on the commutator. This can be determined by examination of the glazed area on the brush after running a short time.
Should the starter drive be of the bendix type, the threaded shaft and pinion should be cleaned, and any grease which has hardened should be removed.
Lamps should be examined. Dim and burned out lamps should be replaced.
All connections of the lighting and ignition switch should be inspected. It should be noted whether the terminals are touching, or nearly touching. If any wires are rubbing thus, entailing the possibility of a short circuit or ground, they should be fixed.
Electric cables that rub on sharp edges of the battery box will soon wear through the insulation from vibration of the car and a short circuit will occur that may be hard to find. Such parts of the wire should be well protected with adhesive tape and should be also frequently inspected.
High tension currents are very hard to control, and a short or leakage often occurs where the wire is cramped. The center wire works or wears through the rubber insulation causing the current to jump to the nearest metal part. This kind of trouble is especially hard to locate as the outer surface of the braided insulation does not show the break.
[261]
It is a good plan to examine the wiring for short circuits occasionally in this manner. When putting the car in at night, close the garage door and turn out the lights, running the motor at various speeds and gently moving each wire. If there are any short or grounded circuits a brilliant spark will jump at the defective point.
[262]
Painting a car requires a great amount of patience. But a fairly good job may be done by the average amateur painter, providing the work is done carefully and exactly. However, this work should be undertaken only in a warm, dry room where it is possible to keep an even temperature.
The old paint is first removed with a paint remover, or solution which is applied to the surface and allowed to penetrate into the pores. Another coat is then applied. The surface is then scraped with a putty knife until it is smooth and free from the old paint. In some cases it may be found necessary to use a blow torch to soften the old paint.
After the old paint has been thoroughly removed, the rough spots should be smoothed over with a piece of sand or emery paper, and all counter sunk screw heads, joinings, and scratches filled with putty, to make an even surface. The metal primer is applied and allowed to dry. A second coat consisting of equal parts of white lead, turpentine and boiled oil is next applied and allowed to dry. Three or four coats of color are applied next and allowed to dry. Colors come in a paste form, and may be turned into a paste by adding a little turpentine. Two coats of color and an equal amount of rubbing varnish are next applied in turn and rubbed with powdered pumice stone and water. The car is then stripped and allowed to dry, and the job finished by applying a coat of finishing varnish.
All the foreign matter and grease is removed from the running gear. The rough places are scraped and rubbed with a piece of emery paper. Two coats of metal primer are applied and allowed to dry. A coat of color varnish is applied which completes the job.
[263]
It is necessary to remove the carbon deposits from the combustion chambers and piston heads at frequent intervals in order to maintain an economical and efficient motor.
There are various methods and ways of doing this without removing the casting or cylinder head; that is, providing regular attention is given to prevent the deposit from baking and forming in a shale which can be removed only by burning or scraping.
There are a number of carbon removing compounds on the market which give excellent satisfaction, although some of these compounds may prove very harmful unless the directions are followed very carefully.
A great many owners use kerosene once or twice a month. An ounce or two may be poured into each cylinder while they are quite warm and allowed to stand for several hours. The motor is then turned over a few times which allows the kerosene to escape through the valves. The particles of carbon are blown out through the muffler when the motor is started. Others prefer to feed it into the motor through the carburetor. This is done by speeding up the motor and feeding a little at a time into the float chamber or air valve. Others use chloroform, turpentine, and alcohol in the same way.
The latest method is to take the car to a garage and have the carbon burnt out occasionally with a carbon dioxide flame. This vaporizes and consumes the carbon and blows it out in the form of soot. The flame of an acetylene welding outfit may be used successfully. Great care must be taken to prevent fire. The carburetor is removed and the fuel line drained and tied out of range of the flame.
[264]
| TROUBLE | CAUSE | REMEDY |
|---|---|---|
| Motor misses | Worn piston rings | New oversize rings |
| Motor misses | Pitted valve seats | Grind in valve seats |
| Motor misses | Loose locknut, tappets | Adjust tappets |
| Motor misses | Gas. mixture too heavy | Adjust carburetor |
| Motor misses | Gas. mixture too thin | Adjust carburetor |
| Motor misses | Contact points worn | Adjust points |
| Motor misses | Loose cable connections | Connect to terminal posts |
| Motor misses | Cracked piston head | Replace piston |
| Motor misses | Cracked water jacket | Weld, rebore cylinder |
| Motor heats | Poor circulation | Flush out radiator |
| Motor heats | Insufficient lubrication | Clean oiling system |
| Motor heats | Excessive carbon deposit | See chapter on Carbon Removing |
| Motor heats | Cracked piston ring | Replace rings |
| Motor heats | Scored cylinder wall | Rebore cylinder |
| Motor heats | Tight main bearings | Lubricate plentifully |
| Motor heats | Heavy gas mixture | Adjust carburetor |
| Motor heats | Cylinders missing | See Motor Misses |
| Motor heats | Worn distributor contact spring | Replace spring on block |
| Motor back-fires | Lean mixture | Adjust carburetor |
| Motor back-fires | Valve open | Reseat valve, adj. tappet |
| Motor back-fires | Ignition off time | See ignition systems |
| Motor fails to start | Lack of gasoline | Fill tank |
| Motor fails to start | Vacuum in fuel tank | Open air hole in cap |
| Motor fails to start | Lack of current | Close circuit |
| Motor fails to start | Short circuit | Tape conductor at point |
| Motor fails to start | Discharged battery | Test with hydrometer; have recharged |
| Motor fails to start | Lack of fuel | Clean carburetor |
| Motor fails to start | Lack of fuel | Clean screen at fuel entrance to vacuum system |
| Motor fails to start | Lack of fuel | Clean pipe from vacuum system to carburetor |
| Motor fails to start | Ignition fouled | Clean corrosion from terminals |
| Motor fails to start | Breaker points stuck | Redress lightly with finger nail file |
| Motor fails to start | Plugs improperly set | Close points to thickness of a dime |
| Motor fails to start | Oil on points | Clean plugs and screw down tightly |
| Motor fails to start | Cracked porcelain | New plug |
| Motor fails to start | Open valves | Grind or reset valves |
| Motor fails to start | Valves stuck | Polish stems |
| Motor fails to start | Weak valve springs | Replace springs |
| Motor fails to start | Open circuit | Close switch |
| Motor misses | Defective spark plug | Replace |
| Motor misses | Disconnected wires | Connect up tightly |
| Motor misses | Dirty plugs | Clean |
| Motor misses | Poor compression | Replace gasket |
| New piston rings | ||
| Motor vibrates | Loose frame connection | Draw bolts down |
| Motor vibrates[265] | Pistons sticking | Increase lubrication |
| Motor vibrates | Pistons weight uneven | Balance evenly |
| Motor vibrates | Defective spark plug | Clean, replace plug |
| Motor kicks | Preignition | Time ignition system |
| Motor kicks | Carbon, combustion chamber | Scrape out, burn out |
| Motor knock head | Wrist pin bearing loose | Give pin 1⁄4 turn |
| Motor knock head | Loose connecting rod | Tighten upper bearing |
| Motor knock head | Valve slap | Adjust tappet |
| Motor knock base | Connecting rod loose | Adjust remove shim |
| Motor knock base | Main bearing loose | Adjust remove shim |
| Motor rumble | Flywheel loose | Adjust reseat |
| Motor rumble | Fan bearing loose | Adjust grease |
| Motor tipping | Fan blade strikes radiator | Adjust bend blade |
| Motor tapping | Tappet worn | Adjust tighten lock nut |
| Motor compression poor | Thread stretch | Tighten head bolts |
| Motor compression poor | Gasket burned or blown | Replace, new gasket |
| Motor compression poor | Valve seat pitted | Grind, reset valve |
| Motor compression poor | Valve guide worn | Replace bushing |
| Motor compression poor | Valve stem warped | New valve |
| Motor compression poor | Piston rings lined up | Distribute openings |
| Motor compression poor | Cylinder wall scored | Oversize rings; rebore |
| Universal joint noise | Loose sleeve connection | Tighten flange bolts |
| Universal joint noise | Insufficient lubrication | Remove boot and pack with grease |
| Universal joint slap | Worn bushings | Turn bushings end for end |
| Universal joint slap | Worn trunion | New bushings |
| Differential noise | Dry | Fill with graphite grease or 600 W |
| Differential click | Chipped gear | Replace |
| Differential knock | Broken out tooth | Replace |
| Differential growl (steady) | Ring gear mesh too deep | Back up trifle on adjustment |
| Differential growl (uneven) | Ring gear mesh too loosely | Set up adjustment |
| Differential growl (uneven) | Axle shaft sprung | Retrue, replace |
| Differential growl (uneven) | Loose bearing retainer | Tighten nuts |
| Brakes fail to release | Rusted clevis joints | Lubricate with heavy grease |
| Brakes fail to release | Broken coil spring | Replace |
| Brakes fail to release | Stretched coil spring | Replace |
| Brake clatter | Loose adjustment | Adjust |
| Brake clatter | Worn lining | Reline the outer band |
| Brake clatter | Loose release spring | Adjust |
| Brake squeak | Dry lining | Four or five drops of oil |
| Brake squeak | Burned lining | Replace |
| Brakes fail to grip | Lining worn down to rivet heads | Replace |
| Brakes fail to grip | Overly lubricated | Wash with kerosene |
| Brakes fail to grip | Lining worn slick | Wash with kerosene and roughen with file |
| Brakes fail to grip[266] | Lining burned hard | Replace |
| Brakes fail to grip | Stretched rivets | Draw down |
| Brake rod rattle | Worn clevis pin | Replace |
| Brake rod rattle | Spread clevis yoke | Drive ends together |
| Brake rod rattle | Loose lock-nut behind clevis | Tighten down |
| Brake rod rattle | Brake rods strike each other | Tape one rod at contact point |
| Brake rod rattle | Dry connections | Lubricate with small lump of grease |
| Torque rod rattle | Loose connections | Adjust |
| Torque rod rattle | Loose coil spring | Adjust |
| Emergency brake lever rattle | Loose joint bearing | Replace bushing |
| Emergency brake lever rattle | Worn plunger spring | Replace |
| Gear shift lever rattle | Worn ball socket | Lubricate with heavy grease |
| Gear shift lever rattle | Worn ball | Dent in socket with punch |
| Gear shift lever rattle | Worn alignment spring blades | Replace |
| Gear shift lever rattle | Worn bearing | Place thin washer at end of joint |
| Steering wheel play | Open mesh | Set up sector |
| Steering wheel play | Loose bearing | Turn down cone |
| Steering wheel play | Worn gear tooth | Take up on eccentric bushing |
| Steering wheel play | Loose drag link sockets | Turn in end plug |
| Steering wheel stiffness | Dry | Pack with grease |
| Radiator heats | Poor circulation | Flush radiator |
| Radiator heats | Jammed tubes | Remove jam and solder in new piece tube |
| Radiator heats | Sediment in bottom tank | Flush out with soda solution |
| Radiator heats | Stopped up overflow | Run wire through |
| Radiator freezes | Too much radiation | Cover bottom half of radiator with cardboard |
| Radiator freezes | Jammed tubes | Cut out section; solder in new piece |
| Radiator freezes | Sediment in bottom tank | Flush out with soda solution |
| Vacuum tank spouts gas | Dirt on vacuum valve seat | Clean valve |
| Vacuum tank overflows | Dirt on vacuum valve seat | Clean valve |
| Vacuum tank fails | Suction pipe from manifold stopped up | Clean pipe |
| Vacuum tank fails | Vacuum valve stuck | Clean valve |
| Vacuum tank fails | Entrance screen stopped up | Remove fuel line and clean screen |
| Vacuum tank fails | Loose connection at manifold | Tighten joint |
| Vacuum tank fails | Plugged fuel line | Run wire through |
| Carburetor wheeze | Choke valve out too far on dash | Push in after starting |
| Carburetor wheeze | Choke valve wire too short | Lengthen and adjust |
| Carburetor wheeze[267] | Butterfly loose on air valve pivot | Adjust and tighten |
| Carburetor chokes | Dirty valve | Grind needle valves |
| Carburetor chokes | Sediment in bowl | Clean out bowl |
| Carburetor chokes | Heavy mixture | Open air valve slightly |
| Carburetor chokes | Water in gas | Clean out bowl |
| Carburetor snaps | Thin mixture | Cut down air |
| Carburetor snaps | Water in gas | Strain gas through chamois |
| Carburetor snaps | Dirt in fuel line | Run wire through |
| Carburetor snaps | Dirt under needle valve | Remove; clean seat |
| Carburetor overflows | Dirt on needle valve seat | Remove; clean seat |
| Carburetor overflows | Cork float (water-logged) | Dry in sun and shellac |
| Carburetor overflows | Metal float punctured | Punch hole opposite leak, blow out, solder both |
| Carburetor backfires | Worn intake valve bushing | Replace bushing |
| Carburetor backfires | Defective spark plug | Replace |
| Carburetor backfires | Pitted valve seat | Reseat |
| Magneto roar | Armature shaft bearings dry | Two drops of light oil in bearing well |
| Magneto click | Dry bearing | Two drops of light oil in bearing well |
| Magneto fires uneven | Breaker points out of adjustment | Adjust points |
| Magneto fires uneven | Open safety spark gap | Adjust gap to 1⁄16″ |
| Magneto fires uneven | Condensor short circuited | Take to service station |
| Magneto fires uneven | Distributor segments worn | Take to service station |
| Magneto fires uneven | Distributor brush worn | Take to service station |
| Magneto fires uneven | Distributor insulation cracked | Take to service station |
| Magneto fires uneven | Coil short circuited | Take to service station |
| Distributor arm wabbles | Worn center bushing | Replace bushing |
| Distributor fails | Spring blade broken in head | Replace blade |
| Distributor fails | Worn contact point in head | Cut down insulation |
| Distributor fails | Oil on contact block blade | Clean with kerosene |
| Distributor fails | Contact points welded | File smooth, adjust |
| Distributor fails | Loose on shaft | Reset and retime |
| Distributor fails | Coil shorted from dampness | Dry out thoroughly |
| Distributor fails | Punctured condensor | Replace |
| Distributor fails | Secondary wire short circuited | Replace or tape |
| Distributor fails | Secondary wire disconnected in switch | Connect to proper terminal |
| Starting motor fails | Corroded terminals | Clean and grease |
| Starting motor fails | Brush loose | Tighten and adjust to even contact |
| Starting motor fails | Terminal from battery short circuited to frame | Clean and tape |
| Starting motor fails | Starting switch short circuited | Cut off end of wire, make new connection |
| Starting motor fails | Bennidict spring broken | Replace |
| Starting motor fails | Battery discharged | Recharge battery |
| Generator fails to charge | Disconnected | Replace heavy wire[268] |
| Generator fails to charge | Short circuit in cut-out switch | Make new connection |
| Generator fails to charge | Brush out of contact | Adjust contact |
| Generator noise | Dry bearings | Lubricate with light oil |
| Battery discharges too quickly | Plate short circuited | Take to service station |
| Battery discharges too quickly | Leaky cell | Take to service station |
| Battery discharges too quickly | Weak solution | Take to service station |
| Battery discharges too quickly | Deteriorated plates | Take to service station |
| Battery discharges too quickly | Dry plates | Cover plates with distilled water |
| Battery overcharges | Insufficient use of current | Burn lights and use starter frequently |
| Battery heats | Overcharging | Burn lights and use starter frequently |
| Horn fails | Wire short circuited | Replace or tape |
| Horn fails | Brush making poor contact | Adjust brush evenly |
| Horn fails | Brush making heavy contact | Adjust brush lightly |
| Horn fails | Drum too tightly adjusted | Adjust through funnel |
| Squeaks | Body loose on frame | Tighten four retainer bolts |
| Squeaks | Dry springs | Lubricate with graphite grease |
| Squeaks | Fuel tank loose | Tighten bands |
| Squeaks | Radiator loose | Tighten studs |
| Squeaks | Drip pan loose | Compress coil springs |
| Squeaks | Fender irons loose | Tighten bolts |
| Squeaks | Upper steering shaft bearing dry | Pack with heavy grease |
| Rattles | Loose spring alignment clamp | Bush and tighten |
| Rattles | Spread rod clevis open | Draw up ends and grease |
| Rattles | Demountable rim lugs loose | Draw up or replace |
| Rattles | Door hinge screws loose | Draw up |
| Rattles | Door lock worn | Bush slot |
| Lights jar out | Wires short circuited | Tape worn insulation |
| Lights jar out | Weak plunger spring in contact plug | Stretch spring |
| Lights fail | Poor contact | Remove wire and tape insulation |
| Lights fail | Poor contact | Remove plugs and adjust firmly in sockets |
| Lights dim | Globes carboned | Replace |
| Lights burn with black spot in center | Globe out of adjustment | Turn back into socket firmly |
[269]
Given in Questions and Answers—This Supplement also Covers the 1-Ton Truck
Q. What should be done before starting the car?
A. Before trying to start the car fill the radiator (by removing the cap at the top) with clean fresh water. If perfectly clean water cannot be obtained, it is advisable to strain it through muslin or other similar material to prevent foreign matter from getting in and obstructing the small tubes of the radiator. The system will hold approximately three gallons of water. It is important that the car should not be run under its own power unless the water circulating system has been filled. Pour in the water until you are sure that both radiator and cylinder water jackets are full. The water will run out of the overflow pipe onto the ground when the entire water system has been properly filled. During the first few days that a new car is being driven it is a good plan to examine the radiator frequently and see that it is kept well filled. The water supply should be replenished as often as it is found necessary to do so. Soft rain water, when it is to be had in a clean state, is superior to hard water, which may contain alkalies and other salts which tend to deposit sediment and clog the radiator.
Q. What about gasoline?
A. The ten gallon gasoline tank should be filled nearly full and the supply should never be allowed to get low. Strain the gas through chamois skin to prevent water and[270] other foreign matter from getting into the tank. Dirt or water in the gasoline is sure to cause trouble. When filling the tank be sure that there are no naked flames within several feet, as the vapor is extremely volatile and travels rapidly. Always be careful about lighting matches near where gasoline has been spilled, as the air within a radius of several feet is permeated with the highly explosive vapor. The small vent hole in the gasoline tank cap should not be allowed to get plugged up, as this would prevent proper flow of gasoline to the carburetor. The gasoline tank may be drained by opening the pet cock in the sediment bulb at the bottom of the tank.
Q. How about the oiling system?
A. Upon receipt of the car see that a supply of medium light high-grade gas engine oil is poured into the crank case through the breather pipe at the front of the engine (a metal cap covers it). Down under the car in the flywheel casing (the reservoir which holds the oil) you will find two pet cocks. Pour oil in slowly until it runs out of the upper cock. Leave the cock open until it stops running, then close it. After the engine has become thoroughly warmed up, the best results will be obtained by carrying the oil at a level midway between the two cocks, but under no circumstances should it be allowed to get below the lower cock. All other parts of the car are properly oiled when it leaves the factory. However, it will be well to see that all grease cups are filled and that oil is supplied to the necessary parts. (See chapter on Lubrication.)
Q. How are spark and throttle levers used?
A. Under the steering wheel are two small levers. The right hand (throttle) lever controls the amount of mixture (gasoline and air) which goes into the engine. When the engine is in operation, the farther the lever is moved downward toward the driver (referred to as “opening the throttle”) the faster the engine runs and the greater the power furnished. The left hand lever controls the spark which ignites the gas in the cylinders of the engine. The[271] advancing of this lever “advances the spark,” and it should be moved down notch by notch until the motor seems to reach its maximum speed. If the lever is advanced beyond this point a dull knock will be heard in the engine. (See chapter on Ignition.)
Q. Where should these levers be when the engine is ready to crank?
A. The spark lever should usually be put in about the third or fourth notch of the quadrant (the notched half circle on which the levers operate). The throttle should usually be opened five or six notches. A little experience will soon teach you where these levers should be placed for proper starting. Care should be taken not to advance the spark lever too far as the engine may “back-kick.”
Q. What else is necessary before cranking the engine?
A. First, see that the hand lever that comes up through the floor of the car at the left of the driver, is pulled back as far as it will go. The lever in this position holds the clutch in neutral and engages the hub brake, thus preventing the car from moving forward when the engine is started. Second, after inserting the switch key in the switch on the coil box, throw the switch lever as far to the left as it will go, to the point marked “magneto.” This switch connects the magneto to the engine. The engine cannot be started until it is on; and the throwing off of the switch stops the engine. The next step is to crank the engine.
Q. How is the engine cranked?
A. By the lifting of the starting crank at the front of the car. Take hold of the handle and push it toward the car until you feel the crank ratchets engage, then lift upward with a quick swing. With a little experience this operation will become an easy matter. Do not as a usual thing crank downward against the compression, for then an early explosion may drive the handle vigorously backward. This does not mean, however, that it is advisable, when the car is hard to start, to occasionally “spin” the engine with the starting handle but be sure that the spark is retarded when spinning[272] or cranking the engine against compression, otherwise a sudden back-fire may injure the arm of the operator. When the engine is cool it is advisable to prime the carburetor by pulling on the small wire at the lower left-hand side of the radiator while giving the engine two or three quarter turns with the starting handle.
Q. How is the engine best started in cold weather?
A. As gasoline does not vaporize readily in cold weather, it is naturally more difficult to start the motor under such conditions. The usual method of starting the engine when cold is to turn the carburetor dash adjustment one-quarter turn to the left in order to allow a richer mixture of gasoline to be drawn into the cylinders. Then hold out the priming rod which projects through the radiator while you turn the crank from six to eight quarter turns in quick succession. Another method of starting a cold troublesome motor is as follows: Before you throw on the magneto switch, (1) close throttle lever. (2) Hold out the priming rod while you crank several quick turns, then let go of the priming rod, being careful that it goes back all the way. (3) Place spark lever in about the third notch and advance throttle lever several notches. (4) Throw on switch being sure to get it on the side marked “magneto.” (5) Give crank one or two turns and the motor should start. After starting the motor it is advisable to advance the spark eight or ten notches on the quadrant and let the motor run until it is thoroughly warmed up.
If you start out with a cold motor you will not have much power and are liable to “stall.” The advantage of turning on the switch last, or after priming, is that when you throw on the switch and give the crank one-quarter turn you have plenty of gas in the cylinders to keep the motor running, thereby eliminating the trouble of the motor starting and stopping. After motor is warmed up turn carburetor adjustment back one-quarter turn.
Note. Many drivers make a practice of stopping their engine by walking around in front of the car and pulling out[273] on the priming rod which has the effect of shutting off the air suction and filling the cylinders full of a very rich gasoline vapor. This should not be done unless the car is going to stand over night or long enough to cool off. If the motor is stopped in this way and then started when hot, starting is apt to be difficult on account of the surplus gasoline in the carburetor.
Q. How do the foot pedals operate?
A. The first one toward the left operates the clutch, and by it the car is started and its operations largely controlled. When pressed forward the clutch pedal engages the low speed gear. When halfway forward the gears are in neutral (i. e., disconnected from the driving mechanism of the rear wheels), and, with the hand lever thrown forward the releasing of the pedal engages the high-speed clutch. The right hand pedal operates the transmission brake.
Q. What function does the hand lever perform?
A. Its chief purpose is to hold the clutch in neutral position. If it were not for this lever the driver would have to stop the engine whenever he left the driver’s seat. He would also be unable to crank the engine without the car starting forward with the first explosion. When pulled back as far as it will go, the hand lever acts as an emergency lever on the rear wheels, by expanding the brake shoes in the rear wheel drums. Therefore the hand lever should be back as far as it will go when cranking the engine or when the car is at rest. It should be only in a vertical position, and not far enough backward to act as a brake on the rear wheels when the car is to be reversed. When the car is operating in high or low speed the hand lever should be all the way forward.
Q. How is the car started?
A. Slightly accelerate the engine by opening the throttle. Place the foot on the clutch pedal, and thereby hold the gears in a neutral position while throwing the hand lever forward. Then to start the car in motion, press the pedal forward into low speed and when under sufficient headway[274] (20 to 30 feet), allow the pedal to drop back slowly into high speed, at the same time partially closing the throttle which will allow the engine to pick up its load easily. With a little practice the change of speeds will be easily accomplished, and without any appreciable effect on the smooth running of the machine.
Q. How is the car stopped?
A. Partially close the throttle. Release the high speed by pressing the clutch pedal forward into neutral. Apply the foot brake slowly but firmly until the car comes to a dead stop. Do not remove the foot from the clutch pedal without first pulling the hand lever back to neutral position, or the engine will stall. To stop the motor, open the throttle a trifle to accelerate the motor and then throw off the switch. The engine will then stop with the cylinders full of gas, which will naturally facilitate starting.
Endeavor to so familiarize yourself with the operation of the car that to disengage the clutch and apply the brake becomes practically automatic, the natural thing to do in case of emergency.
Q. How is the car reversed?
A. It must be brought to a dead stop. With the engine running, disengage the clutch with the hand lever and press the reverse pedal forward with the left foot, the right foot being free to use on the brake pedal if needed. Do not bring the hand lever back too far or you will set the brakes on the rear wheels. Experienced drivers ordinarily reverse the car by simply holding the clutch pedal in neutral with the left foot, and operating the reverse pedal with the right.
Q. How is the spark controlled?
A. By the left hand lever under the steering wheel. Good operators drive with the spark lever advanced just as far as the engine will permit. But if the spark is advanced too far a dull knock will be heard in the motor, due to the fact that the explosion occurs before the piston in the engine has completed its compression stroke. The best results are obtained when the spark occurs just at the time that piston[275] reaches its highest point of travel, the gas being then at its highest point of compression. The spark should only be retarded when the engine slows down on a heavy road or steep grade, but care should be exercised not to retard the spark too far, for when the spark is “late” instead of getting a powerful explosion, a slow burning of gas with excessive heat will result. Learn to operate the spark as the occasion demands. The greatest economy in gasoline consumption is obtained by driving with the spark advanced sufficiently to obtain the maximum speed.
Q. How is speed of car controlled?
A. The different speeds required to meet road conditions are obtained by opening or closing the throttle. Practically all the running speeds needed for ordinary travel are obtained on high gear, and it is seldom necessary to use the low gear except to give the car momentum in starting. The speed of the car may be temporarily slackened in driving through crowded traffic, turning corners, etc., by “slipping the clutch,” i. e., pressing the clutch pedal forward into neutral.
Q. Is it advisable for owners to make their own adjustments?
A. The Ford is the simplest of all cars. Most of the ordinary adjustments an owner will soon learn to make for himself. But we must strongly recommend that when it becomes necessary to employ the services of a mechanic, the car be taken to a Ford mechanic—one of our own representatives who thoroughly understands the car—and who will have no motive for running up useless repair bills. The entire Ford organization is interested in keeping every individual Ford car in constant operation, at the lowest possible cost. We have known of much damage done to many cars by unskilled repair men.
Q. What attention does the car need?
A. Remember that a new machine requires more careful attention during the first few days it is being driven than after the parts have become thoroughly “worked in.” The car[276] which is driven slowly and carefully when new usually gives the most satisfactory service in the end. Never start out with your car until you are sure that it has plenty of oil and water. Frequently inspect the running gear. See that no unnecessary play exists in either front or rear wheels, and that all bolts and nuts are tight. Make a practice of taking care of every repair or adjustment as soon as its necessity is discovered. This attention requires but little time and may avoid delay or possible accident on the road. We aim to deliver the car in proper mechanical adjustment. Afterwards it is plainly the duty of the driver to keep it in that condition.
[277]
Q. What is the principle of the gasoline driven engine?
A. Gasoline when mixed with air and compressed is highly explosive. An explosion is a violent expansion caused by instantaneous combustion of confined gases. In the gasoline engine the mixture is drawn into the cylinder, where it is compressed by an advancing piston and then exploded by an electric spark, which sends the piston violently downward, and through the connecting rod imparts a rotary motion to the crank shaft. (See cut No. 147.)
Q. What are functions of the pistons?
A. On the downward stroke the suction of the piston draws the fresh gas from the carburetor, through the inlet pipe and valve, into the cylinder. The upward movement of the piston compresses the gas into a very small space, between the top of the piston and the depression in the cylinder head, known as the “combustion chamber.” (The compressed gases inert a pressure of approximately 60 pounds to the square inch.) At this point the electric spark, generated by the magneto, explodes the gas-driving piston downward, thus producing the power which turns the crank shaft. On the next stroke upward the piston drives the exploded gas out through the exhaust valve and pipe to the muffler. The accompanying cut shows clearly the relative positions of the pistons and valves during the different strokes.
Q. How is the connecting rod removed?
A. It is a vanadium steel rod connecting piston and crank shaft. Should the babbitt bearing become worn, or burned out through lack of oil, a knocking in the engine will result, in which case the entire connecting rod should be replaced. To make this replacement, (1) drain oil from crank case; (2) take off cylinder head; (3) remove detachable plate on bottom of crank case; (4) disconnect connecting rod from crank shaft; (5) take piston and rod out through top of cylinder.
[278]
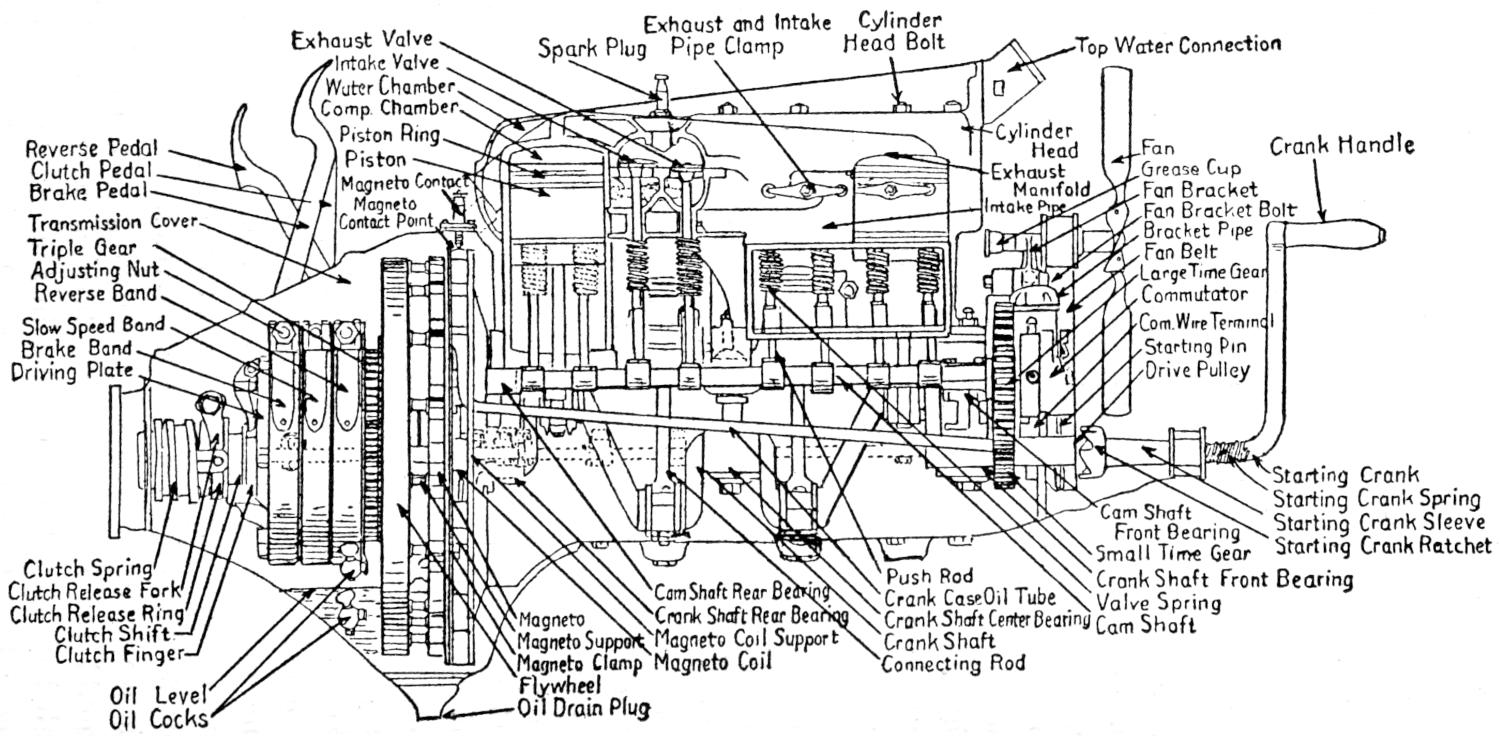
| Exhaust Valve | Spark Plug | Exhaust and Intake Pipe Clamp |
Cylinder Head Bolt |
Top Water Connection | |||
| Intake Valve | |||||||
| Water Chamber | |||||||
| Comp. Chamber | |||||||
| Reverse Pedal | Piston Ring | Cylinder Head |
Fan | Crank Handle | |||
| Clutch Pedal | Piston | Exhaust Manifold |
Grease Cup | ||||
| Brake Pedal | Magneto Contact | Fan Bracket | |||||
| Transmission Cover | Magneto Contact Point |
Intake Pipe | Fan Bracket Bolt | ||||
| Bracket Pipe | |||||||
| Triple Gear | Fan Belt | ||||||
| Adjusting Nut | Large Time Gear | ||||||
| Reverse Band | Commutator | ||||||
| Slow Speed Band | Com. Wire Terminal | ||||||
| Brake Band | Starting Pin | ||||||
| Driving Plate | Drive Pulley | ||||||
| Starting Crank | |||||||
| Starting Crank Spring | |||||||
| Cam Shaft Front Bearing |
Starting Crank Sleeve | ||||||
| Starting Crank Ratchet | |||||||
| Clutch Spring | Push Rod | Small Time Gear | |||||
| Clutch Release Fork | Cam Shaft Rear Bearing | Crank Case Oil Tube | Crank Shaft Front Bearing | ||||
| Clutch Release Ring | Magneto | Crank Shaft Rear Bearing | Crank Shaft Center Bearing | Valve Spring | |||
| Clutch Shift | Magneto Support | Magneto Coil Support | Crank Shaft | Cam Shaft | |||
| Clutch Finger | Magneto Clamp | Magneto Coil | Connecting Rod | ||||
| Oil Level | Flywheel | ||||||
| Oil Cocks | Oil Drain Plug | ||||||
Fig. 147. Ford Motor—Sectional View
[279]
Q. What is the valve arrangement?
A. One intake and one exhaust valve are located in each cylinder. The former admits the fresh gas drawn from the carburetor through the inlet pipe, the latter permits the exploded gas to be driven out through the exhaust pipe. The valves are alternately opened and closed (see Fig. 148) by the cams on the cam shaft striking against push rods which in turn lift the valves from their seats.
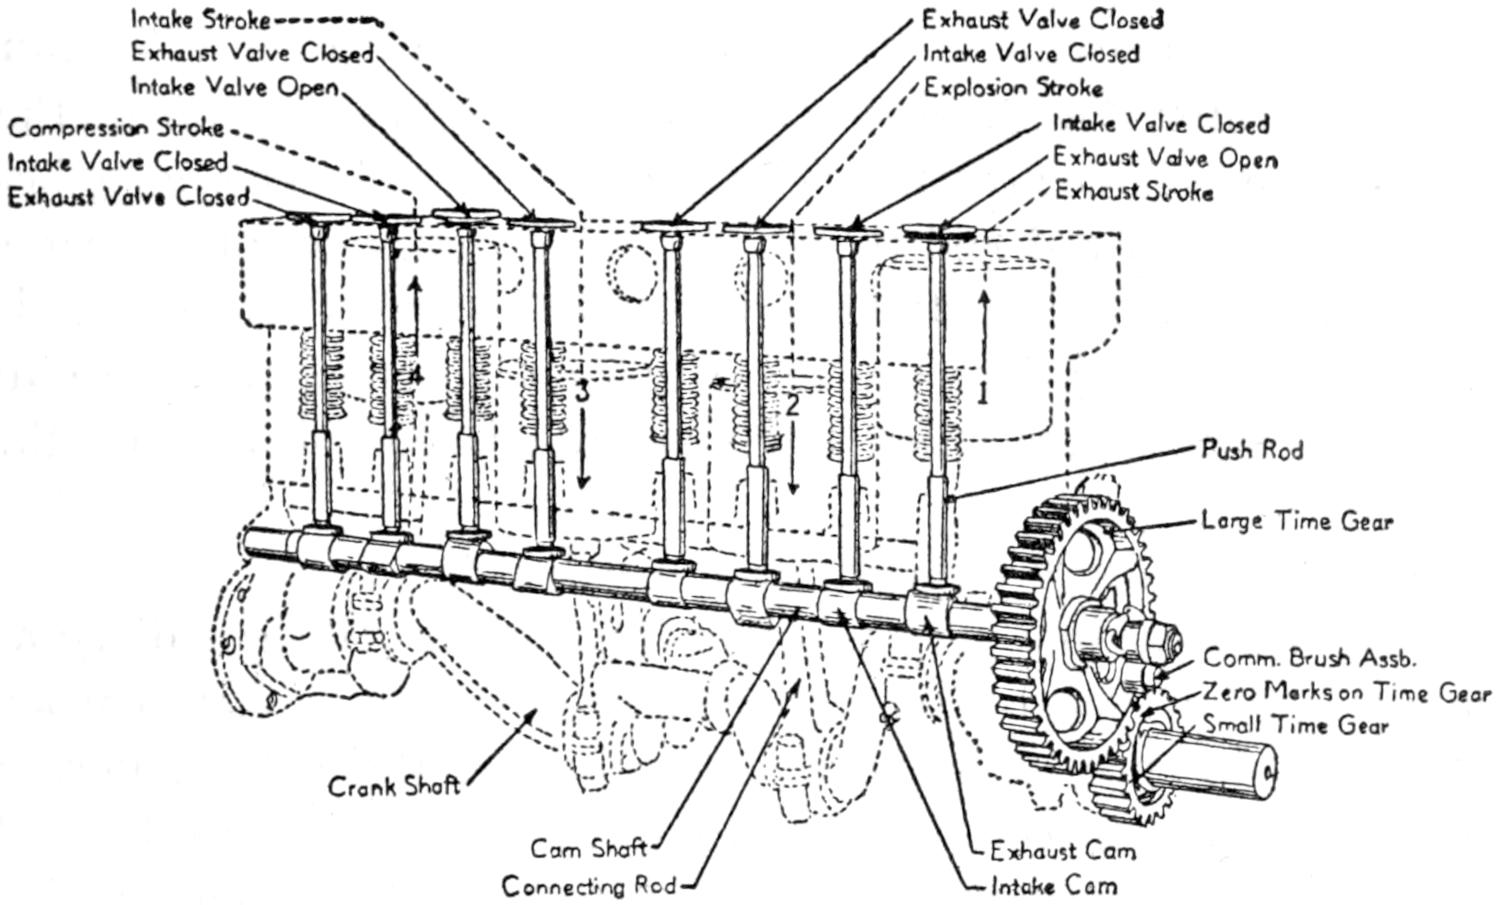
| Intake Stroke Exhaust Valve Closed Intake Valve Open |
Exhaust Valve Closed Intake Valve Closed Explosion Stroke |
||||
| Compression Stroke Intake Valve Closed Exhaust Valve Closed |
Intake Valve Closed Exhaust Valve Open Exhaust Stroke |
||||
| Push Rod | |||||
| Large Time Gear | |||||
| Comm. Brush Assb. | |||||
| Zero Marks on Time Gear | |||||
| Small Time Gear | |||||
| Crank Shaft | |||||
| Cam Shaft | Exhaust Cam | ||||
| Connecting Rod | Intake Cam | ||||
Fig. 148. Ford Motor—Valve and Cylinder Assembly
Q. What about valve timing?
A. In timing the engine the points of opening and closing of the valves are, of course, what should be considered. As the valves are properly timed at the factory when the engine is built, the necessity for retiming would occur only when such parts as the cam shaft, time gears, or valves were removed in overhauling the engine. In fitting the large time gear to the cam shaft it is important to see that the first cam points in a direction opposite to the zero mark (see [280] Fig. 148). The time gears must also mesh so that the tooth marked (0) on the small time gear will come between the two teeth on the large gear at the zero point. The time gears now being properly set, the exhaust valve on No. 1 cylinder is open and the intake valve closed, the other valves being in the position indicated in cut No. 148. The opening and closing of the valves are as follows: The exhaust valve opens when the piston reaches 5⁄16″ of bottom center, the distance from the top of the piston head to the top of the cylinder casting measuring 33⁄8″. The exhaust valve will close on top center, the piston being 5⁄16″ above the cylinder casting. The intake valve opens 1⁄16″ after the top center and closes 9⁄16″ after bottom center, the distance from the top of the piston to the top of the cylinder casting measuring 31⁄8″ The clearance between the push rod and the valve stem should never be greater than 1⁄32″ nor less than 1⁄64″. The correct clearance is naturally halfway between these two measurements. The gap should be measured when the push rod is on the heel of the cam.
Q. What about the care of the valves?
A. They seldom get out of order, but they do get dirty as a result of carbon collecting on the valve seats. These carbon deposits, by preventing proper closing of the valves, permit the gases under compression to escape, resulting in loss of power and uneven running of the motor. If, when turning the engine over slowly, there is lack of resistance in one or more cylinders, it is probable that the valves need regrinding. As the “life” of the engine depends largely upon the proper seating of the valves, it is necessary that they be ground occasionally.
Q. How are valves removed for grinding?
A. (1) Draining radiator; (2) remove cylinder head; (3) remove the two valve covers on the right side of the engine; (4) raise the valve spring with lifting tool and pull out the little pin under the valve seat. The valve may then be lifted out by the head, preparatory to grinding.
Q. How are valves ground?
[281]
A. For this work use a good grinding paste of ground glass and oil procurable from auto supply houses. A convenient way is to put a small amount in a suitable dish, adding a spoonful or two of kerosene and a few drops of lubricating oil to make a thin paste. Place the mixture sparingly on the bevel face of the valve. Put the valve in position on the valve seat, and rotate it back and forth (about a quarter turn) a few times with a Ford grinding tool. Then lift slightly from the seat, change the position and continue the rotation, and keep on repeating this operation until the bearing surface is bright and smooth. The valve should not be turned through a complete rotation, as this is apt to cause scratches running around the entire circumference of the valve and seat. When the grinding is completed the valve should be removed from the cylinder, thoroughly washed with kerosene, and the valve seat wiped out thoroughly. Extreme care should be taken that no abrasive substance gets into the cylinders or valve guides. This can be avoided if the grinding paste is applied sparingly on the bevel face of the valve. If the valve seat is worn badly or smeared, it is best to have it reseated with a valve seating tool. This operation requires considerable skill, and perhaps had better be done by an expert mechanic. Care should be exercised against making too deep a cut, necessitating the retiming of the valve.
Q. What should be done when the valves and push rods are worn?
A. When the valves and push rods become worn so as to leave too much play between them, thus reducing the lift of the valves and diminishing the power of the motor, it is best to replace the push rods with new ones. The clearance between the push rod and the valve stem should never be greater than 1⁄32″ nor less than 1⁄64″. If the clearance is greater, the valve will open late and close early, resulting in uneven running of the motor. If the clearance is less than 1⁄64″ there is danger of the valve remaining partially open all the time. If replacing the push rod does not give the proper clearance, the valve should also be replaced. We do not[282] recommend drawing out the valve stem, as the operation required, and the price of a new part does not warrant the time and expense necessary to properly do the work.
Q. What about valve springs?
A. When the valves fail to seat themselves properly, there is a possibility that the springs may be weak or broken. A weak inlet spring would probably not affect the running of the engine, but weakness in the exhaust valve spring causes a very uneven action, which is difficult to locate. The symptoms are a lag in the engine due to the exhaust valve not closing instantaneously, and as a result a certain per cent. of the charge under compression escapes, greatly diminishing the force of the explosion. Weakness in a valve spring can usually be detected by the following method: Remove the plate which encloses them at the side of the cylinder and insert a screw driver between the coils of the spring while the engine is running. If the extra tension thus produced causes the engine to pick up speed, the spring is obviously weak and should be replaced by a new one.
Q. What causes “knocking” in the engine?
A. There are several causes which may be enumerated as follows: (1) carbon knock, which is by far the most common, resulting from carbonizing of cylinders; (2) knock caused by a too advanced spark; (3) connecting rod knock; (4) crank shaft main bearing knock; (5) knock due to loose fitting piston or broken ring; (6) knock caused by piston striking the cylinder head gasket. When the engine knocks from any cause whatsoever, the matter should be promptly investigated by an experienced mechanic and the difficulty corrected.
Q. How may the different knocks be distinguished?
A. (1) The carbon knock is a clear hollow sound most noticeable in climbing sharp grades, particularly when the engine is heated. It is also indicated by a sharp rap immediately on advancing the throttle. (2) Too advanced spark will be indicated by a dull knock in the motor. (3) The connecting rod knock sound is like the distant tapping of steel with a small hammer, and is readily distinguished when the car is[283] allowed to run idly down grade or upon speeding the car to twenty-five miles an hour, then suddenly closing the throttle, the tapping will be very distinct. (4) The crank shaft main bearing knock can be distinguished as a dull thud when the car is going up hill. (5) The loose piston knock is heard only upon suddenly opening the throttle, when the sound produced might be likened to a rattle. The remedies for these knocks are treated under their proper divisions.
Q. How is carbon removed from the combustion chamber?
A. First, drain the water off by opening the pet cock at the bottom of the radiator; then disconnect the wires at the top of the motor and also the radiator connection attached to the radiator. Remove the 15 cap screws which hold the cylinder head in place. Take off the cylinder head and, with a putty knife or screw driver, scrape from the cylinder and piston heads the carbonized matter, being careful to prevent the specks of carbon from getting into the cylinders or bolt holes. In replacing the cylinder head gasket turn the motor over so that No. 1 and No. 4 pistons are at top center; place the gasket in position over the pistons and then put the cylinder head in place. Be sure and draw the cylinder head bolts down evenly (i. e., give each bolt a few turns at a time). Do not tighten them on one end before drawing them up at the other.
Q. How are spark plugs cleaned?
A. After removing the plug from the engine the points may be cleaned with an old tooth brush dipped in gasoline. However, to do the work thoroughly, the plug should be taken apart by securing the large hexagon steel shell in a vise and loosening the pack nut which holds the porcelain in place. The carbon deposits can then be easily removed from the porcelain and shell with a small knife. Care should be exercised not to scrape off the glazed surface of the porcelain, otherwise it will be apt to carbonize quickly. The porcelain and other parts should be finally washed in gasoline and wiped dry with a cloth.
In assembling the plug care should be taken to see that the[284] pack nut is not tightened too much so as to crack the porcelain, and the distance between the sparking points should be 1⁄32″, about the thickness of a smooth dime. Dirty plugs usually result from an excess of oil being carried in the crank case, or from using oil of poor quality.
Q. How is the power plant removed from the car?
A. (1) Drain the water out of the radiator and disconnect the radiator hose. (2) Disconnect the radiator stay rod which holds it to the dash. (3) Take out the two bolts which fasten the radiator to the frame and take radiator off. (4) Disconnect the dash at the two supporting brackets which rest on the frame. (5) Loosen the steering post bracket, fastened to the frame, when the dash and steering gear may be removed as one assembly, the wires first having been disconnected. (6) Take out the bolts holding the front radius rods in the socket underneath the crank case. (7) Remove the four bolts at the universal joint. (8) Remove pans on either side of cylinder casting and turn off gasoline; disconnect feed pipe from carburetor. (9) Disconnect exhaust manifold from exhaust pipe by uncovering large brass pack nut. (10) Take out the two cap screws which hold the crank case to the front frame. (11) Remove the bolts which hold the crank case arms to the frame at the side. Then pass a rope through the opening between the two middle cylinders and tie in a loose knot. Through the rope pass a “2 by 4,” or stout iron pipe about ten feet long, and let a man hold each end; let a third man take hold of the starting crank handle, when the whole power plant can be lifted from the car to the work bench for adjustment.
Q. How are the connecting rod bearings adjusted?
A. Connecting rod bearings may be adjusted, without taking out the engine, by the following method: (1) Drain off the oil; (2) Remove plate on bottom of crank case, exposing connecting rods; (3) Take off the first connecting rod cap, and drawfile the ends a very little at a time; (4) Replace cap, being careful to see that punch marks correspond, and tighten bolts until it fits shaft snugly; (5) Test tightness of bearing[285] by turning engine over with the starting handle. Experienced mechanics usually determine when the bearing is properly fitted by lightly tapping each side of the cap with a hammer; (6) then loosen the bearing and proceed to fit the other bearings in the same manner; (7) after each bearing has been properly fitted and tested, then tighten the cap bolts and the work is finished.
Remember that there is a possibility of getting the bearings too tight, and under such conditions the babbitt is apt to cut out quickly, unless precaution is taken to run the motor slowly at the start. It is a good plan after adjusting the bearings to jack up the rear wheels and let the motor run slowly for about two hours (keeping it well supplied with water and oil) before taking it out on the road. Whenever possible these bearings should be fitted by an expert Ford mechanic.
Worn connecting rods may be returned, prepaid, to the nearest agent or branch house for exchange at a price of 75 cents each to cover the cost of rebabbitting. It is not advisable for any owner or repair shop to attempt the rebabbitting of connecting rods or main bearings, for without a special jig in which to form the bearings, satisfactory results will not be obtained. The constant tapping of a loose connecting rod on the crank shaft will eventually produce crystallization of the steel, resulting in broken crank shaft and possibly other parts of the engine damaged.
Q. How are the crank shaft main bearings adjusted?
A. Should the stationary bearings in which the crank shaft revolves become worn (evidenced by a pounding in the motor) and need replacing or adjustment, proceed as follows: (1) After the engine has been taken out of the car, remove crank case, transmission cover, cylinder head, pistons, connecting rods, transmission and magnetic coils. Take off the three babbitted caps and clean the bearing surfaces with gasoline. Apply Persian blue or red lead to the crank shaft bearing surfaces, which will enable you, in fitting the caps, to determine whether a perfect bearing surface is obtained.
[286]
(2) Place the rear cap in position and tighten it up as much as possible without stripping the bolt threads. When the bearing has been properly fitted, the crank will permit moving with one hand. If the crank shaft cannot be turned with one hand, the contact between the bearing surface is evidently too close, and the cap requires ohming up, one or two brass lines usually being sufficient. In case the crank shaft moves too easily with one hand, the shims should be removed and the steel surface of the cap filed off, permitting it to set closer.
(3) After removing the cap, observe whether the blue or red “spottings” indicate a full bearing the length of the cap. If “spottings” do not show a true bearing, the babbitt should be scraped and the cap refitted until the proper results are obtained.
(4) Lay the rear cap aside and proceed to adjust the center bearing in the same manner. Repeat the operation with the front bearing, with the other two bearings laid aside.
(5) When the proper adjustment of each bearing has been obtained, clean the babbitt surface carefully and place a little lubricating oil on the bearings, also on the crank shaft; then draw the caps up as closely as possible, the necessary shims, of course, being in place. Do not be afraid of getting the cap bolts too tight, as the shim under the cap and the oil between the bearing surfaces will prevent the metal being drawn into the close contact. If oil is not put on the bearing surfaces, the babbitt is apt to cut out when the motor is started up before the oil in the crank case can get into the bearing. In replacing the crank case and transmission cover on the motor, it is advisable to use a new set of felt gaskets to prevent oil leaks.
[287]
Q. How is the engine cooled?
A. The heat generated by the constant explosions in the engine would soon overheat and ruin the engine were it not cooled by some artificial means. The Ford engine is cooled by the circulation of water in jackets around the cylinders. The heat is extracted from the water by its passage through the thin metal tubing of the radiator, to which are attached scientifically worked out fins, which assist in the rapid radiation of the heat. The fan, just back of the radiator, sucks the air around the tubing through which the air is also driven by the forward movement of the car. The belt should be inspected frequently and tightened by means of the adjusting screw in the fan bracket when necessary. It should not be too tight, however. Take up the slack till the fan starts to bind when turned by hand.
Q. How does the water circulate?
A. The cooling apparatus of the Ford car is known as the thermo-syphon system. It acts on the principle that hot water seeks a higher level than cold water. Consequently when the water reaches a certain heat, approximately 180 degrees Fahrenheit, circulation commences and the water flows from the lower radiator outlet pipe up through the water jackets, into the upper radiator water tank, and down through the tubes to the lower tank, to repeat the process.
Q. What are the causes of overheating?
A. (1) Carbonized cylinders; (2) too much driving on low speed; (3) spark retarded too far; (4) poor ignition; (5) not enough or poor grade oil; (6) racing motor; (7) clogged muffler; (8) improper carburetor adjustment; (9) fan not[288] working properly on account of broken or slipping belt; (10) improper circulation of water due to clogged or jammed radiator tubes, leaky connections or low water.
Q. What should be done when the radiator overheats?
A. Keep the radiator full. Do not get alarmed if it boils occasionally, especially in driving through mud and deep sand or up long hills in extremely warm weather. Remember that the engine develops the greatest efficiency when the water is heated nearly to the boiling point. But if there is persistent overheating when the motor is working under ordinary conditions, find the cause of the trouble and remedy it. The chances are that the difficulty lies in improper driving or carbonized cylinders. Perhaps twisting the fan blades at a greater angle to produce more suction may bring desired results. By reference to the proper division of this book each of the causes which contribute to an overheated radiator is treated and remedies suggested. No trouble can result from the filling of an overheated radiator with cold water, providing the water system is not entirely empty, in which case the motor should be allowed to cool before the cold water is introduced.
Q. How about cleaning the radiator?
A. The entire circulation system should be flushed out occasionally. To do this properly, the radiator inlet and outlet hose should be disconnected, and the radiator flushed out by allowing the water to enter the filler neck at ordinary pressure, from whence it will flow down through the tubes and out at the drain cock and hose. The water jackets can be flushed out in the same manner. Simply allow the water to enter into the cylinder head connections and to flow through the water jackets and out at the side inlet connection.
Q. Will the radiator freeze in winter?
A. Yes; unless an anti-freezing solution is used in the circulating system you are bound to experience trouble. As the circulation does not commence until the water becomes heated, it is apt to freeze at low temperature before it commences to circulate. In case any of the radiator tubes happen[289] to be plugged or jammed they are bound to freeze and burst open if the driver undertakes to get along without using a non-freezing solution. Wood or denatured alcohol can be used to good advantage. The following table gives the freezing points of solutions containing different percentages of alcohol: 20% solution freezes at 15 degrees above zero. 30% solution freezes at 8 degrees below zero. 50% solution freezes at 34 degrees below zero. A solution composed of 60% water, 10% glycerine and 30% alcohol is commonly used, its freezing point being about 8 degrees below zero. On account of evaporation fresh alcohol must be added frequently in order to maintain the proper solution.
Q. How are leaks and jams in the radiator repaired?
A. A small leak may be temporarily repaired by applying brown soap or white lead, but the repair should be made permanent with solder as soon as possible. A jammed radiator tube is a more serious affair. While the stopping of one tube does not seriously interfere with the circulation, it is bound to cause trouble sooner or later, and the tube will freeze in cold weather. Cut the tube an inch above and below the jam and insert a new piece, soldering the connections. If the entire radiator is badly jammed or broken it would probably be advisable to install a new one.
[290]
Q. How does the carburetor work?
A. The carburetor is of the automatic float feed type, having but one adjustment, the gasoline needle valve. The cross-section diagram of carburetor (Fig. 149) shows how the gasoline enters the carburetor, is vaporized by a current of air and passes through the inlet pipe to the engine in the form of an explosive mixture. The gasoline, entering the bowl of the carburetor, gradually raises the float to a point where the inlet needle is forced upwards into its seat, thus cutting off the flow of gasoline. As the gasoline in the bowl recedes, the float lowers, allowing the needle to drop from its seat and the flow of gasoline is resumed. It is plain to see that a constant level of gasoline is maintained in the carburetor by the automatic action of float and needle. The quantity of gasoline entering into the mixture is governed by the needle valve (see following page). The volume of gas mixture entering the inlet pipe is controlled by opening and[291] closing the throttle, according to the speed desired by the driver.
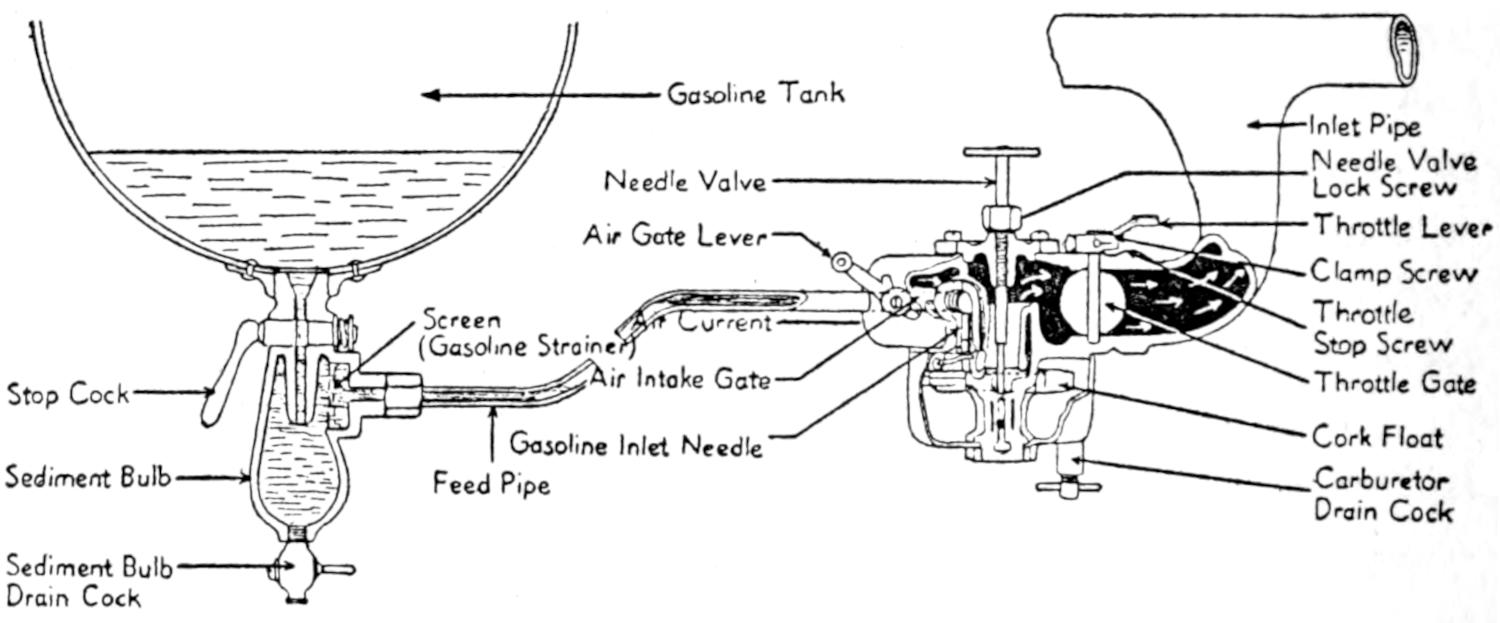
| Gasoline Tank | |||
| Inlet Pipe | |||
| Needle Valve | Needle Valve Lock Screw |
||
| Air Gate Lever | Throttle Lever | ||
| Clamp Screw | |||
| Screen (Gasoline Strainer) |
Air Current | Throttle Stop Screw |
|
| Air Intake Gate | Throttle Gate | ||
| Stop Cock | |||
| Cork Float | |||
| Gasoline Inlet Needle | |||
| Sediment Bulb | Feed Pipe | Carburetor Drain Cock |
|
| Sediment Bulb Drain Cock |
|||
Fig. 149. Ford Fuel System
Q. Why is carburetor adjustment placed on dash?
A. For the convenience of the driver in adjusting the carburetor. After the new car has become thoroughly worked in, the driver should observe the angle of the carburetor adjustment rod at which the engine runs most satisfactorily. In cold weather it will probably be found necessary to turn the dash adjustment one-quarter turn to the left, particularly in starting a cold engine. As gasoline vaporizes readily in warm weather, the driver will find it economical to reduce the quantity of gasoline in the mixture by turning the carburetor adjustment to the right as far as possible without reducing the speed. This is particularly true when taking long drives where conditions permit a fair rate of speed to be maintained, and accounts for the excellent gasoline mileage obtained by good drivers.
Q. What is meant by a “lean” and a “rich” mixture?
A. A lean mixture has too much air and not enough gasoline. A rich mixture has too much gasoline and not enough air. A rich mixture will not only quickly cover the cylinders, pistons and valves with soot, but will tend to overheat the cylinders, and is likewise wasteful of the fuel. It will often choke the engine and cause misfiring at slow speeds, although at high speeds the engine will run perfectly. The mixture should be kept as lean as possible without the sacrifice of any of the power of the motor. A lean mixture will often result in backfiring through the carburetor, for the reason that the gas burns slowly in the cylinder, and is still burning when the inlet valve opens again, which causes the gas in the intake to ignite. A rich mixture is shown by heavy, black exhaust smoke with a disagreeable smell. Proper mixture will cause very little smoke or odor.
Q. How is the carburetor adjusted?
A. The usual method of regulating the carburetor is to start the motor, advancing the throttle lever to about the sixth notch, with the spark retarded to about the fourth notch. The[292] flow of gasoline should now be cut off by screwing the needle valve down to the right until the engine begins to misfire. Then gradually increase the gasoline feed by opening the needle valve until the motor picks up and reaches its highest speed and no trace of black smoke comes from the exhaust. Whenever it is necessary to turn the adjusting needle down more than a quarter turn below its normal position, the lock nut on the top of the carburetor at the point through which the needle passes should first be loosened, as otherwise it is impossible to tell when the needle is turned down in its seat too far. Turning the needle down too tightly will result in its becoming grooved and the seat enlarged. When those parts are damaged it is difficult to maintain proper adjustment of the carburetor. Having determined the point where the motor runs at its maximum speed, the needle valve lock nut should be tightened to prevent the adjustment being disturbed. For average running a lean mixture will give better results than a rich one.
Q. Why does water clog the carburetor?
A. The presence of water in the carburetor or gasoline tank, even in small amounts, will prevent easy starting and the motor will misfire and stop. As water is heavier than gasoline it settles to the bottom of the tank and into the sediment bulb along with other foreign matters. As it is difficult nowadays to get gasoline absolutely free from impurities, especially water, it is advisable to frequently drain the sediment bulb under the gasoline tank. During cold weather the water which accumulates in the sediment bulb is likely to freeze and prevent the flow of gas through the pipe leading to the carburetor. Should anything of this kind happen it is possible to open the gasoline line by wrapping a cloth around the sediment bulb and keeping it saturated with hot water for a short time. Then the water should be drained off. In event of the water getting down into the carburetor and freezing, the same treatment may be applied.
Q. What makes the carburetor leak?
A. The flow of gasoline entering the carburetor through[293] the feed pipe is automatically regulated by the float needle raising and lowering in its seat. Should any particle of dirt become lodged in the seat, which prevents the needle from closing, the gasoline will overflow in the bowl of the carburetor and leak out upon the ground.
Q. What should be done when there is dirt in the carburetor?
A. The spraying nozzle of the carburetor having a very small opening, a minute particle of dirt or other foreign matter will clog up the orifice. The result is that the motor will begin to misfire and slow down as soon as it has attained any considerable speed. This is accounted for by the fact that at high speeds the increased suction will draw the particles of dust, etc., into the nozzle. By opening the valve needle half a turn and giving the throttle lever two or three quick pulls the dirt or sediment will often be drawn through, when the needle may be turned back to its original place. If this does not accomplish the purpose, the carburetor should be drained.
Q. If the engine runs too fast or chokes with throttle retarded, what is to be done?
A. If the engine runs too fast with throttle fully retarded, unscrew the carburetor throttle lever adjusting screw until the engine idles at suitable speed. If the motor chokes or stops when throttle is fully retarded, the adjusting screw should be screwed until it strikes the boss, preventing the throttle from closing too far. When proper adjustment has been made, tighten lock screw so that adjustment will not be disturbed.
Q. What is the purpose of the hot air pipe?
A. It takes the hot air from around the exhaust pipe and conducts it to the carburetor where the heat facilitates the vaporizing of the gasoline. It is usually advisable to remove this pipe in the hot season, but it is an absolutely necessary feature during cold weather.
Q. What is the purpose of the cork float?
A. It automatically controls the flow of gasoline into the carburetor. If it floats too low, starting will be difficult; if[294] too high, the carburetor will flood and leak. A cork float which has become fuel soaked should be removed and replaced by a new one or thoroughly dried and then given a couple of coats of shellac varnish to make it waterproof.
Q. Should priming rod be used in cranking when motor is warm?
A. No. The carburetor does not ordinarily require priming when the motor is warm, and cranking with the rod pulled out is apt to “flood” the engine with an over rich mixture of gas, which does not readily explode. This naturally causes difficulty in starting. If you should accidentally flood the engine, turn the carburetor adjusting needle down (to the right) until it seats; then turn the engine over a few times with the starting crank in order to exhaust the rich gas. As soon as the motor starts, turn back the needle to the left and readjust the carburetor.
[295]
Q. What is the purpose of the ignition system?
A. It furnishes the electric spark which explodes the charge in the combustion chamber, thus producing the power which runs the engine. It is important that the charge be correctly ignited at the proper time, in order to obtain satisfactory results in running the car. In the Ford car the ignition system is as simple as it is possible for human invention to make it.
Q. How does the magneto generate the current?
A. In revolving at the same rate of speed as the motor, the magnets on the flywheel passing the stationary coil spools create an alternating low tension electric current in coils of wire which are wound around spools fastened to the stationary part of the magneto, and is carried from these coils to the magneto connection (wire) leading to the coil box on the dash.
Q. Should the coil vibrator adjustment be disturbed?
A. The present style of coil unit is properly adjusted when it leaves the factory and this adjustment should not be disturbed unless to install new points or to reduce the gap between the points which may have increased from wear. When adjustments are necessary they should, whenever possible, be made by one of the Ford service stations who have special equipment for testing and adjusting units and will gladly furnish expert service. If the points are pitted they should be filed flat with a fine double-faced file and the adjusting thumb nut turned down so that with the spring held down the gap between the points will be a trifle less than 1⁄32 of an inch. Then set the lock nut so that the adjustment cannot be disturbed.[296] Do not bend or hammer on the vibrators, as this would affect the operation of the cushion spring of the vibrator bridge and reduce the efficiency of the unit.
Q. How is a weak unit detected?
A. With the vibrators properly adjusted, if any particular cylinder fails or seems to develop only a weak action, change the position of the unit to determine if the fault is actually in the unit. The first symptom of a defective unit is the buzzing of the vibrator with no spark at the plug. Remember that a loose wire connection, faulty spark plug, or worn commutator may cause irregularity in the running of the motor. These are points to be considered before laying the blame on the coil.
Q. How may short circuit in commutator wiring be detected?
A. Should the insulation of the primary wires (running from coil to commutator) become worn to such an extent that the copper wire is exposed, the current will leak out (i. e., short circuit) whenever contact with the engine pan or other metal parts is made. A steady buzzing of one of the coil units will indicate a “short” in the wiring. When driving the car the engine will suddenly lag and pound on account of the premature explosion. Be careful not to crank the engine downward against compression when the car is in this condition, as the “short” is apt to cause a vigorous kick back.
Q. Does coil adjustment affect starting?
A. Yes. When the vibrators are not properly adjusted more current is required to make and break the contact between the points, and, as a result, at cranking speeds you would not get a spark between the spark plug points. Do not allow the contact points to become “ragged,” otherwise they are apt to stick and cause unnecessary difficulty in starting, and when running they are apt to produce an occasional “miss” in the engine.
Q. What is the purpose of the commutator?
A. The commutator (or timer) determines the instant at which the spark plugs must fire. It affects the “make and[297] break” in the primary circuit. The grounded wire in the magneto allows the current to flow through the metal parts to the metal roller in the commutator. Therefore, when the commutator roller in revolving, touches the four commutator contact points, to each of which is attached a wire connected with the coil unit, an electrical circuit is passed through the entire system of primary wires. This circuit is only momentary, however, as the roller passes over the contact point very rapidly and sets up the circuit in each unit as the roller touches the contact point connected with that unit. The commutator should be kept clean and well oiled at all times.
Q. What about the spark plug?
A. One is located at the top of each cylinder and can be taken out easily with the spark plug wrench included with every car, after the wire connection is removed. The high voltage current flows out of the secondary coils in the coil box and on reaching the contact points on each spark plug it is forced to jump 1⁄32″ gap, thereby forming a spark which ignites the gasoline charge in the cylinders.
The spark plug should be kept clean (i. e., free from carbon) and should be replaced if they persist in not working properly. There is nothing to be gained by experimenting with different makes of plugs. The make of plug with which Ford engines are equipped when they leave the factory are best adapted to the requirements of our motor, notwithstanding the opinion of various garage men to the contrary. All wire connections to spark plugs, coil box and commutator should, of course, at all times be kept in perfect contact.
Q. What are the indications of ignition trouble?
A. The uneven sputter and bang of the exhaust means that one or more cylinders are exploding irregularly or not at all, and that the trouble should be promptly located and overcome. Misfiring, if allowed to continue, will in time injure the engine and the entire mechanism. If you would be known as a good driver you will be satisfied only with a soft, steady purr from the exhaust. If anything goes wrong, stop and fix it if possible. Do not wait until you get home.
[298]
Q. How can one tell which cylinder is missing?
A. This is done by manipulating the vibrators on the spark coils. Open the throttle until the engine is running at a good speed and then hold down the two outside vibrators, No. 1 and No. 4, with the fingers, so they cannot buzz. This cuts out the two corresponding cylinders, No. 1 and No. 4, leaving only No. 2 and No. 3 running. If they explode regularly it is obvious the trouble is in either No. 1 or No. 4. Relieve No. 4 and hold down No. 2 and No. 3 and also No. 1; if No. 4 cylinder explodes evenly it is evident the misfiring is in No. 1. In this manner all of the cylinders in turn can be tested until the trouble is located. Examine both the spark plug and the vibrator of the missing cylinder.
Q. If the coil and plug are right, what?
A. The trouble is probably due to an improperly seated valve, worn commutator, or short circuit in the commutator wiring. Weakness in the valves may be easily determined by lifting the starting crank slowly the length of the stroke of each cylinder in turn, a strong or weak compression in any particular valve being easily detected. It sometimes happens that the cylinder head gasket (packing) becomes leaky permitting the gas under compression to escape, a condition that can be detected by running a little lubricating oil around the edge of the gasket and noticing whether bubbles appear or not.
Q. Does a worn commutator ever cause misfiring?
A. Yes. If misfiring occurs when running at high speed, inspect the commutator. The surface of the circle around which the roller travels should be clean and smooth, so that the roller makes a perfect contact at all points. If the roller fails to make a good contact on any of the four points, its corresponding cylinder will not fire. Clean these surfaces if dirty. In case the fiber, contact points, and roller of the commutator are badly worn, the most satisfactory remedy is to replace them with new parts. The trouble is probably caused by short circuited commutator wires. The spring should be strong enough to make a firm contact between the roller points if they are worn or dirty.
[299]
Q. How is the commutator removed?
A. Remove cotter pin from spark rod and detach latter from commutator. Loosen the cap screw which goes through breather pipe on top of time gear cover. This will release the spring which holds the commutator case in place and this part can be readily removed. Unscrew lock nut; withdraw steel brush cap and drive out the retaining pin. The brush can then be removed from the cam shaft.
In replacing the brush, care must be exercised to see that it is reinstated so that the exhaust valve on the first cylinder is closed when the brush points upward. This may be ascertained by removing the valve door and observing the operation of No. 1 valve.
Q. Does cold weather affect the commutator?
A. It is a well known fact that in cold weather the best grades of lubricating oil are apt to congeal to some extent. If this occurs in the commutator it is very apt to prevent the roller from making perfect contact with the contact points imbedded in the fiber. This, of course, makes difficult starting, as the roller arm spring is not stiff enough to brush away the film of oil which naturally forms over the contact points. To overcome this, as well as any liability to the contact points to rust, we recommend a mixture of 25% kerosene with the commutator lubricating oil, which will thin it sufficiently to prevent congealing, or freezing, as it is commonly called. You have probably noticed in starting your car in cold weather that perhaps only one or two cylinders will fire for the first minute or so, which indicates that the timer is in the condition described above and as a consequence a perfect contact is not being made on each of the four terminals.
Q. How is the magneto removed?
A. It is necessary to take the power plant out of the car in order to remove the magneto. Then remove crank case and transmission cover. Take out the four cap screws that hold the flywheel to the crank shaft. You will then have access to the magnets and entire magneto mechanism. In taking out these parts, or any parts of the car, the utmost care should[300] be taken to make sure that the parts are marked in order that they may be replaced properly.
Q. What is to be done when the magneto gets out of order?
A. A Ford magneto is made of permanent magnets and there is very little likelihood of their ever losing their strength unless acted upon by some outside force. For instance, the attachments of a storage battery to the magneto terminal will demagnetize the magnets. If anything like this happens, it is not advisable to try to recharge them, but rather install a complete set of new magnets. The new magnets will be sent from the nearest agent or branch house, and will be placed on a board in identically the same manner as they should be when installed on the flywheel. Great care should be taken in assembling the magnets and lining up the magneto so that the faces of the magnets are separated from the surface of the coil spool just 1⁄32 of an inch. To take out the old magnets, simply remove the cap screw and bronze screw which hold each in place. The magneto is often blamed when the trouble is a weak current caused by waste or other foreign matter accumulating under the contact spring cover. Remove the three screws which hold the binding post in place; remove binding post and spring and replace after foreign substance has been removed.
[301]
Q. What is the function of the transmission?
A. It is that part of the mechanism of an automobile which lies between the engine shaft and the propeller shaft and by which one is enabled to move at different speeds from the other. It is the speed gear of the car. It sends the car forward at low and high speeds and by it the car is reversed.
Q. What is meant by the term “planetary transmission”?
A. One in which the groups of gears always remain in mesh and revolve around a main axis. The different sets of gears are brought into action by stopping the revolution of the parts which support the gears. By means of bands (similar to brake bands) the rotation of the different parts is stopped. The planetary transmission is the simplest and most direct means of speed control and is a distinct advantage to the Ford car.
Q. What is the purpose of the clutch?
A. If the crank shaft of the engine ran without break straight through to the differential and through it applied its power direct to the rear wheels, the car would start forward immediately upon the starting of the engine (were it possible to get it started under such conditions). To overcome this difficulty the shaft is divided by means of the clutch. The part of the shaft to which the running engine is delivering its power is enabled to take hold of the unmoving part gradually and start the car without jolt or jar. The forward part of the shaft is referred to as the crank shaft, the rear part as the drive shaft.
Q. How is the clutch controlled?
A. By the left pedal at the driver’s feet. If the clutch[302] pedal, when pushed forward into slow speed, has a tendency to stick and not to come back readily into high, tighten up the slow speed band. Should the machine have an inclination to creep forward when cranking, it indicates that the clutch lever screw which bears on the clutch lever cam has worn, and requires an extra turn to hold the clutch in neutral position. When the clutch is released by pulling back the hand lever the pedal should move forward the distance of 13⁄4″ in passing from high speed to neutral. See that the hub brake shoe and connections are in proper order so that the brake will act sufficiently to prevent the car creeping very far ahead. Also be sure that the slow speed band does not bind on account of being adjusted too tight. Do not use too heavy a grade of oil in cold weather, as it will have a tendency to congeal between the clutch discs and prevent proper action of the clutch.
Q. How is the clutch adjusted?
A. Remove the plate on the transmission cover under the floor boards at the driver’s seat. Take out the cotter key on the first clutch finger and give the set screw one-half to one complete turn to the right with a screw driver. Do the same to the other finger set screw. But be sure to give each the same number of turns and do not forget to replace the cotter key. And after a considerable period of service the wear in the clutch may be taken up by installing another pair of clutch discs, rather than by turning the adjusting screw in too far.
Caution. Let us warn you against placing any small tools or objects over or in the transmission case without a good wire or cord attached to them. It is almost impossible to recover them without taking off the transmission cover.
Q. How are the bands adjusted?
A. The slow speed bands may be tightened by loosening the lock nut at the right side of the transmission cover, and turning up the adjusting screw to the right. To tighten the brake and reverse bands, remove the transmission case cover door and turn the adjusting nuts on the shaft to the right. See that the bands do not drag on the drums when disengaged, as they exert a brake effect, and tend to overheat the motor. However, the foot brake should be adjusted so that a sudden pressure will stop the car immediately, or slide the rear wheels in case of emergency. The bands, when worn to such an extent that they will not take hold properly, should be relined, so that they will engage smoothly without causing a jerky movement of the car. The lining is inexpensive and may be had at any of the eight thousand Ford service stations at small cost.
[303]
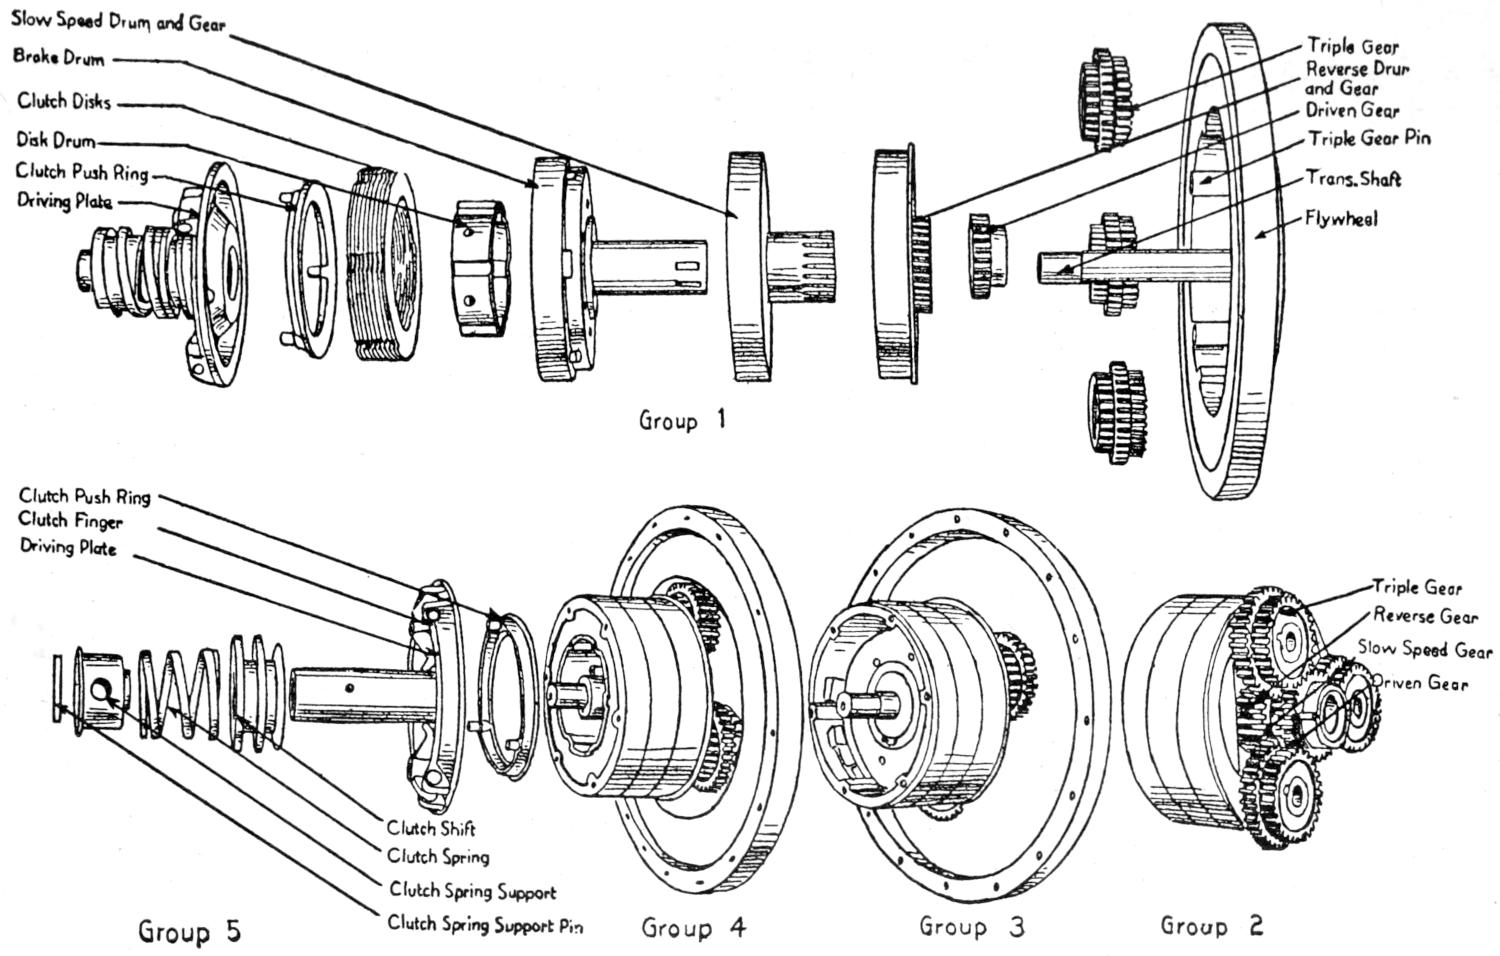
| Slow Speed Drum and Gear | Triple Gear | |||||
| Brake Drum | Reverse Drum and Gear |
|||||
| Clutch Disks | Driven Gear | |||||
| Disk Drum | Triple Gear Pin | |||||
| Clutch Push Ring | Trans. Shaft | |||||
| Driving Plate | Flywheel | |||||
| Group 1 | ||||||
| Clutch Push Ring | ||||||
| Clutch Finger | ||||||
| Driving Plate | ||||||
| Triple Gear | ||||||
| Reverse Gear | ||||||
| Slow Speed Gear | ||||||
| Driven Gear | ||||||
| Clutch Shift | ||||||
| Clutch Spring | ||||||
| Clutch Spring Support | ||||||
| Group 5 | Clutch Spring Support Pin | Group 4 | Group 3 | Group 2 | ||
Fig. 150. Ford Transmission Assembly
[304]
Q. How are the bands removed?
A. Take off the door on top of transmission cover. Turn the reverse adjustment nut and the brake adjustment nut to the extreme ends of the pedal shafts, then remove the slow speed adjusting screw. Remove the bolts holding the transmission cover to the crank case and lift off the cover assembly. Slip the band nearest the flywheel over the first of the triple gears, then turn the band around so that the opening is downward. The band may now be removed by lifting upward. The operation is more easily accomplished if the three sets of triple gears are so placed that one set is about ten degrees to the right of center at top. Each band is removed by the same operation. It is necessary to shove each band forward on to the triple gears as at this point only is there sufficient clearance in the crank case to allow the ears of the transmission bands to be turned downward. By reversing this operation the bands may be installed. After being placed in their upright position on the drums pass a cord around the ears of the three bands, holding them in the center so that when putting the transmission cover in place no trouble will be experienced in getting the pedal shafts to rest in the notches in the band ears. The clutch release ring must be placed in the rear groove of the clutch shaft. With the cover in place remove the cord which held the bands in place while the cover was being installed.
Q. How is transmission assembled?
A. Cut No. 150 shows the transmission parts in their relative[305] assembling positions and grouped in their different operations of assembling.
The first operation is the assembling of group No. 2, which is as follows: Place the brake drum on table with the hub in a vertical position. Place the slow speed plate over the hub with the gear uppermost. Then place reverse plate over the slow speed plate so that the reverse gear surrounds the slow speed gear. Fit the two keys in the hub just above the slow speed gear. Put the driven gear in position with the teeth downward so that they will come next to the slow speed gear. Take the three triple gears and mesh them with the driven gear according to the punch marks on the teeth, the reverse gear or smallest of the triple gear assembly being downward. After making sure that the triple gears are properly meshed tie them in place by passing a cord around the outside of the three gears. Take the flywheel and place it on the table with the face downward and the transmission shaft in vertical position. Then invert the group which you have assembled over the transmission shaft, setting it in position so that the triple gear pins on the flywheel will pass through the triple gears. This will bring the brake drum on top in a position to hold the clutch plates, etc. The next step is to fit the clutch drum key in the transmission shaft. Press the clutch disc drum over the shaft and put the set screw in place to hold the drum. Put the large disc over the clutch drum, then the small disc, alternating with large and small discs until the entire set of discs are in position, ending up with a large disc on top. If a small disc is on top it is liable to fall over the clutch in changing the speed from high to low and as a result you would be unable to change the speed back into high. Next put the clutch push rings over the clutch drum, and on top of the discs, with the three pins projecting upward (see group No. 4, cut No. 149). You will note the remaining parts are placed as they will be assembled. Next bolt the driving plate in position so that the adjusting screws of the clutch fingers will bear against the clutch push ring pins. Before proceeding further it would be a good[306] plan to test the transmission by moving the plates with the hands. If the transmission is properly assembled the flywheel will revolve freely while holding any of the drums stationary. The clutch parts may be assembled on the driving plate hub as follows: Slip the clutch shift over the hub so that the small end rests on the ends of the clutch fingers. Next put on the clutch spring, placing the clutch supports inside so that the flange will rest on the upper coil of the spring and press into place, inserting the pin in the driving plate hub through the holes in the side of the spring support. Then turn the clutch spring support until the pin fits into the lugs on the bottom of the support. The easiest method of compressing the spring sufficiently to insert the pin is to loosen the tension of the clutch finger by means of the adjusting screws. When tightening up the clutch again the spring should be compressed to within a space of two or two and one-sixteenth inches to insure against the clutch spring slipping. Care should be exercised to see that the screws in the fingers are adjusted so the spring is compressed evenly all around.
[307]
Q. How is the rear axle removed?
A. Jack up car and remove rear wheels as instructed below. Take out the four bolts connecting the universal ball cap to the transmission case and cover. Disconnect brake rods. Remove nuts holding spring perches to rear axle housing flanges. Raise frame at the rear end, and the axle can be easily withdrawn.
Q. How is the universal joint disconnected from the drive shaft?
A. Remove two plugs from top and bottom of ball casting and turn shaft until pin comes opposite hole, drive out pin and joint can be pulled or forced away from the shaft and out of the housing.
Q. How are the rear axle and differential disassembled?
A. With the universal joint disconnected, remove nuts in front end of radius rods and the nuts on studs holding drive shaft tube to rear axle housing. Remove bolts which hold the two halves of differential together. If necessary to disassemble differential a very slight mechanical knowledge will permit one to immediately discern how to do it once it is exposed to view. Care must be exercised to get every pin, bolt and key lock back in its correct position when reassembling.
Q. How is the drive shaft pinion removed?
A. The end of the drive shaft, to which the pinion is attached, is tapered to fit the tapered hole in the pinion, which is keyed onto the shaft, and then secured by a cotter pinned “castle” nut. Remove the castle nut, and drive the pinion off.
[308]
Q. How are the differential gears removed?
A. The compensating gears are attached to the inner ends of the rear axle shaft. They work upon the spider gears when turning a corner, so that the axle shaft revolves independently, but when the car is moving in a straight line the spider gears and compensating gears and axle shaft move as an integral part. If you will examine the rear axle shafts you will notice that the gears are keyed on, and held in position by a ring which is in two halves and fits in a groove in the rear axle shaft. To remove the compensating gears, force them down on the shaft, that is, away from the end to which they are secured, drive out the two halves of ring in the grooves in shaft with screw driver or chisel, then force the gears off the end of the shafts.
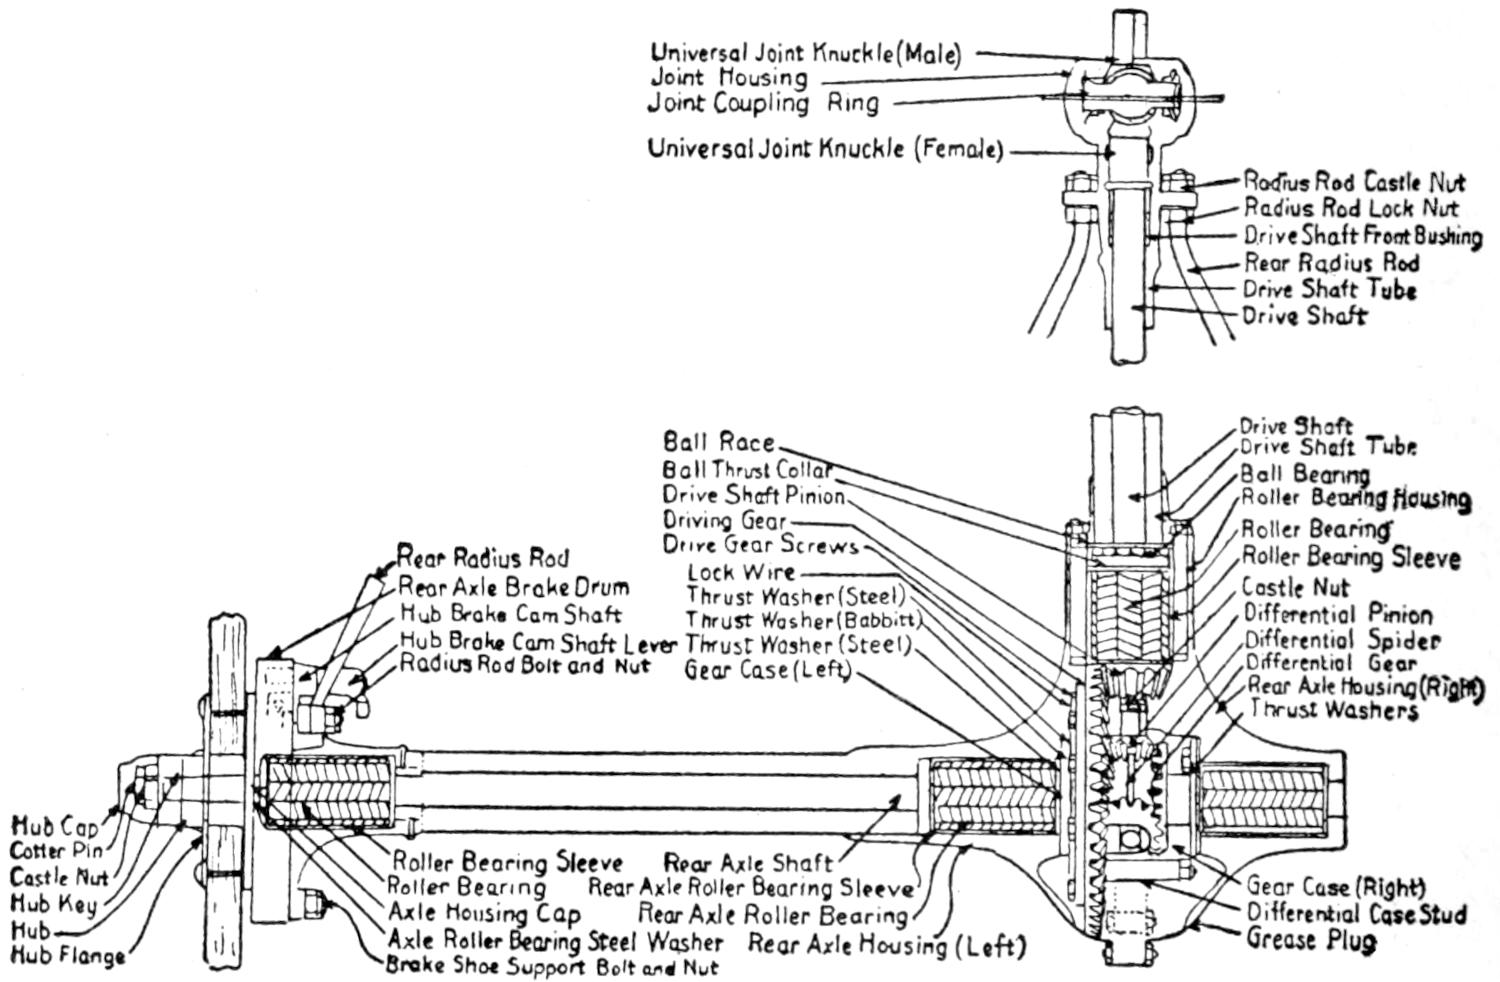
| Universal Joint Knuckle (Male) Joint Housing Joint Coupling Ring Universal Joint Knuckle (Female) |
||||||
| Radius Rod Castle Nut Radius Rod Lock Nut Drive Shaft Front Bushing Rear Radius Rod Drive Shaft Tube Drive Shaft |
||||||
| Ball Race Ball Thrust Collar Drive Shaft Pinion Driving Gear Drive Gear Screws |
Drive Shaft Drive Shaft Tube Ball Bearing Ball Bearing Housing Roller Bearing Roller Bearing Sleeve Castle Nut Differential Pinion Differential Spider Differential Gear Rear Axle Housing (Right) Thrust Washers |
|||||
| Rear Radius Rod Rear Axle Brake Drum Hub Brake Cam Shaft Hub Brake Cam Shaft Lever Radius Rod Bolt and Nut |
Lock Wire Thrust Washer (Steel) Thrust Washer (Babbitt) Thrust Washer (Steel) Gear Case (Left) |
|||||
| Mud Cap Cotter Pin Castle Nut Hub Key Hub Hub Flange |
Roller Bearing Sleeve Roller Bearing Axle Housing Cap Axle Roller Bearing Steel Washer Brake Shoe Support Bolt and Nut |
Rear Axle Shaft Rear Axle Roller Bearing Sleeve Rear Axle Roller Bearing Rear Axle Housing (Left) |
Gear Case (Right) Differential Case Stud Grease Plug |
|||
Fig. 151. Ford Rear Axle System
Q. How is the rear axle shaft removed?
A. Disconnect rear axle as directed above, then unbolt the drive shaft assembly where it joins the rear axle housing at the differential. Disconnect the two radius rods at the outer end of the housing. Take out the bolts which hold the two[309] halves of the rear axle housing together at the center. Take the inner differential casing apart and draw the axle shaft through the housing at the center. After replacing the axle shaft be sure that the rear wheels are firmly wedged on at the outer end of the axle shaft and the key in proper position. When the car has been driven thirty days or so, make it a point to remove the hub cap and set up the lock nut to overcome any play that might have developed. It is extremely important that the rear wheels are kept tight, otherwise the constant rocking back and forth against the key may in time cause serious trouble. If the rear axle or wheel is sprung by skidding against the curb, or other accident, it is false economy to drive the car, as tires, gears and all other parts will suffer. If the axle shaft is bent, it can, with proper facilities, be straightened, but it is best to replace it.
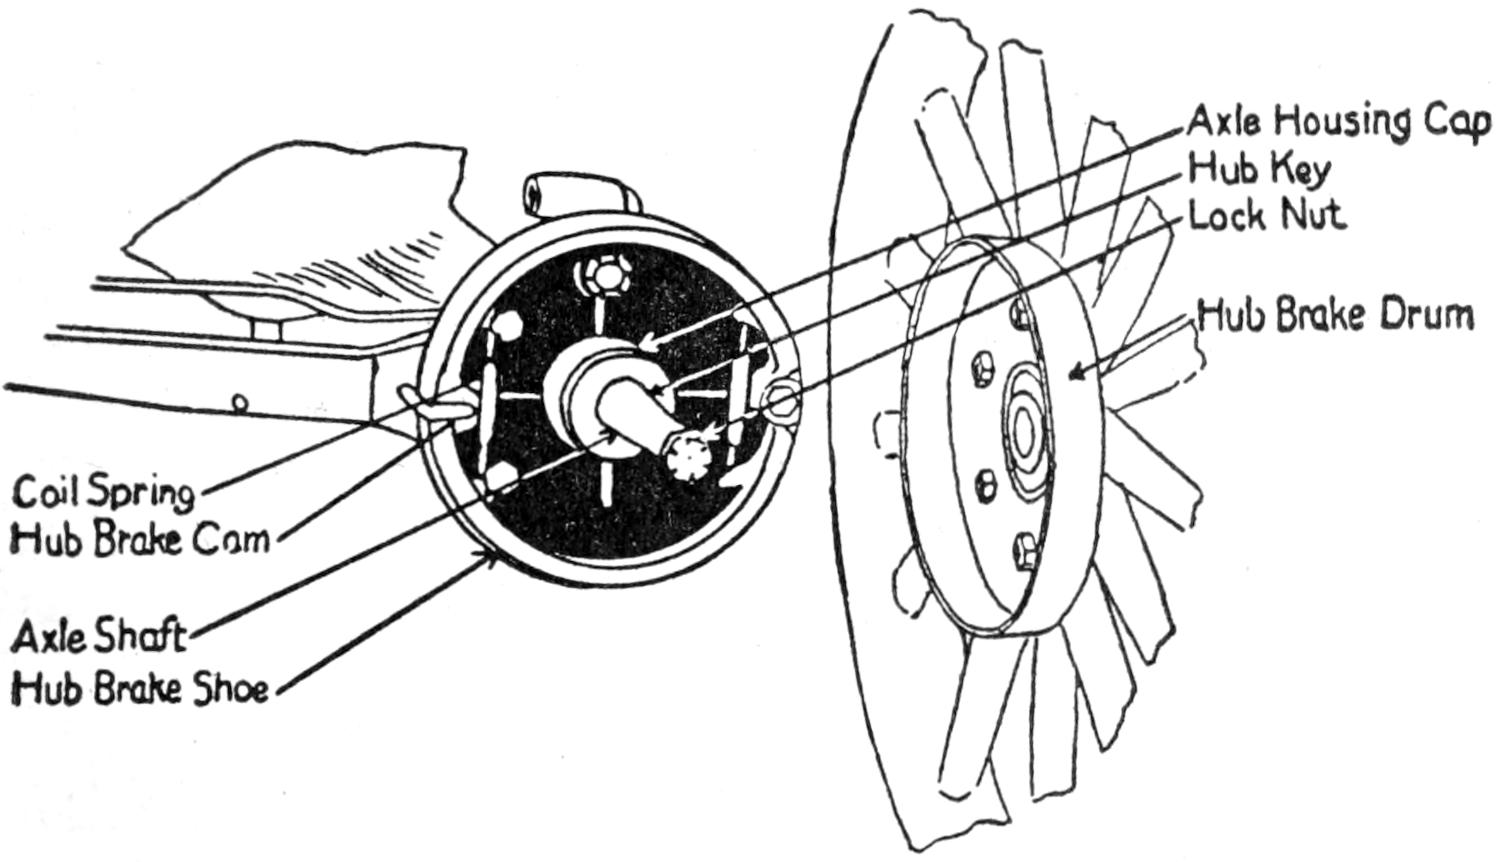
| Axle Housing Cap Hub Key Lock Nut Hub Brake Drum |
|
| Coil Spring Hub Brake Cam Axle Shaft Hub Brake Shoe |
Fig. 152. Ford Brake
[310]
Q. Why is the muffler necessary?
A. The exhaust as it comes from the engine through the exhaust pipe would create a constant and distracting noise were it not for the muffler. From the comparatively small pipe, the exhaust is liberated into the larger chambers of the muffler, where the force of the exhaust is lessened by expansion and discharged out of the muffler with practically no noise. The Ford muffler construction is such that there is very little back pressure of the escaping gases, consequently there is nothing to be gained by putting a cut-out on the exhaust pipe between the engine and the muffler.
Q. How is the muffler kept in order?
A. It should be cleaned occasionally. Remove it and take off nuts on ends of rods which hold it together, and disassemble.
In reassembling muffler, be careful not to get the holes in the inner shells on the same side or end.
Q. How is the muffler disconnected?
A. To disconnect the muffler it is not necessary to disconnect the exhaust pipe from the motor (although it is a good plan and a simple matter, necessitating only unscrewing the union). To disconnect muffler from frame, unscrew union at formed end of pipe, drop it down so it will clear the frame and slip it back off the tube. If the muffler from any cause becomes materially damaged it will probably be cheaper to replace it with a new one than to attempt to repair it.
[311]
Q. What care should the running gear have?
A. In the first place it at all times should have proper lubrication (see chapter on Lubrication). Once in every thirty days the front and rear axles should be carefully gone over to see that every moving part, such as the bushings in spring connections, spring hangers, steering knuckles and hub bearings, are thoroughly lubricated, and that all nuts and connections are secured with center pins in place. The spring clips, which attach the front spring to the frame, should be inspected frequently to see that every thing is in perfect order.
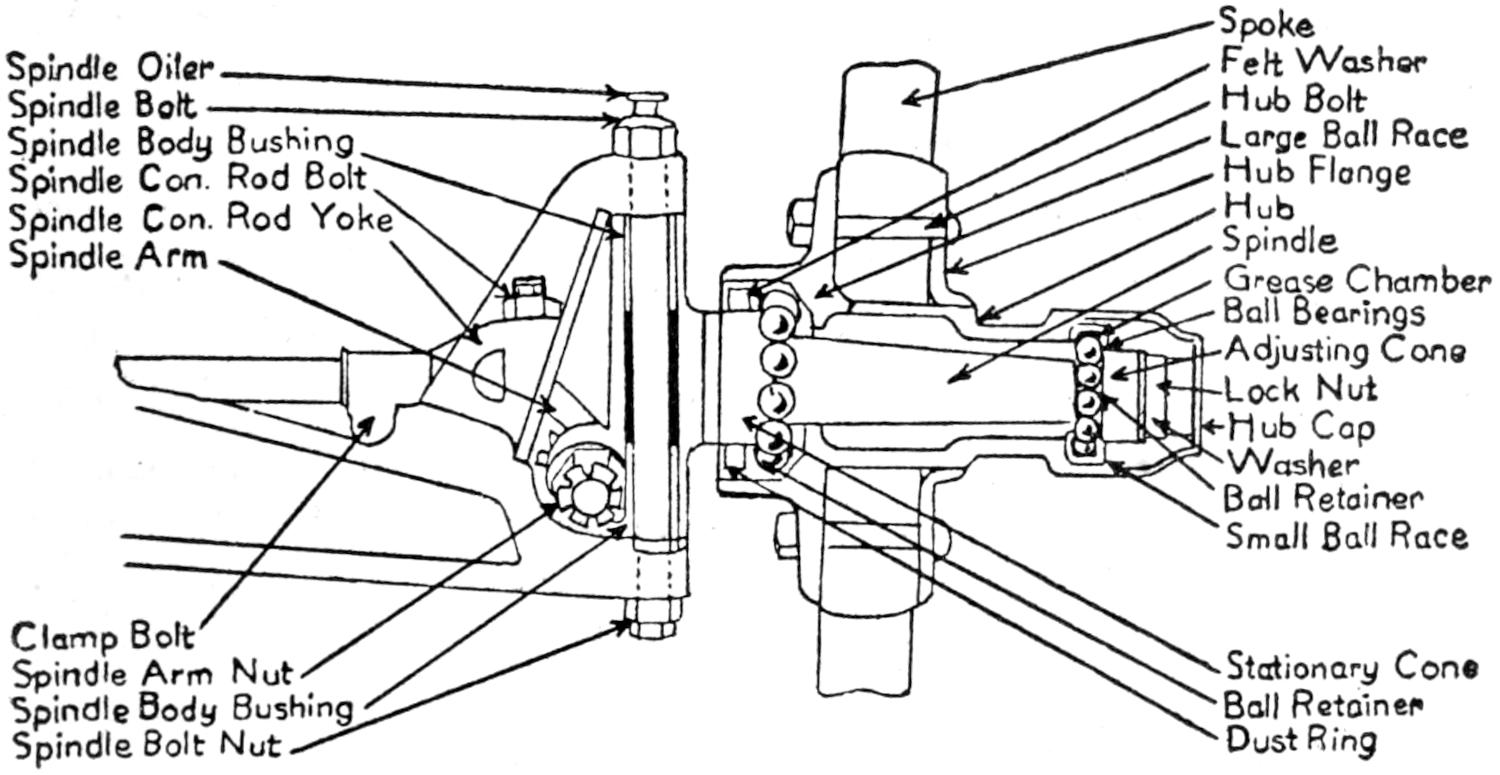
| Spindle oiler Spindle Bolt Spindle Body Bushing Spindle Con. Rod Bolt Spindle Con. Rod Yoke Spindle Arm |
Spoke Felt Washer Hub Bolt Large Ball Race Hub Flange Hub Spindle Grease Chamber Ball Bearings Adjusting Cone Lock Nut Hub Cap Washer Ball Retainer Small Ball Race |
| Clamp Bolt Spindle Arm Nut Spindle Body Bushing Spidle Bolt Nut |
Stationary Cone Ball Retainer Dust Ring |
Fig. 153. Ford Spindle
Q. How is the front axle removed?
A. Jack up front of car so wheels can be removed. Disconnect steering gear arm from the spindle connecting rod,[312] disconnect radius rod at ball joint, and remove two cotter pin bolts from spring shackle on each side, so detaching front spring.
To disconnect radius rod entirely, take the two bolts out of the ball joint and remove lower half of cap.
Q. In case of accident, how is the front axle straightened?
A. Should the axle or spindle become bent, extreme care must be used to straighten the parts accurately. Do not heat the forgings, as this will distemper the steel, but straighten them cold. If convenient it would be better to return such parts to the factory, where they may be properly straightened in jigs designed for that purpose. It is very essential that the wheels line up properly. The eye is not sufficiently accurate to determine whether the parts have been properly straightened, and excessive wear of the front tires will occur if everything is not in perfect alignment.
Q. What about the wheels?
A. The wheels should be jacked up periodically and tested, not only for smoothness of running, but for side play as well. If in spinning a front wheel a sharp click is heard, now and then, and the wheel is momentarily checked, it is probable that there is a chipped or split ball in the bearing which should be removed, otherwise it may necessitate the removal of the entire bearing. A wheel in perfect adjustment should after spinning, come to rest with the tire valve directly below the hub. Undue wear of the hub bearings, such as cones, balls and races, is usually caused by lack of lubrication and excessive friction, due to the adjusting cone being drawn up too tight. It is a good plan to clean the bearing frequently and keep the hub well filled with grease.
Q. How are the wheels removed?
A. Front wheels. Take off hub cap, remove cotter pin and unscrew castle nut and spindle washer. The adjustable bearing cone can then be taken out and the wheel removed. Care should be taken to see that the cones and lock nuts are replaced on the same spindle from which they were removed, otherwise there is a liability of stripping the threads which are[313] left on the left spindle and right on the opposite as you stand facing the car. Back wheels. They should not be removed unless absolutely necessary, in which case proceed as above. Then with a wheel puller remove the wheel from the tapered shaft to which it is locked with a key. In replacing rear wheels be sure that nut on axle shaft is as tight as possible and cotter pin in place. The hub caps of the rear wheels should be removed occasionally and the lock nuts which hold the hub in place tightened. If these nuts are allowed to work loose, the resulting play on the hub key may eventually twist off the axle shaft.
Q. How does the setting of the front wheels differ from that of the rear wheels?
A. It will be observed that the front wheels are “dished”; that is, the spokes are given a slight outward flare to enable them to meet side stresses with less rigid resistance, while the spokes of the rear wheels are straight. The front wheels are also placed at an angle, that is to say, the distance between the tops of the front wheels is about three inches greater than between the bottoms. This is to give perfect steering qualities and to save wear on tires when turning corners. The front wheels should not, however, “toe-in” at the front, at least not more than a quarter of an inch. Lines drawn along the outside of the wheels when the latter are straight in a forward position should be parallel. All wheels should always be kept in proper alignment, otherwise steering will be difficult and tire wear will be greatly increased. Adjustment can be made by turning the yoke at the left end of the spindle connecting rod, to draw the wheels into a parallel position.
Q. What care do the springs need?
A. The springs should be lubricated frequently with oil or graphite. To do this, pry the leaves apart near the ends and insert the lubricant between them. Whenever a car is given a general overhauling, the springs should be disassembled and the leaves polished with emery cloth, afterwards packing them with graphite when reassembling. Rust can be prevented from accumulating on the springs by painting them when[314] necessary with a quick drying black paint. You will find that these suggestions if carried out will not only improve the riding qualities of the car but prolong the life of the parts as well.
Q. Should spring clips be kept tight?
A. Yes. If the spring clips are allowed to work loose the entire strain is put on the tie bolt which extends through the center of the spring. This may cause the bolt to be sheared off and allow the frame and body to shift to one side. It is a good plan to frequently inspect the clips which hold the springs to the frame and see that they are kept tight.
Q. What about the steering apparatus?
A. It is exceedingly simple and will need little care except, of course, proper lubrication. The post gears which are arranged in the “sun and planet” form are located at the top of the post just below the hub of the wheel. By loosening the set screw and unscrewing the cap after having removed the steering wheel they may readily be inspected and replenished with grease. To remove the steering wheel unscrew the nut on top of the post and drive the wheel off the shaft with a block of wood and hammer.
Q. How is the steering gear tightened?
A. Should the steering gear become loose, that is, so that a slight movement of the wheel does not produce immediate results, it may be tightened in the following manner: Disconnect the two halves of the ball sockets which surround the ball arm at the lower end of the steering post and file off the surface until they fit snugly around the ball. If the ball is badly worn it is best to replace it with a new one. Also tighten the ball caps at the other end of the steering gear connecting rod in the same manner. If the bolts in the steering spindle arms appear to be loose, the brass bushings should be replaced with new ones. Excessive play in the front axle may be detected by grasping one of the front wheels by the spokes and jerking the front axle back and forth. After the car has been in service two or three years excessive play in the steering gear may make necessary the renewal of the little[315] pinions, as well as the brass internal gear just underneath the steering wheel spider.
It is also advisable to inspect the front spring hangers occasionally to determine whether or not new bushings are necessary to overcome any excessive vibration.
[316]
Q. How does the Ford lubricating system differ from others?
A. It is simplified,—and there are fewer places to oil. Practically all of the parts of the engine and transmission are oiled by the Ford splash system, from the one big oil reservoir in the crank case. Fig. 154 shows the principal points of lubrication, and specifies when replenishment should be made, according to mileage. This chart should be studied carefully and often. It is a good plan to frequently supply all oil cups with the same oil used in the engine (any good light grade lubricating oil will answer) and the dope cups with good grease. Be sure to see that the commutator is kept freely supplied with oil at all times.
Q. Which is the best way to fill the dope cups?
A. When it is advisable to fill the dope cup covers screw them down, refill with grease and repeat the operation two or three times. Always open oil cups by turning to the right, as this keeps tightening them rather than loosening them. Occasionally remove front wheels and supply dope to wearing surface. A drop of oil now and then in crank handle bearing is necessary, also on fan belt pulleys and shaft. The axles, drive shaft, and universal joint are well supplied with lubricant when the car leaves the factory, but it is well to examine and oil them frequently.
[317]
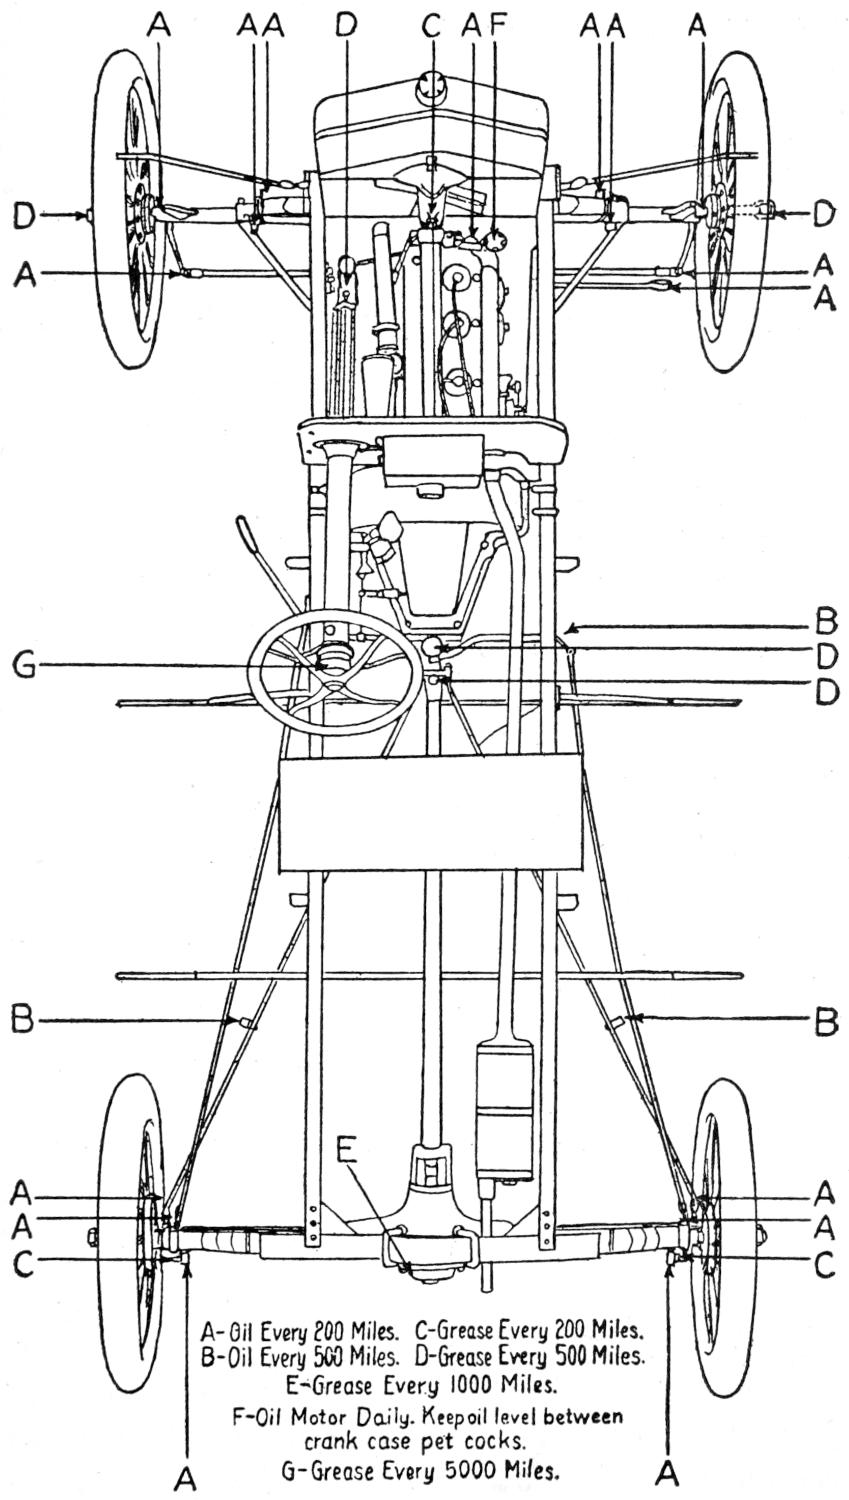
| A—Oil Every 200 Miles. | C—Grease Every 200 Miles. |
| B—Oil Every 500 Miles. | D—Grease Every 500 Miles. |
| E—Grease Every 1000 Miles. | |
| F—Oil Motor Daily. Keep oil level between crank case pet cocks. |
|
| G—Grease Every 5000 Miles. | |
Fig. 154. Ford Chassis Oiling Chart
[318]
Q. What kind of oil should be used?
A. We recommend only light high grade gas engine oil for use in the model T motor. A light grade of oil is preferred as it will naturally reach the bearings with greater ease and consequently less heat will develop on account of friction. The oil should, however, have sufficient body so that the pressure between the two bearing surfaces will not force the oil out and allow the metal to come in actual contact. Heavy and inferior oils have a tendency to carbonize quickly, also “gum up” the piston rings, valve stems and bearing. In cold weather a light grade of oil having a low cold test is absolutely essential for the proper lubrication of the car. The nearest Ford branch will advise you concerning the lubricating oil this company has found best suited for its cars, both for summer and winter weather. Graphite should not be used as a lubricant in the engine or transmission as it will have a tendency to short circuit the magneto.
Q. How often should the oil be drained from crank cases?
A. It is advisable to clean out the crank case by draining out the dirty oil when the new car has been driven four or five hundred miles; thereafter it will only be necessary to repeat this operation about every thousand miles. Remove plug underneath the flywheel casing and drain off the oil. Replace the plug and pour in a gallon of kerosene oil through the breather pipe. Turn the engine over by hand fifteen or twenty times so that the splash from the kerosene oil will thoroughly clean the engine. Remove crank case plug and drain off kerosene oil. In order to get all of the kerosene out of the depressions in the crank case the car should be run up a little incline, about the height of the ordinary street curbing. Refill with fresh oil.
Q. How often should the commutator be oiled?
A. Keeping the commutator well oiled is a matter of far greater importance than many drivers believe, and is necessary in order to have a smooth operating engine. Do not be afraid to put a little oil into the commutator every other day—at least every two hundred miles. Remember that the commutator roller revolves very rapidly, and without sufficient oil the parts soon become badly worn. When in this condition perfect contact between the roller and the four contact points is impossible, as a result the engine is apt to misfire when running at a good rate of speed.
[319]
Q. What about lubricating the differentials?
A. Do not make the mistake of putting too much grease in the differential housing. The housing should not be more than one-third full. The differential is supplied with the required amount of lubricant when the car leaves the factory. The oil plug should be removed about every 1000 miles and more grease added if necessary. If a fluid is used the level should be approximately one and one-half inches below the oil hole.
[320]
Q. How are Ford tires removed?
A. First, jack up the wheel clear of the road. The valve cap should be unscrewed, the lock nut removed and the valve stem pushed into the tire until its bead is flush with the rim. This done, loosen up the head of the shoe in the clinch of the rim by working and pushing with the hands, then insert one of the tire irons or levers under the beads. The tire iron should be pushed in just enough to get a good hold on the under side of the bead, but not so far as to pinch the inner tube between the rim and the tool. A second iron should be inserted in the same fashion some seven or eight inches from the first, and a third tool the same distance from the second. As a cylinder tire must be pried over the clinch, three or four levers will come in handy in a case of a “one man job,” and the knee of the driver can be used to good advantage to hold down one lever while the other two are being manipulated in working the shoe clear of the rim. After freeing a length of the bead from the clinch, the entire outer edge of the casing may be readily detached with the hand, and the damaged inner tube removed and “patched” or a spare tube inserted. Always use plenty of soapstone in replacing an inner tube.
Q. How are casings repaired?
A. Should the casing be cut so there is danger of the inner tube being blown through it, a temporary repair can be made by cementing a canvas patch on the inside of the casing. Before applying the patch the part of the casing affected should be cleaned with gasoline and when dry, rubber cement applied[321] to both casing and patch. This will answer as an emergency repair, but the casing should be vulcanized at the first opportunity.
To prolong the life of the tire casings, any small cuts in the tread should be filled with patching cement and a specially prepared “plastic” sold by tire companies.
Q. How may tire expense be reduced?
A. Tire cost constitutes one of the most important items in the running expenses of an automobile. To get the most service at the least expense, the tire should be inspected frequently and all small cuts or holes properly sealed or repaired,—thus preventing dirt and water working in between the rubber tread and the fabric, causing blisters or sand boils.
Tires should never be run partially deflated, as the side walls are unduly bent and the fabric is subject to stress, which is known as rim cutting. The chances of getting a puncture will be greatly reduced by keeping your tires properly inflated, as a hard tire exposes much less surface to the road than a soft tire, and also deflects sharp objects that would penetrate a soft tire.
Running a flat tire, even for a short distance, is sure to be costly. Better run on the rim, very slowly and carefully, rather than on a flat tire.
Remember that fast driving and skidding shorten the life of the tires. Avoid locking the wheels with the brakes,—no tire will stand the strain of being dragged over the pavement in this fashion.
Avoid running in street car tracks, in ruts, or bumping the side of the tire against the curbing.
The wheel rims should be painted each season and kept free from rust.
When a car is idle for any appreciable length of time, it should be jacked up to take the load off the tires. If the car is laid up for many months, it is best to remove the tires, and wrap up the outer casings and inner tubes separately, and store them in a dark room not exposed to extreme temperature. Remove oil or grease from the tires with gasoline.[322] Remember that heat, light and oil are three natural enemies to rubber.
Q. How is a puncture in the inner tube repaired?
A. After locating the puncture, carefully clean the rubber around the leak with benzine or gasoline. Then rough the surface with sand paper from your tire repair kit to give a hold for the cement. Apply the cement to both patch and tube, allowing it to dry for about five minutes, repeating the application twice with like intervals between for drying. When the cement is dry and sticky press the patch against the tube firmly and thoroughly to remove all air bubbles beneath it and insure proper adherence to the surface. Then spread some soapstone or talc powder over the repair so as to prevent the tube sticking to the casing. Before the tube is put back into the casing plenty of talc powder should be sprinkled into the latter. A cement patch is not usually permanent and the tube should be vulcanized as soon as possible. In replacing the tire on the rim be very careful not to pinch the tube.
[323]
Q. What is the proper way to wash the car?
A. Always use cold or lukewarm water,—never hot water. If a hose is used, do not turn on the water at full force, as this drives the dirt into the varnish and injures the finish. After the surplus mud and grime have been washed off, take a sponge and clean the body and running gear with a tepid solution of water and ivory or linseed oil soap. Then rinse off with cold water; then rub dry and polish the body with a chamois skin. A body or furniture polish of good quality may be used to add luster to the car. Grease on the running gear may be removed with a gasoline soaked sponge or rag. The nickeled parts may be polished with any good metal polish.
Q. What care does the top need?
A. When putting the top down be careful in folding to see that the fabric is not pinched between the bow spacers, as they will chafe a hole through the top very quickly. Always slip the hood over the top when folded to keep out dust and dirt. Applying a good top dressing will greatly improve the appearance of an old top.
Q. What should be done when the car is stored?
A. Drain the water from the radiator, and then put in about a quart of denatured alcohol to prevent freezing of any water that may possibly remain. Remove cylinder head and clean out any carbon deposits in combustion chamber. Draw off all the gasoline. Drain the dirty oil from the crank case and cleanse the engine with kerosene as directed above. Refill the crank case with fresh oil and revolve the engine enough to cover the different parts with oil. Remove the[324] tires and store them away. Wash up the car, and if possible cover the body with a sheet of muslin to protect the finish.
Q. What attention do the electric headlights require?
A. Very little. When the cars leave our factory the lamps are properly focussed and unless the bulb burns out there should be no occasion for removing the door, as there is nothing to get out of order. Should the door be removed for any reason care should be exercised not to touch the silver-plated reflector or the bulb with anything but a soft, clean rag, preferably flannel. To focus the lamps turn the adjusting screw in the back of the lamp in either direction until the desired focus is attained. The bulbs we are furnishing in electric head lamps are 8 volts, 2 amperes, and best results will be obtained by securing lamps of this voltage and amperage when replacement is necessary.
[325]
Q. Do the instructions relative to the car apply to the truck?
A. The answers pertaining to the car are applicable to the truck.
Q. How is the rear axle removed?
A. Jack up the truck, place supports under rear axle housings, and remove the rear wheels. Take out the four bolts connecting the universal ball cap to the transmission case and cover. Disconnect brake rods. Remove nuts holding spring perches to rear axle housing flanges. Raise frame by placing a long iron bar or gas pipe under the frame just in front of rear spring, one end resting on a substantial support of the proper height. Two workmen at the other end of the bar can raise the frame and place the end of the bar on another support. The rear axle assembly can then be easily removed.
Q. How is the universal joint disconnected from the drive shaft?
A. Remove two plugs from top and bottom of ball casting and turn shaft until pin comes opposite hole, drive out pin and the joint can be pulled or forced away from the shaft and out of the housing.
Q. How are the rear axle and differential disassembled?
A. With the universal joint disconnected, remove the bolt in front end of radius rods and the cap screws which hold the drive shaft tube to the rear axle housing. Then remove the rear axle housing cap; also the bolts which hold the two halves of the differential housing together. With the differential exposed to view, the manner of disassembling it will be[326] apparent. Care must be exercised to get every part back in its correct position when reassembling, being sure to use new paper liners.
Q. How is the worm removed?
A. To remove the worm, drive out the pins which hold the coupling to the worm and drive shaft. Then remove the felt washer, roller bearing sleeve, and roller bearing by slipping them over the coupling. Drive the coupling off from the drive shaft and then force the worm from the coupling. Removing the worm nut will permit the removal of the retaining washer, thrust bearing and rear worm roller bearing. In reassembling be sure that the pin which holds the retaining washer stationary is in place.
Q. How is the rear axle shaft removed?
A. Remove the rear axle assembly as directed above. Disconnect brake rods and radius rods at rear axle housing flange; also remove nuts holding spring perches to flanges. Take out the cap screws holding the drive shaft tube to the rear axle housing and remove the rear axle housing cap and the bolts which hold the two halves of the differential housing together, then pull or force the housing from the shafts and disassemble differential. After replacing the axle shaft be sure that the rear wheels are firmly wedged on at the outer end of the axle shaft and the key in proper position. When the truck has been driven thirty days or so make it a point to remove the hub cap and set up the lock nut to overcome any play that might have developed. It is extremely important that the rear wheels are kept tight, otherwise the constant rocking back and forth against the keyway may in time cause serious trouble.
Q. How is the differential gear removed from the shaft?
A. The differential gear is fastened to the inner end of the rear axle shaft by means of splines, and is held in position by a ring which is in two halves and fits in a groove in the rear axle shaft. To remove the gear, force it down on the shaft, that is, away from the end to which it is fastened, drive out the two halves of the ring in groove in shaft with[327] screw driver or chisel, and force the gear off the end of the shaft.
Q. What about lubricating the rear axle?
A. Extreme care must be used in lubricating the differential. An A-1 heavy fluid or semi-fluid oil, such as Mobiloil C or Whittemore’s Worm Gear Protective, should be used and cared at a level with the upper oil plug. The differential is supplied with the required amount of lubricant when the car leaves the factory and the supply should be maintained by replenishments as required. After running the truck about 500 miles, the oil should be drained off by removing the lower oil plug, and the differential filled with fresh lubricant. This operation should be repeated at approximately 1000 miles, and after that whenever necessary. The rear axle outer roller bearings are lubricated by means of dope cups. These cups should be kept filled with a good grade of grease and given a full turn every 100 miles. Before putting the truck back into service after the rear axle has been taken out fill the differential with oil, jack up the axle and run it for five or ten minutes to insure proper lubricant of all bearings.
[328]
Q. Of what does the starting and lighting system consist?
A. The starting and lighting system is of the two unit type and consists of the starting motor, generator, storage battery, charging indicator, and lights, together with the necessary wiring and connections.
Q. Where is the starter located?
A. The starting motor is mounted on the left hand side of the engine and bolted to the transmission cover. When in operation the pinion on the Bendix drive shaft engages with the teeth on the flywheel.
Q. What must be done before starting the engine?
A. The spark and the throttle levers should be placed in the same position on the quadrant as when cranking by hand, and the ignition switch turned on. Current from either battery or magneto may be used for ignition. When starting, especially when the engine is cold the ignition switch should be turned to battery. As soon as the engine is warmed up, turn switch back to magneto. The magneto was designed to furnish ignition for the Model T engine and better results will be obtained by operating in this way. Special attention must be paid to the position of the spark lever as a too advanced spark will cause serious backfiring which in turn will bend or break the shaft in the starter. The starting motor is operated by a push button, conveniently located in the floor of the car at the driver’s feet. With the spark and throttle levers in the proper position, and the ignition switch turned on, press on the push button with the foot. This closes[329] the circuit between the battery and the starting motor, causing the pinion of the Bendix drive shaft to engage with the teeth on the flywheel, thus turning over the crank shaft. When the engine is cold it may be necessary to prime it by pulling out the carburetor priming rod, which is located on the instrument board. In order to avoid flooding the engine with an over rich mixture of gas, the priming rod should only be held out for a few seconds at a time.
Q. What if the engine fails to start?
A. If the starting motor is turning the crank shaft over and the engine fails to start, the trouble is not in the starting system. In this event, release the button at once so as not to unnecessarily discharge the battery and inspect the carburetor and ignition system to determine the trouble.
Q. What if the starting motor fails to act?
A. If the starting motor fails to act, after pushing the button, first inspect the terminal on the starting motor, the two terminals on the battery and the two terminals on starting switch, making sure all the connections are tight; then examine the wiring for a break in the insulation that would cause a short circuit. If the wiring and connections are O. K. and the starting motor fails to act, test the battery with the hydrometer. If the hydrometer reading is less than 1.225 the trouble is no doubt due to a weak or discharged battery.
Q. How is the generator operated?
A. The generator is mounted on the right hand side of the engine and bolted to the cylinder front end cover. It is operated by the pinion on the armature shaft engaging with the large time gear. The charging rate of the generator is set so as to cut in at engine speeds corresponding to ten miles per hour in high speed and reaches a maximum charging rate at twenty miles per hour. At higher speeds the charge will taper off, which is a settled characteristic of battery charging. This operation of cutting in and cutting out at suitable speeds is accomplished by the cut-out, which is mounted on the dash. This cut-out is set properly at the[330] factory and should not under any circumstances be tampered with.
Q. What about oiling?
A. The starting motor is lubricated by the Ford splash system, the same as the engine and the transmission. The generator is lubricated by a splash of oil from the time gears. In addition an oil cup is located at the end of the generator housing and a few drops of oil should be applied occasionally.
Q. What should be done when repairing the ignition?
A. The introduction of a battery current into the magneto will discharge the magnets and whenever repairing the ignition system or tampering with the wiring in any way, do not fail to disconnect the positive wire from the battery. The end of this wire should be wound with tape to prevent its coming in contact with the ignition system or metal parts of the car.
Q. How does the charging indicator work?
A. The charging indicator is located on the instrument board. This indicator registers “charge” when the generator is charging the battery and “discharge” when the lights are burning and the engine not running above ten miles per hour. At an engine speed of 15 miles per hour or more the indicator should show a reading of from 10 to 12 even with the lights burning. If the engine is running above 15 miles per hour and the indicator does not show “charge,” first inspect the terminal posts on the indicator, making sure that the connections are tight, then disconnect the wire from the terminal on generator, and with the engine running at a moderate speed, take a pair of pliers or a screw driver and short circuit the terminal stud on the generator to the generator housing. If the generator is O.K., a good live spark will be noted. (Do not run the engine any longer than is necessary with the terminal wire disconnected.) Next inspect the wiring from the generator through the charging indicator to the battery for a break in the insulation that would result in a short circuit.
Q. How are the lights operated?
A. The lighting system consists of two 2-bulb headlights[331] and a tail light operated by a combination lighting and ignition switch located on the instrument board. The large bulbs are of 6-8 candle-power type. The small bulbs of 6-8 volt two candle-power type. The small bulb is also used in the tail light. All of the lamps are connected in parallel so that the burning out or removal of any one of them will not effect the other. Current for the lamps is supplied by the battery. Do not connect the lights with the magneto as it will result in burning out the bulbs and might discharge the magnets.
Q. What about repairing starter and generator?
A. If either the starter or generator fails to give proper service, the owner should at once consult an authorized Ford dealer. If the trouble is not found in the wiring, connections, etc., as outlined, the dealer will remove the starter or generator, or both if necessary, and return them intact to the nearest branch for repair or replacement. Dealers or owners should not attempt to repair or tamper in any way with the mechanism of the starter and generator.
Q. How is the starter removed?
A. When removing the starter to replace transmission bands, or for any other reason, first remove the engine pan and the left hand side of the engine and with a screw driver remove the four small screws holding the shaft cover to the transmission cover. Upon removing cover and gasket, turn the Bendix drive shaft around so that the set screw on the end of the shaft is in the upward position. Immediately under the set screw is placed a lock washer, designed with lips or extensions opposite each other on the outside diameter. One of these is turned against the collar and the other is turned up against the side of the screw head. Bend back the lip which has been forced against the screw and remove the set screw. As the lock washer will no doubt be broken or weakened in removing the starter, a new one must be used in replacing it. These washers may be obtained from the nearest branch. Next, pull the Bendix assembly out of the housing, being careful that the small key is not misplaced[332] or lost. Remove the four screws which hold the starter housing to the transmission cover and pull out the starter, taking same down through the chassis,—this is why it was necessary to remove the engine pan. Extreme care should be used in removing the Bendix drive and other parts that none are misplaced nor lost and that they are replaced in their former positions. In replacing the starter, be sure that the terminal connection is placed at the top. If the car is to be operated with the starter removed, be sure to put the transmission cover plates in position. These plates may also be obtained from the nearest branch.
Q. How is the generator removed?
A. If it is found necessary to remove the generator, first take out the three cap screws holding it to the front end cover and by placing the point of a screw driver between the generator and front end cover; the generator may be forced off the engine assembly. Always start at the top of the generator and force it backward and downward at the same time. Plates may be obtained from the nearest branch to place over the time gear if the car is to be operated with the generator removed.
Q. Can the engine be run with the generator disconnected from the battery?
A. If for any reason it is run with the generator disconnected from the battery, as on a block test, or when battery has been removed for repair or recharging, be sure that the generator is grounded to the engine by running a wire from the terminal on generator to one of the valve cover stud nuts. A piece of wire 1⁄16″ or more in diameter may be used for this purpose. Be sure that the connections at both ends of the wire are tight. Failure to do this when running the engine with the generator disconnected from the battery will result in serious injury to the generator.
Q. What about the care of the battery, repairing of recharging?
A. The Ford Starting System uses a 6-volt 13-plate[333] “Exide” battery, type 3-XC-13-1. The care of the battery in service is summed up in the following rules:
1. Add nothing but pure water to the cells and do it often enough to keep the plates covered at all times. Distilled water, melted artificial ice or rain water collected in clean receptacles is recommended. In cold weather add water only just before running the engine so that the charging may mix the water and the electrolyte and freezing of the water be avoided.
2. Take frequent hydrometer readings to make sure that the generator is keeping the battery charged. To take reading remove filler cap of cell, insert end of hydrometer syringe in filler opening, squeeze bulb, and release, drawing up enough liquid to float hydrometer bulb free in the liquid. The reading of the scale at the surface of the liquid when hydrometer is floating in the specific gravity (density) of the electrolyte. A fully charged battery will show a reading of 1.275 to 1.300. A battery half charged will show a reading of 1.225 to 1.250. A completely discharged battery will show a reading of 1.200 or less. When taking hydrometer readings remove the filler cap from only one cell at a time and be sure to return electrolyte to the cell from which it was taken. Then replace and tighten the filler cap. Hydrometer tests taken immediately after filling with water and before water has become thoroughly mixed with the electrolyte will not show the true condition of the battery.
3. If hydrometer reading shows battery less than half charged it should be taken to the nearest Exide Battery Service Station for recharging. Continued operation in a less than half charged condition is injurious to the battery, just as running in a soft or deflated condition is injurious to the tires.
4. Keep the filler caps in place and screwed tight,—a half turn tightens them. Keep battery connections tight and clean. A coating of heavy oil or vaseline will protect the connectors from corrosion. Keep battery firmly secured in place. If hold-downs are loose battery will shift about in[334] compartment and result in loose connections, broken cells or other trouble.
5. Exide Battery Stations are maintained in principal cities and towns throughout the country to assist you to obtain good service from your battery. Do not entrust your battery to the care of a novice.
Q. What about battery guarantee?
A. The Exide batteries are guaranteed by the manufacturers (The Electric Storage Battery Company, Philadelphia, Pa.) to be free from defects in material and workmanship.
At any time within three months from date of delivery to the purchaser any battery which may prove to be defective or incapable, when fully charged, of giving its rated capacity, will be repaired or replaced free of expense upon receipt, transportation charges prepaid, at any Exide Battery Depot or authorized Exide Battery Service Station. This guarantee does not cover the free charging of batteries nor the making good of damage resulting from continued lack of filling the cells from time to time with pure water. No claims on account of alleged defects can be allowed unless made within three months of date of delivery of battery to purchaser, and the right is reserved to refuse to consider claims in the case of batteries opened by other than authorized Exide Battery Service Stations.
Purchasers of cars equipped with the “Exide” batteries are earnestly urged to coöperate with the battery manufacturers to taking their cars, as promptly as possible after receipt, by the nearest Exide Battery Service Station in order that the battery may be tested and its condition and installation checked. No charge is made for this inspection.
[335]
The text of this e-text is that as printed in the source document. Unless listed under Changes below, factual errors, inconsistent spelling and hyphenation, the inconsistent use of quote marks surrounding reference letters or model and type letters, the inconsistent use of per cent with and without full stop, etc. have not been corrected or standardised. The automobile brand consistently called Jeffrey in the text was actually called Jeffery. The (minor) differences in wording and structure between the table of contents and the text have not been standardised.
Hyperlinks have been provided only where the target is clear and unambiguous.
Depending on the hard- and software used to read this text and their settings, not all elements may display as intended.
Page 8: there are no seventeenth and eighteenth items listed; items nineteen and twenty are cardinal rather than ordinal numbers in the source document.
Page 14, Fig. 3: the oddly shaped cylinder head is as printed in the source document.
Page 33, ... Twin, Four, and Six Cylindered Motors ... and ... a case where two, four, or two six cylindered motors are set ...: as printed in the source document; the commas between Twin and Four and between two and four are possibly erroneous.
Page 35, calculation of piston displacement: the calculation results in 192.42 cubic inches.
Page 54: Fig. 32 shows an exterior photograph ...: as printed in the source document; Fig. 32 is obviously a drawing.
Page 128 and 135: Fig. 68 and Fig. 75 and their captions are identical in the source document.
Page 159 and 183: Fig. 91 and Fig. 103 and their captions are identical in the source document.
Page 205 Whitemore and page 327 Whittemore: possibly misspellings of Whitmore.
Changes made
Most tables and illustrations have been moved out of text paragraphs. In some tables and lists the ditto character has been replaced with the dittoed text.
Some minor obvious typographical and punctuation errors have been corrected silently.
Above or underneath some illustrations dashed boxes provide transcriptions (and an indication of their relative positions) of the explanatory and descriptive texts inside the accompanying illustration. These transcriptions do not occur as such in the source document but have been provided for the sake of legibility and searchability.
Page xii: page number 126 inserted.
Page 1-2: Daimler was consistently spelled Diamler; this has been corrected.
Page 3: Marquis de Doin changed to Marquis de Dion.
Page 33: ... a staggard position ... changed to ... a staggered position ....
Page 47: ... through a verticle channel ... changed to ... through a vertical channel ....
Page 47, 48: ... air bled jet ... changed to ... air bleed jet ... (2 ×).
Page 70: ... which embodies a radically new principal ... changed to ... which embodies a radically new principle ....
Page 82: It acts on the principal that ... changed to It acts on the principle that ....
Page 84: ... its freezing point being 8% below zero ... changed to ... its freezing point being 8° below zero ....
Page 87: ... are scrapped and rubbed ... changed to ... are scraped and rubbed ....
Page 98: reference letters A-F in paragraph Dynamo changed to lower case as in illustration.
Page 117: ... the verticle shaft bearing sleeve ... changed to ... the vertical shaft bearing sleeve ....
Page 126: ... which eliminate troubles ... changed to ... which eliminates troubles ....
Page 152: Figs. 87 (Position 2A) and 87A (Position 3) have been placed in the right order.
Page 169: ... in contact with the ear ... changed to ... in contact with the gear ....
Page 178: ... shown at D and C (Fig. 99) ... changed to ... shown at D and C (Fig. 100) ....
Page 231: ... E-EL lines drawn through the spindles will meet at F ... changed to ... e-e1 lines drawn through the spindles will meet at E ...; ... the lines E and E1 meet at different angles ... changed to ... the lines e and e1 meet at different angles ....
Page 260: ... the nearest mettle part. changed to ... the nearest metal part.
Page 333: ... show a reading of 1,200 or less. changed to ... show a reading of 1.200 or less.
This eBook is for the use of anyone anywhere in the United States and most other parts of the world at no cost and with almost no restrictions whatsoever. You may copy it, give it away or re-use it under the terms of the Project Gutenberg License included with this eBook or online at www.gutenberg.org. If you are not located in the United States, you will have to check the laws of the country where you are located before using this eBook.